
BBQ and Broadway

Last night was BBQ and Broadway in Berwyn. Okay... slightly off-Broadway, but a Broadway show with as much heart as you'll ever see.
We were at the Footlighter's Theatre in Berwyn, PA. It is a Community Theatre now in its 81st season. 81 years of entertainment. That, in itself, is impressive.
The show was Gypsy, based on the memoirs of stripper Gypsy Rose Lee. (Just to show ya how old I am, I actually remember the Gypsy Rose Lee Show on TV.) Ah... the good ol' days.
It was a great performance by some really fun and talented folks. There's something extremely fulfilling about seeing local community theatre. Footlighters probably only seats 150 people. There just isn't more intimate theatre out there.
Let Me Entertain You, indeed!
If you're in the neighborhood of Berwyn, PA, the show is running through May 1st and tickets are only $15.00. Less than a movie and a lot more entertaining!

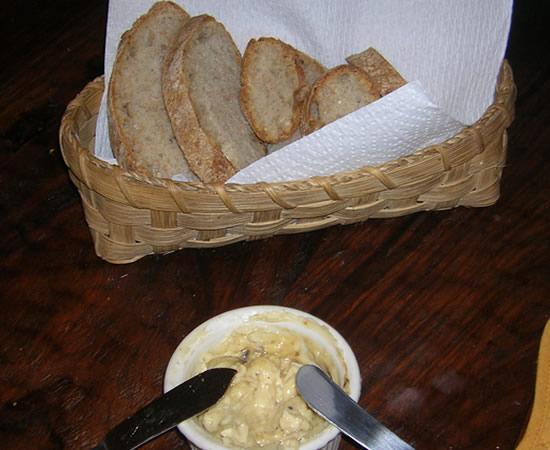
For sustenance before the show, we grilled chicken. Bone-in breasts with the Strawberry BBQ Sauce I made a while back. Mashed yellow sweet potatoes and broccoli.
And seeded rolls.

I used the no-knead dough and rolled the rolls in sunflower seeds, sesame seeds, and flax seeds.
Great dinner. Great show.

Wintery Pasta & Cheesy Garlic Bread
Tonight was going to be salads with grilled chicken. Slushy snow is falling from the sky. We had pasta, instead.
It's been raining all day, we're under a flood watch, it's cold, windy, and the aforementioned slush just made my day. A lovely salad just wasn't going to work.
I took the chicken breasts I was going to grill and cut them up and sauteed them in a braising pan. I added some chopped broccoli, orange cauliflower, zucchini, and garlic. And salt, pepper, and Italian seasoning.
Next was about 2 cups of chicken broth, then a cup of shredded Italian cheeses.
I then added about 6 ounces of cooked tri-color rotini pasta, some chopped parsley, and about 6 ounces of small fresh mozzarella balls. I mixed it all up, thickened it with a bit of cornstarch, and popped it into the oven for 30 minutes.
And while it was baking, I made some cheesy garlic bread.

It's supposed to be in the mid-80s Friday and Saturday.
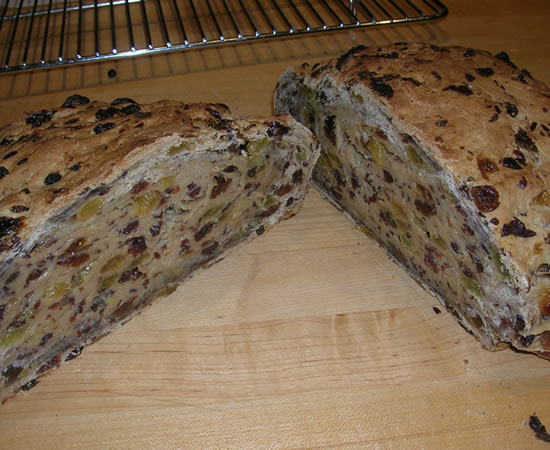
When Irish Eyes Are NOT Smiling
I planned on bringing a loaf of Irish bread to work today.
I have made this bread so many times I can do it blindfolded. However... the basic laws of bread-making do not change just because one decides he's in a hurry. I proved that last night.
I set out to make my absolute favorite yeasted fruit bread - a barmbrack. As I said, I've made it for years and have never had an issue. It has always come out perfect - until last night.
I knowingly made two very basic mistakes - and threw away the result.
I had soaked my fruit in the requisite Jameson's for two days. I had all my ingredients together. I heated the cup of milk in the microwave. Mistake number one. It was too hot to mix with the yeast. I could have just put it on the counter (or even the refrigerator) and walked away for a few minutes, but I was impatient. I decided just to add the dry yeast to the flour, et al, and add the too-hot milk to it. It would be cool enough. But it wasn't.
My liquid was too hot and my yeast may or may not have been good. The end result was my impatience and failure to follow the very most basic bread-making steps ruined what should have been a magnificent loaf of bread.
Even more fun is that I talked it up at work for several days and now get to walk in empty-handed and explain that I totally screwed up.
I hate that.
Here's the recipe in case you want to give it a try. It really is great - when you follow the instructions.
Barmbrack
Barmbrack is a traditional Irish spiced fruit bread. It’s delicious sliced, toasted and buttered – or you can eat it on its own. I found this recipe years ago and made it for my father’s cousins on St Paddy’s Day when they were visiting San Francisco.
Traditionally, the fruit is soaked overnight in 2 cups of strong Irish tea. This recipe calls for the fruit to be soaked in 2 cups of Irish whisky overnight. I’ve made it both ways and really prefer the whisky version the best!
Ingredients:
- 3 ½ cups mixed dried fruit (raisins, golden raisins, sultanas, currants, candied peel)
- 1 cup whole milk
- 1 tsp sugar
- 2 tsp active dry yeast
- 3 cups bread flour
- 1 tsp salt
- ¼ cup brown sugar
- 1/3 cup butter (Kerrygold or Plugra European style butter!)
- 1 beaten egg
- 2 tsp mixed spices (allspice, cloves, nutmeg, cinnamon…)
Soak the dried fruit in 2 cups of Irish whisky overnight.
Warm the milk slightly (no more than 110°.) Stir in the teaspoon of sugar and the yeast and let proof about 10 minutes.
Mix the flour, salt and brown sugar in a large bowl. Rub in the butter or margarine. Add the frothy yeast, the beaten egg and the spice. Drain any remaining liquid from the fruit and add the fruit to the mixture. Mix well to make a smooth dough (add more flour if the mixture is too wet).
Turn the dough onto a floured board and knead it thoroughly. (I use my KitchenAid and mix about 6 minutes.) Place the dough in a well-greased 8”-9” springform pan, cover with a cloth, and leave in a warm place to rise for 45 – 60 minutes or until doubled in size.
Place the pan in a preheated 350° oven and bake for about 50 minutes. The loaf will be ready when it sounds hollow when you tap on it.
Remove from pan and cool on a wire rack before serving.

Hopefully it won't look like this.
Salads and Cheesy Bread

Did my weigh-in at work. I lost 2 pounds this past week. I'm happy. That's not a bad achievement considering we have dessert virtually every night. But it also shows that if one takes the time to cook real food and not fill up on processed crap all day, you can have your cake and eat it, too. It's all about balance - and real calories that will do me some good versus crap calories that are nothing more than crap calories.
We're fully into salad mode, now. It's cold and raining, but I grilled a couple of thin-sliced round steaks to add to salads, and I made a loaf of bread to go along with it. Cheesy bread.
I cubed up some sharp provolone and mixed it in before forming the dough into a ball.
And if a couple of slices of provolone bread with roasted garlic butter wasn't celebration enough for losing a couple more pounds, I'm making a yellow cake for dessert! Real cake - not a mix. It's in the oven right now.
I'm thinking chocolate icing.....
Steaks and Bread

Charcoal grilling is just the best! It may not be as convenient as a gas grill, but there's just no comparing the flavor! And with the thermometer actually hitting 60° today, grilling was definitely called for.
On my Monday grocery shopping trek today, I picked up 8 - yes, eight - bone-in New York strip steaks for a mere $24.00. I love an in-store special! Six of them were vacuum-packed for the freezer, and two became dinner tonight. Grilled perfectly rare and topped first with a bit of Boursin cheese, and then slathered with caramelized onions. Lots and lots of onions.
Baked sweet potatoes and peas rounded out the plate.
But that wasn't all we had!
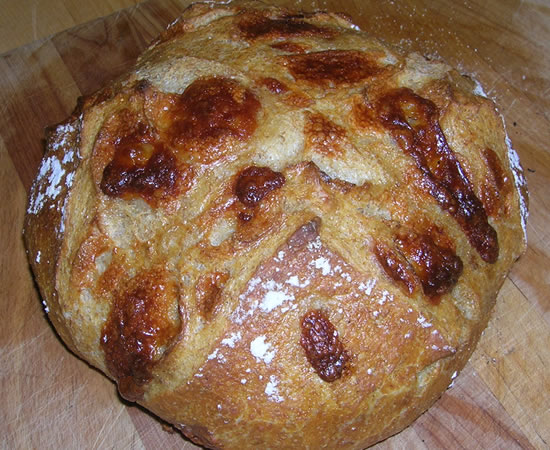
I also made Whole Wheat Sun-Dried Tomato Bread! I took the no-knead recipe and tweaked it a bit and for this loaf, added some chopped sun-dried tomatoes in oil. It was a little messy mixing them in, but the final result was worth it!
Whole Wheat No-Knead Bread
- 3 cups lukewarm water
- 2 pkg yeast
- 1 1/2 tbsp salt
- 4 cups all-purpose flour
- 2 1/2 cups whole wheat flour
Stir ingredients together and let rise 3 hours. Follow instructions for basic no-knead artisan bread.
For sun-dried tomato bread, chop tomatoes and mix into 1lb piece of dough, form into ball and follow instructions for rising and baking.

I really like the whole wheat version better. It has a better crumb - not as chewy as the white, but the crust is still excellent.
And to add just another layer of decadency, Victor made roasted garlic butter to slather on the bread. It's quite simple.
Take a whole head of garlic and slice off the tips to expose the garlic cloves. Drizzle with olive oil and place in a hot oven (450-ish) for about 45 minutes. Let cool, then squeeze out the garlic and mix with softened butter. Use on anything and everything.
And there's flourless chocolate cake later on.....
Loafing, Again
I did it. I finally baked a loaf of No-Knead Bread.
I've heard aboiut this stuff for a long time. Everybody's doing it - Jim Lehey is doing it. Peter Reinhart is doing it. Jeff Hertzberg and Zoe Francois are doing it in Artisan Bread in Five Minutes a Day. And Luigi Pomi is doing it. And got me to do it, too.
I've been baking bread for a really long time. 38 or so years ago I was baking bread on an aircraft carrier. Thousands and thousands of loaves of bread.

Sometimes I just slept on top of the bags of flour and sugar. And yes, once upon a time I was skinny. But I digress.
I've made lots of bread.
I've pretty much resisted making no-knead bread because ANYTHING that says "whatever in 5 minutes a day" is evil in my book. One of the biggest problems with society today - in my not so humble opinion - is NOT taking the time to do something. Especially cooking.
So it was with more than just a bit of trepidation that I decided to do this. Luigi hasn't steered me wrong, yet.
The recipe comes from a blog called The Italian Dish. The recipe is verbatim from the blog:
No Knead Artisan Bread
adapted from Artisan Bread in Five Minutes a Day
makes four 1 pound loaves.
3 cups lukewarm water
1-1/2 tablespoons granulated fast acting yeast (2 packets)
1-1/2 tablespoons kosher or other coarse salt
6-1/2 cups unsifted, unbleached all purpose white flourMixing and Storing the Dough
1. Warm the water slightly. It should feel just a little warmer than body temperature, about 100 degrees F. Warm water will rise the dough to the right point for storage in about 2 hours.
2. Add yeast and salt to the water in a 5 quart bowl or a plastic container with a lid.
3. Mix in the flour - kneading is unnecessary. Add all of the flour at once, measuring the flour by scooping it and leveling it off with a knife. Mix with a wooden spoon - do not knead. You're finished when everything is uniformly moist, without dry patches. This step is done in a matter of minutes. The dough should be wet and loose.
4. Allow to rise. Cover with a lid (not airtight). Lidded plastic buckets designed for dough storage can be purchased many places. (I used a plastic square food storage container at my local grocery store. I just make sure that the lid is not snapped on completely). You want the gases to be able to escape a little. Allow the mixture to rise at room temperature until it begins to collapse (or at least flattens on top), about two hours. Longer rising times will not hurt your dough. You can use a portion of the dough any time after this period. Fully refrigerated wet dough is less sticky and is easier to work with than dough at room temperature. So, the first time you try this method, it's best to refrigerate the dough overnight (or at least 3 hours) before shaping a loaf.
Baking
5. Shape your loaf. Place a piece of baking parchment paper on a pizza peel (don't have a pizza peel - use an unrimmed baking sheet or turn a rimmed baking sheet upside down). Sprinkle the surface of your dough in the container with flour. Pull up and cut off about a 1-pound piece of dough (about the size of a grapefruit), using scissors or a serrated knife. Gently stretch the surface of the dough around to the bottom on all four sides, rotating the ball as you go. Dust your hands with flour if you need to. This is just to prevent sticking - you don't want to incorporate the flour into the dough. The top of the dough should be smooth - the object here is to create a "gluten cloak" or "surface tension". It doesn't matter what the bottom looks like, but you need to have a smooth, tight top. This whole step should take about 30 seconds! Place the dough onto your parchment paper.
6. Let the loaf rise for about 40 minutes (it does not need to be covered). If it doesn't look like it has risen much, don't worry - it will in the oven. This is called "oven spring".
7. Preheat a baking stone on the middle rack in the oven for at least 20 minutes at 450 degrees F. Place an empty rimmed baking pan or broiler pan on a rack below the baking stone. This pan is for holding water for steam in the baking step. (If you don't have a baking stone, you can use a baking sheet, but you will not get the crisp crust on the bottom. You will still have a great loaf of bread. Baking stones are cheap and easy to find - Target carries them - and are a must for making pizzas, so go out and get one as soon as you can.)
8. Dust the loaf with a little flour and slash the top with a knife. This slashing is necessary to release some of the trapped gas, which can deform your bread. It also makes the top of your bread look pretty - you can slash the bread in a tic tac toe pattern, a cross, or just parallel slashes. You need a very sharp knife or a razor blade - you don't want the blade to drag across the dough and pull it. As the bread bakes, this area opens and is known as "the bloom". Remember to score the loaves right before baking.
9. Bake. Set a cup of water next to your oven. Slide the bread (including the parchment paper) right onto the hot baking stone. Quickly pour the water right into the pan underneath the baking stone and close the oven door. This creates the necessary steam to make a nice crisp crust on the bread. Bake at 450 F for about 25 - 30 minutes. When you remove the loaf from the oven, you will hear it crackle for a while. In baking terms, this is called "sing" and it is exactly what you want.
10. Cool. Allow the bread to cool for the best flavor and texture. It's tempting to eat it when it's warm, and that's fine, but the texture is better after the bread has cooled.
11. Store the remaining dough in the refrigerator in your lidded (not airtight) container and use for up to 14 days. Every day your bread will improve in flavor. Cut off and shape more loaves as you need them. When your dough is gone, don't clean the container. Go ahead and mix another batch - the remaining bits of dough will contribute flavor to the next batch, much like a sourdough starter does!
tip: If you are using King Arthur All Purpose Flour, I would use slightly less water (about 1/4 cup) than the recipe calls for. King Arthur AP Flour is higher protein flour than regular AP Flour, like Gold Medal or Pillsbury.
The dough is reminiscent of an Italian Biga - a starter. Same wet texture, although a biga is added for flavor and texture to more flour and liquid - and kneadedkneadedkneaded.

The bread came out pretty good. The hardest part for me was forming a proper loaf. I've made plenty of loose-dough breads before, but this one is a bit different. Very sticky. My hands aren't used to it. It doesn't feel right. But although it wasn't the most perfect loaf I've ever made, it was good.
The crust, in fact, is excellent. It's that nice, shiny, crackly crust ya get by spritzing and steaming a traditional loaf. The crumb was good but it's going to take just a bit of getting used to for me. It's very chewy. Not exactly but almost a bit gummy. Not a bad chewy or gummy, but just a bit different than what I've been baking recently.
The flavor is really good, though, and I can only imagine how much better it will become as it sours a bit in the fridge.
I don't know about the 5 minutes a day, stuff, but I can have a loaf baked in an hour.
It's not going to replace my other bread baking, but I have a feeling we'll have even more fresh bread on the table than we do now - and we have a lot now!
Cooking in a Winter Wonderland
I was a serious cookin' machine today! Beautiful snow falling (but not really sticking) put me in the mood to bake.
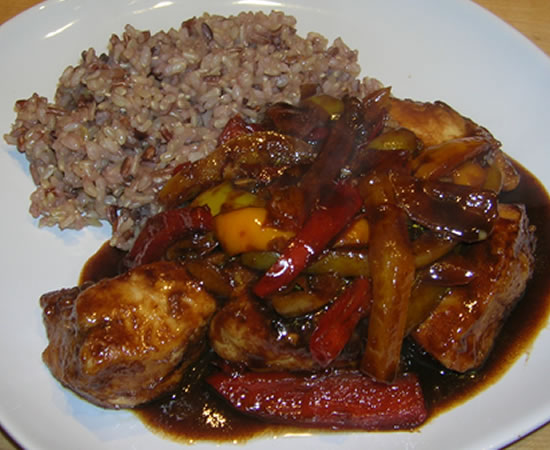
In-between baking projects, though, I did cook dinner,as well. Victor saw a recipe in Parade Magazine of all places that looked intriguing. Chicken and Peppers in a balsamic vinegar sauce. We've done a lot of balsamic reductions, but this one sounded just different enough to give it a try. This one comes from Bobby Flay.
Chicken and Peppers in Vinegar Sauce
- 3 Tbsp olive oil
- 8 bone-in, skinless chicken thighs
- Kosher salt and freshly ground black pepper
- 1 large red bell pepper, stem and seeds removed, thinly sliced
- 1 large yellow bell pepper, stem and seeds removed, thinly sliced
- 4 cloves garlic, chopped
- 1 Tbsp tomato paste
- 1 cup balsamic vinegar
- 2 Tbsp clover honey
- 2 cups low-sodium chicken stock or broth
- 1/4 cup chopped fresh flat-leaf parsley
1. Heat oil in a medium Dutch oven over high heat until it shimmers. Pat the chicken dry with paper towels; season with salt and pepper. Place chicken in the pan, in batches, top-side-down. Cook until golden brown, 4 minutes. Turn over, continue cooking 3 minutes. Remove chicken to a plate.
2. Add peppers and cook, stirring occasionally, until slightly soft, about 5 minutes. Add garlic and cook for 1 minute. Add tomato paste and cook for 1 minute. Add the vinegar and cook until reduced by half. Add honey and broth, season with salt and pepper, cook for 5 minutes. Return the chicken and accumulated juices to the pot. Reduce heat to medium, cover the pot, and cook until the chicken is tender, about 15 minutes. Remove the chicken to a platter. Cook sauce until slightly reduced, about 5 minutes. Stir in parsley and pour sauce over the chicken.
I served it with a whole grain mahogany rice blend. I made it with chunks of chicken breast because I didn't have any thighs in the freezer. It came out pretty good. I think I like Lidia's Pork Chops and Apples, better, though...

One thing I was definitely going to make today was an apple pie. And yes, I make my own pie crusts. They're just not that difficult to make and I can't find a decent pre-made crust that will fit a standard 10" deep-dish pie plate.
Food Processor Pie Crust
- 2 1/2 cups flour
- 1 cup butter, cubed (I freeze it)
- pinch salt
- pinch sugar (if for sweet pie)
- 1/4 cup ice-cold water
Put flour, salt and sugar (if using) in food processor bowl. Pulse a second to blend.
Add cold or frozen butter pieces and pulse until well mixed.
Add water while mahine is running and pulse a few times to mix.
Dough will look very crumbly. Pinch together a small amount to see if it holds together. if it doies, you're set.
Form into two disks - one larger than the other - and let rest about 10 minutes.
Roll out on well-floured board.

It really is easy to do!

Apple Pie filling
- 5 large apples, peeled, cored, and sliced
- 1/2 cup sugar
- 1/4 cup flour
- 1/4 cup melted butter
- 2 tsp cinnamon
- 1 tsp allspice
- pinch salt
- 1/4 cup apricot brandy
Place all filling ingredients in large bowl and mix well.
Place filling into pastry-lined pie plate. Top with crust and crimp edges.
Bake at 400° about an hour.

It came out really good. It didn't even need ice cream!

The other thing I was obsessing about a bit today was Cinnamon Raisin Swirl Bread. I almost bought a loaf and then decided I could make one just as easy.

Cinnamon Raisin Swirl Bread
- 3 cups flour, more or less, divided
- 1 tablespoon sugar
- 1 tsp salt
- 1 envelope active dry yeast
- 1 cup warm water
- 2 tablespoons softened butter
- 1 cup raisins
- 1/2 cup sugar
- 1 tbsp cinnamon
- 2 tbsp butter, melted
In a large mixing bowl combine 1 cup flour, sugar, salt, and yeast. Beating at low speed, add the water and butter. Continue beating at high speed for 3 minutes. Add 1/2 cup flour and beat 4 minutes longer. Stir in 1 1/2 cups flour, or enough to make a soft dough. Turn out onto a lightly floured surface. Knead for about 8 to 10 minutes, or until dough is smooth and elastic, adding a little more flour as necessary.
Place dough in a large buttered bowl, turning to butter top. Cover with a clean towel and let rise for about 1 hour in a warm place, free of drafts.
Punch dough down; knead until smooth. Roll into a 12x9-inch rectangle.
Brsh with melted butter. Sprinkle with cinnamon and sugar and then spread raisins evenly.
Starting with the narrow edge, roll up, turning ends under to make loaves to fit pans. Place rolls seam side down in greased loaf pans, 9x5x3-inches.
Cover pans with clean towel and let rise in warm place until double, about 45 minutes.
Bake loaves at 400° for 25 to 30 minutes, or until loaves sound hollow when tapped with fingers. Remove from pans to racks; brush with butter.

This was supposed to be for breakfast tomorrow. Needless to say, we didn't wait.
I could eat this every day.
As for the snow storm that was supposed to droip another 18" of snow? It hasn't quite hit yet.
More Valentine Love
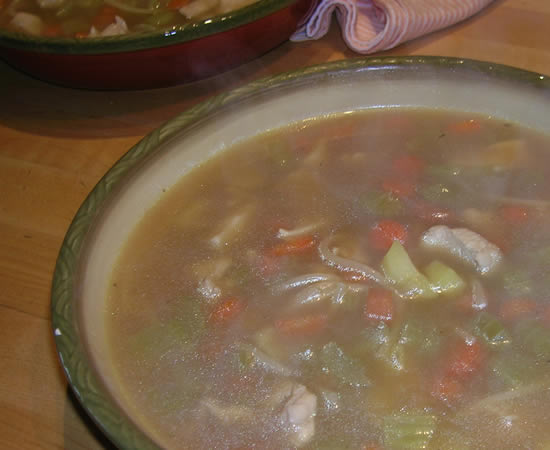
Chicken Noodle Soup. Jewish Penicillin. Actual medicine.
Researchers have actually confirmed what Grandma already knew - Chicken soup helps when we have a cold.
They found that chicken soup and many of its ingredients helped stop the movement of neutrophils -- white blood cells that eat up bacteria and cellular debris and which are released in great numbers by viral infections like colds.
Neutrophil activity can stimulate the release of mucous, which may be the cause of the coughs and stuffy nose caused by upper respiratory infections such as colds.
"All the ingredients were found to be inhibitory, including the boiled extract of chicken alone," they wrote.
Rennard said vitamins and other agents in the ingredients could, plausibly, have biological action.
So Victor made me Chicken Soup.
We had the stock made, so it was just a matter of pulling it all together... carrots, celery, onions, chicken, and noodles, noodles, noodles. Simple. basic. Nutritious and delicious.
And just because we always need it, I made a loaf of Beer Bread.

Made with Sierra Nevada Torpedo Extra IPA.
Clam Chowder
This has been just one of the most wonderful of days. The non-stop (and still falling) snow has really brought me back to those 5 years I lived at Lake Tahoe. Definitely those thrilling days of yesteryear. Three, four, and five-day snowstorms were not uncommon with storms dropping 10+ feet of snow equally normal. Granted, living in the mountains is a bit different than living in the Philadelphia suburbs, but the lessons are the same. Keep enough food in the house for a few days, shovel when you can, and sit back and enjoy it. Light a fire if you have a fireplace, cook some great meals, slow down and enjoy life.
It's what winter is all about. That in-your-face reminder that it is winter. Slow down and enjoy life.
Slowing down and enjoying life have been at the top of our list the past few days. Today we had steel-cut oats for breakfast, last night's pot pie for lunch, and clam chowder in home made bread boules for dinner. Victor made a Cannoli Cake that we'll have in an hour or so. (And I'll post that later.) We're eating well.
About noon I went out and shoveled a foot of snow from the driveway. By the time I finished, there was already an inch of snow behind me covering the drive. There should easily be another foot out there by the time we wake up tomorrow. I love it!
Cybil is having the time of her life. She's Parnelli Snow Dog running and rolling and having the time of her life. I love her enthusiasm.
Back to food...
The Clam Chowder we had tonight was pretty basic. Nothing out of the ordinary. Just a good, honest chowder.
New England Clam Chowder
- 2 6-1/2-ounce cans minced clams
- 4 bottles clam juice
- 1/4 cup sherry
- 5 slices bacon, cut up
- 3 medium potatoes, peeled and diced
- 1/2 cup chopped onion
- 1/8 teaspoon black pepper
- 1 cup heavy cream
- 3 tablespoons all-purpose flour
- splash Worcestershire sauce
- 2 tbsp chopped parsley
In a large saucepan cook bacon until desired crispness. Add onion and cook about 5 minutes. Add sherry and reduce a bit. Add clam juice, Worcestershire sauce, and pepper. Bring to boil and then reduce heat. Simmer, covered, about 15 minutes or until potatoes are tender.
Stir together heavy cream and flour; add to potato mixture. Cook and stir until slightly thickened and bubbly. Stir in clams and parsley. Return to boiling; reduce heat. Cook for 1 to 2 minutes more or until heated through.
The bread was excellent! A really tender crumb and soft but chewy crust. It would make a great sandwich bread. The possibilities are endless and definitely one to keep in the rotation.
And now... Cannoli Cake is calling me.....
Buttermilk Bulgur Bread
In case you've just crawled out from under a rock, somewhere, it's snowing. A lot. It's wonderful. I'm loving every foot of it - and yes, it's being measured in feet!
We've been eating well since this all began and have a few more fun meals coming up.
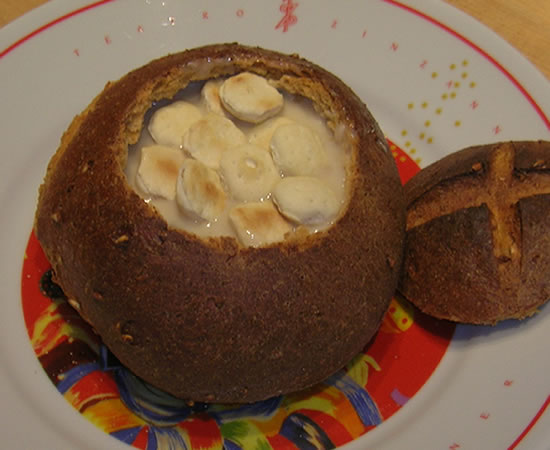
We had leftover Chicken Pot Pie for lunch today. It was the perfect winter lunch. And tonight, I'm making New England Clam Chowder - in Bread Bowls.
I was hunting through different bread books when I found this in the Bob's Red Mill Cook Book.
I've never made it before but it seemed like it would compliment clam chowder well.
Buttermilk Bulgur Bread
- 1 Tb Yeast, Active Dry
- 3 Tb Honey
- 1/2 cup Bulgur (ALA) from Hard Red Wheat
- 1/3 cup Unsalted Butter, melted
- 2 cups Whole Wheat Flour
- 2 Tb Cornmeal, Coarse Grind
- 1/4 cup Warm Water (110 degrees)
- 2 tsp Tomato Paste
- 1-1/2 cups Buttermilk, warmed
- 1/2 tsp Sea Salt
- 2 cups White Flour, Unbleached
Place yeast in a large bowl. Cover with warm water; let stand until yeast begins to soften, about 3 minutes. Add honey and tomato paste, and whisk until smooth. Stir in bulgur and buttermilk; let stand 20 minutes.
Stir the butter and salt into the bulgur mixture. Then stir in the whole wheat flour and about 1-1/2 cups unbleached white flour to make a stiff dough. Turn out onto a lightly floured surface. Knead for 15 minutes, adding more flour if necessary to keep dough from sticking. Transfer the dough to a lightly oiled bowl, turn once to coat and cover with plastic wrap. Let rise in a warm place until doubled in volume (about 1-1/2 hours).
Turn dough out onto a lightly floured surface; punch down and divide in half. Roll and pull each half until it resembles a loaf of French or Italian bread.
Sprinkle a baking sheet with coarse cornmeal and place the loaves on the sheet. Brush loaves lightly with water; cover loosely with a towel and let rise in a warm place until doubled in volume, 45 minutes to an hour.
Preheat oven to 400F.
With a sharp knife, slash the surface of the loaves four or five times; brush again with water. Bake until crisp and hollow sounding when tapped with your finger, about 25 minutes. Cool on a wire rack.
I made two individual bowl-sized boules and one large loaf. I really should have used two ovens for this, but I didn't. The loaves were a bit cramped on the stone. Oh well. They may look a bit weird, but they look and smell great!
They should eb perfect foir the clam chowder and Victor made a Cannoli Cake for dessert.
I'm loving this weather!
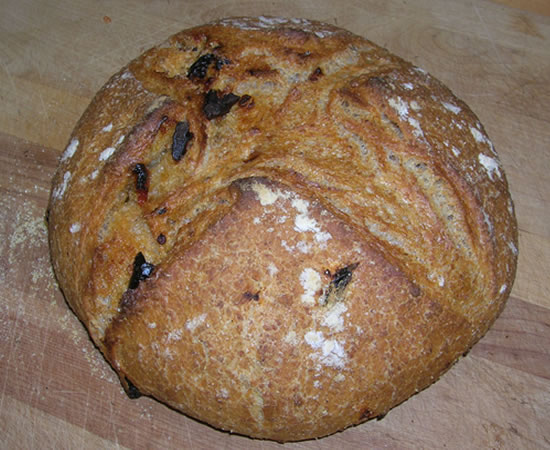
Pane Pugliese and Lentilles du Puy

More bread. I just can't think of a better food right now. It's still a bazillion degrees below zero (or so it seems) and the only sensible thing is to stay indoors and heat the kitchen.
I've been making this particular bread for years. It may be one of the easiest, no-brainer-fool-proof breads in the world. And one of the absolute best-tasting.
Today, I really proved the fool-proof part.
Our neighbor across the street just had his gall bladder removed. Since he regularly comes over and plows our driveway when it snows, it is imperative that he regain his good health immediately. I thought fresh-baked bread and a no-fat lentil soup was just the thing to help him on the road to recovery.
This is a basic white-flour recipe. I pulled the biga out of the 'fridge (left over from the Pan Siciliano), got it mixed with the yeast and the water and - exactly 6 cups of flour. I needed 7 1/2. I don't think I've ever run out of flour before, but I have been doing a lot of bread-baking. I did another search to make sure there wasn't a 5 lb bag hiding somewhere. I have whole wheat flour, I have rye flour, I have graham flour, I have self-rising flour. There's even corn flour. No more white flour.
There was absolutely no way I was leaving the house. I added a cup and a half of whole wheat.
The dough came out great. Felt good, it had a great smell to it. Into a ball, into a bowl, and into the "proofing room" it went. (For those not in the know... I just open the heater vents in our powder room and it becomes the warmest and best environment for proofing bread.)
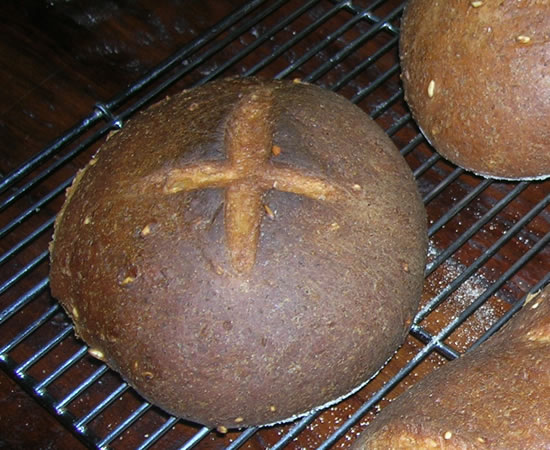
The recipe makes three good-sized loaves and I have generally been able to get them all to fit on one peel. Well... today, they seemed to have a bit more of a mind of their own than usual.
They got big. One was actually hanging off the side a bit.
I already planned to do two loaves in one oven and the third in the other, but as I was sliding the first loaf in, the second fell right off the peel and landed upside down halfway in the oven, laying across the heating element and the door.
Ooops!
I quickly slid the third loaf onto the butcher block and carefully picked up the fallen loaf. I got it into the bottom oven, slid the third one back onto the peel, and got it into the oven.
The loaf in the picture above is the one that fell. It came out pretty awesome. A bit misshapen, but awesome.
THAT is a forgiving loaf of bread.
Pane Pugliese
- 1 packet dry yeast
- 1/4 cup warm water
- 3 cups water; room temp
- 1 cup biga
- 7 1/2 cups all-purpose flour
- 1 tbsp salt
Proof the yeast in the warm water. Add 1 1/2 c water and the biga, mix till blended. Add flour and salt, mix till dough comes together and pulls off the sides of the bowl. Knead 3-5 minutes in a mixer, longer by hand. Dough will be very soft and elastic. Let rise about 3 hours, shape into 2 small round loaves or 1 big flattish one. If you have baking stones, place loaves on baking peel or on baking sheets sprinkled corn meal. Let rise about 1 hour. Preheat oven to 450°, and 10 minutes before baking flour the loaf tops and dimple them with your fingers. Bake 50-60 minutes for big loaves, 30-35 minutes for small. Tap the loaves to test for doneness (hollow=done) and cool on a rack.
And the biga. I would imagine it could stay in the 'fridge and just keep adding to it as I used to do with my starters years ago.
Biga
- 1/2 tsp active dry yeast
- 1/4 cup warm water
- 1 1/4 cup water (room temperature)
- 3 3/4 cups unbleached all-purpose flour
Stir the yeast into the warm water and let stand until creamy – about 10 minutes. Stir in the remaining water and then the flour, one cup at a time.
Mix with the paddle attachment on the mixer at the lowest speed about 2 minutes.
Remove to a slightly oiled bowl, cover, and let rise at cool room temperature for 6 to 24 hours. The starter will triple in volume and still be wet and sticky when ready. Cover and refrigerate until ready to use.
During all of this commotion, I was also making lentil soup. With French lentils. Lentilles du Puy. I'm brave. I'll pair Italian bread with French lentils. Fancy restaurants would charge an arm and a leg and call it fusion.
I call it getting my driveway plowed.

I made two versions of the soup. I added cooked sausage and chicken to ours after taking out half for our neighbor. (I wasn't being cheap. Gall bladder removal = low fat diet. Sausage is definitely not on his diet right now.)
The recipe is for making it all at once. I had a chicken breast in the 'fridge that needed cooking, so I cut it up and added it to the sausage when I cooked it. You can make it vegetarian simply by omitting the sausage/chicken.
Potage de lentille du Puy
- 1 onion, diced
- 6 carrots, chopped
- 6 celery stalks, chopped
- 2 cloves garlic, minced
- 1 lb French green lentils (or other lentils)
- 10 cups water
- 1 sm can tomato paste
- 2 tsp Herbs d'Provence
- 2 bay leaves
- salt and pepper, to taste
- 1 lb sausage, sliced
Brown sausage, onions, carrots, cekery, and garlic together in soup pot. When cooked reasonably well, add water, lentils, tomato paste and seasonings.
Bring to boil and then simmer uncovered until lentils are tender and soup has thickened slightly.
Check for seasoning and add additional salt and/or pepper, as desired.
We're not expecting any snow showers until next weekend.

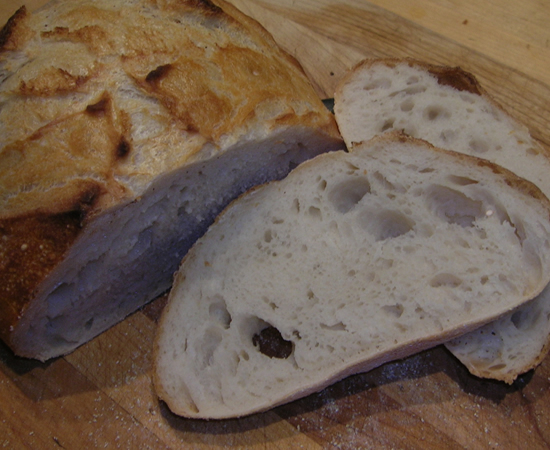
Pseudo Risotto and Fresh-Baked Bread
I couldn't get dinner on the table fast enough, tonight. And I tell ya - I have found my new favorite bread. It's unbelievable.
The crust is crunchy, crusty, chewy, rich, dark, with a powerful flavor. The crumb is soft, chewy, spongy. And it all hints of sourdough. That yeasty smell of my youth. Seriously, it''s my new favorite bread.
The Pseudo Risotto was a chicken and rice casserole baked in the oven. I actually hadn't thought risotto until plating it up. Pseudo. Definitely not the real thing. But good. Wintertime comfort food - even if it's 60° outside.
I boiled down last nights chicken carcass and pulled off all the meat. I then thickened the broth using the chicken fat from the pot mixed with flour. (I wasn't about to skim off all that flavor just to add fat to thicken it.)
I saved some of the chicken for sandwiches and the rest went into bowl with cooked rice and frozen mixed vegetables. I stirred in the gravy, put it all in a casserole (actually, I split it into two casseroles - one went in the freezer) and into a 350° oven for an hour.
It was very risotto-like. Smooth, creamy, and just the right comfort-food feel.
But the star of tonight's dinner really was the bread.

Yum.