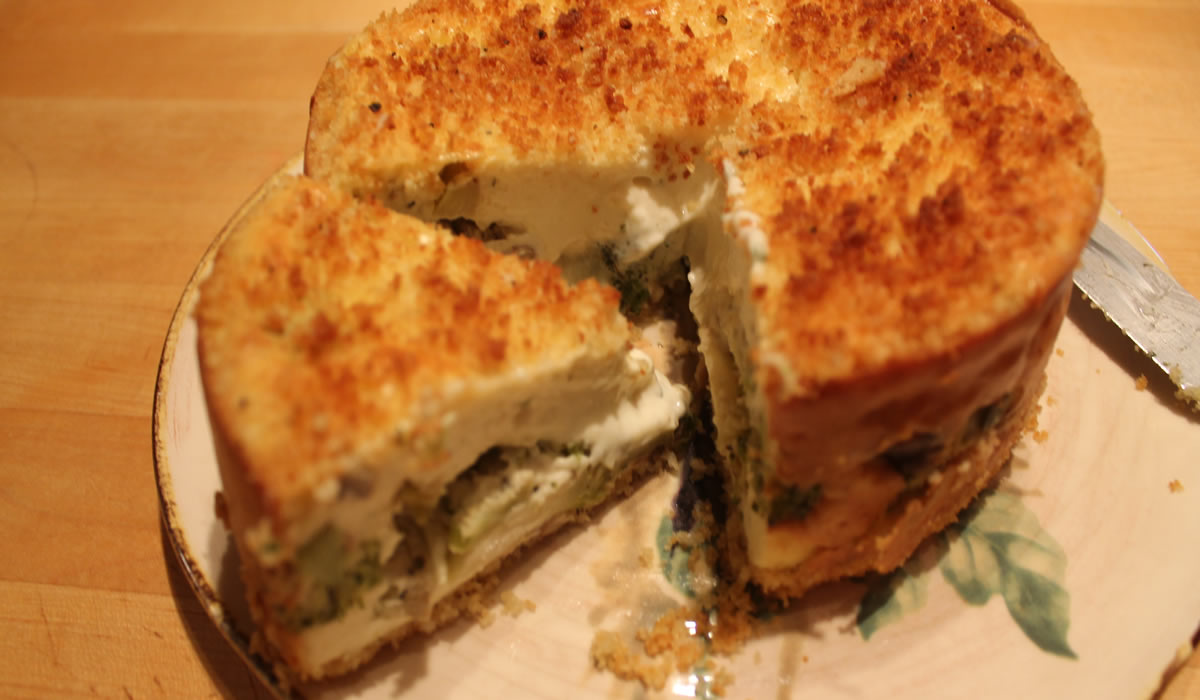
Broccoli Cheesecake
I love my emails from La Cucina Italiana. In fact, they may be just about the only non-family-and-friends emails I do like.
I'm getting old and crotchety. Constant barrages of Buy Now! Save! Limited Time Offer! and Exclusive! Just For You! drive me up the friggin' wall. Contrary to the statement that the more I spend, the more I save, the less I spend, the more I save. I get enough alternative facts from The White House - I don't need them in my inbox.
As I hit delete without ever opening, I do stop and look at La Cucina. I may not make anything they're highlighting, but it gives me a few minutes to remember where I'd rather be - under an olive tree in Sicily...
Because the emails are all in Italian, I rely on my limited Italian, pictures, and Google Translate to get the gist of them. It can lead to some interesting reads and occasional confusion.
Today, there was a recipe for a cauliflower cheesecake. How could it possibly be bad? Only thing was - I didn't have any cauliflower. Or robiola cheese. I did, however, have broccoli. And Boursin. A plan was in the making.
Here's the recipe - translated by Google:
Cauliflower Cheesecake with Anchovy
- cauliflower florets 400 gr
- robiola 200 gr
- creamy white cheese 150 gr
- rusks 100 gr
- fresh cream 50 gr
- butter plus a little '40 gr
- nonfat yogurt 20 gr
- Flour 15 gr
- 2 eggs
- anchovy
- salt
- pepper
Set aside a few houseline cauliflower to complete, the rest do not boil it in salted boiling water for 6-8 '. Drain the florets and cut into slices. Crumble the toasted slices with butter and impastatele getting the bricioloni. Lined with parchment paper the bottom of a springform pan (ø 19 cm, h 8 cm) and buttered the edges.
Spread the butter mixture on the bottom and partly on the edge, pressing so that good compact. Mix the soft cheese with the cream cheese and flour; then add the yogurt, cream, eggs, salt and pepper: you will get a fairly liquid cream.
Spread a thin layer of cream in the mold then add the cauliflower slices, cover with the rest of the cream cheese and bake at 180 ° C for 35-40 '. Remove from the oven, let cool, misshapen, completed with raw florets kept aside and cut into slices with a few drops of anchovy. Then served sliced.
After you've done this for a while, it actually makes sense. Grams to ounces is extremely easy - we learned this conversion back in the '70s - and the rest of it is just using your basic cooking skills.
My version took on a bit of a twist... Broccoli and mushrooms in place of the Cauliflower, Boursin in place of robiola, breadcrumbs and panko mixed in place of the rusk, no yogurt, and no anchovy.
I used a 6" springform pan, baked at 350°F for 40 minutes, and probably could have let it go another 10 minutes. But the flavor was outstanding!
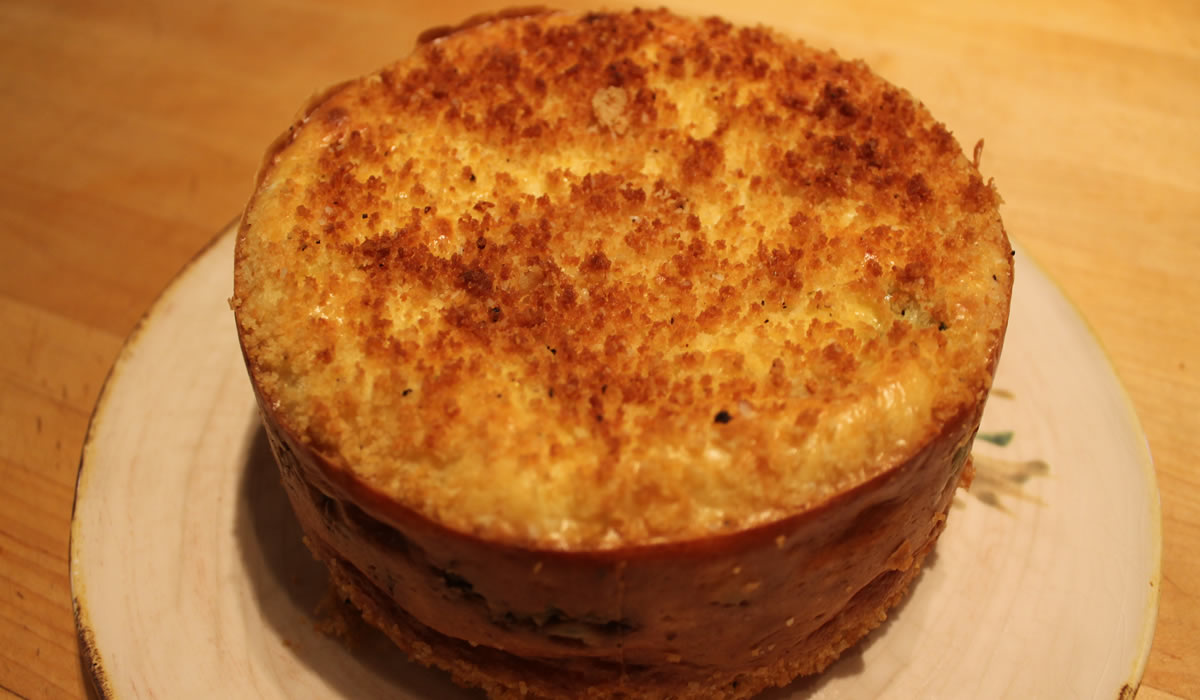
I also topped it with some of the leftover breadcrumbs from the base. Extra crunch is always good.
And then to compliment the cheesecake, I made an Italianesque Pot Roast. Red wine, tomatoes, basil, oregano, radicchio, onion, porcini mushrooms... the basic flavors...

I plated everything up and called Nonna in for dinner. I was a bit unsure of how she was going to react since she generally doesn't like new things, and her first reaction was what?!? cheesecake for dinner?!? when I told her it was a broccoli cheesecake. She didn't say anything, pushed it around her plate a bit - and then proceeded to all but lick her plate clean.
She liked it. A lot.
And it was good! Very simple to put together and really worth the time to make.
I can see this concept used for any number of vegetables - and since it's served room temperature or cold, summer's going to be fun!
Berry Cake in a Pie Plate
My original plan this weekend was to make a Bourbon Barrel Cake. I have to admit, that for a store-bought cake, these things are pretty good. On the other hand, there are more artificial ingredients, flavor and texture enhancers, and additives in it than I will normally go for. Hell - even the bourbon is an extract! Powdered milk, powdered eggs - whites and yolks and their accompanying stabilizers - all add to the chemical shitstorm.
There's a reason that your basic home cook can't replicate a store-bought or cake-mix cake - they don't have a chemistry degree or access to those commercial ingredients. And as scratch baking has slipped to the wayside, the cake mix flavor and texture has become the standard that one wants and then feels like a failure when they can't do it.
Loved the cake, knew I wasn't going to buy one, and then decided that making one this weekend was going to give me more cake than I needed - not wanted, needed. Let's face it, I could down half a cake without batting an eye. I love my desserts and really love boozy desserts.
I have an idea for making one, but I'm saving it for a crowd.
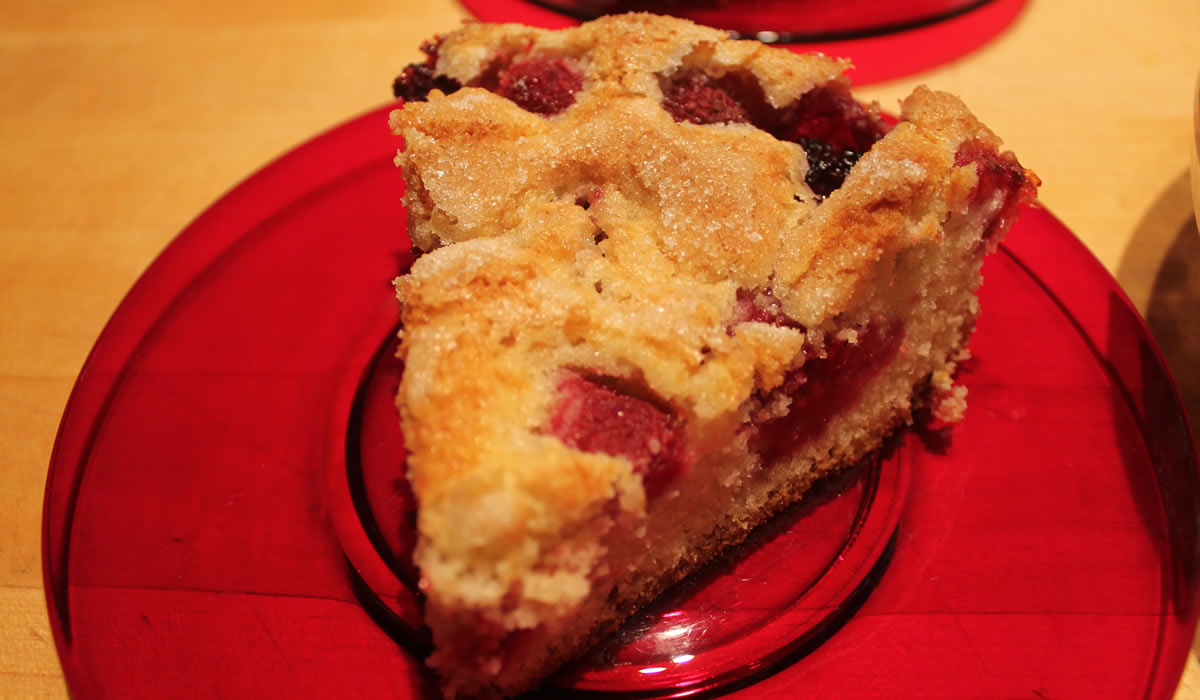
I didn't make that - yet - but we have to have our dessert, so... I decided on a Berry Cake. We had blackberries and raspberries in the 'fridge so off I went.
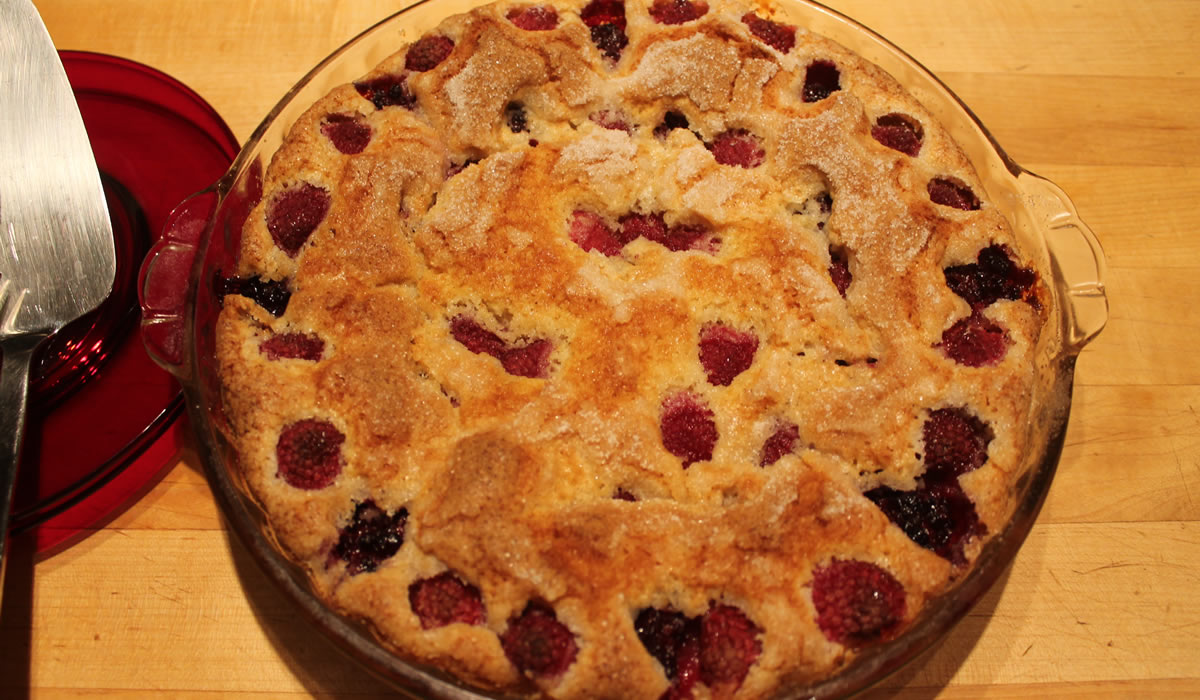
The recipe is a bit of a single layer right-side up upside-down cake, made in a pie plate. I think the concept originally came from Martha Stewart, but I didn't write it down, so I'm not positive. It seems like a Martha recipe, though!
Berry Cake
- 6 tbsp butter
- 1 1/2 cups flour
- 1 1/2 tsp baking powder
- pinch salt
- 1 cup sugar plus more for top
- 1 egg
- 1/2 cup milk
- 1 tsp vanilla
- 12 oz mixed berries
Preheat oven to 350°F/180°C. Butter a 10-inch pie plate.
Mix flour, baking powder, and salt and set aside.
Mix butter and sugar until light and fluffy, about 3 minutes. Mix in egg, milk, and vanilla.
Slowly add flour mixture and mix just until blended.
Place in buttered pie plate. Arrange berries on top of batter, pressing into batter. Sprinkle top with 2 tablespoons sugar.
Bake cake 10 minutes. Reduce oven temperature to 325°F/160°C and bake until cake is golden brown and firm to the touch, about 1 hour.
Cool and enjoy!
This really was a better match for the weekend - a nice crunch from the sugar on top, the cake was light, and the berries perfectly sweet.
And the Bourbon Barrel Cake is still a concept that's going to happen.
Reasonably soon.
Flourless Flours
One of the many things I love about my job is we encourage - and are encouraged - to try just about every product we sell. We constantly have formal and informal tastings of items, along with some information about the items, because you can't talk to a customer about something if you don't know what in the hell it is. Sometimes the tastings are as simple as opening up some new cookies or slicing a new cheese. Other times it's a bit more complex - like trying different flours.
Anyone who knows me knows my disdain of fad diets - and the gluten free dieters are probably on the top of the list, right now. I can't count how many times I've been asked "Is this gluten-free?" and when the answer is "No" the response is "Well - a little won't bother me" as they shovel the food into their mouths. It seriously diminishes the people out there who really do have gluten issues.
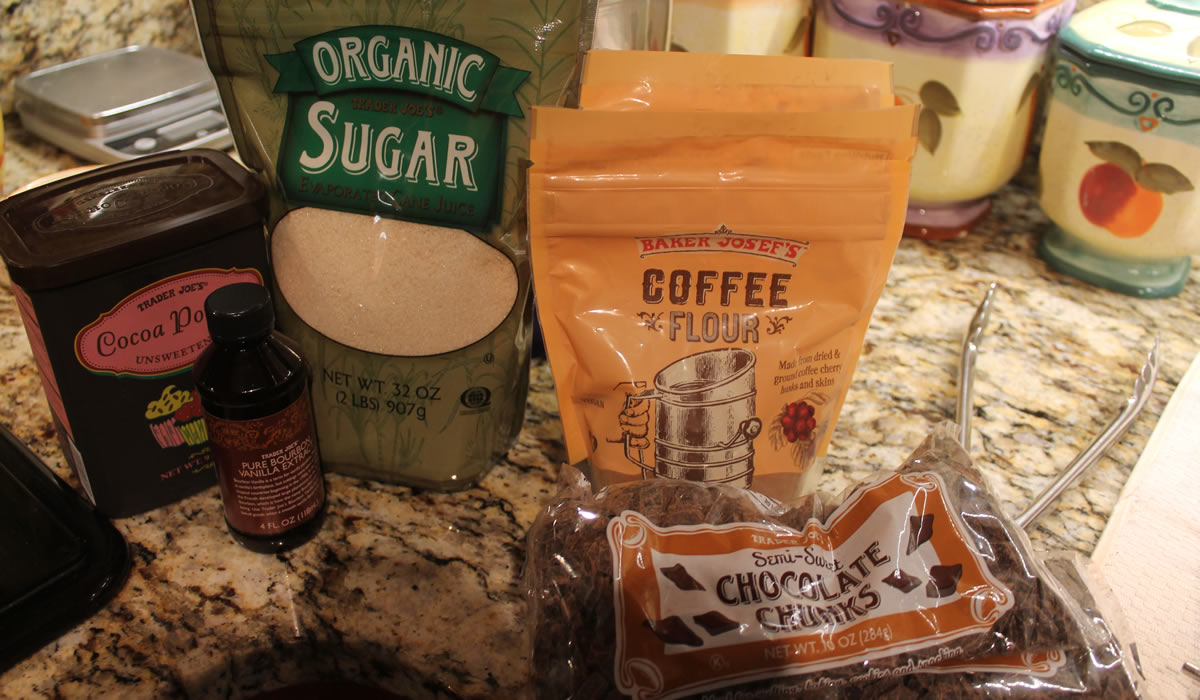
But there are folks out there who really do have gluten issues - and there are more and more options becoming available to them. My challenge was to come up with three items using three different faux-flours - Coffee Flour, Coconut Flour, and Almond Flour - so the staff can taste them and get an idea of what they can be used for.
In basic baking, fat and sugar are used for tenderness, while eggs and flour are used for structure. It's the ratio of those four items that make a crisp cookie or a soft cookie. Using non-wheat flour changes that. Without the flour's ability to trap the leavening gasses and expand and rise, more eggs are generally needed for structure.
I haven't done enough faux-baking to start writing my own recipes, so I went to Chef Google to help me out.
First one is Sweet Potato Bread using coconut flour.

Of the three recipes I chose, this one is bothering me the most. The batter tasted really good, but I'm not keen on the look. I won't be tasting any of them until tomorrow, so I may be over reacting - but I' not sold on this one. It was easy to put together - actually, they all were.
The recipe came from Wholefood Simply.
The second is Coffee Flour Brownies.

It's been known forever that a bit of coffee added to chocolate intensifies the chocolate flavor. This one may have just a tad too much coffee for my taste. The batter had a sharp raw coffee flavor that wasn't really that great. On the other hand, the finished product smells great.
The recipe came from Honest Cooking.
The third - and possibly my favorite based solely on batter-flavor - is Almond Flour Blondies.
This recipe came from Meaningful Eats.
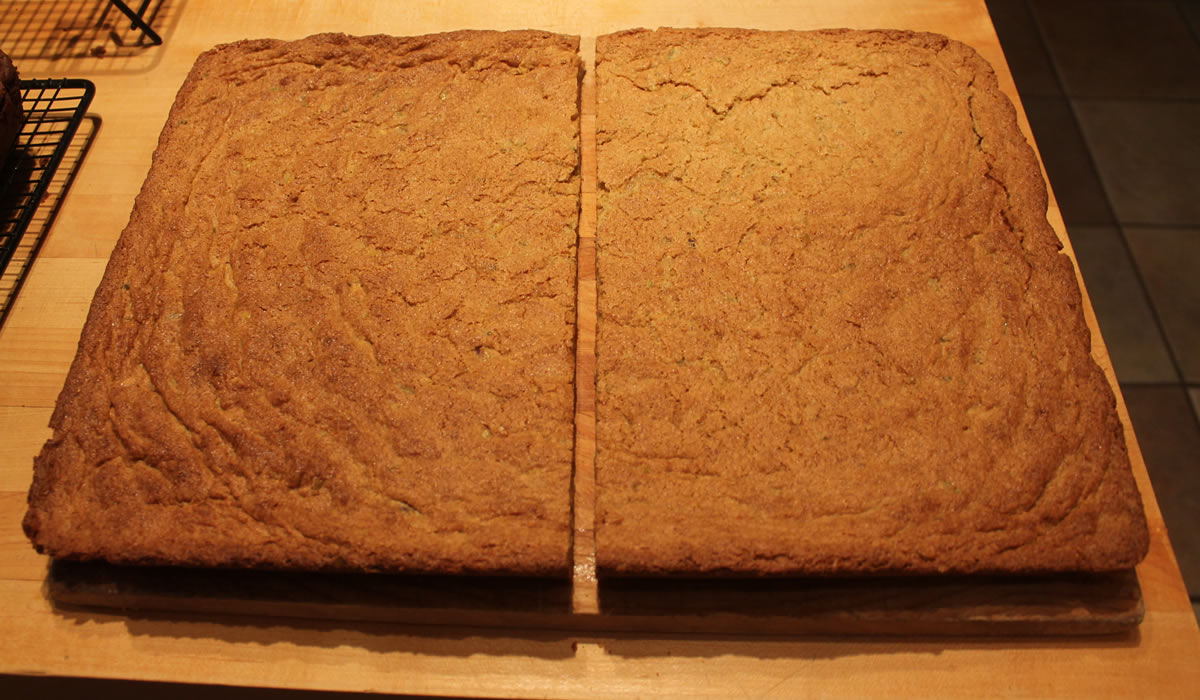
I made it with coconut oil for our dairy-free staff and in place of all the chocolate chips, white chocolate chips, and pecans, added a couple cups of chopped pistachios - because I like pistachios. They came out the most like a traditional blondie - both smell and flavor. I made a double batch in a sheet pan and it just seemed right. The proof of the pudding will be the tasting, tomorrow, but I think they may be my personal winner.
So... if you are having folks over and someone is gluten-free, there are more and more real options out there - and possibly a few things that even the most discerning gluten-eater will enjoy.
I'll be back tomorrow with a taste-and-texture critique of each of them!
Okay... here we are with the results!!
The Blondies were outstanding! They were really like any ol' blondie you'd make with wheat flour. The pistachios worked really well - and I'm really glad I didn't do the chocolate chips in them. Flavor and texture rocked.
The Coffee Brownies were liked by a lot more people than me. I thought they were just a bit too 'earthy' but I was in the minority. I think they really needed one more flavor in there to pull them together - and either vanilla or a couple shots of whiskey would probably round them out.
The Sweet Potato Bread was - okay. It was a bit spongy and would probably benefit from a teaspoon or so of xanthan gum. I'm a gluten-free novice, here, so it's merely a guess. Flavor-wise, it was good and the crew liked it.
The final result is - they're all winners. Buy 'em and use 'em. Have some fun!
Pumpkin Pie
I mentioned in the post that the Ricetta Maiorchino I made the other night was on the dry side. It was fine a few hours after coming out of the oven, but yesterday morning, it was Gobi Desert Dry.
It still had a good flavor, but it was seriously suck-the-moisture-out-of-your-mouth dry.
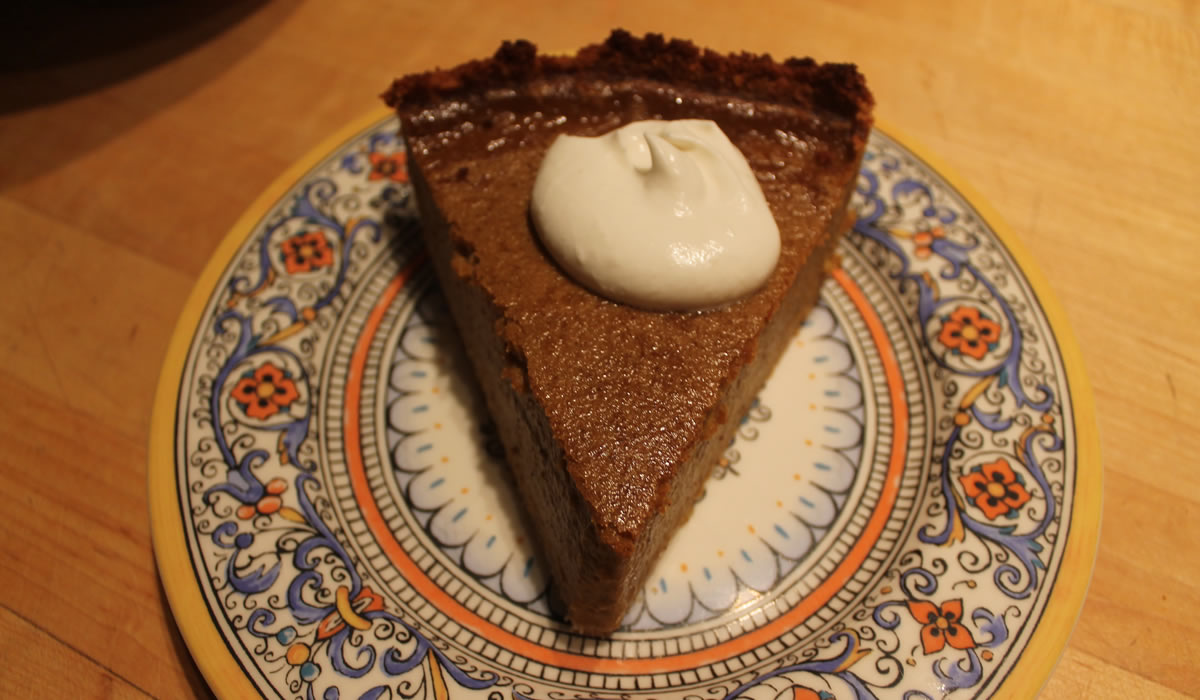
Being my mother's son, there was no way I was going to just throw it out - it was a dessert, after all! Time to get creative. I started thinking of what one can do with cake crumbs... when I worked at the Donut Center years ago, we ground up stale donuts for our bear claws and other danish pastries - but I wasn't about to make danish. Trifle, tiramisu, cobbler with a cake-crumb topping... more ambitious than I was feeling. As I was blankly staring into the cupboard, I saw a can of pumpkin - and a pie was born!
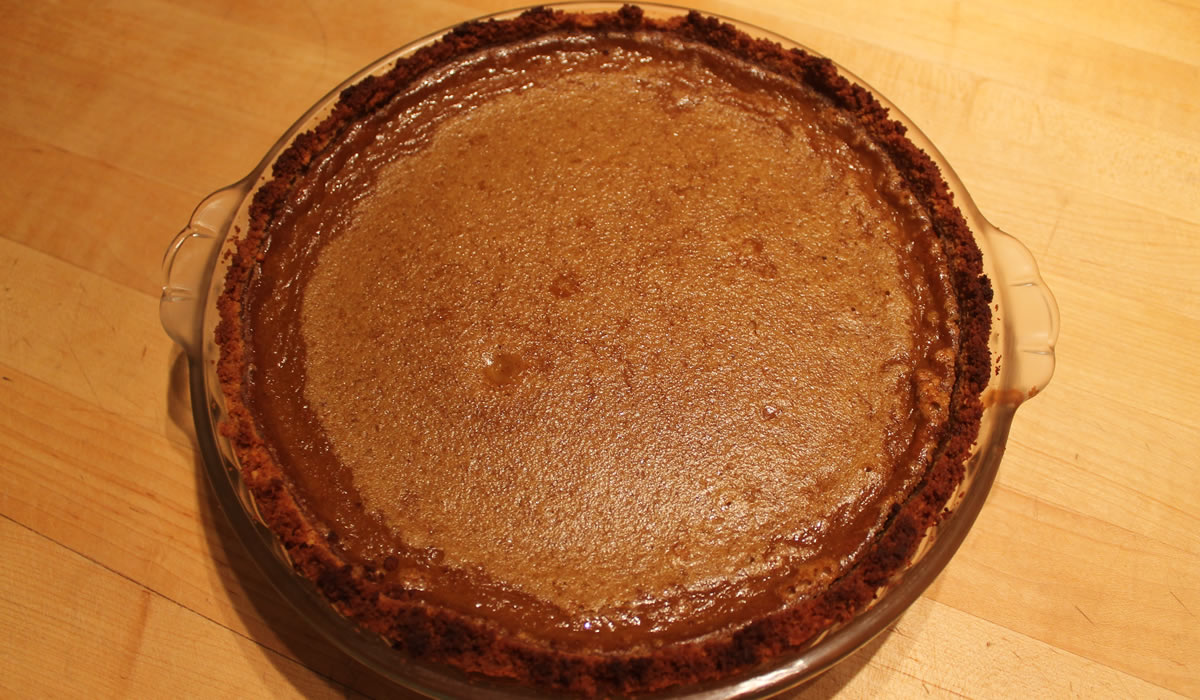
If you can make a crust out of cookie crumbs, you can make a crust out of cake crumbs, says I!
I took some of the cake and placed it in the food processor and when it was nice and crumbly, added some melted butter. Pressed it into the pie plate and added a basic pumpkin filling.
Into the oven.
It came out great! The crust held together and was solid but soft - a nice contrast to a traditional pie. And it had a great flavor.
My you-never-know-when-it's-going-to-hit frugality was a success. It's always fun to see when money is no object but $1.29 is too much to pay for something. I offer no explanations or excuses - it just is when it is.
And this is one of those times I'm glad it was.
Involtini di Sogliola al Limone
I have learned so much from watching cooking shows on PBS. Back in a former lifetime where I worked a Monday-Friday job, we would turn on the cooking shows on KQED and have them going all day long as we did chores or whatever. I have a ragged copy of The French Chef, numerous books from Lidia and Jacques Pepin, and even a bread whisk I got from the The Bread Monk. The best part of watching the PBS shows is they really are any-man programs. Anyone really can make the stuff they're creating with a bit of effort and practice.
Heck, I have a cooking and baking background, but I haven't cooked professionally since 1978. I continued to work in kitchens, yes, but other than the occasional jumping in when there was a need, my duties were generally elsewhere. The cooking shows bring technique forward that I had forgotten, or have shown me a new and better way to do something I've done for years.
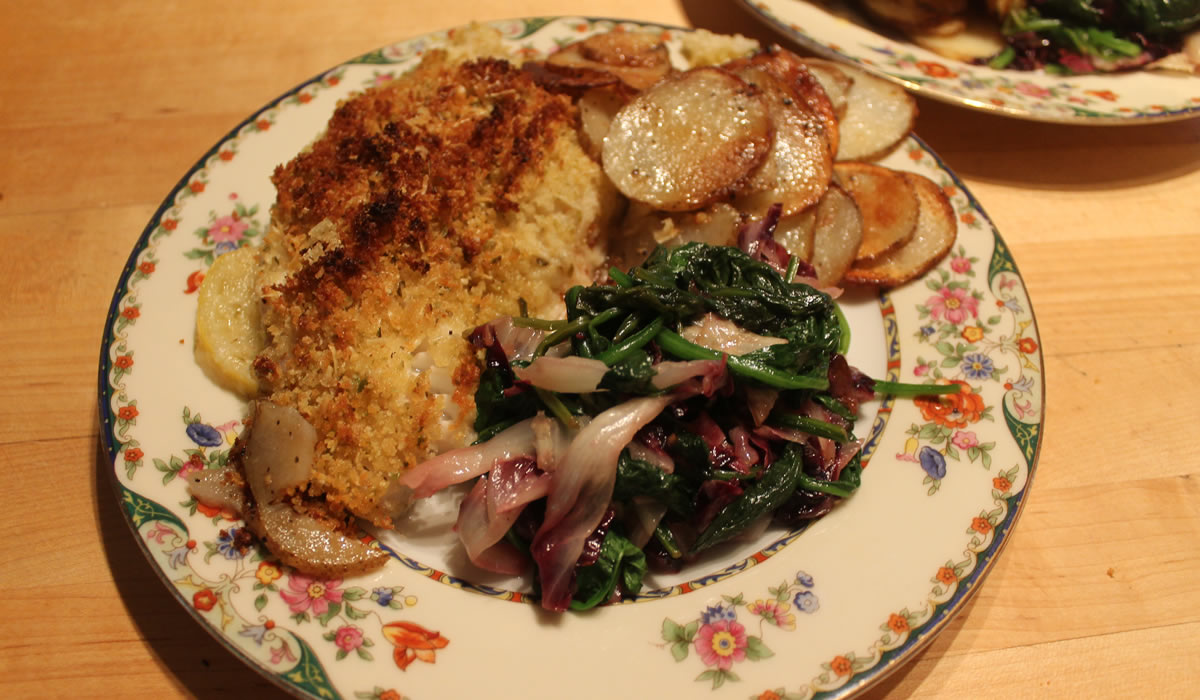
Tonight's dinner was an impulse-buy at the grocery store based on a Lidia Bastianich show a while back - Involtini di Sogliola al Limone - Rolled Lemon Sole. It's a Sicilian dish of seasoned breadcrumbs placed on a thin fish fillet, rolled, and baked. Pretty easy, pretty basic. My impulse-buy fish, however, was not thin sole fillets - it was thick cod fillets.
Thick cod fillets do not stuff and roll.
Of course, I did not check any of this until I had made the breadcrumbs, buttered the baking dish, and was all ready to put them together. Our rolled fish became fillets topped with breadcrumbs, but otherwise cooked as the recipe stated.
Ya need to be flexible.
And I have to tell ya, the fish came out great! It was perfectly-lemony, the breadcrumbs had tons of flavor, and the contrast between the crunch of the crumbs and the tender fish was perfect.
Simple fried potatoes and a saute of radicchio and spinach with a drizzle of fig balsamic finished the plate.
I now want to make this with the right fish just to see how it comes out, so... stay tuned...
Involtini di Sogliola al Limone
- 1⁄2 cup bread crumbs
- 1/2 cup grated grana padano cheese
- 1/4 cup chopped Italian parsley
- 2 lemons - 1 zested and juiced, 1 thinly sliced
- 2 tsp dried oregano
- 6 tbsp olive oil
- 2 tbsp butter
- 1 cup dry white wine
- 6 skinless fillets of sole - about 1 1/2 lbs
- 2 tbsp capers, drained
Preheat oven to 350°F.
Toss together the breadcrumbs, grated cheese, parsley, lemon zest, and oregano in a bowl. Drizzle with 4 tablespoons of the olive oil, and toss until the crumbs are evenly coated with the oil.
Coat the bottom of a 9-by-13- inch Pyrex baking dish with the softened butter. Arrange the lemon slices in one layer on the bottom of the baking dish. Pour in the lemon juice and white wine. Lay the fish on your work surface, and press the crumbs into the top of the fish.
Starting with the short side, roll each fillet up with crumbs on the inside, and secure closed with toothpicks. Arrange the fish in the baking dish, and scatter capers in the open spaces. Sprinkle any leftover crumbs over the fish, and drizzle with the remaining 2 tablespoons olive oil.
Place the baking dish on the bottom rack of the oven, and bake until the fish is just cooked through, about 20 minutes.
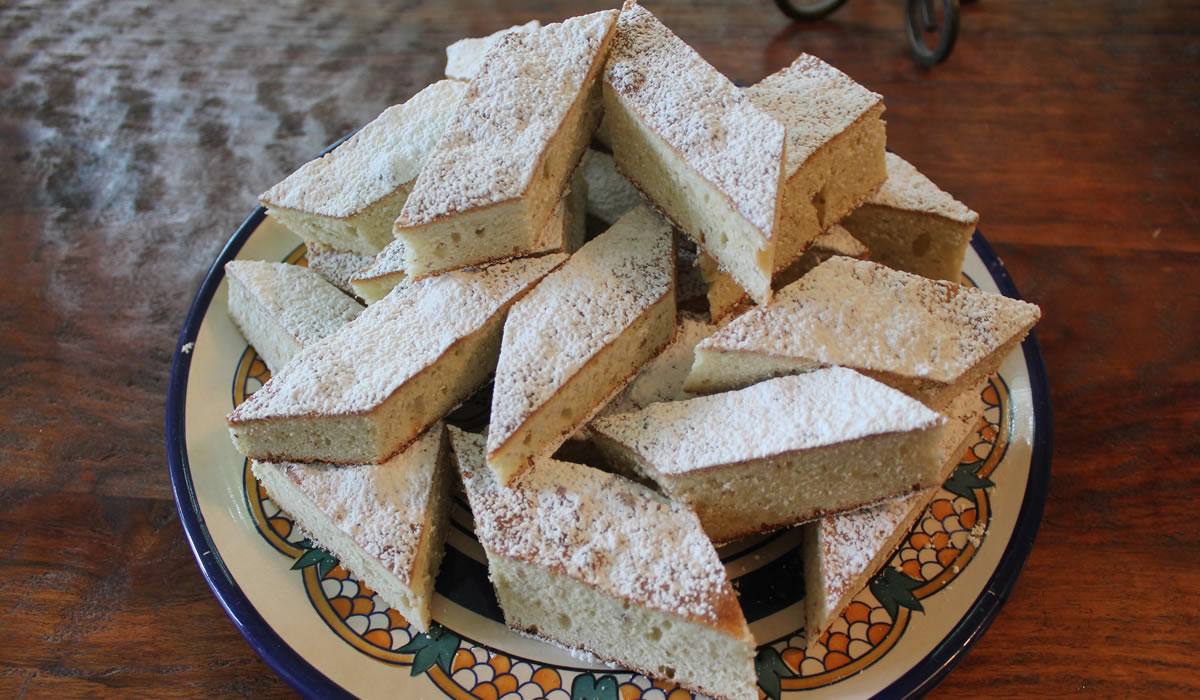
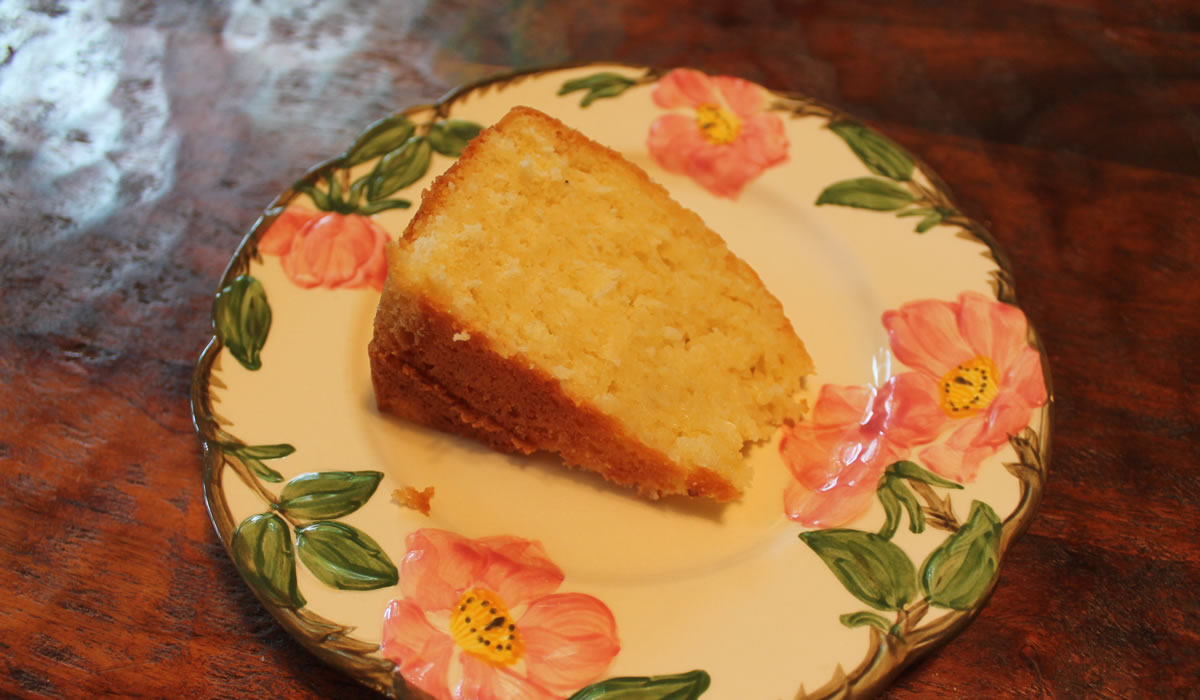
Ricetta Maiorchino
Since the demise of the English version of La Cucina Italiana, I've had to make due with the Italian version via email. A couple of times a week I get an email with recipes and other food information - all in Italian.
If you've ever used Google Translate, you know how kludgy it can be. Translating recipes brings it to a whole new level. If you didn't have a basic understanding of cooking to begin with, you'd probably really be up a creek without a spatula.
But... I know my way around a kitchen and have a scale that I can use to measure out grams instead of cups or ounces. And I'm married to an Italian so certain things just come to me through osmosis.
Which brings us to tonight's ultime ricette - Maiorchino - which translates to "Majorcan." Majorca is certainly not Italian, but they do use lots of almonds, so I'm guessing that's where the name comes from. And while sitting here, I figured I might do a bit of research, and found a similar cake in Majorca called Coca de Cuarto - that just doesn't translate, right. But it does appear that it's at least based upon a Majorcan recipe.
All this for a piece of cake!
The La Cucina Italiana picture is what got me to look at the recipe in the first place:
Heck, ya look at that and immediately want to make it! So I did...

It was really easy - made a huge cake - and half of it went into the freezer because I know we'll never be able to eat it all before it goes stale.
Here's the Google-Translated recipe straight from the Google-Translated web page:
Ricetta Maiorchino
For the Majorcan recipe, mix the flour and granulated sugar with the eggs, the chopped almonds and a pinch of salt. Cover a baking sheet with parchment paper and imburratela (butter it).
Roll out the dough in the baking pan and bake at 200 ° C for 25 '. Sfornate (remove from the oven) the Mallorcan, let cool, cut into slices and sprinkle with powdered sugar.
It's on the dry side, not too sweet, and the perfect after dinner - or afternoon snack.
Now... time for me to look up a few more ricette!
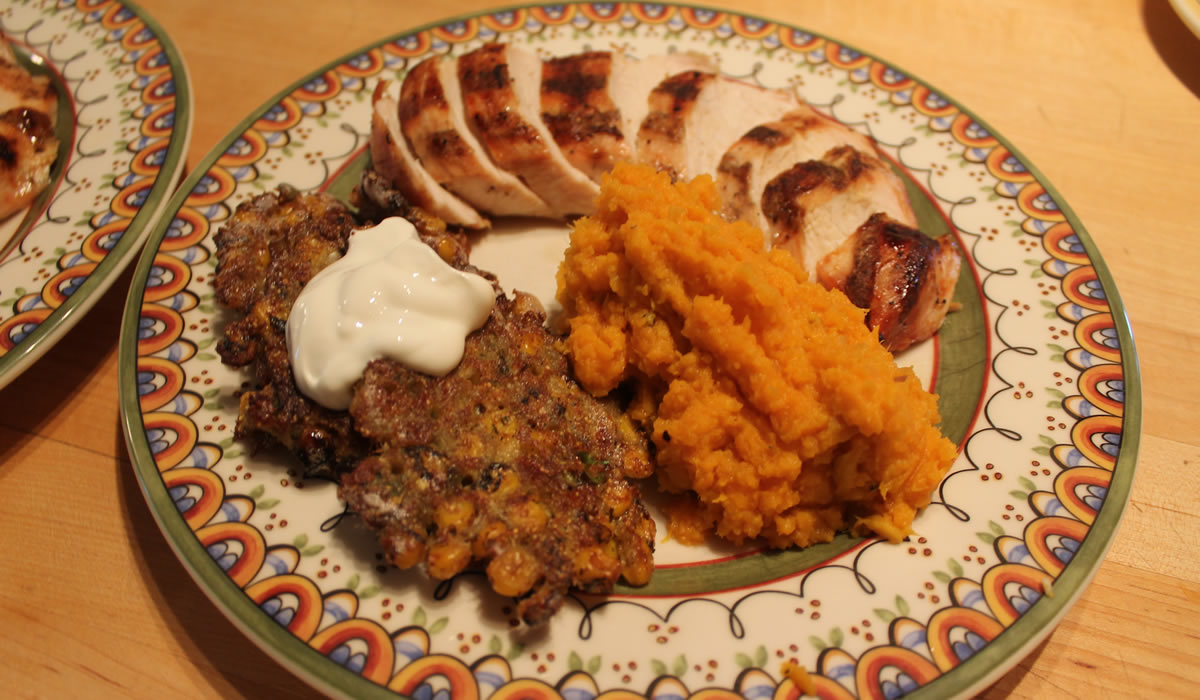
Corn Cakes
Cooking Light arrived the other day with a recipe for Corn Cakes with Bacon and Turmeric Yogurt. It sounded like something I needed to try.
Naturally, I couldn't just follow the recipe as written - I wasn't up to cutting corn off the cob, for one, and didn't feel like dicing a yellow squash - but the bacon and green onion part sounded good. Especially good with Mexican Style Roasted Corn with Cotija Cheese.
Yeah, I cheated big-time.
The end result was pretty good, though - and the future corn cake possibilities are pretty endless. I didn't go for the turmeric yogurt sauce, either. A dollop of sour cream worked just fine. The lazyman's guide to fine cooking...
Corn Cakes
- 3 strips bacon, chopped and fried
- 1 bag Mexican Style Roasted Corn with Cotija Cheese
- 3 green onions, chopped
- 1/4 cup cornmeal
- 3 eggs
- S&P
Cook bacon. Add corn to pan and heat until sauce is mixed in. Let cool.
Stir in cheese packet, green onions, and cornmeal. Add eggs and S&P to taste.
Drop by scoops into skillet and cook about 2 minutes per side.
I fried them in a goodly amount of oil, but probably could have done them in a non-stick skillet with just a hint of oil and gotten a better look. However, they really did come out good - and there's lots of possibilities with this - any diced veggies from the garden will work, for sure.
Have fun with it!
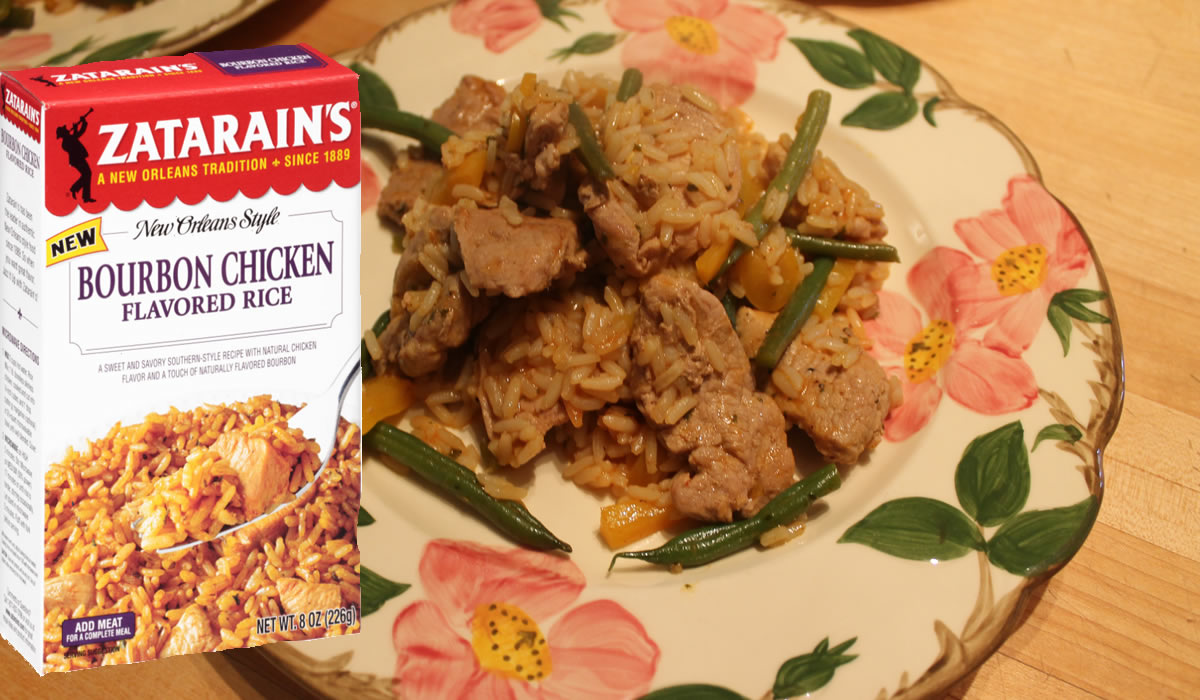
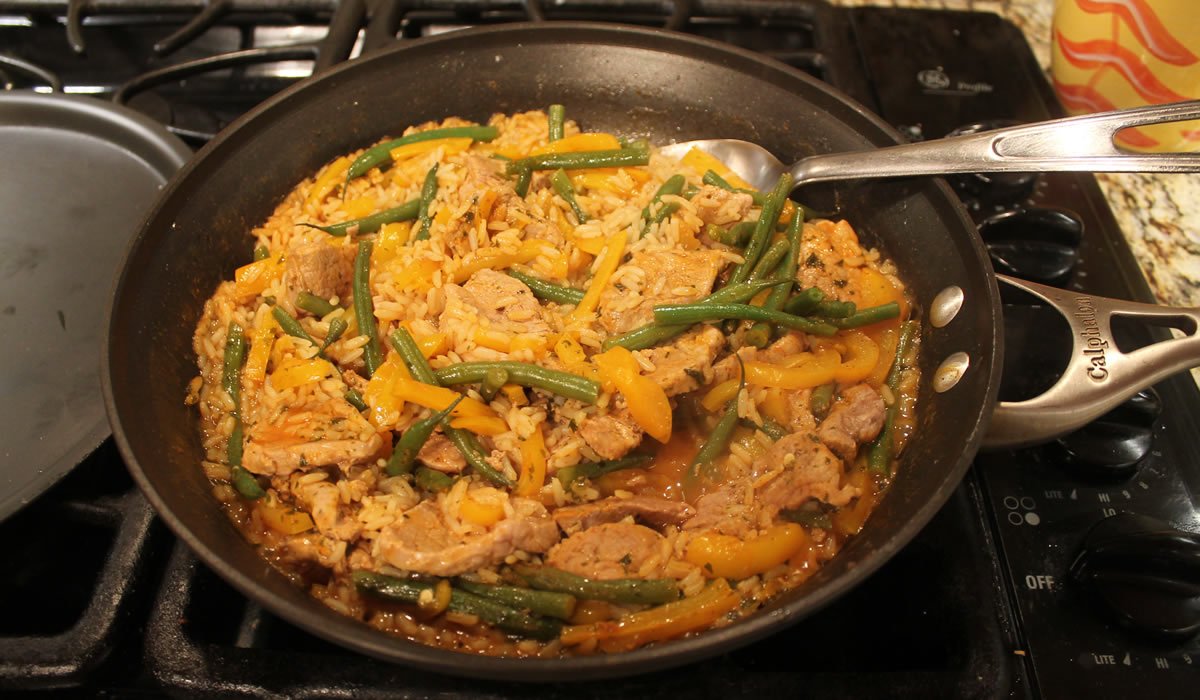
Zatarain's
I grew up with Rice-A-Roni. Never-ever bought Zatarain's rice. And an impulse-buy at the grocery store turned into dinner, tonight. I'm not sure I'll be stocking the larder with the stuff, but it made for an okay meal.
Okay, as in okay.
My main reason for not buying things like this in the first place is they're so easy to just make. I do whatever-and-rice dishes on the stove all the time. Usually they're of the clean-out-the-refrigerator variety and the herbs and spices are picked to match whatever it is I'm trying to get rid of - gourmet cooking at it's finest.
Tonight, it was green beans and a yellow pepper that needed eating. I had taken a pork tenderloin out of the freezer on Saturday, but Victor cooked the Bucatini with Clam Sauce and the Focaccia, so that wa on the list of things that needed using up, as well.
I read the ingredients - I'm not a purist-purist. There are a few things I just won't buy - ever - but I'll grab a box of something every now and again. I got down the list and found "whiskey solids (contains barley & rye gluten)." Do I really want to know what whisky solids" are?!?
Nah... I'll pass on that one. And since it's so far down the list - ingredients are listed by weight - I'll let my natural defenses filter it out of me...
I think my only real complaint about it was there wasn't a lot of flavor. It was okay, but I guess I was expecting more from the commercials I've seen. Not bad, just not great.
I have a box of another flavor in the cupboard. I'll give it a try one of these days...
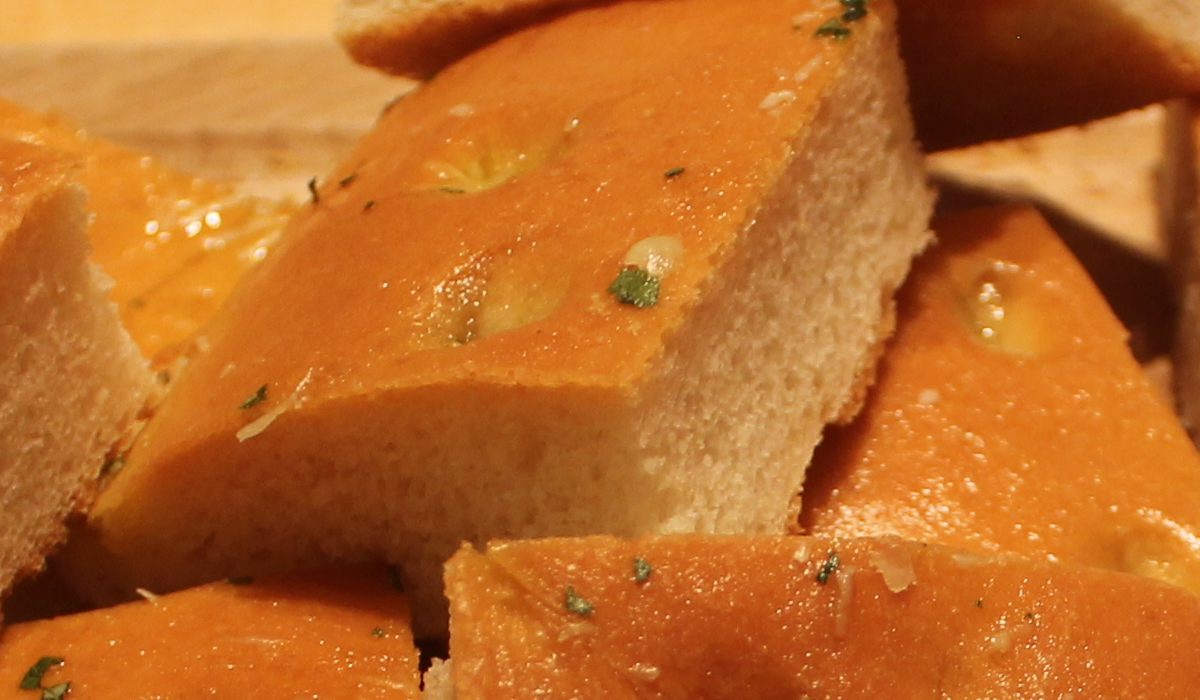
Focaccia Genovese
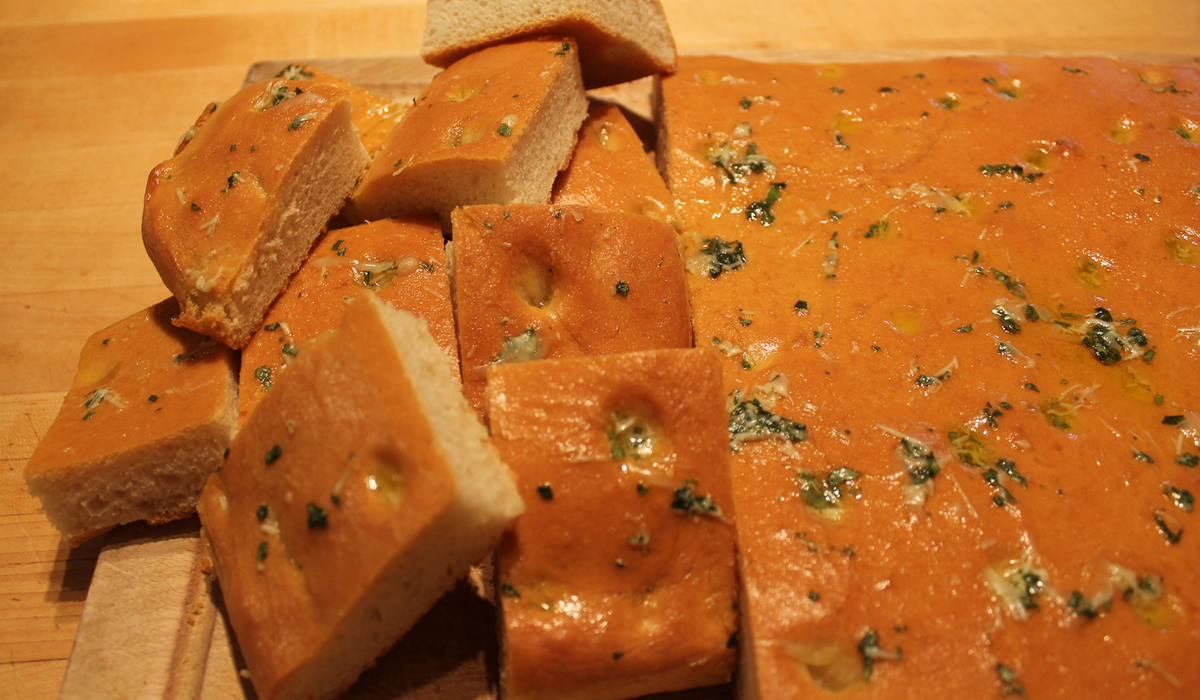
While I was working, Saturday, Victor was cooking - shades of what retirement is going to be like in a couple of weeks! We're both looking forward to this. As much as I like to cook, it will be nice not having that "5 o'clock" deadline looming when I get home.
When I walked in, the first thing I smelled was baking bread. There are not a lot of scents out there that can top that one - especially since it included fresh basil... This is not a bad way to start the weekend unwind...
The recipe comes from one of our many Lidia Bastianich cook books - Lidia’s Commonsense Italian Cooking. They're excellent cook books.
Focaccia Genovese
adapted from Lidia's Commonsense Italian Cooking.
For the focaccia:
- 1 pkt yeast
- 1 tsp sugar
- 6 tbsp olive oil
- 6 cups flour
- 2 tsp kosher salt
For the topping:
- 3 tbsp olive oil
- 1/2 cup chopped basil
- 3 tbsp grana padano, grated
Dissolve the yeast and sugar in ½ cup warm water (90 to 110 degrees F). Let the mixture sit a few minutes, until the yeast is bubbly.
Put the proofed yeast in a mixer fitted with the dough hook attachment. Pour in another 1½ cups warm water and 2 tablespoons olive oil. Add the flour, holding back about ½ cup of the total measured amount. Add the salt. Mix on low speed to combine into a wet dough. If the dough is still dry or seems tight, add up to ½ cup more warm water, a little at a time. If it seems too wet, add up to the remaining ½ cup flour, a little at a time. Knead the dough on medium speed until it is soft and springy and leaves the sides of the bowl clean, about 3 to 4 minutes.
Dump the dough on a floured counter, and knead a few times by hand to bring together into a ball. Oil a large bowl, and toss the dough to coat. Cover, and let rise until doubled in size, about
1 to 1½ hours, depending on the temperature of your room.
Punch down the dough. Oil a half sheet pan with olive oil, and dump the dough into the sheet pan. Press with your fingers to fit dough to the edges of the pan. Let rise another 30 minutes, uncovered. Preheat oven to 400 degrees F. Once the dough has risen, gently press indentations in the dough with your fingertips, about 1 inch apart. Bake until set, about 10 to 15 minutes, pull out of oven, and brush with 1 tablespoon olive oil. Finish baking until the focaccia is golden brown on the top and bottom, about 25 minutes in all.
While the dough finishes baking, in a bowl stir together the basil, grated cheese, and the remaining olive oil. As soon as you remove focaccia from oven, spread with the basil mixture.
Crispy exterior, light interior - the perfect bread. I made grilled cheese sandwiches with it for lunch, today.
I'm going to have fun getting used to this...
Oh... and dinner?!?
Bucatini with Clam Sauce.
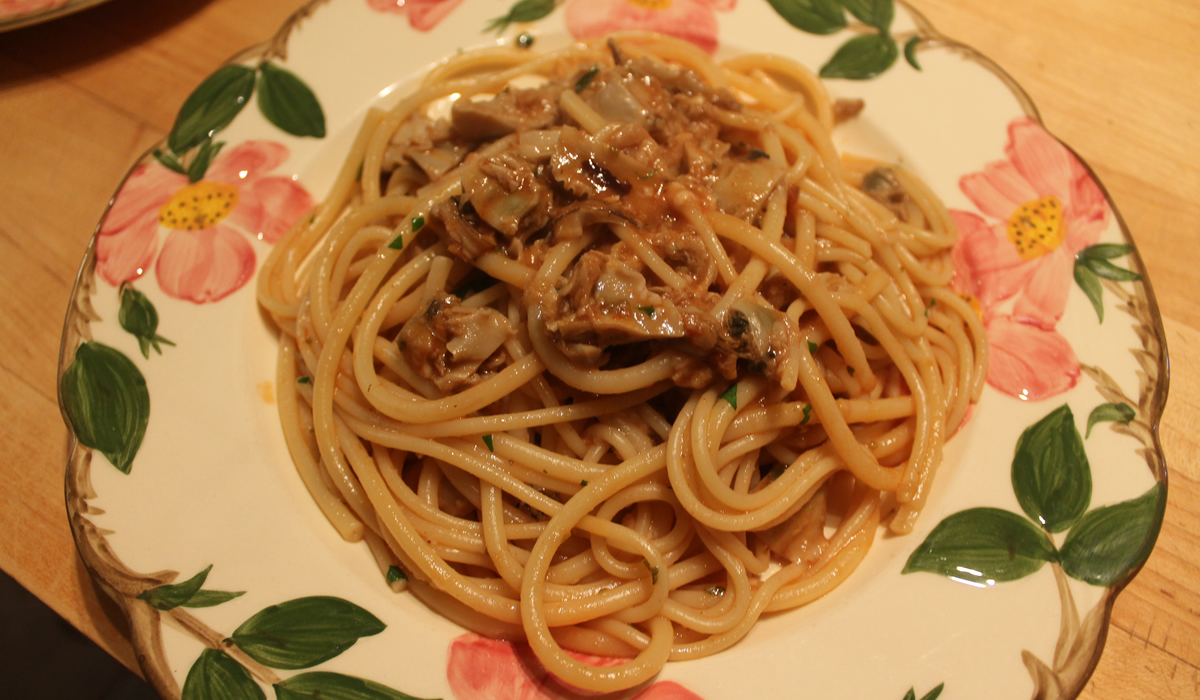
Yeah... I'm spoiled...
Lemon Coconut Cake
Nonna's Birthday Cake.
She no longer likes chocolate - go figure - but still really like coconut, so here we go!
Lemon Coconut Cake
- 10 tbsp unsalted butter, softened
- 2 cups all-purpose flour
- 2 tsp baking powder
- 1 tsp kosher salt
- 1/4 tsp baking soda
- 1 cup shredded coconut
- 1 tbsp lemon zest
- 1 1/4 cups sugar
- 2 large eggs
- 3 tbsp fresh lemon juice
- 1 cup plain yogurt
Preheat the oven to 350°F.
Butter and flour a 10" tube pan.
Mix the flour, baking powder, salt, and baking soda into a large bowl. Stir in the coconut and lemon zest.
Cream butter and 1 cup of the sugar until pale. Whisk in the eggs one at a time. Whisk in 1 tablespoon of the lemon juice. Add half of the flour mixture and mix until incorporated. Add the yogurt and mix briefly on low speed until incorporated. Add the remaining flour mixture and mix on medium speed until the batter is smooth.
Scrape into the prepared pan and bake until a skewer inserted in the center comes out clean, 55 to 65 minutes.
For glaze:
Combine 1/44 cup sugar with 1/4 cup water in a small saucepan. Bring to a boil and stir until the sugar dissolves. Boil one minute. Remove from heat and add the remaining 2 tablespoons lemon juice.
Place the cake pan on a rack. Poke all over with a skewer and pour syrup over.
Cool and serve.
This is a really simple and really tender cake. Have fun with it!

Manicotti
It's Nonna's Birthday. There's not a lot you can get a 91 year old for her birthday. It's not like she's wearing out things at this stage of her life - and there's really not a lot of things she needs. So how do you celebrate a birthday? With a special dinner!
The criterion for a Nonna Dinner is pretty simple - Italian and soft. I figured homemade manicotti would met both - and it did.
I made everything last night so all I had to do was sauce it and get it into the oven when I got home.
I followed Lidia's recipe for crespelle - the manicotti wrappers.
Manicotti
Crespelle:
- 4 large eggs
- 1/4 teaspoon kosher salt
- 1 to 1 1/4 cup water
- 2 cups all-purpose flour
Place the flour in a large mixing bowl. Crack the eggs over the flour and whisk them in. Add salt and whisk in water until smooth.
Heat your pan until hot and brush with melted butter.
Pour 1/4 cup batter into the pan and swirl to completely coat. Cook until pale golden and crespelle is dry on top.
Place on plate and continue until all the batter has been used.
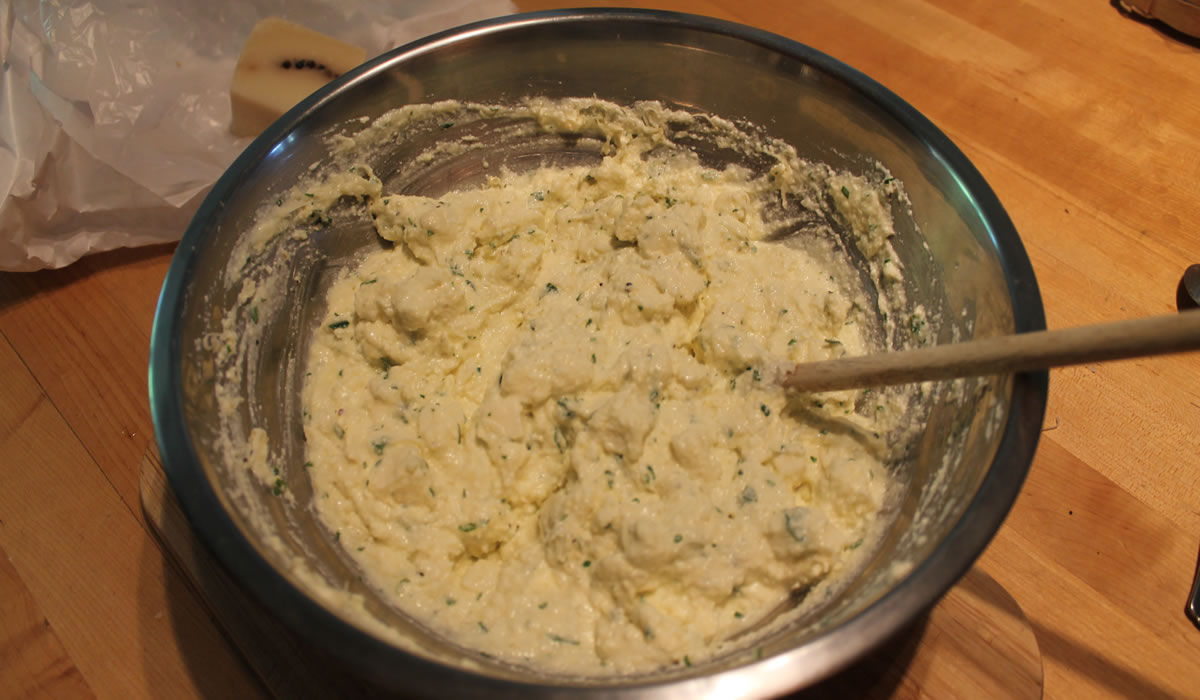
The filling I just winged...
- 1 16 oz carton whole-milk ricotta cheese
- 2 large eggs
- 8 oz cubed mozzarella
- 1 cup Pepato cheese, shredded
- 1/4 cup chopped fresh Italian parsley
- S&P
Mix all ingredients together.
Place crespelle on counter, place about 1/2 cup filling. Roll and place seam-side down in baking dish.
Cover with a simple marinara sauce, cover dish, and bake about 30 minutes at 375°F. Uncover, top with additional cheese, and bake an additional 15 or so minutes.


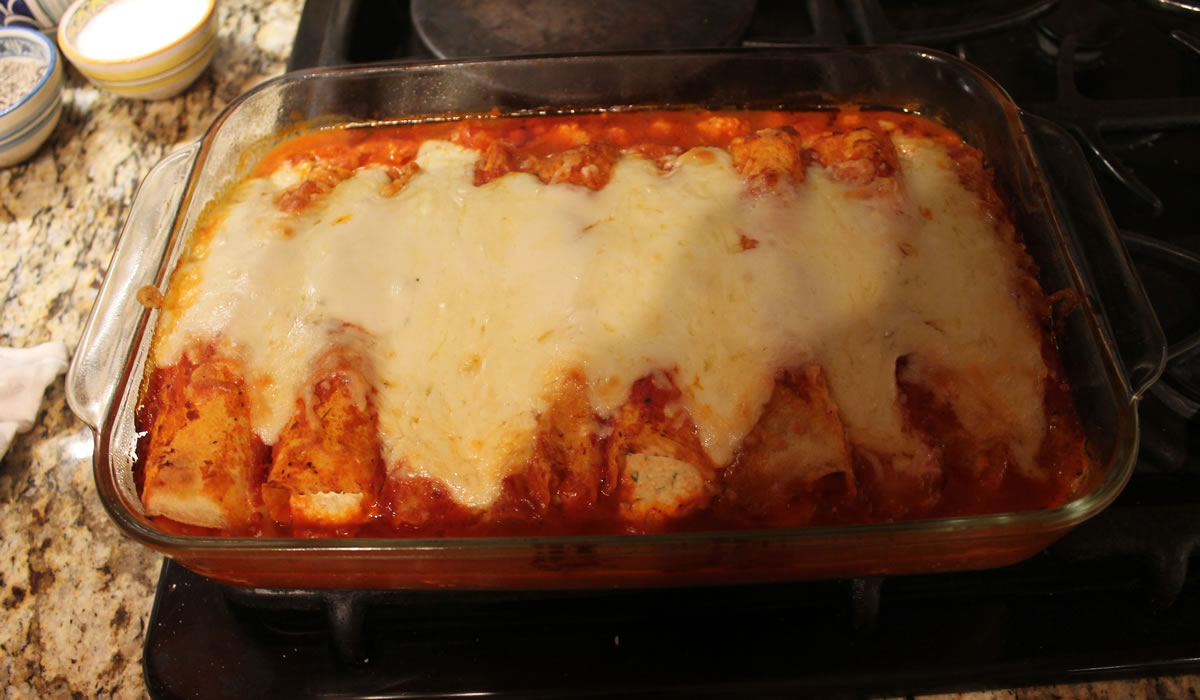
Nonna loved it. She ate every bite and almost licked her plate.
They really did come out good - I was a bit nervous because the crespelle seemed thicker than the last time I made them, but they absorbed the sauce and were hearty without being heavy. Definitely good.
Victor made cheesy garlic bread to go along with it and Nonna immediately had a piece of Lemon Coconut Cake.
It was a good birthday!
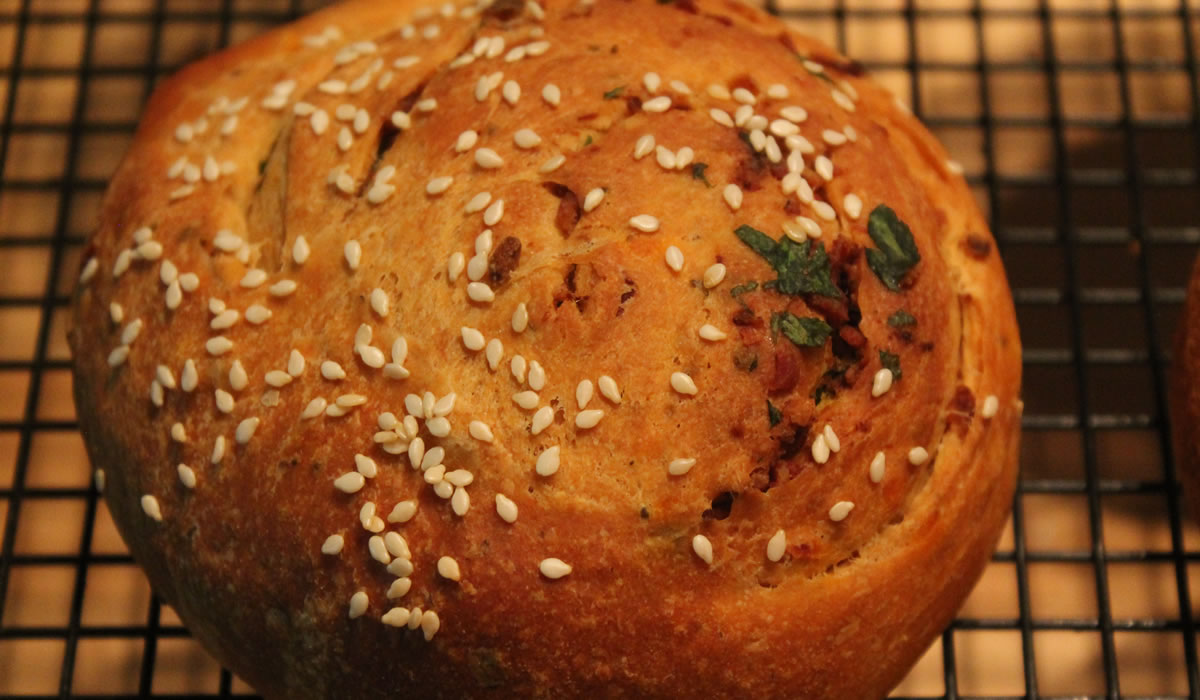
Bacon and Tomato Swirl
It's a bit rainy and cold out, today - perfect for some homemade soup and bread!
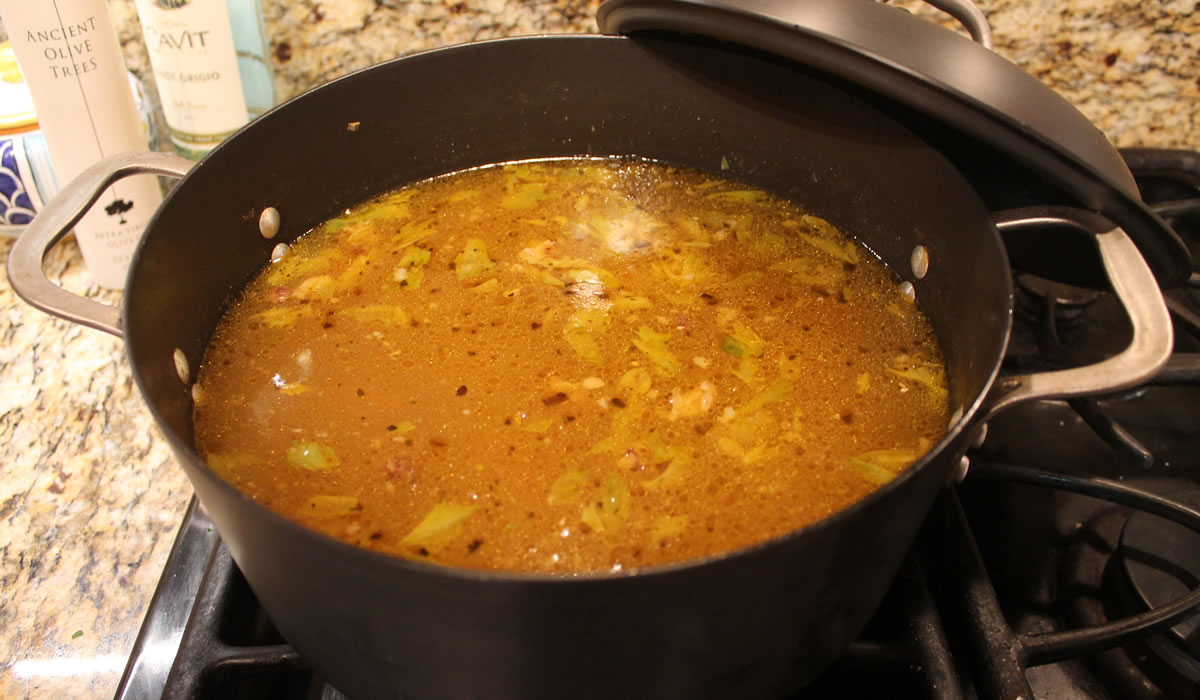
We had our Easter ham bone in the freezer, so I pulled it out and Victor made Bean Soup. While he busied himself with that, I made bread.
It's rather fun what one can create with a bone and some water. Add heat, some vegetables, some legumes - and dinner is served!
It's really the same thing with bread. Some flour, some yeast, and a bit of imagination brings everything together.
The recipe for the bread comes from my Mom's Cook Book. It was something she cut out of a newspaper 50 or so years ago and, while I'm not sure if she ever made it while I was at home, it's definitely one of those recipes she would have embellished. I can see her adding cheese and all sorts of things to it.
Today, however, I played it straight. So to speak.
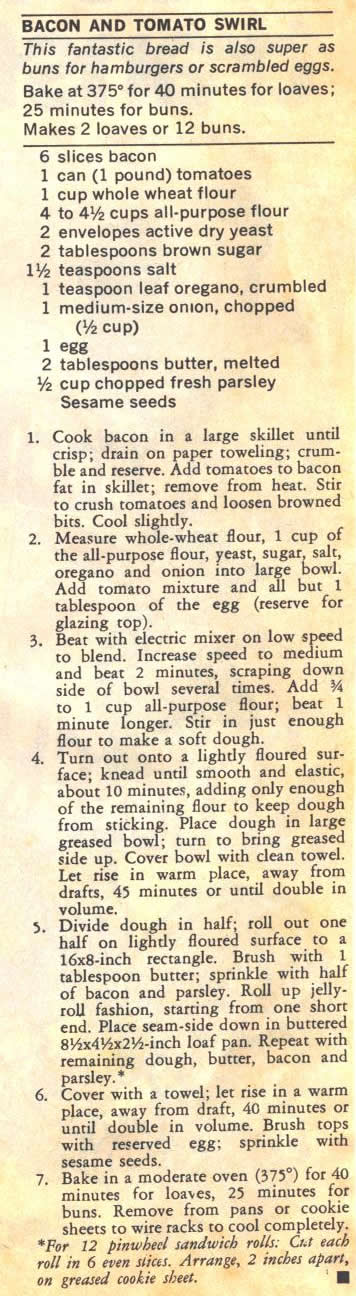
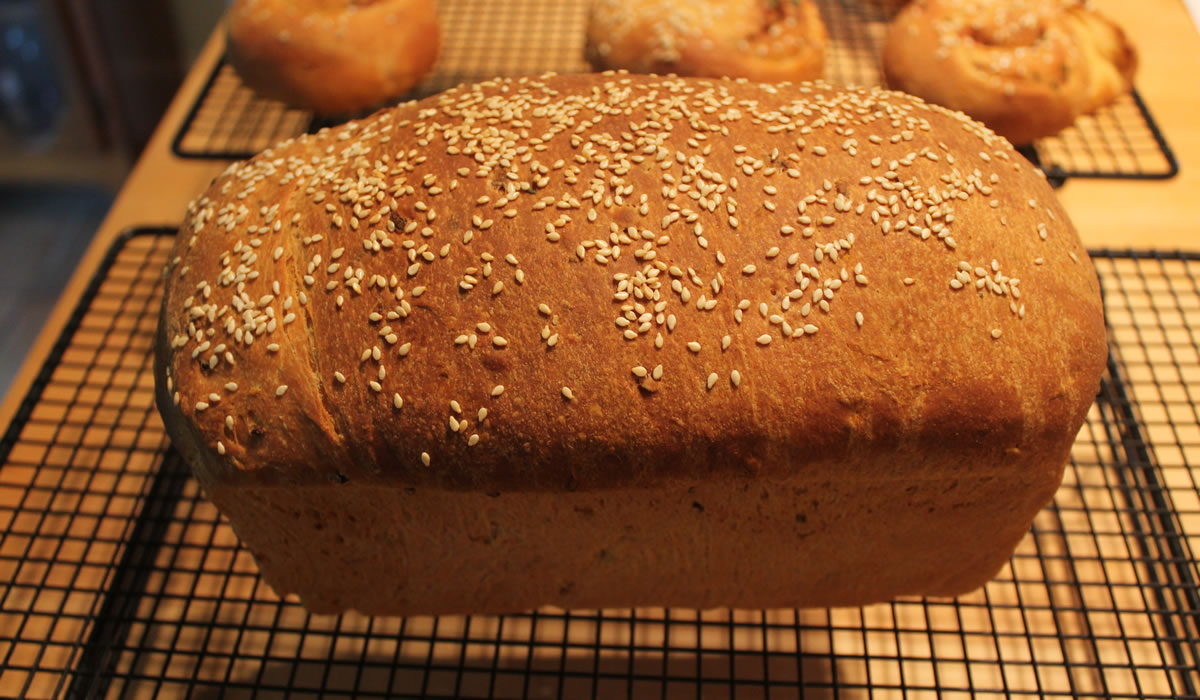
I followed the recipe as written - and made one loaf of bread and six rolls. This is where those double ovens really come into play - the loaf up top for 40 minutes and the rolls down below for 25.
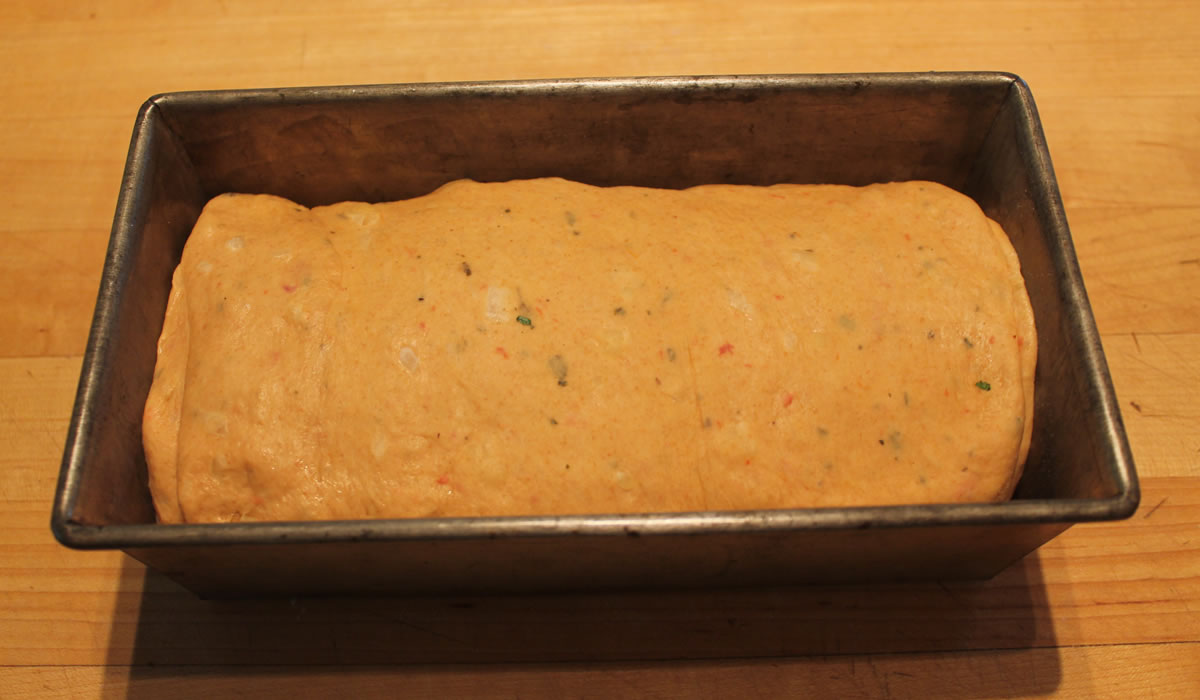
This was the first one I rolled out - for the bread loaf.

It went right into the pan...
Proofed...
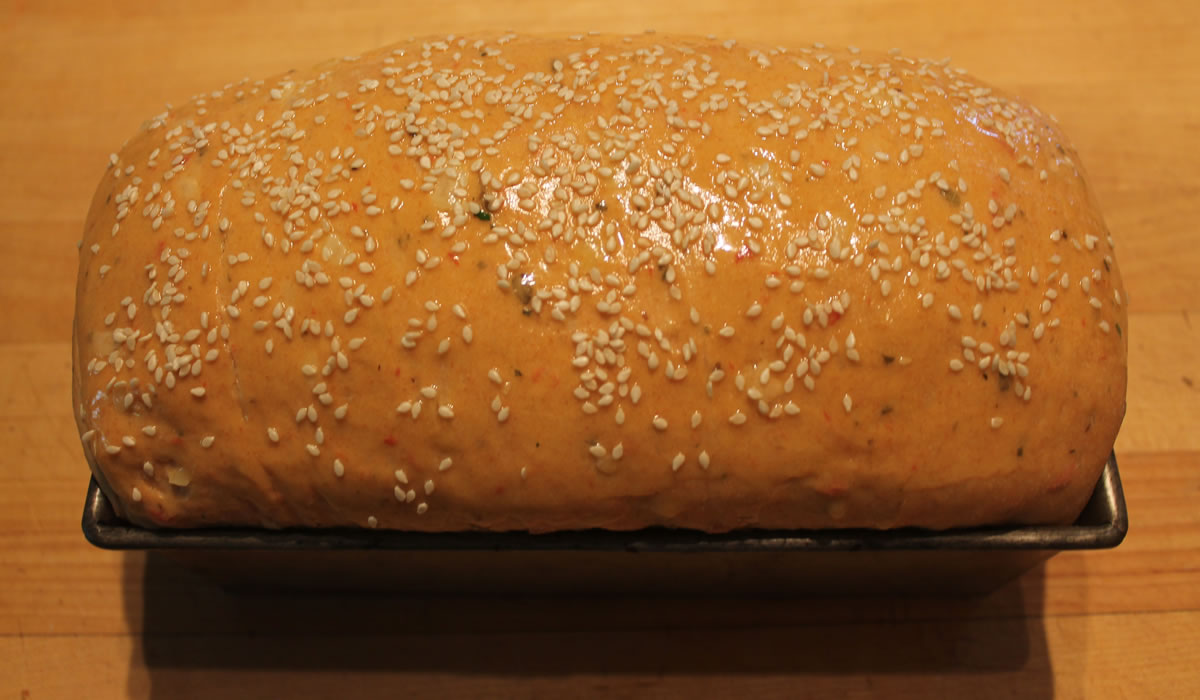
And came out perfect!
Same with the rolls... Rolled and formed...

Proofed...
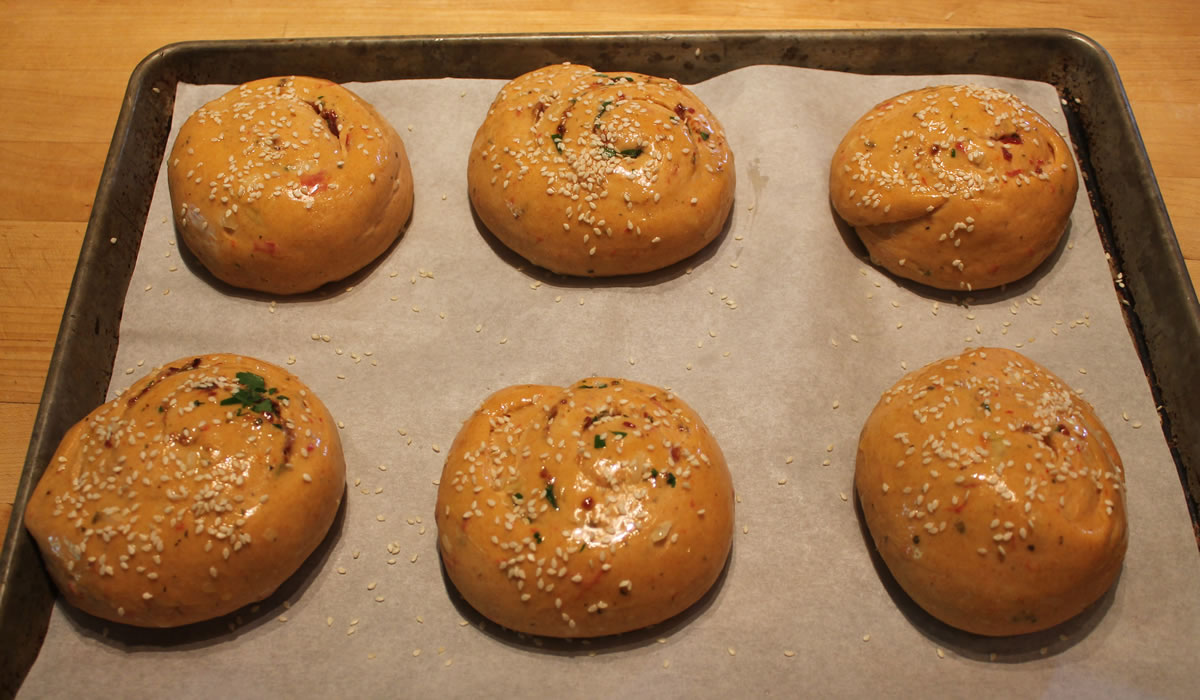
And baked to perfection!

Really easy to pull together and we're set with bread for the next few days.
I'm thinking that maybe we should have burgers for dinner tomorrow night.....