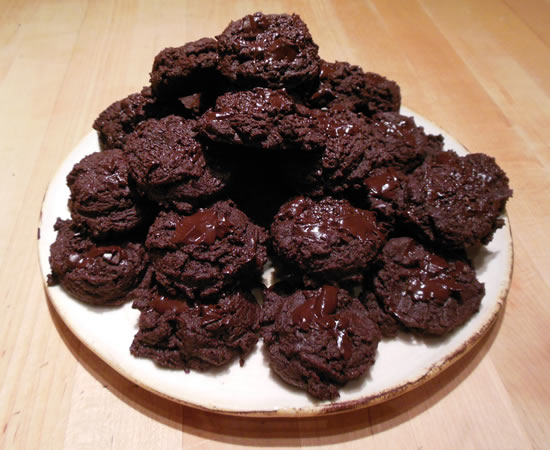
Chocolate Cookies
I was really in the mood for cookies, tonight.
I suppose I'm always in the mood for cookies - which is why I make them and don't buy them. We try to keep the instant gratification foods to a minimum around the house. If we want a treat, we have to make it. It's not like either of us can't have a batch of cookies out of the oven in 20 minutes or less, but it's still more effort than going to the cupboard and getting down the box. Treats take a modicum of planning.
My first thought was a basic chocolate chip - I can make those in my sleep - but as I was starting to pull ingredients together, I remembered a double chocolate cookie that starts off with a pound of melted chocolate. And I just happened to have a pound of chocolate waiting to be melted!
The joys of a well-stocked larder...
All I needed to do was find the recipe - which I did in a matter of minutes.
I'm glad I found the recipe. These are some fine cookies! Much more cake-like and really really chocolaty. They're light, fudgy, and and intense - all at the same time! I ate four of them - and then went back for one more!
As with all things, the better the ingredients, the better the end result. I used a really good 72% dark chocolate. I wouldn't waste my time melting chocolate chips...
These would handle crushed peppermint candy really well. I may have to think about making a batch at Christmas...
Double Chocolate Cookies
- 1 1/4 cups all-purpose flour
- 2 tbsp cocoa powder
- 1 tsp baking powder
- 1/2 tsp salt
- 1 pound good-quality dark chocolate
- 1 stick butter
- 1/2 cup sugar
- 3 large eggs
Preheat oven to 350°.
Line cookie sheets with parchmant paper.
Mix together flour, cocoa, baking powder, and salt.
Coarsely chop chocolate. Melt together 3/4 of the chocolate and 1 cube of butter in medium bowl - in double boiler or microwave. Stir in sugar.
Stir in eggs 1 at a time and then add flour mixture until just combined.
Chill dough about 20 minutes.
Use a 1 tbsp scoop and dish out cookies about 1" apart. Bake in middle of oven about 8 minutes.
Cool cookies on sheet pan about 5 minutes and then place on rack to cook completely. Makes about 42 cookies.
Yeah... I definitely see more of these in our future...
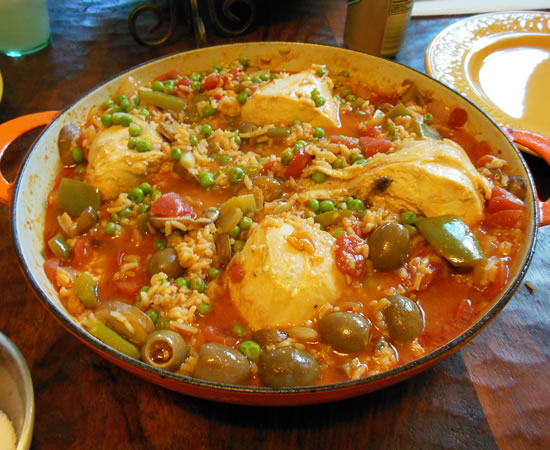
Arroz con Pollo
Look what you can do with one cup of rice and two chicken breasts!
I feel like I've been in a bit of a cooking rut, lately, so I started looking through the bazillion pictures of food I've taken since starting this 8+ years ago. I have them nicely set up by year - folders for blog post pictures and folders for all the things that didn't make the cut. I usually take two or three pictures of a dish and then choose the best one. The others go into the archive folder because you just never know when you're going to need a high-resolution picture of a plate of tortellini... I'm a digital pack rat.
I saw a picture for a rice dish from several years ago and it got me thinking of an arroz con pollo. Rice with chicken. It's scary how my mind associates things, sometimes...
One-pot rice dishes are great. With a few tweaks of herbs and spices, they can take on just about any ethnicity. I leaned towards Spain, tonight.
Arroz con Pollo
- 2 bone-in chicken breasts
- 1 large onion, chopped
- 1 bell pepper, chopped
- 4 oz mushrooms, sliced
- 2 garlic cloves, minced
- 2 teaspoons paprika
- 1 cup long-grain rice
- 1 (14-oz) can diced tomatoes in juice
- 2 cups chicken broth
- big pinch saffron threads
- 1 cup peas
- 12 large stuuffed green olives
- S&P to taste
Brown chicken in large skillet. Remove chicken and set aside.
Add onion, bell pepper, and mushrooms. Cook, stirring, until softened, about 5 minutes. Add garlic, paprika, and rice, then cook, stirring, 1 minute. Add broth and tomatoes with juice, and saffron. Bring to a boil
Nestle chicken in rice and cover.
Reduce heat and cook until chicken is cooked through, rice is tender, and most of liquid is absorbed, about 25 minutes. Stir once or twice to prevent rice from sticking on the bottom and to let it cook more evenly.
Stir in peas, olives, and salt and pepper to taste, and cook another 5 or so minutes.
It's probably not the most authentic recipe out there, but it did the trick, tonight. Nonna even asked for more rice - something she rarely does. Of course, she didn't want the olives or mushrooms, but that left more for us.
I didn't use any hot peppers or add any heat which was a nice change of pace. And I'm sure it would be really good with bone-in chicken thighs...
Time to look through more pictures. We have another dinner coming up, tomorrow. And another after that...

Washing Chicken
The other day, NPR came out with a story entitled Julia Child Was Wrong: Don't Wash Your Raw Chicken, Folks.
I have to say that the story irritated the hell out of me. Not because it maligned Julia Child - who knew a bit about cooking - but because of the whole tone of the article. The basic premise of the story was if you wash your chicken, you're going to contaminate yourself and the surrounding area - up to three feet away, some studies suggest - and it then states that salmonella and Campylobacter together are estimated to cause nearly 1.9 million cases of foodborne illness in the U.S. each year. They don't say how many of these cases are actually caused by someone rinsing their chicken, however. It's just a big number to make you think what they have to say is important.
After the Big Number, they offer a cute little video cartoon that shows chicken-slime-infested water splashing all over the kitchen. I wish I had that much water pressure in my house.
So since they threw out the almost 1.9 million number, let's look at some other numbers...
8 BILLION chickens are sold in the US each year. If every one of those nearly 1.9 million cases of foodborne illness were caused by washing your chicken, it would be a fairly insignificant 0.02375%. Since they are not, the number drops even more.
Focus-group surveys, conducted by New Mexico State University as part of a research project funded by the U.S. Department of Agriculture, suggest as many as 90 percent of people rinse their raw birds.
Ninety Percent.
That's a lot of chicken being rinsed and not a lot of illness. It's right up there with spraying fecal matter all over your toothbrush when you flush the toilet.
Because there may be some truth in something doesn't automatically make it an issue or a calamity.
My Main Gripe
My main gripe with the article wasn't that they were against rinsing chickens - something that 90% of people do - but that they didn't offer a better way to do it; that they didn't explain the problem is actually rinsing a chicken under a torrent of water, splashing water and potential contamination all over hell and creation - and not the act of rinsing, itself.
Supermarket chicken - where most of us buy it - is sealed in plastic that has to be cut away or otherwise opened, somehow. Since I keep a clean sink, the sink is the best place for me to open that package. I can contain the mess in a place with a drain. Chicken goes from package to pan or dish to marinate or season and cook. I'm not dragging dripping chicken all over the kitchen - it is always contained by sink, plate, pan, or board. A pretty simple concept.
The only chickens I ever rinse are whole birds. I usually rinse them not because of my fear of germs and bacteria, but because I want to get rid of whatever package juices that have accumulated. I want to start with as fresh a bird as possible. I don't have the luxury of having a butcher nearby where I can buy my chickens fresh - and dry - the day I want to cook one.
I rinse under slow-running water, place the bird on a wood cutting board, and dry inside and out with paper towels. And then I wash the cutting board and the sink.
Yes, I use wood cutting boards. And we have a butcher block island in the kitchen.
People are scared enough of food and cooking without giving them yet another reason to open a box instead of cooking something relatively healthy. If the goal is to cut down on foodborne illness, education is what is needed, not asinine video graphics and scare tactics.
It's really all about keeping things clean and using a bit of common sense.
And not being afraid.
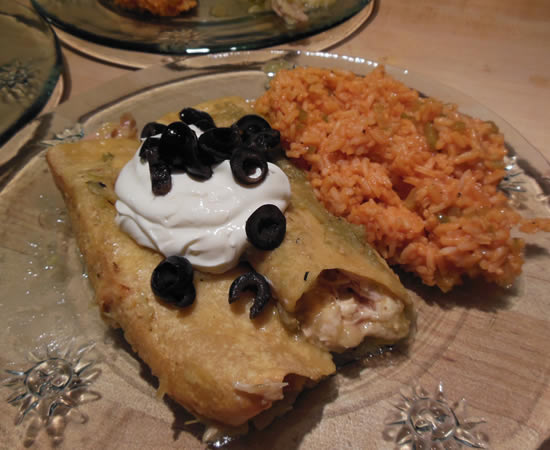
Chicken Enchiladas
They may not be much to look at, but dayum! these little suckers had some flavor!
I have made enchiladas almost as long as I have been able to reach the stove. They're just a part of growing up out west.
But one thing I have continually done is used too much sauce. Less Is More is a mantra I often don't follow. I know better. I do it, anyway.
So I started off this afternoon with a plan to make enchiladas with the leftover chicken from the last Beer Can Chicken I made the other night. I wanted a chile verde enchilada but only had one jar of sauce. I had a large can of red enchilada sauce, I had a jar of sofrito sauce. I wanted verde. I agonized. I opened cabinets, looked in the 'fridge, trying to see how I could stretch the lone jar. My kingdom for a tomatillo. Everything in the house was tomato-based. I decided to just go with the single jar and, if need be, add a bit of water to thin.
I made a filling of cooked chicken, a can of diced green chiles, and 3 kinds of cheese that I shredded - monterey jack, cheddar, and the rest of the mozzarella from last night. Waste not, want not, and all that. No other spices. I wanted a simple filling.
I poured a bit of sauce into my 9x13 pyrex baking dish and went to work, filling and rolling the tortillas. When they were finished, I poured the rest of the jar of sauce over. And it actually looked like enough sauce! I covered the enchiladas with parchment paper and then tightly covered it with foil - and placed it into a 350° oven for about 50 minutes. I almost always cover dishes with parchment paper before covering with foil. It's so much neater and none of those pesky foil-spots...
I actually buy parchment paper by the case from a restaurant supply house. I can get 1000 sheets of full-sized paper for about 40 bucks and it lasts me 4-5 years. The deal of the century.
But I digress...
The enchiladas came out perfect. They had the perfect amount of sauce, the tortillas were perfectly tender, the entire dish was perfectly tasty. Indelible proof that I don't need as much sauce as always think I do - and they're better with less.
The key will be remembering this the next time I make them!
While the enchiladas were bubbling away in the oven, I made a simple Spanish Rice. Nothing overly-fancy, just simple flavors to compliment the chile verde.
Spanish Rice
- 1/2 cup onion, chopped
- 1/2 cup bell pepepr, chopped
- 2 stalks celery, chopped
- 1 clove garlic, minced
- 1 cup white rice
- 1 can tomato sauce - 8oz
- 2 cups water
- 1/2 tsp cumin
- S&P to taste
Saute onion, pepper, and celery in a pat of butter unbtil wilted. Add garlic and cook another minute or so. Add cumin and cook until fragrant.
Add the rice, tomato saucxe, and water, along with a bit of S&P. Stir it all together and bring to a boil.
Cover, reduce heat to low, and simmer about 20 minutes.
Stir it well before serving.
Nonna cleaned her plate. Always a good sign.

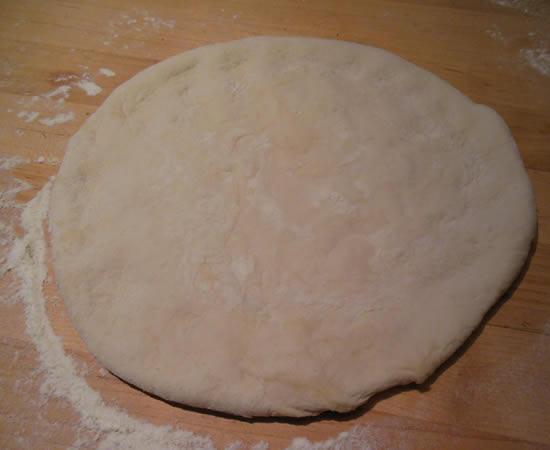
Pizza and Penne with Pesto
La Cucina Italiana has really become my favorite cooking magazine. I love the basic simplicity of the dishes. The recipes are straight-forward and you just know that they're going to come out as promised.
Case in point is the pizza dough recipe in the August 2012 issue. It's a slow-rise dough that takes 2 days to come together. And it uses Italian "00" flour. Just about any recipe you pick up will say you can substitute "all-purpose" flour. You can. But it doesn't taste as good.
Trust me on this one.
I made the dough yesterday and did the punch down early this morning so it would have another 8 hours in the 'fridge before I pulled it out, formed the balls, and let it rise.
Pizza
- 1 1/2 cups warm water (100º to 105º)
- 1/4 teaspoon active dry yeast
- 4 cups “00” flour or unbleached all-purpose flour plus more for dusting
- 2 teaspoons fine sea salt
- Extra-virgin olive oil for bowl
Sprinkle yeast over warm water in bowl of mixer fitted with dough hook. Let proof about 5 minutes.
Mix together flour and salt. Add to yeast mixture. Mix on low speed about 4 minutes or until dough forms a coarse ball. Stop mixer and cover bowl with a towel. Let dough rest about 5 minutes, then remove towel and continue mixing another 2 minutes or so.
Lightly oil a large bowl. Form dough into a ball, transfer to bowl and turn to lightly coat with oil. Cover bowl tightly with plastic wrap and let stand at room temperature 30 minutes, then refrigerate overnight.
Punch down dough, re-roll, and return to bowl. Tightly cover bowl with plastic wrap and refrigerate at least 4 hours or up to 24 hours.
Divide dough into 2 pieces; shape pieces into balls and place on a lightly floured work surface. Loosely cover with a damp kitchen towel and let rise at warm room temperature until doubled, about 2 hours.
Fresh Sauce
- 1/2 cup chopped onion
- 2 cups chopped tomatoes
- 1 clove garlic
- 1/2 cup loosely-packed assorted fresh herbs - basil, oregano, thyme
- salt and pepper, to taste
Place all ingredients in food processor and blend until fairly smooth.
Assemble
Heat pizza stone in oven for at least 45 minutes before assembling pies: Place pizza stone on rack in lower third of oven. Heat oven to 500º.
On a lightly floured work surface, press 1 dough ball with your fingers to begin to shape into a round. Use your hands to gently stretch dough to a 12-inch round. Drape over sides of hands and spin the dough repeatedly until stretched to desired size. Transfer dough to a well-floured peel; gently shake peel to make sure dough does not stick.
Working quickly, spread sauce over dough, leaving about a 1/2-inch border. Add cheese and sliced tomatoes. Sprinkle with fresh basil. Slide pizza onto pizza stone. Bake until crust is lightly golden, about 8 minutes.
Let sit about 3-4 minutes before slicing.
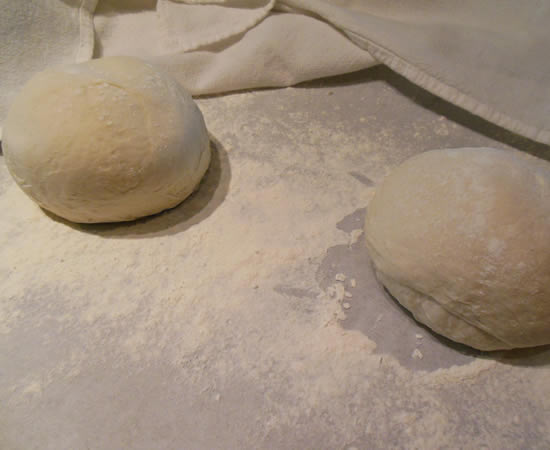
Roll the dough into balls and then let rise to double in size about 2 hours at room temperature.

I had them in the kitchen for an hour and then brought them outside in the 85° heat with high humidity for about 45 minutes. Mother Nature's Proofing Oven.
Start by using your fingertips to press the ball into a circle. Then with a combination of fingertips and the palm of your hand, press and pound it flat. At this point you can lay it across the side of your hands and with a bit of a motion with your fingers, spin the dough to let it stretch. It's a lot easier than it sounds. You want a goodly amount of flour around to keep it from sticking to anything.

Place it on a well-floured pizza peel and - working quickly - top the pizza and slide it into the oven.
Okay... I made hand-spun pizza for 6 years in my youth at Pirro's in San Francisco. I worked there while in high school and then after I went into the Navy while stationed in San Diego - my boss would pay my airfare on PSA to fly up and work weekends. I continued working there while stationed at Hunter's Point and Alameda. It was my first management position and I continued for another 2 years after I got out. I've made more than a few pizzas in my life.
Pizza is all about the dough - and I can make a good pizza dough - but this one took it just a step farther. We used a pizza blend flour back in the Pirro's days - both hard and soft wheats to give it stretch, texture, and bite. Something the home cook won't find at the grocery store. But more and more stores are carrying Italian "00" flour.
If you see it - get it.
And anyone can spin a pizza.
The second part of dinner tonight was Penne with Pesto.
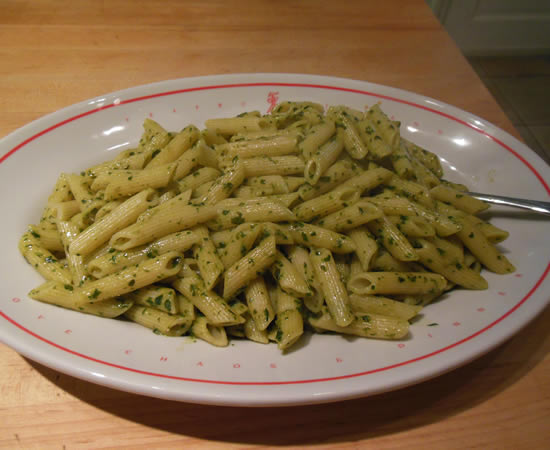
Victor made the pesto last month and we still have a bit of a stash in the freezer.
I have a ball of dough in the freezer and think the next pizza shall be a pesto variety.
Cooking is fun.
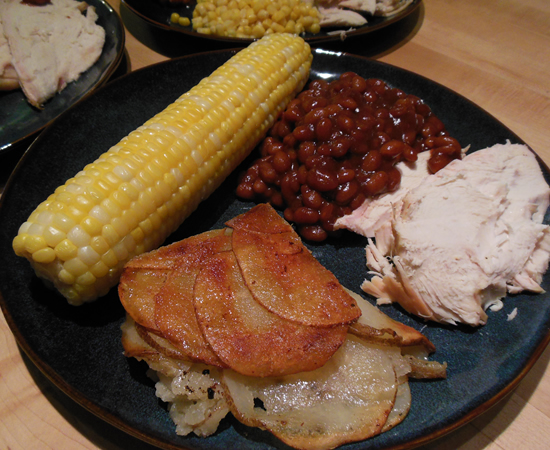
Another Beer Can Chicken
It is 73° outside. It's August 19th. In the Philadelphia suburbs. The average temperature is usually around 85° for this time of year. Hot and humid. It's very strange... But 73° is better than 85° - no matter what the reason. I have never liked the heat and humidity and I doubt I ever will.
I'm enjoying the cooler weather respite - it's supposed to head back to 90° by Wednesday - and it put me in the mood to do another beer can chicken! This may just be no-brainer simplicity at its finest. A chicken sitting on a beer on a grill. Done. It really does come out good. Moist, succulent chicken with a crispy skin that Victor loves. In most instances I'm not a skin-eater, so Victor and Cybil get to fight over it.
Non-GMO corn-on-the-cob boiled with salt, rolled in butter. Nothing fancy. The corn has been pretty good, so far. And Phoebe's Baked Beans. The only baked beans I make. I went a bit overboard with the chipotles. Nonna didn't eat hers - too hot. But I thought they were perfect.
The potatoes are another go-to-no-brainer. I thin-slice a potato on my mandoline, add a pat of butter to a small skillet, and then layer the slices around the pan. I drizzle a bit more butter over the top, sprinkle with salt and pepper, cover with a lid, and fry on low for about 30 minutes. The bottom gets nice and crunchy and the rest of the potatoes get buttery and creamy.
Yummers.
Tomorrow I am making pizza. I found a recipe in La Cucina Italiana magazine for a slow-rise pizza dough that looks pretty good. It uses Italian "00" flour - which I just happened to have. The dough is made and in the 'fridge for it's first overnight rise.
Yummers, again.
Feed A Cold...
The Dreaded Summer Cold.
It really is one of the worst (non-life-threatening) illnesses out there. Ya feel like crud, there's nothing you can take to make you actually feel better, you lose your sense of taste and smell... It is just no fun.
Mine has been lingering in the peripheral of life - just enough to feel headachy and out of sorts. It's hit Victor Full-Tilt-Boogie. Imagine hacking and coughing and mountains of Kleenex and you get the picture. I merely feel meh - he feels really rotten.
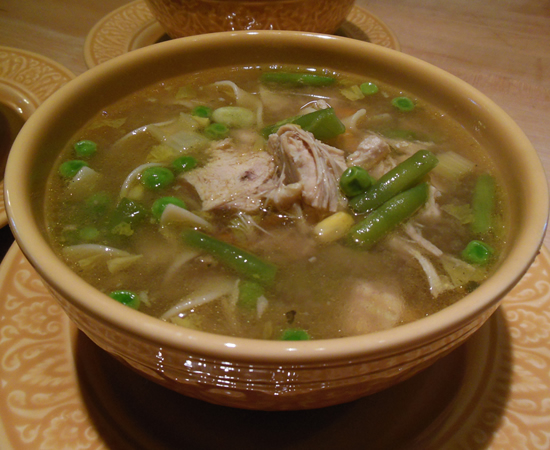
So we started the week with a thin-broth Chicken Soup. There are a score of studies out there that show the medicinal properties of chicken soup. It really is Jewish penicillin. It hasn't seemed to cure anything this time around, though, but I'm going to make another batch tonight.
I also made some Beer Bread because it's easy and can be on the table in an hour. The recipe is totally no-brainer and can be played with to your liking.

I used Guinness in this batch because it's what I had in the 'fridge.

Since man - or Nonna - cannot live by soup alone, I stayed with the chicken theme, but added a twist - pureed carrots and peach-pepper jam. Capsasin is also a miracle food. We had the carrot puree at my sister's house in Portland a few weeks back - under her famous crab cakes.

I grilled the chicken and topped it with the Peach-Pepper Jam.
For the carrot puree, I cooked carrots until they were really soft, and then blended them with salt, pepper, butter, and a bit of maple syrup. I saved a bit of the cooking water and used it to get the right consistency.I used my immersion blender but a regular blender will work just fine.
One of my favorite Lundgerg rice blends on the side...

Feeling the need for Comfort Food, I next made a beef pot pie with biscuit topping. And I used canned biscuits. Yes, it's true. I was sick. That's my story and I'm sticking to it.
And while they weren't horrible, there really is a reason why I make my own. Homemade really are better. The big secret to making a biscuit top is to make sure the filling is REALLY hot before putting the biscuits on and placing everything into the oven. If the filling is cold, the biscuit will burn before the bottom cooks. Ask me how I know.
I made a pretty basic beef stew - another item I really don't have a recipe for - put too much into the casserole, and it bubbled over everything. I did place it on a sheetpan in the oven, so I spared us the billowing clouds of smoke I'm famous for.
Still looking for Comfort Food, I next went for Tortellini with sauce made from fresh tomatoes out of our garden.

Victor made the sauce. It's pretty much just throwing tomatoes in a skillet with some onion, garlic, red wine, some grated cheese, salt, pepper, and fresh herbs from the garden. Hit it with an immersion blender.
One of the bigger mistakes a lot of people do is try and replicate jarred sauces or flavors from packaged foods. Food manufactures are chemists who manipulate foods, ingredients, enhancers - you name it - to trick the brain into thinking it's good. Even All-Natural-Organic foods can contain ingredients like carrageenan that create an otherwise unnatural creaminess. It's like the biscuits I used. The ingredient list was a mile long - and they're "all-natural."
Real food tastes like real food. It's okay if your sauce doesn't taste like Ragu. in fact, it's better if it doesn't!
In the meantime, I'm off to make another pot of soup.
Peach Pepper Jam
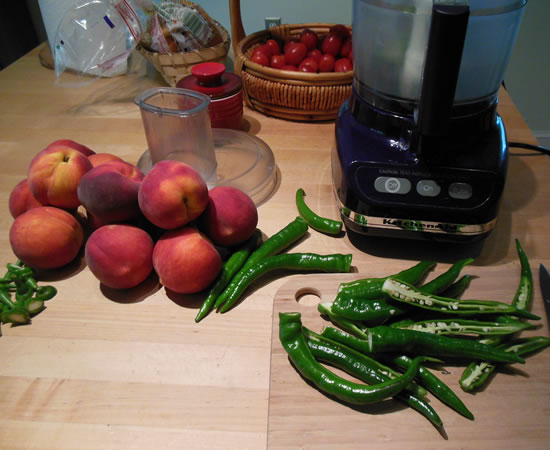
I had peaches. I had fresh peppers from the garden. I had canning jars. Time to make some jam.
Every summer when peach season hits its peak, I think of my sister, Arlene, and the peach orchard she used to live on. It was peach-everything back in those days. Pies, cobblers, salsa... just eating them out-of-hand with juice running down your arm. Good times, indeed.
Fast-forward to today, and I have 4 pounds of pretty awesome California peaches and a dozen or so long hot peppers that are just waiting to be chopped and boiled and placed into sterile jars.
I don't have any fancy canning equipment, so I stick with high-acid items and the basic water bath. Maybe one day I'll get a pressure cooker - but it probably won't be this week.
Canning is not difficult and it's not even particularly time-consuming. That being said, I remember my grandmother canning vegetables and jams back when I was a kid in a sweltering kitchen. She mostly did paraffin-topped canning where thin layers of paraffin wax were poured into the jars and built up to about a half-inch to seal them before the lids were added. My mother flat-out refused to can. Being able to buy frozen and canned vegetables at the store was a luxury she totally took advantage of.
And I tend to make smaller batches of things. It really is different doing it because I want to rather than having to in order to feed my family. Talk about being spoiled. Today was just 24 4-ounce jars. Perfect for gifts at Christmas!
The peppers we're growing are pretty hot when left unseeded, so I seeded them before chopping them in the food processor. And I didn't peel the peaches. I rarely peel anything. I also chopped the peaches in the food processor but left a few chunks for texture and interest.
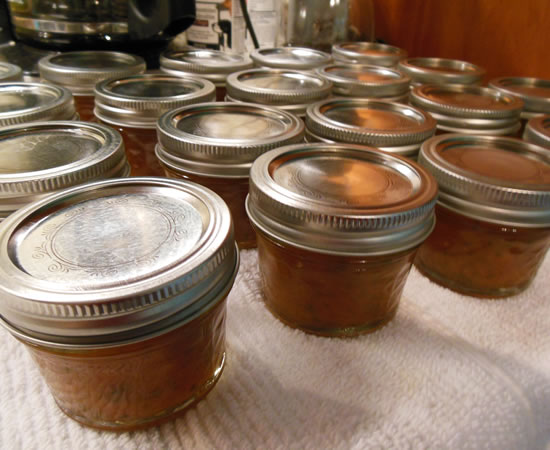
24 jars later... 15 minutes in the water bath, and every one sealed.
Peach Pepper Jam
(makes about 24 1/2-cup jars)
- 4 lbs peaches, chopped
- 1 1/2 cups minced hot peppers
- 2 cups white balsamic vinegar
- 4 cups sugar
- 1 pkg powdered fruit pectin
Finely mince peppers in food processor. Finely chop peaches in food processor.
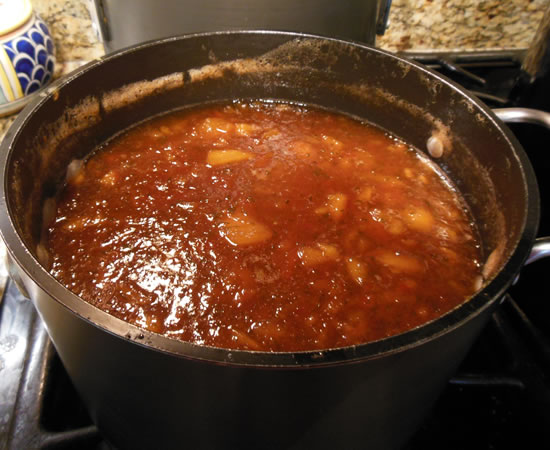
Mix pectin with 1/2 cup of the sugar. Add it, along with the peppers, peaches, and vinegar to saucepan. Heat to boil, stirring occasionally.
Add remaining sugar, stirring well, and let boil at a full rolling boil about 5 minutes, stirring occasionally.
Remove from heat, skim foam from top, and place in hot sterile jars.
Wipe rims, top with lids and rings, and process in boiling water bath about 15 minutes.
It came out spicy-sweet! Perfect for topping chicken or pork - or on a cracker with cheese...
I don't know how many more peppers we're going to be getting... I'm hoping to be able to can a bunch of them, as well - I just used up my last jar from last year - but the bounty doesn't seem as prolific as last year...
We shall see...
Huli Huli Chicken
One of the more fun things about going to Cost Plus is finding obscure and/or off the wall food items. We spent a lot of time at Cost Plus when we lived out west and I really miss the convenience of having a store in the neighborhood.
We did a fun shopping trip when we were in Oregon and after getting home and receiving a few emails - and online coupons - I decided to do a bit of online shopping.
One of the first things I saw was Huli Huli Sauce. For the uninitiated, Huli Huli sauce is a Hawai'ian staple. It's a teriyaki-type sauce with a Hawai'ian flair. It's been around forever and Huli Huli Chicken stands are everywhere on Oahu. And they're relatively inexpensive.
I think the first time I had Huli Huli Chicken was when 2 of my sisters lived in Hawai'i back in the mid-70s. Another sister and I flew over to visit them for a couple of weeks and we didn't have a lot of money - it was definitely pre-credit card days. I know we flew over on a DC-10 and I have a vague recollection of taking mushrooms right before we took off. Kids today will never know the joys of walking right into an airport and getting on a plane without standing in long lines, taking off shoes, submitting everything for x-ray, and having their nether-regions photographed. It was so civilized. And drinks were only a buck and there was a huge smoking section. Smoking and drinking were important when you took mushrooms on an airplane to Hawai'i. Ah... sweet youth...
But I digress...
The word huli means "turn" in Hawai'ian, which is what the cook does with the chicken on the charcoal grill that is traditionally used.
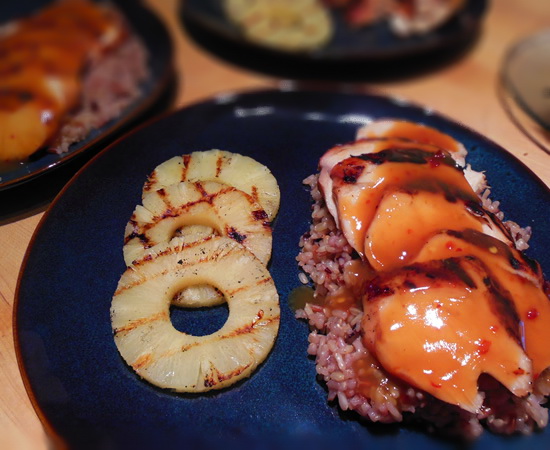
Being the non-traditionalist that I am, I mixed the pineapple juice from the can of pineapple rings, along with some sambal oelek for added heat and marinated chicken breasts in it for about an hour. I drained the chicken and grilled it on my non-charcoal gas grill.
I boiled the marinade and then thickened it with a bit of cornstarch. It's not really recommended to use marinades for sauces because there's always the possibility of catching something, but I boiled it for a long time before thickening it. I like walking on the wild side.
The chicken came out really moist. I served it over a really good Lundberg rice blend. I really like Lundberg rices - whole grain, environmentally conscious, and just flat-out good. Grilled pineapple rings finished the plate. It was spicy-good.
I think a Huli Huli stir-fry may be in our future...
I'll pass on the mushrooms...
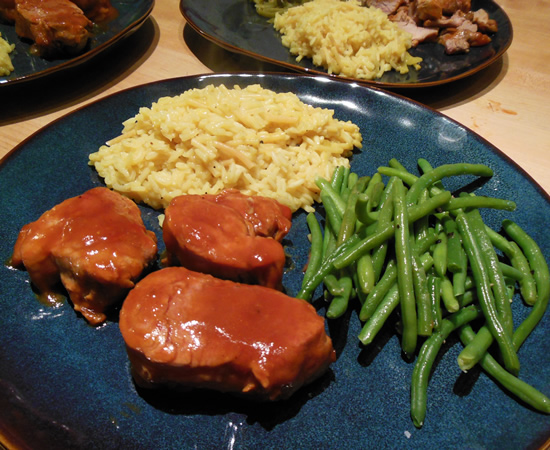
Pork Tenderloin and Faux Rice-A-Roni
Rice-A-Roni, The San Francisco Treat! ™
I have heard that jingle more times than I could ever possibly count! Hearing the clang of a cable car bell immediately brings the jingle to mind. Good ol' Golden Grain Macaroni Company. Rice-A-Roni is now owned by Quaker Oats which is owned by Pepsi. The San Francisco Treat is headquartered in Purchase, NY.
How sad.
Growing up in San Francisco, I rarely - if ever - actually ate Rice-A-Roni. My mom made her own faux-rice-a-roni dishes all the time by just breaking up spaghetti noodles and adding it to rice. She'd saute the rice and spaghetti in a bit of butter, add water, a bouillon cube and some chopped [fill-in-the-blank] and we'd have a tasty side dish with Sunday Chicken or whatever. Mama was an inventive cook.
Fast-forward a few years and I'm still making variations on a rice-a-roni theme...
Tonight, it was rice, broken up spaghetti, and a bit of onion. I sauteed about 3 ounces of broken spaghetti with 3/4 cup rice and then added 2 1/2 cups of chicken broth, a pinch of poultry seasoning, and a pinch of salt and pepper. I brought it to a boil, and then covered it and let it simmer on low for about 20 minutes. My own treat.
The rest of the meal was just as simple.
I cut a pork tenderloin into medallions and browned them in a skillet. I added a bit of homemade BBQ sauce and a splash of chicken broth and let them simmer until done. Green beans.
Done.
Back in the late '60s, I actually knew the grandson of the founder of Golden Grain Macaroni - he and his lovely wife lived up the street from Pirro's Pizzeria where I spent my time spinning pizzas and making every management mistake a young manager could make.
Small world.
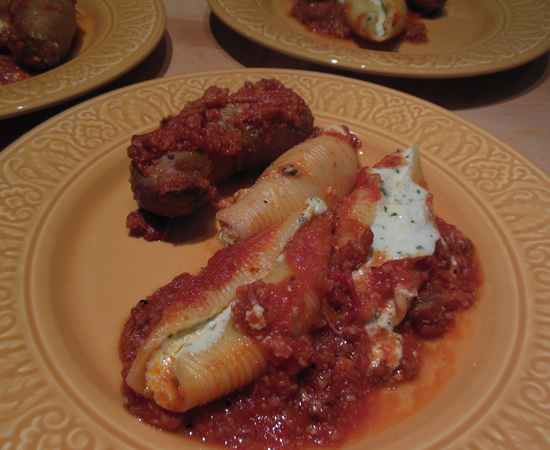
Stuffed Shells
I was walking through the grocery store today, and while looking for my favorite mini rigatoni, I saw a box of shells. Large shells. The kind of shells you stuff with cheese. Never one to fight an impulse-buy, I grabbed one and started planning a meal...
Stuffed Shells isn't my normal August-Go-To-Meal, but it wasn't sweltering, today, and Nonna does like her pasta. And even though Victor and I both like our pasta, too, it's much easier to blame things on the little old lady living in the house, ya know?!?
So through the store I went, finishing my shopping. The only thing I needed was the cheese for the filling - I had everything else at home. I grabbed ricotta, farmers cheese, and fresh mozzarella.
This was definitely a wing-it recipe. I took pieces-parts of things already in the house for the sauce, blended a couple of cheeses for the filling, and popped it in the oven.
First was cooking the shells...

I cooked the whole pound not really knowing how many I was going to need. I ended up with about 8 extra.
And then I started the sauce.

I pureed about 5 tomatoes from the garden and added about a cup of oven-roasted plum tomatoes in olive oil.
In a skillet, I browned off 6 spicy Italian sausages, added a container of sauce from the freezer, and the fresh and oven-roasted tomatoes, above.

I also had about a quarter-head of cauliflower that had seen better days, so it got chopped up and added to the pot. Waste not, want not.
Next came the filling.

The filling was simplicity, itself. A container of ricotta, 8 ounces of farmers cheese, 8 ounces of fresh mozzarella, and about 2 ounces of granna padano. I put it all into the food processor with a handful of parsley, a pinch of garlic powder, salt, and pepper. I didn't add any binder - no eggs or any of that stuff. I figured the cheeses would stand up on their own. And they did.
I filled the shells using a pastry bag because it's a lot easier than trying to do it with a spoon. Go out and buy a couple of pastry bags. They're cheap. And they come in handy.

I added some sausage to the pans, added more sauce, covered one and baked it at 350° for about an hour. The other was frozen and then vacuum-packed for later.
We had lots of thick-sliced Italian bread and butter to sop up the sauce.
Nonna cleaned her plate. So did we.
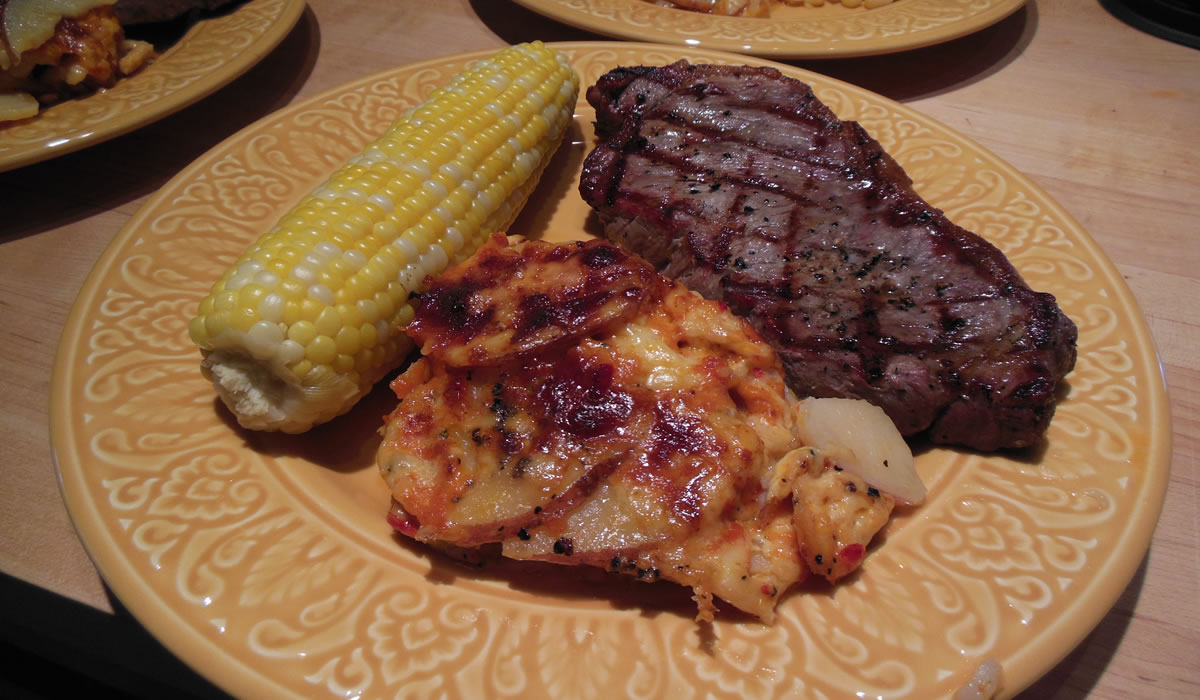
New York, New York
I grew up calling the strip loin steak a New York Steak. The restaurants where I worked had New York steaks on the menu. Not that I bought many in my youth, but it seems to me that at Lou or Phil Lehr's Steakhouse in San Francisco - the scene of a couple of pre-prom dinners - it was called a New York, as well. The Lehr brothers both had steakhouses and I think they both had a "by the ounce" menu. You chose your steak from a huge refrigerated case and they cut your steak in front of you before cooking it to perfection. The eyeballs were always bigger than the pocketbook. Not an inexpensive dinner, but always good for a prom. They're both gone, now, but the memory lingers on...
I'm not sure when I even became aware of the numerous different names for the cut - strip steak, sirloin strip, Kansas City steak, club steak - to name but a few, but regardless of what it is called, my mind sees New York. It just is. And I also see Ernie, the butcher at the Hyatt in Cambridge when I worked there in the early '80s. I learned more about quality beef from him than anyone else. He would come out of his butcher area when a shipment of meat arrived and wordlessly go through, check, and accept or reject pieces. It was classic the way he could wither someone with a look. I was the receiving manager when I first met him and even though I had cut and cooked a bazillion steaks by 1980, I hadn't really purchased them. I really learned a lot from him.
It was a definite impulse-buy when I saw the package of them at the store the other day, but they just looked right. The fact that they were on sale pretty much clinched the deal. They still weren't cheap, but they were affordable.
Quality means simplicity, so they only got salt and pepper before going on the grill. They didn't require anything else after coming off the grill, either. Ernie would have been proud.
I had some cheese that needed using up, so cheesy scalloped potatoes were a natural addition. I made them slightly different, this time - I heated the milk and started with only half the cheese. And I cooked them a lot longer.
I do have to admit that they came out pretty stellar. I used red leister, havarti, and gorgonzola cheeses in the dish, but about 6 or more ounces of any cheese or cheese combination would work. Use what you have in the 'fridge. It's how I make mac & cheese, as well.
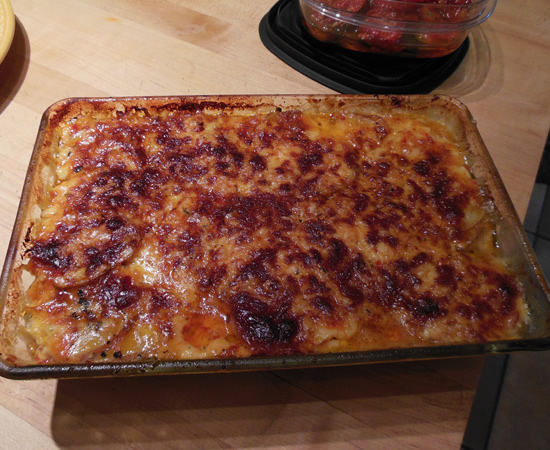
Cheesy Scalloped Potatoes
- 6-8 oz freshly-grated flavorful cheese - any combination
- 2 lbs potatoes, sliced about 1/4" thick
- 2 tbsp flour
- 2 tbsp butter
- 2 cups milk
- salt and pepper, to taste
Preheat oven to 350°. Lightly butter oven-proof baking dish. Mix cheeses and set aside.
Layer half of potatoes in pdish. Sprinkle with flour. Dot with 2 tablespoons butter and dust with salt and pepper. Sprinkle half of cheese mixture over. Top with remaining potatoes, dust with salt & pepper, and dot with butter. Save remaining cheese for later.Bring milk to simmer and pour over potatoes.. Cover tightly with foil and bake about an hour. Remove from oven and sprinkle with reserved cheese. Return to oven uncovered and bake about 45 more minutes or until cheese is crusty-golden-brown.
I hardly ever peel potatoes - I see no need to and I like the skins - so peel or not as you desire.
And having nothing to do with dinner tonight, I roasted a bunch of plum tomatoes from our yard.

I sliced them in half, laid them out on a sheet pan, drizzled them with olive oil, sprinkled them with salt & pepper, and then roasted them at 350° for about an hour. When they came out, I placed them in a container and added more olive oil.
They have a really awesome concentrated tomato flavor and the oil will be great for salads or other drizzling.