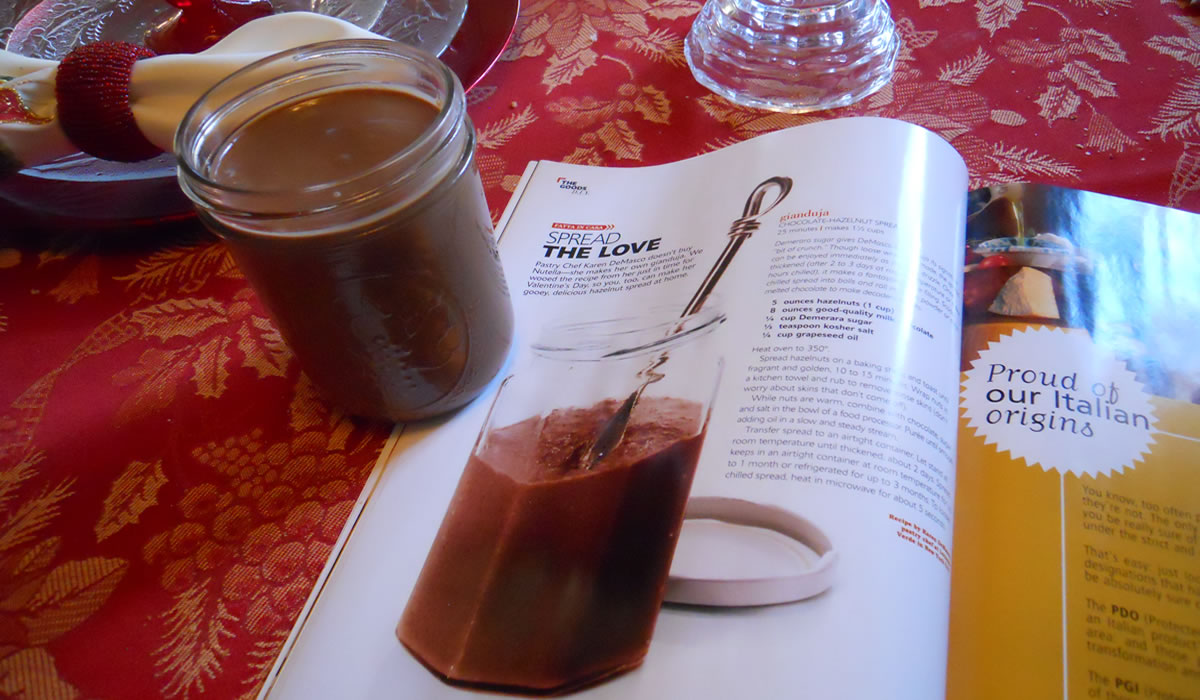
Gianduja
I think this may be the surprise dish of the holiday season. It's mid-December but the February issue of La Cucina Italiana magazine is already here. And I am very glad it is! A past issue had a recipe for Nutella Cookie Sandwiches that seemed perfect as one of our Christmas cookies this year. But since Nutella is not on my regular shopping list, I just keep forgetting to pick it up. Had I not come across this recipe, the cookies would have probably fallen into the ever-growing "I thought about making" category.
And to make good things even better, I just found out that this recipe and the cookie recipe both come from Pastry Chef Karen DeMasco. I've been checking her out online and really like her style. I see more of her ideas coming to town!
Gianduja is a sweet chocolate and hazelnut invented in Turin 1852 by Caffarel Chocolate Company. The better-known to us Nutella came into being in the 1940's in Italy. Nutella is good. This is nothing short of totally amazing. And it literally took minutes to prepare.
I bought hazelnuts already hulled from Oh! Nuts in Brooklyn. They are cheap at $8.99/lb! Plus they arrived in just a couple of days! The Demerara sugar came from Atlantic Spice. I bought it a while back with no particular plan or recipe. I just figured I'd use it, eventually... Around here, nothing ever goes to waste.
One note... since I bought hulled hazelnuts I didn't have to go through the toasting-and-rubbing, but I did put the nuts in the oven for a few minutes to warm them before making the spread.
Gianduja
Chocolate Hazelnut SpreadDemerara sugar gives DeMasco's Gianduja its signature "bit of crunch." Though loose when first made, the spread can be enjoyed immediately as a dip or drizzle. Once thickened (after 2 to 3 days at room temperature or a few hours chilled), it makes a fantastic cookie filling. Scoop chilled spread into balls and roll in cocoa powder or dip in melted chocolate to make decadent truffles.
- 5 ounces hazelnuts (1 cup)
- 8 ounces good-quality milk chocolate
- 1/4 cup Demerara sugar
- 1/2 teaspoon kosher salt
- 1/4 cup grapeseed oil
Heat oven to 350°.
Spread hazelnuts on a baking sheet and toast until fragrant and golden, 10 to 15 minutes. Wrap nuts in a kitchen towel and rub to remove loose skins (don't worry about skins that won't come off).
While nuts are warm, combine with chocolate, sugar, and salt in the bowl of a food processor. Puree until smooth, adding oil in a slow steady stream.
Transfer to an airtight container. Let stand at room temperature until thickened, about 2 days. Spread keeps in an airtight container at room temperature for up to 1 month or refrigerated for up to 3 months. To loosen chilled spread, heat in microwave for about 5 seconds.
And now that the gianduja is done those cookies are going to be made in the next few days.

Tagliatelle al Burro al Tartufo
We have pretty much run out of the La Cucina Pasta Issue recipes. Tonight, Victor made one of their pastas, but the sauce was pure Victor.
In his TV cooking-show-watching, he saw a couple of different pasta recipes with truffles. One was a Wolfgang Puck dish with billion-dollar-a-pound white truffles. Another was Ina - the Barefoot Contessa - making a pasta butter or something.
So...
Tagliatelle al Burro al Tartufo - Tagliatelle with Truffle Butter - was born.
The sauce is definitely not for the faint of heart, but I tell ya... if ya have to go, this is the way to do it - with a smile on your face.
And we have to thank Ann and Julie for letting us know that it was okay to have real, fresh truffles in the house in the first place. They brought us truffles last year when they visited and after using them up, decided I really could buy one myself now and again.
They really are a very special treat!
Tagliatelle al Burro al Tartufo
Tagliatelle Fresche
Ingredients
- 2 cups unbleached all-purpose flour
- 2 large eggs
- 2 large egg yolks
- Coarse sea salt
Instructions
On a clean work surface, mound flour and form a well in the center. Add eggs and egg yolks to the well. Using a fork, gently break up yolks and slowly incorporate flour from inside rim of well. Continue until liquid is absorbed, then knead for 10 minutes. Wrap dough tightly in plastic and let rest for 30 minutes.
Divide dough into 3 pieces. Cover 2 pieces with plastic wrap. Flatten remaining dough piece so that it will fit through the rollers of a pasta machine.Set rollers of pasta machine at the widest setting, then feed pasta through rollers 3 or 4 times, folding and turning pasta until it is smooth and the width of the machine.
Roll pasta through machine, decreasing the setting, one notch at a time (do not fold or turn pasta), until pasta sheet is scant 1/16 inch thick.Cut sheet in half widthwise; dust both sides of sheets with flour. Layer sheets between floured pieces of parchment or wax paper. Cover with paper and repeat with remaining dough.
With the short end of 1 pasta sheet facing you, loosely fold up sheet, folding sheet over two or three times from short ends toward the center. With a large chefs knife, cut folded sheet into ribbons, a scant 1/4 inch wide. Unroll strips and lightly dust with flour; spread on a lightly floured baking sheet. Repeat with remaining pasta sheets.
To cook the tagliatelle, bring a large pot of salted water to a boil. Add pasta and cook until tender, about 3 minutes. Drain pasta, transfer to a large serving bowl and toss with sauce.
In the meantime, in a large skillet:
Sauce
- 1 cup heavy cream
- 1 cup freshly grated Grana Padano or Parmigiano-Reggiano cheese
- 7 oz truffle butter
Truffle butter
- 1 small, fresh truffle
- 7 oz softened butter
Grate the truffle with a fine plane and in a mixer (or by hand) whip the truffle and butter together. You can do this a day ahead and refrigerate, covered.
While the pasta is cooking, add the heavy cream to the skillet and bring to just a simmer. Add the butter and let it melt into the cream. Remove from heat and immediately add the drained pasta to the skillet with the grated cheese, reserving some cheese for topping. Serve immediately.
Victor only used about half of the truffle butter. It was more than adequate.
And better markets will probably have truffle butter already made, if you're so inclined.
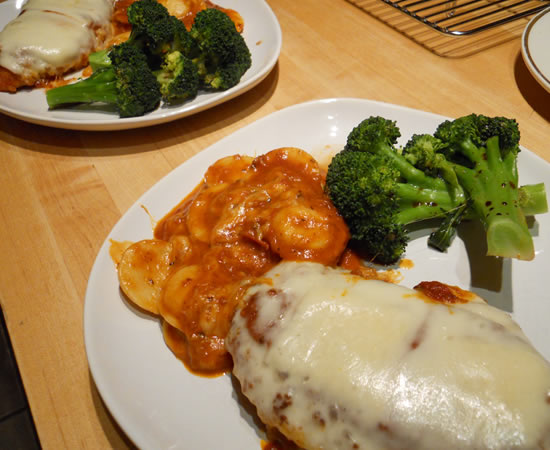
Chicken Parmigiana
There's something about a breaded chicken cutlet that just makes my tummy smile. I like them in just about any fashion or mode. Highly seasoned, simple with sauce, plain, fancy. With cheese, without. I'm not that picky. I like 'em.
But when a chicken cutlet gets hooked up with homemade sauce and slices of parmesan cheese under a blanket of melted mozzarella... well... my tummy does more than smile - and the rest of me is pretty happy, as well!
That was tonight's dinner. Served with ravioli and broccoli drizzled with olive oil and balsamic vinegar. I used the cheesy sauce in the pan for the ravioli. We waste nothing!
Very simple. Very quick. Very good.
I made a Pear and Raisin Pie for dessert tonight, too!
I bought a frozen crust.
More on that, later...
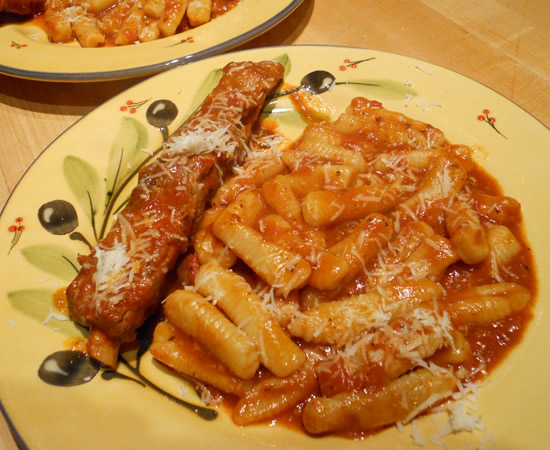
Malloreddus with Victor's Homemade Sauce
Tonight's Monday Pasta comes half-way from La Cucina Italiana magazine. The pasta is from the magazine, but the sauce is pure Victor.
He was looking in the magazine for recipes when I asked in my most-pleading voice if he would make his red sauce tonight. The pasta was almost secondary. I was craving the red sauce.
And to make it even better, we had pork ribs in the freezer that would become fall-off-the-bone-tender after simmering in the sauce all day. And they did.
There's no recipe** for the sauce. It just is. There are as many variations of this simple sauce as there are Italian households out there. Everyone's is the best - except Victor's really is!
**EDITED TO ADD** Victor's Spaghetti Sauce. He finally wrote it down.
The semolina pasta has substance to it. It works well shaped into the malloreddus, but would work equally well as a linguine or papardelle.
This was perfect. Exactly what I was hoping for.
My stomach is smiling.
Malloreddus
- Sea Salt
- 1 ¼ cups semolina flour
- ¾ cup unbleached all purpose flour
- Extra virgin olive oil
Gnocchi board or a table fork
Dissolve 1 tsp salt in ¾ cup warm water. In a large bowl whisk together semolina and all purpose flour; mound and form a well in the center.
Add water mixture and 2 tsp olive oil to the well. Using your hand or a fork, slowly incorporate flour from inside the rim of the well. Continue until liquid is absorbed, then knead in bowl until dough forms a complete mass (dough will be slightly sticky).
Transfer dough to a well floured work surface and knead, dusting with a bit more flour as needed just to keep dough from sticking to your hands, for 5 minutes. Wrap dough tightly in plastic wrap and let rest for 30 minutes.
Break off about 1/8 of the dough; tightly rewrap remaining dough. Roll dough into ½ inch cylinder, and cut into ¼ inch thick pieces. Pressing with your thumb, roll each piece on a gnocchi board (or down the back of a fork) to give it the characteristic ridges, and put on a floured baking sheet. Repeat with the remaining dough.
To cook fresh Malloreddus, bring a large pot of salted water to a bill. Add pasta and cook until tender, about 6 minutes after water returns to a boil. Drain, transfer to a large serving bowl and immediately toss with sauce and serve.
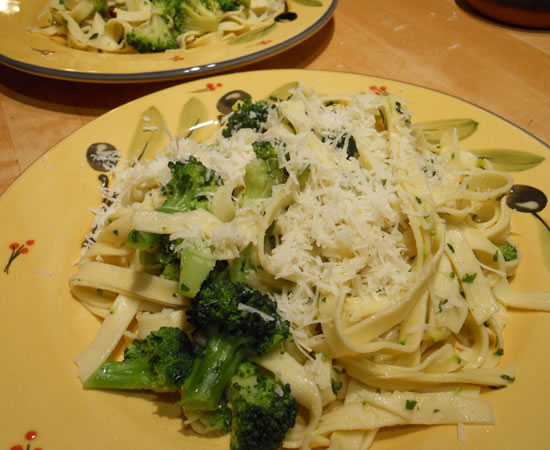
Strascinati ai Broccoli
We made a change in the recipe tonight. I know, I know... we're supposed to follow the recipe exactly, but Victor made homemade pasta yesterday for his niece's birthday, so we had the leftover already made. And I'll take leftover homemade pasta over any packaged pasta. Any time.
This is a definite winner and proves the beauty of following simple recipes. If I had been in the kitchen, I would have looked at the recipe and then cleaned out the vegetable bin. And I'm sure it would have been a good pasta dish, but it wouldn't have had the crisp clean flavors this had. And two little chiles added just the right amount of heat. Not too much - just enough.
Another thing is the recipe calls for cooking the broccoli for 7 minutes. That is a really long time. Victor pulled it out of the water after 5 minutes and it was getting close to being overcooked for our way of thinking. I definitely believe you don't want crunchy broccoli, but 7 minutes would probably result in mush. Use your own judgment.
The recipe is written for the strascinati pasta.
Strascinati ai Broccoli
Ingredients
- Fine sea salt
- 1 1/4 pounds broccoli
- 1 pound strascinati or other short pasta
- 1/2 cup extra-virgin olive oil
- 1/2 cup finely chopped flat-leaf parsley
- 2 dried red arbol chiles, or red pepper flakes to taste
- 1 garlic clove, minced
- Freshly grated Pecorino Romano, Caciocavallo, or ricotta salata cheese for serving (optional)
Instructions
Bring a large pot of salted water to a boil. Meanwhile, cut broccoli into 1-inch florets; peel stems. Cut stems into 1-inch pieces, then cut pieces in half or quarters lengthwise, depending on size.
Cook broccoli florets and stems in the boiling water until tender, about 7 minutes. Reserving water, transfer broccoli to a colander to drain, then rinse under cold water to stop cooking.
Return water to a boil. Add pasta and cook until al dente. Meanwhile, combine oil, parsley, chiles and garlic in a small skillet. Heat over medium heat, stirring occasionally, for 2 minutes. Remove from heat; stir in 1½ teaspoons salt.
When pasta is al dente, drain pasta and return to pot. Immediately add broccoli and oil mixture. Heat over medium heat, stirring to combine, for 30 seconds; adjust seasoning, if necessary. Serve immediately, with cheese if desired.
We're getting close to the end of the pasta issue, but I have a feeling we will be continuing this for a while.
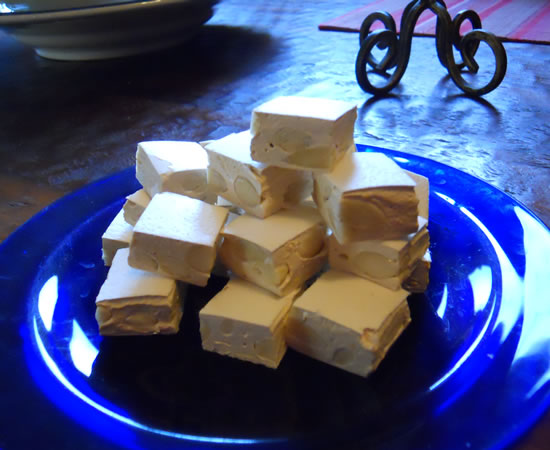
Torrone
I did it!
My first real candy-making attempt in years. I did it!
I have cooked and baked all my life, but candy-making has always juuuust slightly eluded me.
Candy-making is an unforgiving science - and I am not a scientist. The old adage that cooking is an art and baking a science is definitely true. But I've been baking long enough to know where I can change or substitute things and get my desired result. Bread-baking is totally touch and feel. Yes, the science is getting the right ratios of leavening, flour, and liquid, but it is the feel of the dough that lets you know when that balance has been achieved.
Not so with candy.
It is exacting step-by-step, exact temperatures, exact, exact, exact. I am so not an exact person.
But I was today - and it came out great!
The only hassle I had was blanching the almonds. And that wasn't difficult - just time-consuming. There is a suburban conspiracy going on around me. None of the local stores had whole blanched almonds. So... I blanched a pound of them, myself. It's not difficult. Pour boiling water over them, let them sit for 2 minutes, drain, rinse under cold water. Drain, again, and slip off the skins.
There's a lot of almonds in a pound,. It took me about 45 minutes to do them.
The recipe comes from La Cucina Italiana Magazine and it was extremely straightforward and easy to follow. The candy did exactly what it said it was going to do in the recipe at every step. It was great. The one caveat is this is a sticky, sticky candy. And I do mean sticky. I broke a heavy-duty spatula stirring in the nuts. It was old, granted, but it was my favorite. Oh well.
The only change I made was to use edible rice paper instead of cornstarch and parchment paper. I laid out the rice paper on a sheet pan, spread the torrone on it, topped it with rice paper, rolled it to the desired thickness, and then cut it after it had cooled and set.
Sticky.
Torrone
Ingredients
- Cornstarch for dusting
- 3 cups whole blanched almonds
- 3 large egg whites, at room temperature
- 1/4 teaspoon kosher salt
- 3 cups sugar
- 1 cup clover honey
- 1/2 cup confectioners sugar
- 1 teaspoon vanilla extract
- Finely grated zest of 1 large orange
Special equipment: parchment paper; a candy thermometer
Instructions
Heat oven to 350º. Lightly dust a clean work surface with cornstarch. Line a 9- x 13- inch baking dish with parchment paper, letting excess paper hang over edges.
Spread nuts on a rimmed baking sheet. Bake, stirring once halfway through, until fragrant and golden, 10 to 12 minutes. Transfer pan to a rack; let nuts cool completely.
Put egg whites and salt into the bowl of an electric mixer fitted with whisk; set aside.
In a heavy 4-quart saucepan with candy thermometer attached, heat sugar and honey over medium heat, stirring with a wooden spoon, until mixture begins to simmer and sugar is mostly dissolved, 12 to 14 minutes (mixture will be very thick, then begin to loosen and turn cloudy). Continue cooking, stirring occasionally, until candy thermometer reaches 280º degrees. Continue to cook mixture, stirring once or twice, until temperature reaches 315º. It will take the mixture about 15 minutes more to reach that temperature (the mixture will begin to foam and darken in color as temperature increases).
Meanwhile, beat egg whites on medium speed until firm peaks form. Add confectioners sugar and continue to beat until fully incorporated, about 1 minute more. Turn off mixer, leaving bowl in place.
When sugar mixture reaches 315º, remove from heat; stir until temperature reduces to 300º, 1 to 2 minutes, then carefully remove candy thermometer. With mixer on medium speed, slowly pour sugar mixture down the side of the bowl (egg mixture will double in volume, then decrease); continue to beat until mixture is cooled to warm and begins to lighten in color, about 5 minutes. Add vanilla and zest; beat for 1 minute more, then, using a wooden spoon or heatproof spatula, fold in nuts (mixture will be very sticky).
Turn out candy onto prepared work surface; dust hands with cornstarch. Knead for 5 to 6 turns, then transfer to prepared baking dish. Dust hands with more cornstarch, then press candy to flatten and fill pan. Put pan on wire rack and let candy cool completely, about 1 hour.
Using parchment paper overhang, lift out candy from pan; cut candy into pieces. Layer in a sealed container, between sheets of parchment paper and let stand overnight, with container sealed and at room temperature, to dry, at least 8 hours or overnight. Candy can be kept, layered between sheets of parchment paper, in a sealed container at room temperature, for up to 3 weeks.

The recipe makes about 2 1/2 pounds of candy.
There's a recipe for Chocolate Torrone that I'm going to try next... I just have to watch myself. I tend to get a bit cocky after a success like this and not pay attention the second time around.
I really need to pay attention!
The Pumpkin That Keeps On Giving
Not quite 4 weeks ago I roasted and pureed a fairytale pumpkin. A big fairytale pumpkin. After making pumpkin pies, pumpkin cupcakes, chicken with pumpkin, pumpkin butter, and pork with pumpkin, I decided pasta with pumpkin needed to be done. Pumpkin is just so versatile. You can do anything with it.
So I started out with the rest of the sage sausage I bought yesterday for the sausage gravy. I browned it off, added a couple of cups of pumpkin puree, maybe a quarter-cup of heavy cream (clean out the refrigerator) and about a half-teaspoon of dried sage, and a pinch of salt and pepper.
Served over butternut squash ravioli.
Creamy goodness.
I'm lovin' that pumpkin, which is a good thing... I have pumpkin for days in the freezer... More pies, pumpkin rolls... and I really need to do a pumpkin soup...
Yeah... definitely lovin' it!

Tagliatelle Fresche al Prosciutto Crudo
The fabulous Monday Pasta continues.
Tonight we had another hand-made pasta. Tagliatelle. Feather-light tagliatelle. Perfect ribbons of silkiness...
I'm in love.
Victor has mastered the art of pasta-making. Totally and completely.
Personally, I think everyone needs to go out and buy a pasta roller. You can't buy pasta like this. You just can't.
Tagliatelle
Serves 4
Making fresh pasta is easier and quicker than you may think, and the results are well worth the extra effort. Tender and supple, this hand-cut tagliatelle readily absorbs the flavors of the sauce it's tossed with.
Ingredients
- 2 cups unbleached all-purpose flour
- 2 large eggs
- 2 large egg yolks
- Coarse sea salt
Instructions
On a clean work surface, mound flour and form a well in the center. Add eggs and egg yolks to the well. Using a fork, gently break up yolks and slowly incorporate flour from inside rim of well. Continue until liquid is absorbed, then knead for 10 minutes. Wrap dough tightly in plastic and let rest for 30 minutes.
Divide dough into 3 pieces. Cover 2 pieces with plastic wrap. Flatten remaining dough piece so that it will fit through the rollers of a pasta machine.Set rollers of pasta machine at the widest setting, then feed pasta through rollers 3 or 4 times, folding and turning pasta until it is smooth and the width of the machine.
Roll pasta through machine, decreasing the setting, one notch at a time (do not fold or turn pasta), until pasta sheet is scant 1/16 inch thick.Cut sheet in half widthwise; dust both sides of sheets with flour. Layer sheets between floured pieces of parchment or wax paper. Cover with paper and repeat with remaining dough.
With the short end of 1 pasta sheet facing you, loosely fold up sheet, folding sheet over two or three times from short ends toward the center. With a large chefs knife, cut folded sheet into ribbons, a scant 1/4 inch wide. Unroll strips and lightly dust with flour; spread on a lightly floured baking sheet. Repeat with remaining pasta sheets.
To cook the tagliatelle, bring a large pot of salted water to a boil. Add pasta and cook until tender, about 3 minutes. Drain pasta, transfer to a large serving bowl and toss with sauce.
Three ingredients. That's it. Three ingredients. No gums, stabilizers, or dough conditioners. Flour, eggs, and salt.
The sauce is the same.
The recipe tonight called for prosciutto, shallots, and cheese. Three ingredients. Four if you count a couple tablespoons of wine. Simple, basic, and exploding with flavor.
I really love complex dishes where a score of ingredients compete and blend. But there is another side of me that really loves the simplicity of a dish - where there are three ingredients and I taste each one individually and collectively.
Tonight's pasta was just that. Each ingredient stood out, yet complimented and balanced the others.
Having grown up with - and cooked - Americanized versions of Southern Italian food, I'm really enjoying the more authentic and simpler foods Italy has to offer. A couple of good ingredients is all it takes.
Tagliatelle Fresche al Prosciutto Crudo
4 servings
Ingredients
- Fine sea salt
- 5 ounces 1/8-inch-thick slices prosciutto
- 3 tablespoons unsalted butter
- 1/2 cup thinly sliced shallot (1 to 2 large)
- 2 tablespoons dry white wine
- 14 ounces fresh tagliatelle
- 3/4 cup freshly grated Grana Padano or Parmigiano-Reggiano cheese
Instructions
Bring a large pot of salted water to a boil. Meanwhile, cut fat from prosciutto; finely chop fat. Cut remaining prosciutto into
1/4-inch cubes. Combine prosciutto fat and butter in a large nonstick skillet. Cook over medium heat, stirring occasionally, for 2 minutes. Add shallot and cook for 1 minute more. Add cubed prosciutto and cook for 1 minute more, then add wine and ¼ cup of the boiling water; cook until liquid has evaporated, about 3 minutes, then remove from heat.Add pasta to the boiling water and cook until al dente (about 3 minutes for fresh pasta). Reserving 1/4 cup of the pasta cooking liquid, drain and immediately transfer to a large bowl.
Return skillet with prosciutto to medium-low heat. Add cheese and stir to combine. Immediately add contents of skillet and 1 tablespoon of the pasta cooking liquid to pasta; toss to combine. Add more pasta cooking liquid to moisten, if desired. Serve immediately.
And for dessert, I made a Spongata...
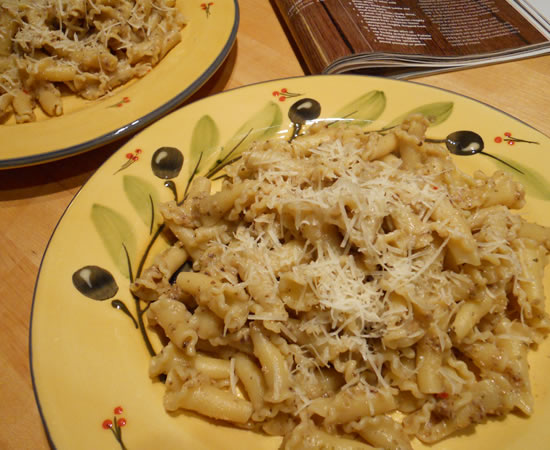
Campanelle con Salsa di Olive
It's La Cucina Italiana Pasta Monday! Victor would have been in the kitchen cooking tonight, except he was at the doctors office. He threw his back out making the bed yesterday. 30 hours of excruciating pain later, he went for the drugs. Perfect. It means I will be able to sleep tonight, as well. We've both had back problems over the years. The first time I hurt my back was in a car accident when I was 18. A guy ran a red light on Van Ness as I was crossing on Geary. In the ensuing 40 years, I've managed to screw it up every few years. It's been a while. I'm probably due.
But I digress...
My first two thoughts when seeing this recipe were how wonderful it sounded and how much Ruth would hate it. (It was fabulous. You would have hated it.)
Gaeta olives can be either brine-cured or dry-cured. I found the brine-cured. (Brine-cured Kalamatas can substitute for brine-cured gaetas.) I also found pitted picholine olives. I have a pitter, but if I don't have to use it..... It made for easier work.
The only actual change from the printed recipe is I used the food processor to make the olive paste. I know the arguments for mortar and pestle. I'm neurotic enough to use a burr grinder for my coffee beans at home instead of chopping them with a little Braun. I fully understand the benefits. The mortar and pestle got sold a year or so ago at the yard sale.
Food processor worked just fine.
The recipe made a goodly amount. We used about a third of it for our two generous portions and the rest is going to become bruschetta or something. Maybe a Thanksgiving appetizer...
Another cook note: I did not salt the water for the pasta. The unsalted pasta balanced the olives and the cheese .
Campanelle con Salsa di Olive
4 servings
Olive pesto, delicious over pasta, also makes a great spread for crostini and pizza.
Ingredients
- Coarse sea salt
- 1 cup Gaeta olives, pitted
- 3/4 cup Picholine or other mild green olives
- 2 scallions, thinly sliced (white and light green parts)
- 1 small fresh red chile, thinly sliced, or pinch red pepper flakes
- 1 tablespoon plus 1 teaspoon roughly chopped fresh marjoram leaves
- 1 tablespoon roughly chopped fresh thyme leaves
- 1/4 cup extra-virgin olive oil
- 1 cup freshly grated Grana Padano or Parmigiano-Reggiano cheese plus more for sprinkling
- 1 pound campanelle
Instructions
Bring a large pot of salted water to a boil.
Meanwhile, put olives, scallions, chile, marjoram and thyme into a mortar. Using the pestle with a rotary movement, grind mixture against wall of mortar until combined. Working with 1 to 2 tablespoons at a time, drizzle in oil, grinding and mixing to incorporate as you go, until pesto is combined and smooth. Add cheese and grind to combine.
Cook pasta in the boiling water until al dente. Reserving ¼ cup of the pasta cooking liquid, drain pasta and return to pot. Immediately add pesto and toss to combine, adding as much of the pasta cooking liquid to moisten as desired. Serve immediately with a sprinkle of cheese.
Crispy Gnocchi with Peas and Bacon
This was a two-person-in-the-kitchen dinner! My favorite kind.
Victor was perusing the internet looking at different gnocchi ideas when he came across a recipe for Crispy Gnocchi with Fresh Peas and Bacon. The minute I heard about it (yesterday) I knew I had to have it (today.) I shopped on a Saturday afternoon - stood in line - just to bring home the bacon.
We're talkin' dedication. Or something.
It was worth standing in line. I'd do it again.What a great idea!
Victor used gnocchi he made and froze last month. The recipe is really simple - and you can cut back on the butter considerably!
Crispy Gnocchi with Peas and Bacon
- ¼ pound bacon or pancetta, diced (1 cup)
- 1 shallot, thinly sliced
- 1 garlic clove, thinly sliced
- juice of 1 lemon
- 2 cups shelled fresh peas (frozen works in a pinch)
- 12 fresh flat-leaf parsley leaves (left whole)
- 6 tablespoons butter, divided
- 1/3 cup grated parmesan
- 2 tablespoons water
- 1lbs gnocchi fresh or frozen
For the sauce, cook the bacon in a large sauté pan over medium-low heat until the fat is rendered and the bacon is crispy, about 5 minutes. (Pour off some of the fat if your pork is especially greasy. You’ll want about 2 tablespoons of fat.) Add the shallot and garlic, sweat for 1 minute, and then add the lemon juice.
Increase the heat to medium, add the peas, and sauté just until the peas brighten in color. Remove the pan from the heat and fold in the parsley and 2 tablespoons butter. Taste for seasoning and add salt if necessary, though you shouldn’t need much, if any, because the bacon adds a natural saltiness to the sauce. Turn off the heat and set aside while you sauté the gnocchi.
To finish the gnocchi, heat 3 tablespoons of butter over medium-high heat in a sauté pan large enough to accommodate all of the gnocchi without crowding. When the butter becomes brown and fragrant, add the gnocchi to the pan and cook, turning as necessary, until they’re browned and crisp on all sides, 5 or 6 minutes.
Pour in the pea and bacon sauce, turning to coat. Add the remaining tablespoon butter, the parmesan, and the 2 tablespoons of water while turning the gnocchi. Allow the sauce ingredients to emulsify and form a silken coating, 1 to 2 minutes. The sauce should cling to the gnocchi. Spoon the gnocchi and sauce into shallow bowls and serve immediately.
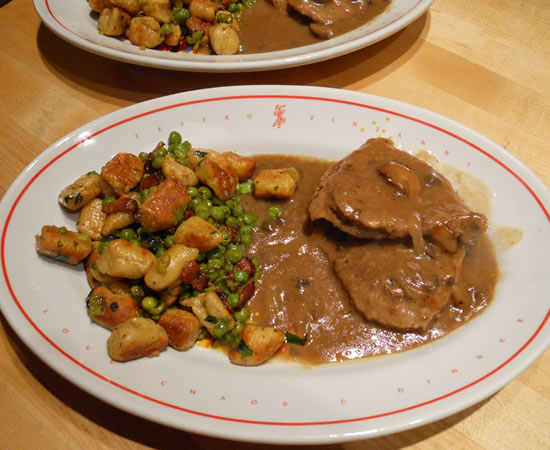
I made a swiss steak of sorts. Beef round steak sliced thin and pounded, floured, and sauteed with onion and mushrooms. A bit of beef broth and the final container of mushroom soup.
I covered it and put it into a 275° oven while Victor made the gnocchi.
So...
Did you notice the plate that tonight's dinner was on? It's from Teatro Zinzanni - a show that plays in Seattle and San Francisco.

The concept pretty much is a 5-course dinner served in a circus tent - and the diners being a part of the show. It's non-stop fun and possibly one of the best three hours you'll ever spend. It's fantastic.
They bill themselves as Love, Chaos, and Dinner. They are so right. We were so enthralled with everything that after the show, we went into the gift shop and bought 4 plates - two oval and two round. I think they were something like $40.00 a piece. We were flush back in those days.
Go to the website and click on the videos to see some of the show in action.
And then... if you're ever in San Francisco or Seattle - GO SEE IT!
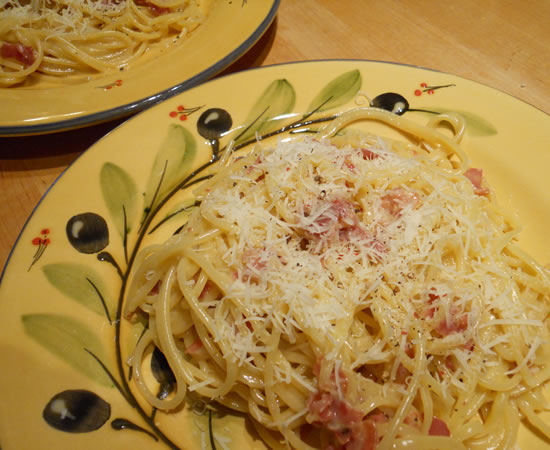
Spaghetti alla Carbonara
Monday Pasta Night from La Cucina Italiana Magazine showcases a classic, tonight. Not a "been around since the beginning of time" classic but a classic nonetheless.
Spaghetti alla Carbonara is a rather recent addition to the Italian culinary landscape. There is no mention of it prior to WWII and quite possibly came about after the war from foods being supplied by GIs. The first record of it has it as a Roman dish.
But regardless of its origins, it's one of the simplest - and tastiest - pasta dishes one can imagine. Leave it to the Italians to take simplicity to such heights!
Spaghetti alla Carbonara
Though hearty and delicious, this classic pasta comes together with ingredients almost always on hand.
Ingredients
- Fine sea salt
- 7 ounces thick-sliced flat pancetta or bacon
- 3 large egg yolks
- 1 cup freshly grated Pecorino Romano cheese plus more for sprinkling
- 3/4 cup freshly grated Grana Padano or Parmigiano-Reggiano cheese
- Freshly ground black pepper
- 1/4 cup extra-virgin olive oil
- 1 pound spaghetti
Instructions
Bring a large pot of salted water to a boil. Meanwhile, cut pancetta into ¼-inch batons. In a medium bowl, whisk together egg yolks, grated cheeses, 1/3 cup water, and generous pinch salt and pepper. In a medium nonstick skillet, combine pancetta and oil; cook over medium heat, stirring frequently, until browned, about 15 minutes.
About halfway through pancetta cooking time, cook pasta in the boiling water until al dente (ideally pancetta and pasta will be ready at about the same time). Reserving ¼ cup of the pasta cooking liquid, drain pasta and return to pot. Add pancetta and its rendered fat; toss to combine. Immediately add egg mixture and 2 tablespoons pasta cooking liquid; quickly stir to combine. Moisten with additional pasta cooking liquid, if desired. Serve immediately, passing cheese and pepper at the table.
The cheese and the egg yolks meld with the spaghetti to create a rich and creamy dish that defies description. The black pepper offsets the salty bite of the cheeses.
It really is perfection on a plate.

Knowing it was Pasta Monday, I picked up a loaf of Italian bread this morning and Victor turned it into a simple garlic toast. Great crunch and perfect for sopping up the last bits of sauce on the plate.
Another keeper.
15 down. 5 to go.

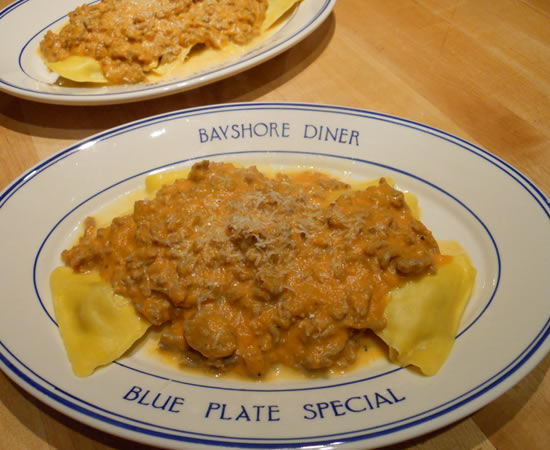
Arugula Ravioli
Once upon a time, I made a lot of Italian food. I cooked in several Italian restaurants in my youth and know my way around the regional differences pretty well. From Milan to Syracuse, the foods are varied and wonderful and can range from three ingredients to twenty-three ingredients, all blending together perfectly. It's a culinary wonderland.
And then I married an EyeTalian.
Well... why would one cook Italian food when one has an Italian at home to cook Italian food for one?!? I mean... Mrs Dineen did not raise a stupid child!
Over the years I have happily given the Italian cooking reins to Victor. Of course, that doesn't mean that I don't cook Italian, it just means I don't cook it as often as I once did.
Tonight was one of those nights I decided to go for it!
Arugula and Cheese ravioli were the inspiration! I am a huge fan of cooked arugula. I think more people probably use it as a salad green, but it is better than spinach as a side vegetable.
Tonight, I made a pretty simple meat sauce of mushrooms, bell pepper, onion, garlic, and a carrot all minced together in the food processor. I sauteed it and then added a splash of marsala (no red wine in the house?!?) and then some ground beef. When it was all cooked, I added a can of crushed tomatoes and a sprinkling of salt, pepper, and Italian seasoning and let it all cook down.
I sauteed a bunch of fresh arugula in a splash of olive oil and added a bit of garlic and a drizzle of balsamic vinegar.
That went on the plate first, then the ragu, then the ravioli, then a bit more ragu and a bit of freshly-shredded parmesan stravecchio.
It's like riding a bike...
And, since I had the dough in the 'fridge already, I baked off a loaf of bread.

The presentation was a lot of fun and the bread properly crispy on the outside and firm but light on the inside.
Yeah... like riding a bike.
And now for baseball!