Leftovers and Pane Pugliese

Tonights dinner was really nothing more than having a reason to get bread and butter into our mouths.
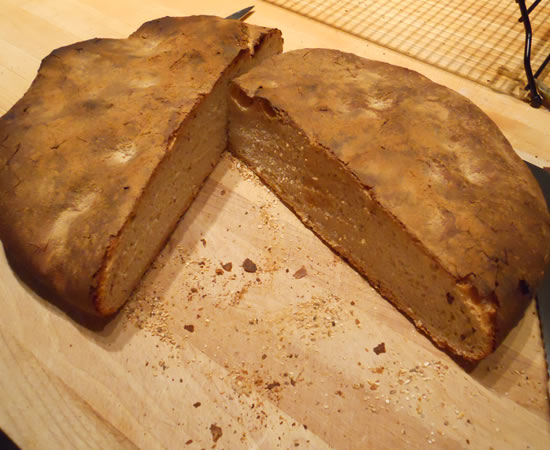
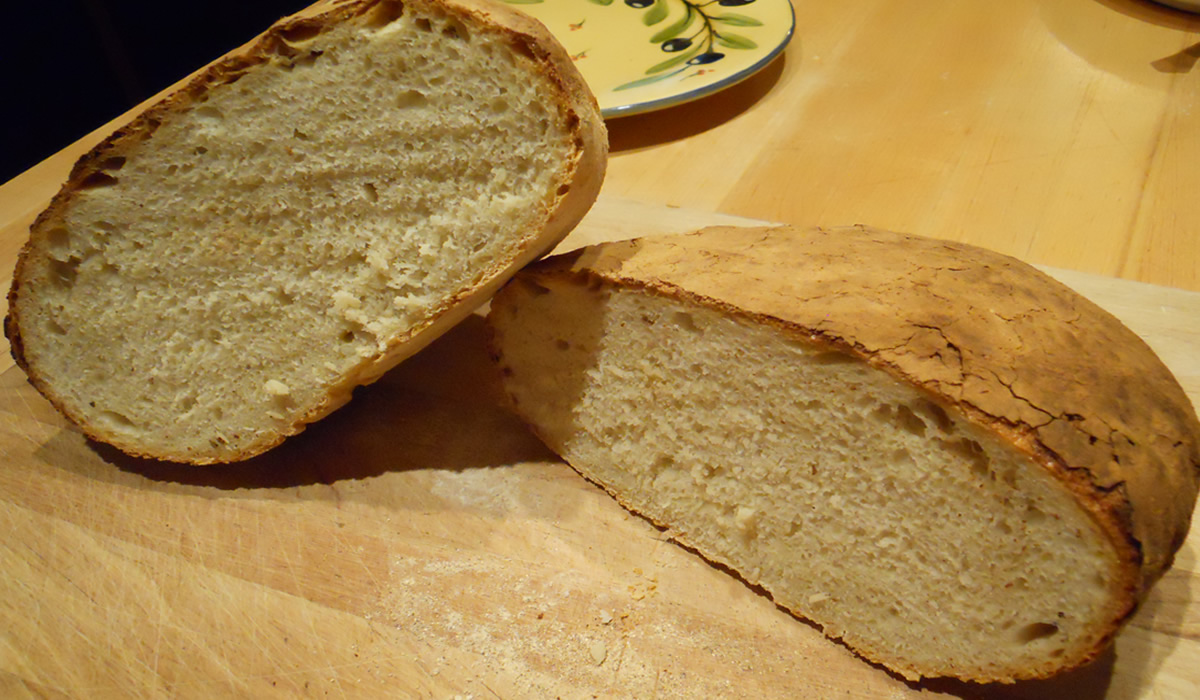
Not just any bread, though... Pane Pugliese - one of my most-favorite rustic breads.
This recipe comes from The Italian Baker by Carol Field. I’ve been making this particular bread forever – and really do like it. It's a dark, crusty, hearty bread that just screams for soup or stew or pasta sauce to sop. It calls for a biga - a starter - that needs to be made the day before. There's also about 4 hours of rising time, so plan accordingly.

Pane Pugliese
- 1 packet dry yeast (or 1/2 package fresh yeast)
- 1/4 cup warm water
- 3 cups water; room temp
- 1 cup biga
- 7 1/2 cups all-purpose flour
- 1 tbsp salt
Proof the yeast in the warm water. Add 1 1/2 c water and the biga, mix till blended. Add flour and salt, mix till dough comes together and pulls off the sides of the bowl. Knead 3-5 minutes in a mixer, longer by hand. Dough will be very soft and elastic. Let rise about 3 hours, shape into 2 small round loaves or 1 big flattish one. If you have baking stones, place loaves on baking peel or on baking sheets sprinkled corn meal. Let rise about 1 hour. Preheat oven to 450°, and 10 minutes before baking flour the loaf tops and dimple them with your fingers. Bake 50-60 minutes for big loaves, 30-35 minutes for small. Tap the loaves to test for doneness (hollow=done) and cool on a rack.
Biga
- 1/2 tsp active dry yeast (or 1/10 package fresh yeast)
- 1/4 cup warm water
- 1 1/4 cup water (room temperature)
- 3 3/4 cups unbleached all-purpose flour
Stir the yeast into the warm water and let stand until creamy – about 10 minutes. Stir in the remaining water and then the flour, one cup at a time.
Mix with the paddle attachment on the mixer at the lowest speed about 2 minutes.
Remove to a slightly oiled bowl, cover, and let rise at cool room temperature for 6 to 24 hours. The starter will triple in volume and still be wet and sticky when ready. Cover and refrigerate until ready to use.
And the timing could not have been better. Earlier today, my sister booked our vacation rentals in Italy for June. A week in Rome and a week in Florence - with day-trips here and there... We won't be as far south as Puglia to get a loaf of this particular bread, but I can't wait to stray off the tourist path and besides eating fabulous meals - actually buy groceries and do a little cooking there!
What fun. I have to get going on my Rosetta Stone Italiano program!
Fresh Bread and Beef Stew
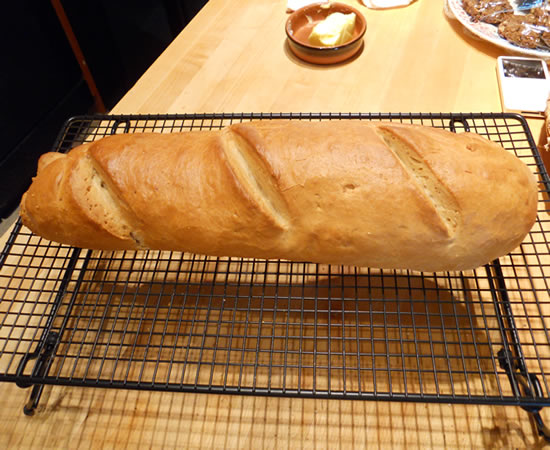
I'm still baking bread - and loving every loaf of it. This is a James Beard bread that only takes a couple of hours from start-to-finish. There is no second rise. The loaf is formed and it goes right into a cold oven.
It's magic.
It's also really good. Great texture and a really crunchy crust. I'm still using the Daisy Organic Flour.
I'm loving it!
James Beard French-Style Bread
- 1 1/2 pk active dry yeast
- 1 tbsp sugar
- 2 cups warm water (100-115 deg.)
- 1 tbsp salt
- 5-6 cups all-purpose or hard wheat flour
- 3 tbsp Yellow cornmeal
- 1 egg white mixed with 1 tbsp cold water
Combine the yeast with sugar and warm water in a large bowl and allow to proof. Mix the salt with the flour and add to the yeast mixture, a cup at a time, until you have a stiff dough.
Remove to a lightly floured board and knead until no longer sticky, about 10 minutes, adding flour as necessary.
Place in a buttered bowl and turn to coat the surface with butter. Cover and let rise in a warm place until doubled in bulk..1 1/2-2 hrs.
Punch down the dough. Turn out on a floured board and shape into two long, French bread-style loaves. Place on a baking sheet that has been sprinkled with the cornmeal, but NOT buttered.
Slash the tops of the loaves diagonally in two or three places with a single edge razor blade or sharp knife, brush the loaves with the egg white wash.
Place in a COLD oven, set the temperature at 400° and bake 35 minutes, or until well browned and hollow sounding when the tops are tapped.
I cut the recipe in half and just make one loaf at a time. This is a serious one-day bread. It does not like being around more than that. But it makes great bread crumbs!

But it does like getting slathered in butter and then dipped into a big bowl of beef stew! I like it, too!
Stew is stew. I don't have a recipe. I just make it.

Beard on Bread

When the Daisy flour arrived last week I knew I was going to have some fun with it.
Baking and I go well together. I love homemade breads, pastries, cakes, cookies, pies... All that good stuff. And if you're going to take the time to do it - use quality ingredients and make the time to do it right.
Coming up with my first loaf of bread, though, presented a bit of a challenge. My first instinct was to make an artisan-type bread. Something rustic and crusty (kinda like me.) In the end, though, I thought a classic white loaf was really where I should begin - and that meant James Beard.
James Beard has been my culinary hero since day two. (Julia Child came first.) I love the introduction to his 1959 cook book - a recipe for boiling water. He taught the basics and then used them to build more complex recipes. In his 1973 Beard on Bread, he demystified bread-making for a generation that was raised on Wonder Bread.
It was to this tome I turned for my first loaf. I've made the Basic White Bread many times. It really is a quick and easy loaf and pretty foolproof. As with most of Beard's recipes, you really have to work at screwing it up.
The recipe below is verbatim from the 1973 cook book. It is long and detailed as his instructional recipes generally are. His subsequent recipes assume the reader has read and understands the basics and he does not repeat himself. The beauty of his cook books and recipes is that he actually explains why something happens and how to compensate for the variables of things such as weather and ingredients. Anyone can cook if they pay attention.
Basic White Bread
This is my idea of a good, simple loaf of bread—firm, honest in flavor, tender to the bite yet with a slight chewiness in the crust, and excellent for toast. The ingredients are just flour, water, salt, and yeast, with the addition of a little sugar. It is a recipe I use constantly, although I vary it from time to time, and I have chosen it as my first recipe here because I think it will provide any beginner with the basic techniques of breadmaking. In fact, it is one I have taught to my pupils through the years. Once you have mastered the procedures given here, you can go on to more complex recipes without difficulty.
As I have said in the introductory observations, there are many variables in breadmaking. As far as flours are concerned, for example, since I know that the hard wheat flour producing the best results in wheat breads is not always easy to come by, in this recipe we’ll use a common unbleached (or bleached) all-purpose flour. And since compressed yeast is often difficult to find and the dry variety is available everywhere, throughout this book we’ll use “active dry yeast” and refer to the measure by package, although occasionally I will suggest the alternative of compressed yeast, since many people enjoy working with it. Some breads call for milk or fruit juice; some, like this one, are made with water. The salt content of bread is adjustable too: I use a rule of thumb of 1 tablespoon for each pound (3¾ cups) of flour; you may alter this to your own taste. There are several ways to knead dough, several ways to shape it into a loaf, and it can be given one or more risings. There is also a choice of washes you can use on the loaf before it goes into the oven, and you can slash the top in different styles or leave it as it is. Even the weather has an effect on breadmaking. The degree of humidity and warmth will govern the absorption quality of the flour and the action of the yeast.
Here, in this first recipe, we’ll reduce decisions to a minimum and put all of these extra factors into footnotes. You should be able to make this loaf successfully the first time around without referring to a single one of the notes. But they will come in handy as you vary ingredients and develop your own style of baking. For instance, if you have small hands, you will probably prefer to use two hands for kneading. The approach to making every loaf of bread is essentially the same, and for that reason you should implicitly have this recipe in mind throughout the rest of the book, as I will not keep spelling out fundamental procedures, such as how to proof or how to knead.
Yield : 1 large loaf or two smaller loaves
Ingredients
- 1 package active dry yeast
- 1½ to 2 cups warm water (l00° to 115°, approximately)
- 2 teaspoons granulated sugar
- 3¾ to 4 cups all-purpose flour (approximately 1 pound)
- 1 tablespoon salt
- 1½ to 2 tablespoons softened butter for buttering bowl and pan
Directions
First, proof the yeast, which means testing it to make sure it is still active. To do this, pour the contents of the package into ½ cup of the warm water (about 100° to 115°), add the sugar, stir well, and set aside. After a few minutes the fermentation of the yeast will become apparent as the mixture swells and small bubbles appear here and there on the surface.
1. While the yeast is proofing, measure 3¾ cups unsifted flour into a 2- to 3-quart bowl with rounded sides. (Save the other ¼ cup flour for kneading, if necessary.) Add the tablespoon of salt and blend well.
2. Pour approximately ¾ cup warm waters into the flour and stir it in with a wooden spoon or with your hands. Add the yeast mixture, and continue stirring until the ingredients are thoroughly blended and tend to form a ball that breaks away from the sides of the bowl. (If the dough is very stiff, add a tiny bit more water.) Transfer the dough to a lightly floured marble slab, bread board, or counter top.
3. Now begin the kneading process, which evenly distributes the fermenting yeast cells through the dough. There are several ways to knead,4 but I prefer this one-handed method: Sprinkle the dough lightly with flour and also flour your working hand. Push the heel of your hand down into the dough and away from you. Fold the dough over, give it a quarter turn, and push again with the hand. Continue the sequence of pushing, folding, and turning until it becomes a rhythmic motion. Knead until the dough no longer feels sticky and has a smooth, satiny, elastic texture, adding more flour, if necessary; this will take anywhere from 4 to 10 minutes, depending on the character of the flour and the warmth and humidity of the room. To test whether the dough has been kneaded enough, make an indentation in it with your fingers; it should spring back. Sometimes blisters will form on the surface of the dough and break, which is another sign that the kneading is sufficient.
4. When the dough has reached the consistency described above—with experience you will know what this means by the feel of it—it is ready for the first rising. (Rising allows the fermenting yeast to produce tiny bubbles of carbon dioxide, which stretches the gluten in the flour and thus leavens the bread.) First, rest the dough on the board for several minutes. Meanwhile, wash out the mixing bowl; dry it, and rub it with 1 to l½ tablespoons of softened butter.
5. Place the ball of dough in the bowl, and roll it around so that it becomes completely coated with butter. (This will keep the surface from drying out and cracking as the dough rises.) Cover the bowl with a piece of plastic wrap or foil or with a towel and set in a warm, draft-free place. (The term “draft-free,” which you will encounter repeatedly, is used because the yeast must be pampered with constant warmth to keep it active.) Find a protected corner or shelf, or use a cool oven (it won’t hurt if the pilot light is on). Allow the dough to double in bulk, which will take about 1 to 2 hours.
It is difficult for a beginner to tell when dough has actually doubled in volume, but the increase is dramatically more than one might expect. You can get the idea best by pouring 4 cups of water into the empty bowl (before it has been greased) and then pouring in the same amount again, noting how high up the water comes. Fortunately there is another, surer test to show when the dough is properly risen. When it looks ready, simply make an indentation in it with two fingers. If the dough does not spring back, then it is ready. It will not hurt should it rise a little too much, but excessive rising will affect the flavor and texture of the finished bread. If for some reason you must prolong a rising, place the bowl of dough in the refrigerator to slow down the action of the yeast.
The dough must now undergo a second rising, which will take place in the baking pan. Thoroughly butter one or two heavily tinned loaf pans.
6. Then remove the cover from the bowl and deflate the dough by pushing down into it with your fist. Transfer it to a floured board, knead it rather well for about 3 minutes, then pat it into a smooth round or oval shape. Let it rest for 4 to 5 minutes, then form it into a loaf about 8 inches long and 3 inches wide.
7. Lift it carefully, drop it into the loaf pan, and smooth it out.Cover the loaf pan, as you did the bowl, and set it in a warm, draft-free place to double in bulk, at which point the loaf will have risen slightly above the edge of the pan. The second rising will take anywhere from 40 minutes to 1¼ hours, according to the warmth of the room and the way you have worked the dough. Don’t rush the process, and watch the dough carefully. Meanwhile, set the oven for 400°.
8. There are various ways to treat the loaf before it goes into the oven. For this recipe, merely brush the dough with cold water, which helps to give the top a textured crust.
9 Then, with a sharp knife make three diagonal slashes about ½ inch deep across the top of the loaf, both for a more professional look and to prevent cracking.
10 Place the pan near the center of the lower oven rack and set a timer for 35 minutes. Begin testing after that time, even though the total baking time may be as much as 50 minutes. To test, rap the top of the loaf with your knuckles. When done, it will sound hollow. Invert the loaf onto a towel held in one hand and test the bottom as well for that hollow sound. If it does not seem quite firm enough and needs only a little more baking, place the loaf directly on the oven rack to crisp the bottom, watching it carefully to prevent it from burning. If the test shows that the bottom is somewhat soft, slide the loaf back into the heated pan and return it to the oven to bake for 5 or 6 minutes more. Test the bottom again, and when firm enough, bake the unmolded loaf a few minutes for the final crisping. When completely baked, remove from the oven and set on a bread rack to cool.
After 2 or 3 hours the bread is good for slicing. When it is thoroughly cooled it can be stored in a plastic bag, in or out of the refrigerator, for several days. It also freezes well, and a frozen loaf, wrapped airtight, can be stored for a month. To reheat, remove from the freezer, wrap in aluminum foil, and heat in a 350° oven for about 20 to 40 minutes.
VARIATION
Whole-Wheat Bread: This same recipe can be used to make a whole-wheat loaf. Merely use 2 cups whole-wheat flour and 1¾ to 2 cups white flour. For a slightly richer loaf, add 3 to 4 tablespoons olive oil or peanut oil to the flour before adding the water, and use slightly less water to compensate for the oil.
Notes
1. If you use compressed yeast, crumble it into a measuring cup, add the sugar, and cream the two ingredients together with a spoon for a minute or two, until the mixture becomes quite soft and runny; this helps activate the yeast. Add the warm water–in this instance no warmer than 95°.
2. I feel that 1 tablespoon of salt to 1 pound of flour is the right seasoning, but some people feel it is too much. You can increase or decrease the amount according to your taste. (A sweet bread, for instance, may not take as much.)
3. Milk can be used instead of water; it makes a somewhat richer bread.
4. Here are three alternative ways to knead:
A. Push into the dough with the heel of your right hand (if you are right-handed), then fold the dough toward you, at the same time giving the mass a quarter turn with your left hand, pulling it toward you; this is one continuous circular motion. Repeat the procedure, increasing your speed. It sounds complicated but is in fact quite simple and fast; and it gives a better fold.
B. Many people prefer to knead with both hands. In this procedure you push into the dough with the heels of the hands, fold the dough over, and give it a quarter turn before pushing again.
C. You can use the dough hook in the electric mixer; see description on page 10.
5. You can also use vegetable oil.
6. You can also use aluminum, aluminum foil, stainless steel, or glass.
7. Here are two alternative ways to shape a loaf:
A. Pat or roll the dough into a strip about as wide as the bottom of the loaf pan and approximately three times the length of the pan. Lightly mark the dough into thirds or just visualize the divisions. Fold the first third over the middle third, and pinch the edges together very well. Fold the final third over the other two thirds, again pinching the edges together. Then with both hands plump the loaf and fit it into the buttered pan.
B. Roll out the dough, and then roll it up into a sausage shape. Tuck the ends under and fit it, seam side down, in the buttered pan.
8. When using glass for baking, always set the temperature 25 degrees lower than is specified, since glass heats faster than metal and holds the heat longer.
9. The dough can also be brushed with a mixture of lightly beaten egg whites and water, which colors the crust and makes it very crisp, or it can be brushed with a mixture of beaten egg yolk and milk, cream, or water, which gives the crust a rich brown color.
10. The loaf can also be slashed lengthwise down the center.
REMEDIES FOR THE NOT-QUITE-PERFECT SLICE
- If your slice sags more than the one on the next page and is soggy to the bite, the dough was not aerated enough. It probably had too much liquid and did not get enough kneading. Next time work in a bit more flour as you knead and keep at it longer.
- If your dough seems to have a pretty good crumb but tastes damp, it means that it did not bake long enough. Try putting it in the oven at a slightly lower temperature at the start and let it cook longer.
- If your loaf has really fallen flat and doughy, gooey streaks appear in the slices, the chances are that the second rising was too long and the bread collapsed on contact with the heat. Be careful not to let the loaves rise too much in the pans.
- If your bread has risen more on one side than on the other, you probably had it in the wrong position in the oven. And if the slice has an uneven crumb, this is certainly true. Next time be sure to place a single loaf in the center of the oven so that uneven distribution of heat won’t upset the form and shape of the loaf while it is baking. Usually, if you have several loaves in the oven, evenly spaced, this problem will not occur, since the flow of air around the pans will be regular.
- If your loaf has cracked on one side during the baking, don’t worry. It is likely to be a perfectly good loaf–in fact, it may be utterly delicious–even if it doesn’t look beautiful. This is something that at times even the best bakers can’t prevent.
- If the bottom and side crusts are pale and soft and the bread is difficult to slice without having to saw with a very sharp knife, next time remove the bread from the pan and place it on the rack or on tiles in the warm oven to brown and crisp the bottom and sides, turning the loaves once, before cooling. (Also, do not ever wrap loaves in plastic before they are thoroughly cooled.)
- If your bread has really mushroomed and there is a rather deep indentation around the bottom, it means that the entire loaf has broken away from the bottom crust, probably because you tried to pack too much dough into too small a pan, or, if you were making a free-form loaf, your oven was undoubtedly too hot at first so that the bottom cooked too quickly and as the loaf rose it broke away and mushroomed. In either case you’ll have an uneven slice, denser at the bottom than at the top, but this is no great tragedy.
- If your free-form loaf spread too much as it was rising, your dough was too soft. Free-form loaves must be quite firm when shaped. Next time remember to add extra flour as you are kneading and if you are still uncertain put the dough in a ring to contain it.
- If, when slicing your bread, you find that the top crust separates from the rest, it means your loaf was not properly formed and the heat caused instant aeration when it was put in the oven. This is not a serious matter and sometimes happens even with commercial breads. To remedy, try one of the alternate methods of forming to get a tighter loaf.
- Large holes in your bread indicate that you may have overkneaded or that the dough rose too long. This is an advantage with certain freeform loaves, particularly French, but with other breads an even crumb is one of the attributes of good baking. All this is really a matter of taste, however, and if you really like a strong bread with big holes and a chewy texture, given the dough lots of kneading and a long, slow rise–even two risings.
- If there are circular streaks in your slice, don’t worry. They are usually caused by the rolling and pinching of the dough when you formed your loaf, and you probably pinched too vigorously.
- If your slice has doughy or small, hard lumps, it is certain that the original dough was not mixed sufficiently, possibly because it got too stiff to handle. Next time hold back on the flour so that the dough gets thoroughly mixed, then work in additional flour as you knead.

The recipe calls for 3 3/4 to 4 cups of flour - or 1 pound. Weights are more accurate than cups, so if you have a scale, use it!

I use a KitchenAid mixer to make the dough but always finish it off by hand. All of the precise measurements in the world cannot compete with your hands for knowing exactly when the dough is ready.

Place in a well-buttered bowl and roll the dough around to cover it completely with a butter film. This keeps the dough from drying out and forming a tough skin.

Let the dough rise until it is double in bulk and when your fingers pressed into the dough leave an impression.

Pat the dough out to the size of your pan. Starting at the top, roll it towards you with the heels of your hands, pinching and sealing it as you go.

Place formed loaf into buttered pan and cover for second rise.

After second rise.

Brush loaf with water and slit top. Three width-wise cuts or one lengthwise cut will work. Bake..

Let cool and then enjoy...
And enjoy, we did!
Hands-down one of the best loaves of plain ol' sandwich bread I've ever made! A perfect crust and a perfect crumb. Soft, but with substance. Out-of-this-world-goodness!
So, you ask... is it the flour or is it the recipe?
And the answer is both, of course. A perfect flour with a mediocre recipe will result in a mediocre product. The same holds true with the flour - mediocre flour will produce a mediocre product no matter how fantastic the recipe.
So thank you, James Beard, and thank you, Daisy Flour.
I have a feeling I'm going to be making a lot of this.
It's perfect.
Meatloaf and Fresh-Baked Bread

It's still colder than cold outside. Spring has not sprung.
I have all sorts of plans for the coming warm weather... Lots of salads, of course, but I also want to play with a "BBQ Sauce of the Week" idea... There are just so many BBQ sauce ideas out there that I think it might be fun to see just what I can come up with. I want to redo the Root Beer BBQ Sauce - it just didn't have enough of a root beer kick, and I'm thinking different fruits - peaches, definitely - and different chilis, some regional differences... the possibilities are pretty endless and should keep me busy for a while.
But that's tomorrow - or, next month. Whenever the weather starts getting better. In the meantime, it's winter food. Meatloaf.
Meatloaf is a non-recipe meal, generally. I just put stuff together and that's that.
But every now and again, I need to do something just a little bit different. I started hunting through old recipes and found this in an old Gourmet MNagazine:
Meatloaf
Gourmet | February 2008
Ian KnauerThis is the perfect antidote to the Sunday blues, not least because there will be enough left over to pack sandwiches for Monday's lunch. A mix of beef, pork, and bacon ensures meatiness, with Worcestershire sauce, chopped prunes, and cider vinegar added for good balance and occasional suggestions of sweetness. Because the loaf is baked without a loaf pan, there's plenty of well-browned crust to go around.
Yield: Makes 6 servings with leftovers
Active Time: 30 min
Total Time: 1 1/2 hr
ingredients
- 1 cup fine fresh bread crumbs (from 2 slices firm white sandwich bread)
- 1/3 cup whole milk
- 1 medium onion, finely chopped
- 3 garlic cloves, minced
- 1 medium celery rib, finely chopped
- 1 medium carrot, finely chopped
- 2 tablespoons unsalted butter
- 2 tablespoons Worcestershire sauce
- 1 tablespoon cider vinegar
- 1/4 teaspoon ground allspice
- 1/4 pound bacon (about 4 slices), chopped
- 1/2 cup pitted prunes, chopped
- 1 1/2 pounds ground beef chuck
- 1/2 pound ground pork (not lean)
- 2 large eggs
- 1/3 cup finely chopped flat-leaf parsley
Garnish: cooked bacon
preparationPreheat oven to 350°F with rack in middle.
Soak bread crumbs in milk in a large bowl.
Meanwhile, cook onion, garlic, celery, and carrot in butter in a large heavy skillet over medium heat, stirring occasionally, 5 minutes. Cover skillet and reduce heat to low, then cook until carrot is tender, about 5 minutes. Remove from heat and stir in Worcestershire sauce, vinegar, allspice, 2 teaspoons salt, and 1 1/2 teaspoons pepper. Add to bread-crumb mixture.
Finely chop bacon and prunes in a food processor, then add to onion mixture along with beef, pork, eggs, and parsley and mix together with your hands.
Pack mixture into a 9- by 5-inch oval loaf in a 13- by 9-inch shallow baking dish or pan.
Bake until an instant-read thermometer inserted into center of meatloaf registers 155°F, 1 to 1 1/4 hours. Let stand 10 minutes before serving.
Of course, I didn't follow the recipe, but it was my base.
I didn't use bacon, prunes, ground pork, or parsley. I more-or-less followed the rest of the recipe, using three pounds of ground beef, three carrots and three stalks of celery.
I also didn't bake it in a baking dish.
It really came out good.
And I baked bread.
I've been a bit remiss in my artisan bread-baking and thought it time to get back into it.
The bread is just super-easy to make.
- 6 1/2 cups flour
- 1 1/2 tbsp yeast
- 1 1/2 tbsp salt
- 3 cups water
Mix all ingredients, cover, and let rise three hours. At this point you can punch it down and refrigerate.
When ready to bake bread, cut off 1/4 of the dough and for into a ball. Place on cornmeal-sprinkled baking sheet or bread peel. Let rise 30 minutes. Cut deep slits into dough with very sharp knife.
Preheat oven to 450° with pizza stone on middle rack and rimmed sheet pan on bottom rack.
Slide dough onto hot pizza stone and immediately add 1 cup of hot water to sheet pan.
Quickly close oven and bake for 30 minutes.
You can add different flours to the basic recipe. I usually do 4 cups white to 2 1/2 cups whole wheat. Today I did 1/2 cup rye and 1/2 cup buckwheat to 5 1/2 cups white.
It came out great.
Beef Stew and Beer Bread

It's amazing how much fun it is to decorate the house for Christmas and what a chore it is to take everything down. And how do decorations get so dirty?!? Do I stop and wash or clean things or say hell with it and pack 'em away, thinking I'll be in a better vrame of mind to deal with them next year?!?
You may guess which route I chose...
Spending the day taking down decorations means a day not spent in the kitchen cooking. But I still wanted a decent dinner.
Beef stew was the logical choice. It could sinner while I stewed about the 487 trips up-and-down the basement steps with 632 plastic bins full of 7,874,928 santas and other decorations.
We decided that if we ever won the lottery, we would have two identical wings to the house. One would always be decorated for Christmas. We'd just close it off until the holidays and open it up and close the other. I'd never have to worry about stowing dirty ornaments, again.
As we were getting towards the end of the bins, I decided we needed bread to go with dinner.
The quickest loaf to bake was definitely George and Suzanne's Quick Beer Bread.
I made this particular loaf with Samuel Smith's Nut Brown Ale. I keep several bottles of beer in the 'fridge just for cooking and making beer bread. I've been on the no-knead kick for a while and the beers have just been sitting there. The type of beer definitely changes the flavor. I tend to go for the darker beers, but a light pilsner works very well, also.
 Beer Bread

- 3 cups self-rising flour
- 2 tbsp sugar (raw sugar works best)
- 12 oz beer
Use a 4″ x 8″ bread pan. Mix and bake at 350° about 1 hour. Top with melted butter.
If you don't have any self-rising flour in the cupboard, don't fret. Use:
- 1 cup flour
- 1 1/4 tsp baking powder
- 1/4 teaspoon salt
per cup of flour.
I'm seeing toast for breakfast.....

White Bread

I remember my mom making a chocolate fruitcake many many moons ago. I really don't remember much about it other than I liked it at the time. I think she only made it once , or, at least, I only remember it once. It definitely wasn't a Christmas tradition.
It's a bit of a cold day out there, I'm getting that Christmas-Baking-Bug, and I decided to see if I could find that recipe. I got out her cook books and started looking. I didn't find it, but I did find a score of bread recipes. Being the easily-sidetracked person that I am, I decided to bake a loaf of bread as well as make a fruitcake.
We had the ingredients.
I have the cook books scanned into the computer but there really is nothing like pulling out and holding and reading the real thing. The notes she made, comments, alterations... It really does bring me back to a simpler place and time. Well... simpler for me... I really can't imagine having six kids in the house.

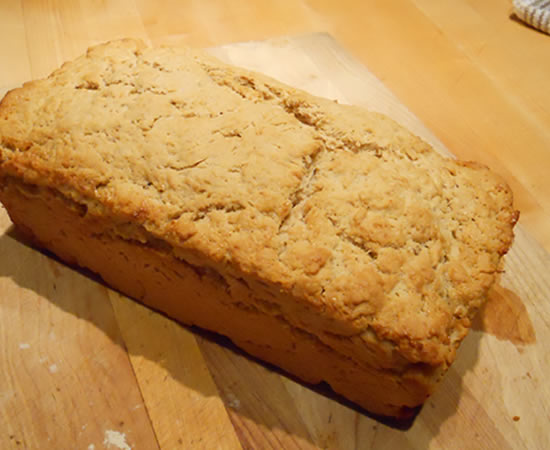
It's a really loose batter bread. Really loose. It's a no-knead bread because there's no way it could ever be kneaded. The batter literally pours into the pan.
But it came out looking great!

The top split in the oven but it has all the appearances of a very light bread. I have a small ham for dinner tonight but I'm thinking ham sandwiches might be on the menu!
Light without being "squishy" with a great crust! It's definitely going to be a good sandwich bread.
Beef Stew and Fresh-Baked Bread

The weather was wet and chilly all day long. Perfect for a pot of stew and a loaf of bread. I've been craving a stew for a while now, but the weather just wasn't cooperating. It finaly did, today.
My recipe for stew is pretty basic - beef, potatoes, onions carrots and celery. Garlic powder, a splash of red wine, beef broth... I don't go too crazy when I'm making plain ol' comfort-food stew. No recipe. I just throw the stuff in the pot .
My mom used coffee in her stew. It made for a really rich broth. Back in those days, we had a coffee pot going in the house 24/7. Someone was always brewing or drinking a cup. It was easy to add - it was always available.
I tend to eschew the coffee in favor of a cup of red wine, although if there's coffee in the pot, I'll always throw it in. It really does add flavor and you don't taste "coffee" when you do it.
And I made more bread.
This egg white recipe really rocks!
It is crusty-crunchy, soft and chewy. It's my favorite of the no-knead breads I've tried thus far! And it is so simple. It's adding 3 egg whites in the measuring cup to make 3 cups total of liquid, following the basic recipe, and brushing the bread with an additional egg white before going into the oven.
It is seriously good!
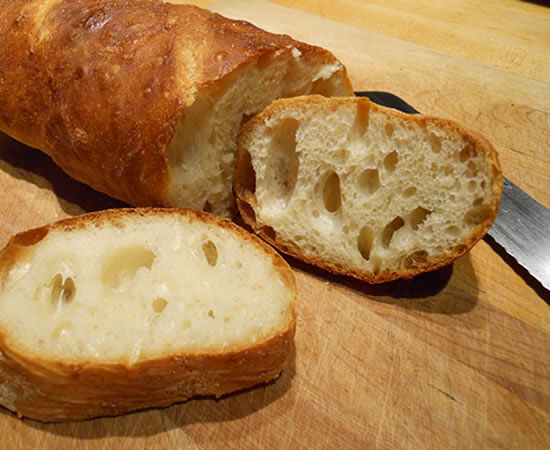
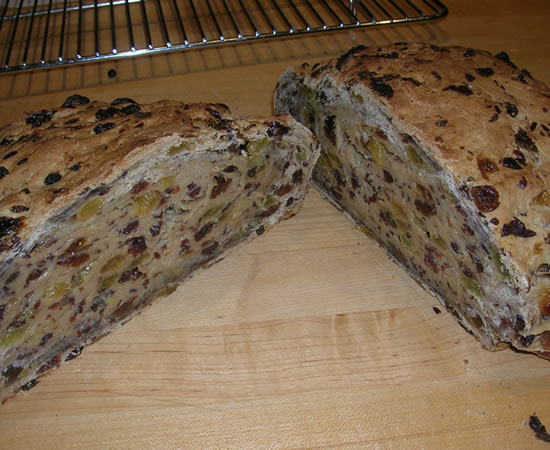
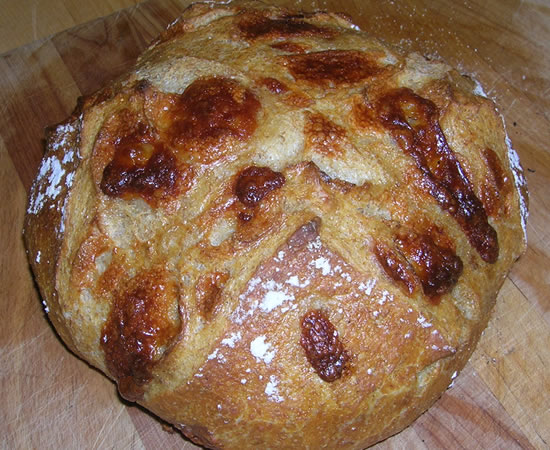
Pane Pugliese
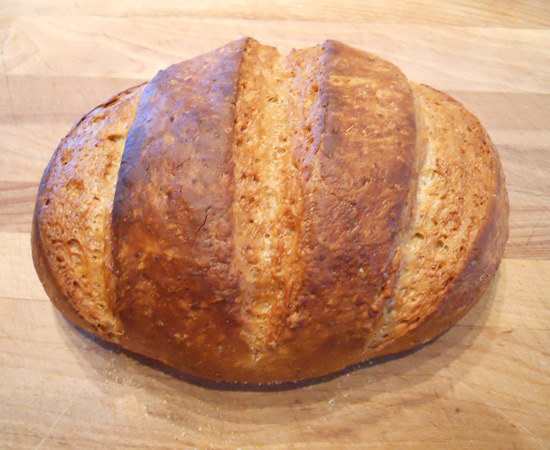
Victor's making his Monday Masterpiece, so I've baked a loaf of bread to go along with it.
The Pane Pugliese is a rustic bread from Puglia. Puglia is Italy's heel - and the perfect accompaniment to tonight's pasta sensation!
The bread calls for a biga - a starter - that needs to be made the day before.

This recipe comes from The Italian Baker by Carol Field. It's one of the few cook books we didn't get rid of a few years ago. I've been making this particular bread forever - and really do like it.
Pane Pugliese
- 1 packet dry yeast (or 1/2 package fresh yeast)
- 1/4 cup warm water
- 3 cups water; room temp
- 1 cup biga
- 7 1/2 cups all-purpose flour
- 1 tbsp salt
Proof the yeast in the warm water. Add 1 1/2 c water and the biga, mix till blended. Add flour and salt, mix till dough comes together and pulls off the sides of the bowl. Knead 3-5 minutes in a mixer, longer by hand. Dough will be very soft and elastic. Let rise about 3 hours, shape into 2 small round loaves or 1 big flattish one. If you have baking stones, place loaves on baking peel or on baking sheets sprinkled corn meal. Let rise about 1 hour. Preheat oven to 450°, and 10 minutes before baking flour the loaf tops and dimple them with your fingers. Bake 50-60 minutes for big loaves, 30-35 minutes for small. Tap the loaves to test for doneness (hollow=done) and cool on a rack.
And the biga. I would imagine it could stay in the 'fridge and just keep adding to it as I used to do with my starters years ago.

The bread is wild. It rises wild, it bakes wild. It really has a mind of its own. One of the reasons I really like it. The unpredictability is what makes it fun.
Biga
- 1/2 tsp active dry yeast (or 1/10 package fresh yeast)
- 1/4 cup warm water
- 1 1/4 cup water (room temperature)
- 3 3/4 cups unbleached all-purpose flour
Stir the yeast into the warm water and let stand until creamy – about 10 minutes. Stir in the remaining water and then the flour, one cup at a time.
Mix with the paddle attachment on the mixer at the lowest speed about 2 minutes.
Remove to a slightly oiled bowl, cover, and let rise at cool room temperature for 6 to 24 hours. The starter will triple in volume and still be wet and sticky when ready. Cover and refrigerate until ready to use.

I made one loaf and froze the rest of the dough - as well as the biga.

Ready to go into the hot oven!
This bread is stellar! It is really crusty with a great interior.

I can't wait for dinner!
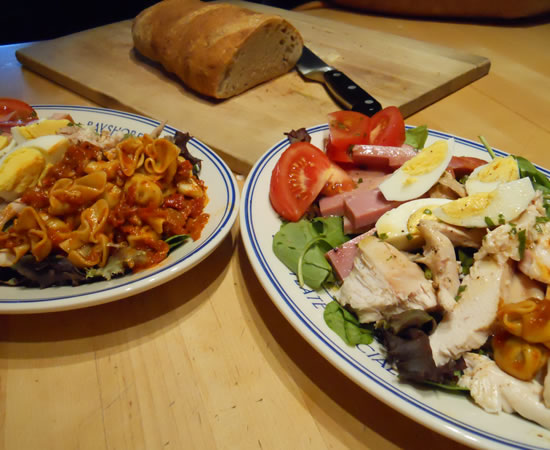
Chicken Salads and Homemade Bread
When I cooked yesterday's chicken, I had tonight's dinner in mind. I knew I was going to make salads - I just wasn't sure what was going to be in (or on) them.
Cold chicken started me thinking about ham. Victor had boiled some eggs, so A Cobb-type salad was formulating. And then some ravioli, or tortellini, or something...
I settled on perline pasta mixed with a red pepper and eggplant dip I had in the cabinet. Quick and easy pasta salad.
The bread was a take on the no-knead breads I've been making for a while. I finally got a copy of the actual book Artisan Bread in Five Minutes A Day. (It was a freebie using Zoom Panel points.)
Fun.
There was a recipe for a rustic bread using whole wheat and rye flour. Since I just happened to have both in the cabinet, I made a half-batch of the dough last night. When I got home today, I formed the loaf, put it outside into Mother Nature's proofing box, and in 30 minutes it was in the oven!
Half-Batch Rustic Bread
- 1 1/2 cups lukewarm water
- 1-1/2 tbsp yeast (1 packet)
- 3/4 tbsp kosher salt salt
- 3 cups flour
- 1/4 cup rye flour
- 1/4 cup whole wheat flour
Mix all ingredients. Let proof about 2 hours.
Refrigerate. (Dough is ready at this point but handles better when chilled.)
Preheat oven to 450°.
Form grapefruit-sized ball of dough into loaf.
Let rise about 30 minutes.
Bake for 25 minutes.
Cool before slicing.
It was pretty good!
Brioche and Beef
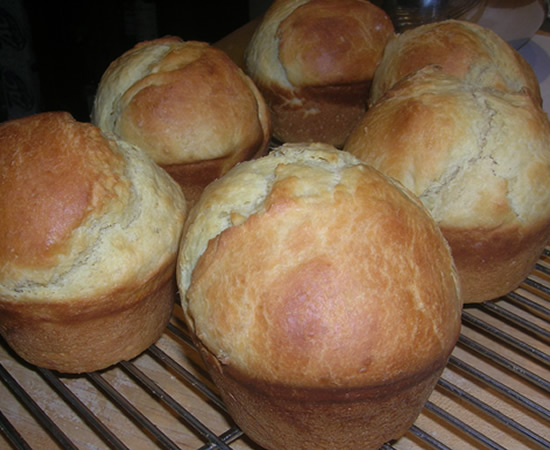
I've been thinking that the no-knead brioche dough would make great hamburger buns so tonight I did a bit of an experiment...
Using over-sized muffin tins, I made some rolls. Fantastic tasting. A wee bit too big! Definitely no way they could be used as a bun, although I did make sandwiches with them tonight with grilled london broil. Did I say a wee bit too big?!? Let me rephrase that... really too big! But dayum, were they good!
I made the dough last night using the basic recipe. I didn't weigh them when I made them today, but I have a pretty good idea of how big they were - a little larger than a jumbo egg. I'll need to cut the size in half, at least. I see another experiment in a day or so!
In the meantime, here's what I did for dinner tonight. Sliced grilled london broil with a chipotle powder rub on the rolls with a green chili mayonnaise. And fries.

I didn't even try to pick it up. I made it open-faced and ate it with a knife and fork.
This recipe is direct from the Artisan Bread in Five Minutes a Day website. I have now made it twice and it's completely foolproof!
Brioche dough
(makes about 4 loaves)
- 1 1/2 cups lukewarm water
- 1 1/2 tablespoons granulated yeast (2 packets)
- 1 1/2 tablespoons kosher salt
- 8 large eggs, lightly beaten
- 1/2 cup honey (this is my all time favorite!)
- 1 1/2 cups (3 sticks) unsalted butter, melted
- 7 1/2 cups unbleached all-purpose flour
Mix the yeast, salt, eggs honey and melted butter with the water in a 5-quart bowl, or lidded (not airtight) food container.
Mix in the flour, using a spoon until all of the flour is incorporated.
Cover (not airtight), and allow to sit at room temperature for about two hours.
The dough can be used as soon as it is chilled. This dough is way too sticky to use after the initial rise, but once it is chilled it is very easy to handle. It can be used to create the Tatin or any of these brioche recipes: caramel sticky buns, grilled fruit tart, Fresh Fruit Muffins, Brioche à tête, apricot pastries and fabulous doughnuts! The dough can be stored in the refrigerator for up to 5 days. After that you can freeze the dough.
It's gonna make an awesome burger bun!
When Irish Eyes Are NOT Smiling
I planned on bringing a loaf of Irish bread to work today.
I have made this bread so many times I can do it blindfolded. However... the basic laws of bread-making do not change just because one decides he's in a hurry. I proved that last night.
I set out to make my absolute favorite yeasted fruit bread - a barmbrack. As I said, I've made it for years and have never had an issue. It has always come out perfect - until last night.
I knowingly made two very basic mistakes - and threw away the result.
I had soaked my fruit in the requisite Jameson's for two days. I had all my ingredients together. I heated the cup of milk in the microwave. Mistake number one. It was too hot to mix with the yeast. I could have just put it on the counter (or even the refrigerator) and walked away for a few minutes, but I was impatient. I decided just to add the dry yeast to the flour, et al, and add the too-hot milk to it. It would be cool enough. But it wasn't.
My liquid was too hot and my yeast may or may not have been good. The end result was my impatience and failure to follow the very most basic bread-making steps ruined what should have been a magnificent loaf of bread.
Even more fun is that I talked it up at work for several days and now get to walk in empty-handed and explain that I totally screwed up.
I hate that.
Here's the recipe in case you want to give it a try. It really is great - when you follow the instructions.
Barmbrack
Barmbrack is a traditional Irish spiced fruit bread. It’s delicious sliced, toasted and buttered – or you can eat it on its own. I found this recipe years ago and made it for my father’s cousins on St Paddy’s Day when they were visiting San Francisco.
Traditionally, the fruit is soaked overnight in 2 cups of strong Irish tea. This recipe calls for the fruit to be soaked in 2 cups of Irish whisky overnight. I’ve made it both ways and really prefer the whisky version the best!
Ingredients:
- 3 ½ cups mixed dried fruit (raisins, golden raisins, sultanas, currants, candied peel)
- 1 cup whole milk
- 1 tsp sugar
- 2 tsp active dry yeast
- 3 cups bread flour
- 1 tsp salt
- ¼ cup brown sugar
- 1/3 cup butter (Kerrygold or Plugra European style butter!)
- 1 beaten egg
- 2 tsp mixed spices (allspice, cloves, nutmeg, cinnamon…)
Soak the dried fruit in 2 cups of Irish whisky overnight.
Warm the milk slightly (no more than 110°.) Stir in the teaspoon of sugar and the yeast and let proof about 10 minutes.
Mix the flour, salt and brown sugar in a large bowl. Rub in the butter or margarine. Add the frothy yeast, the beaten egg and the spice. Drain any remaining liquid from the fruit and add the fruit to the mixture. Mix well to make a smooth dough (add more flour if the mixture is too wet).
Turn the dough onto a floured board and knead it thoroughly. (I use my KitchenAid and mix about 6 minutes.) Place the dough in a well-greased 8”-9” springform pan, cover with a cloth, and leave in a warm place to rise for 45 – 60 minutes or until doubled in size.
Place the pan in a preheated 350° oven and bake for about 50 minutes. The loaf will be ready when it sounds hollow when you tap on it.
Remove from pan and cool on a wire rack before serving.

Hopefully it won't look like this.
Salads and Cheesy Bread

Did my weigh-in at work. I lost 2 pounds this past week. I'm happy. That's not a bad achievement considering we have dessert virtually every night. But it also shows that if one takes the time to cook real food and not fill up on processed crap all day, you can have your cake and eat it, too. It's all about balance - and real calories that will do me some good versus crap calories that are nothing more than crap calories.
We're fully into salad mode, now. It's cold and raining, but I grilled a couple of thin-sliced round steaks to add to salads, and I made a loaf of bread to go along with it. Cheesy bread.
I cubed up some sharp provolone and mixed it in before forming the dough into a ball.
And if a couple of slices of provolone bread with roasted garlic butter wasn't celebration enough for losing a couple more pounds, I'm making a yellow cake for dessert! Real cake - not a mix. It's in the oven right now.
I'm thinking chocolate icing.....