

While family and friends across the USofA are getting pummeled by snow and ice, we’re supposedly going to see a bit of slushy snow tonight that turns into rain on Sunday with a temperature hovering close to 50°F. On Monday, we’re supposed to drop to single digits turning the roads into a surface suitable for a Shipstad and Johnson’s show.
The forecasts around here change every couple of minutes, so I’m counting on anything being possible – and keeping open the idea that we could be buried under ten feet of snow, have torrential rains and floods, or sunshine and blue skies.
Anything is possible.
And, we’re prepared for anything. There’s plenty of food in the house and no reason to leave. We’re prepared.
I think my funniest we’re prepared story goes back to 2012 when I was working at Trader Joe’s and a woman came in right before Hurricane Sandy was scheduled to hit land. She was panic-buying and was putting a dozen cans of tuna in her cart – along with everything else in the store – complaining that she hated tuna. I asked her why she was buying it, and she said they said I need canned tuna in my disaster kit. I tried to explain that it was just a suggestion for protein foods that didn’t need refrigeration but she was adamant that she needed it – even though she hated it. I just shook my head.
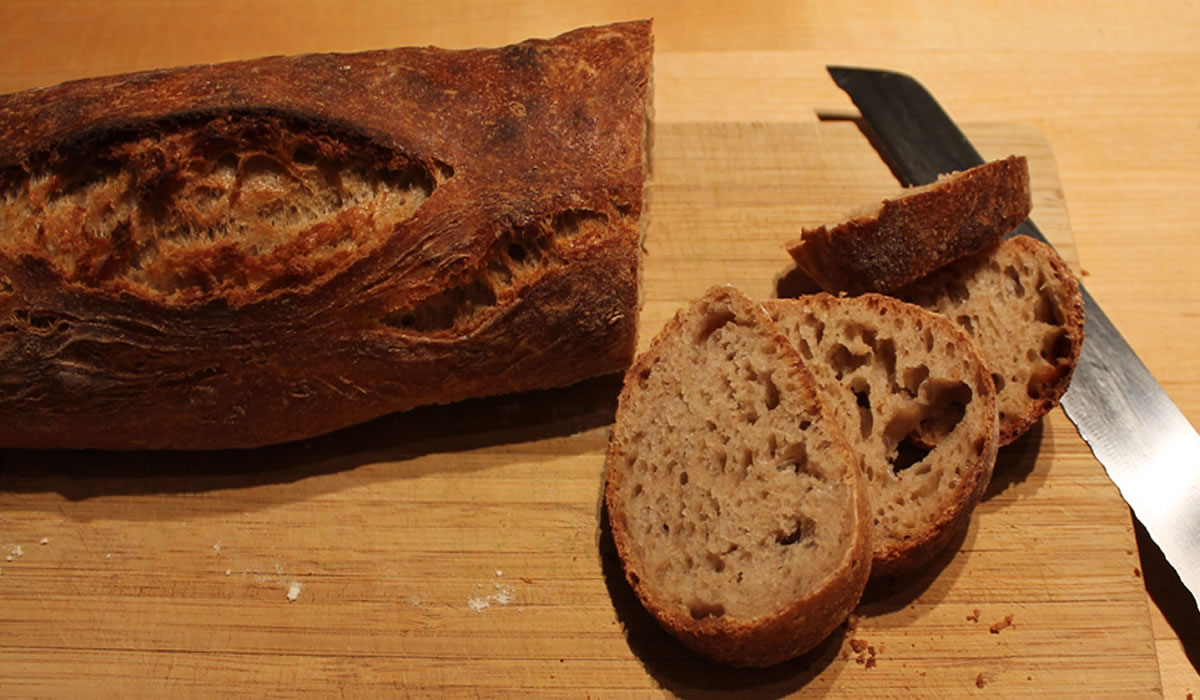
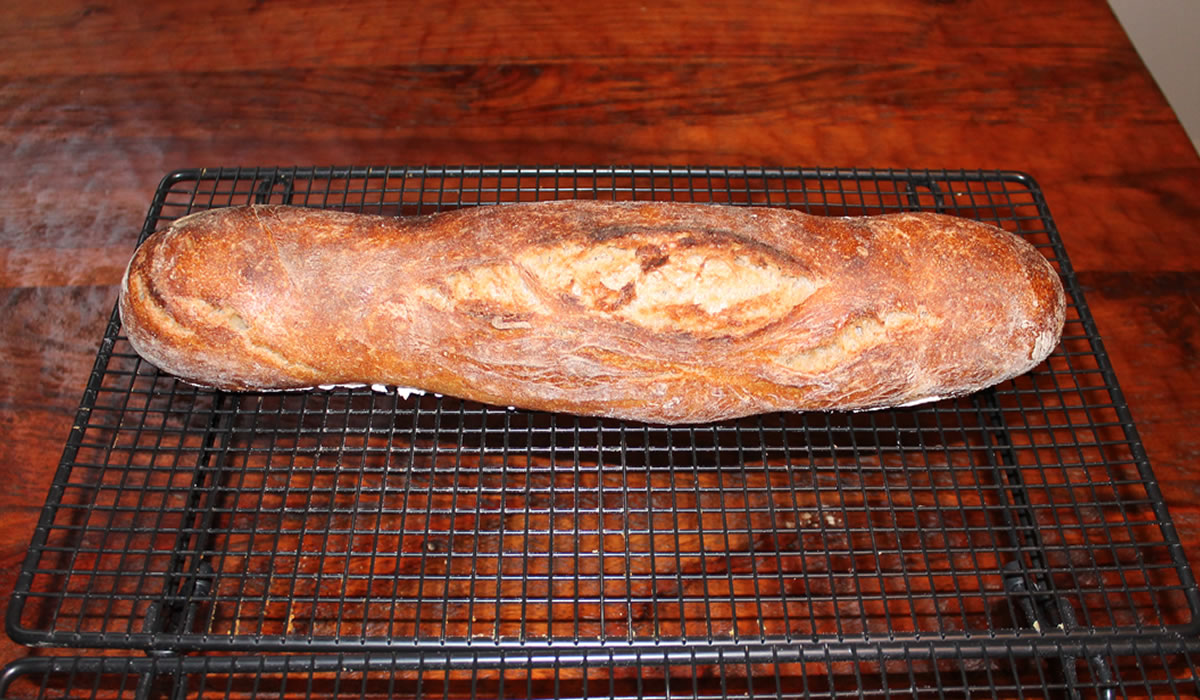
It’s a nice, quiet, and relaxing day around here, so I thought I’d bake my mandatory bread instead of buying it. Our friend, Susan, had just baked some gorgeous loaves from Flour Water Salt Yeast by Ken Forkish, so I thought I’d give it a try, as well. It’s a very straightforward dough, but takes hours of proofing time – especially in the winter when room temperature in is the sixties. I bake a lot of bread, but have used the ol’ KitchenAid mixer for most of them. I actually used my hands for this one. I guess I’ve been watching too much of the Great British Bake Off. Paul is pushing me back to my roots.
I found the recipe online on many different sites – so I don’t feel bad about reposting, here. And I have ordered the book. You should, too. I definitely recommend using a scale, but if you don’t have one, cup measurements will suffice.
I used 700 grams “00” flour, 200 grams whole wheat, and 100 grams rye. I also don’t have proofing baskets so I use a colander with a floured towel for one and made a baguette with the other.
Saturday White Bread
adapted from Flour Water Salt Yeast by Ken Forkish
Ingredients
- White flour 1,000 g — 7¾ cups
- Water 720 g, 90ºF to 95ºF (32ºC to 35ºC) — 3 1/8 cups
- Fine sea salt 21 g — 1 tbsp + 1 scant tsp
- Instant dried yeast 4 g — 1 tsp
1. Autolyse
Combine the 1,000 grams of flour with the 720 grams of 90°F to 95°F (32°C to 35°C) water in a 12-quart round tub or similar container. Mix by hand just until incorporated. Cover and let rest for 20 to 30 minutes.
2. Mix
Sprinkle the 21 grams of salt and the 4 grams (1 level teaspoon) of yeast evenly over the top of the dough. Mix by hand, wet-ting your working hand before mixing so the dough doesn’t stick to you. (It’s fine to rewet your hand three or four times while you mix.) Reach underneath the dough and grab about one-quarter of it. Gently stretch this section of dough and fold it over the top to the other side of the dough. Repeat three more times with the remaining dough, until the salt and yeast are fully enclosed.Use the pincer method to fully integrate the ingredients. Make five or six pincer cuts across the entire mass of dough. Then fold the dough over itself a few times. Repeat, alternately cutting and folding until all of the ingredients are fully integrated and the dough has some tension in it. Let the dough rest for a ew minutes, then fold for another 30 seconds or until the dough tightens up. The whole process should take about 5 minutes. The target dough temperature at the end of the mix is 77°F to 78°F (25°C to 26°C). Cover the tub and let the dough rise.
3. Fold
This dough needs two folds. It’s easiest to apply the folds during the first 1½ hours after mixing the dough. Apply the first fold about 10 minutes after mixing and the second fold during the next hour (when you see the dough spread out in the tub, it’s ready for the second fold). If need be, it’s okay to fold later; just be sure to leave it alone for the last hour of rising. When the dough is triple its original volume, about 5 hours after mixing, it’s ready to be divided.
4. Divide
Moderately flour a work surface about 2 feet wide. Flour your hands and sprinkle a bit of flour around the edges of the tub. Tip the tub slightly and gently work your floured free hand beneath the dough to loosen it from the bottom of the tub. Gently ease the dough out onto the work surface without pulling or tearing it. With floured hands, pick up the dough and ease it back down onto the work surface in a somewhat even shape. Dust the area in the middle, where you’ll cut the dough, with a bit of flour. Cut the dough into 2 equal-size pieces with a dough knife or plastic dough scraper.
5. Shape
Dust 2 proofing baskets with flour. Shape each piece of dough into a medium-tight ball. Place each seam side down in its proofing basket.
6. Proof
Lightly flour the tops of the loaves. Set them side by side and cover with a kitchen towel, or place each basket in a nonperforated plastic bag. Plan on baking the loaves about 1¼ hours after they are shaped, assuming a room temperature of about 70°F (21°C). If your kitchen is warmer, they will be optimally proofed in about 1 hour. Use the finger-dent test to determine when they are perfectly proofed and ready to bake, being sure to check the loaves after 1 hour. With this bread, 15 minutes can make the difference between being perfectly proofed and collapsing a bit.
7. Preheat
At least 45 minutes prior to baking, put a rack in the middle of the oven and put 2 Dutch ovens on the rack with their lids on. Preheat the oven to 475°F (245°C). If you only have 1 Dutch oven, put the second loaf into the refrigerator about 20 minutes before baking the first loaf and bake the loaves sequentially, giving the Dutch oven a 5-minute reheat after removing the first loaf. Alternatively, you can keep the second loaf in the refrigerator overnight, in its proofing basket inside a nonperforated plastic bag, and bake it early the next morning; if you do this, put the second loaf in the refrigerator immediately after shaping.
8. Bake
For the next step, please be careful not to let your hands, fingers, or forearms touch the extremely hot Dutch oven. Invert the proofed loaf onto a lightly floured countertop, keeping in mind that the top of the loaf will be the side that was facing down while it was rising—the seam side. Use oven mitts to remove the preheated Dutch oven from the oven. Remove the lid. Carefully place the loaf in the hot Dutch oven seam side up. Use mitts to replace the lid, then put the Dutch oven in the oven. Maintain the temperature at 475°F (245°C). Bake for 30 minutes, then carefully remove the lid and bake for about 20 more minutes, until at least medium dark brown all around the loaf. Check after 15 minutes of baking uncovered in case your oven runs hot. Remove the Dutch oven and carefully tilt it to turn the loaf out. Let cool on a rack or set the loaf on its side so air can circulate around it. Let the loaf rest for at least 20 minutes before slicing.
The only caveat I have with this recipe is it takes time. The slow rise develops the flavor and texture, so don’t try to rush it.
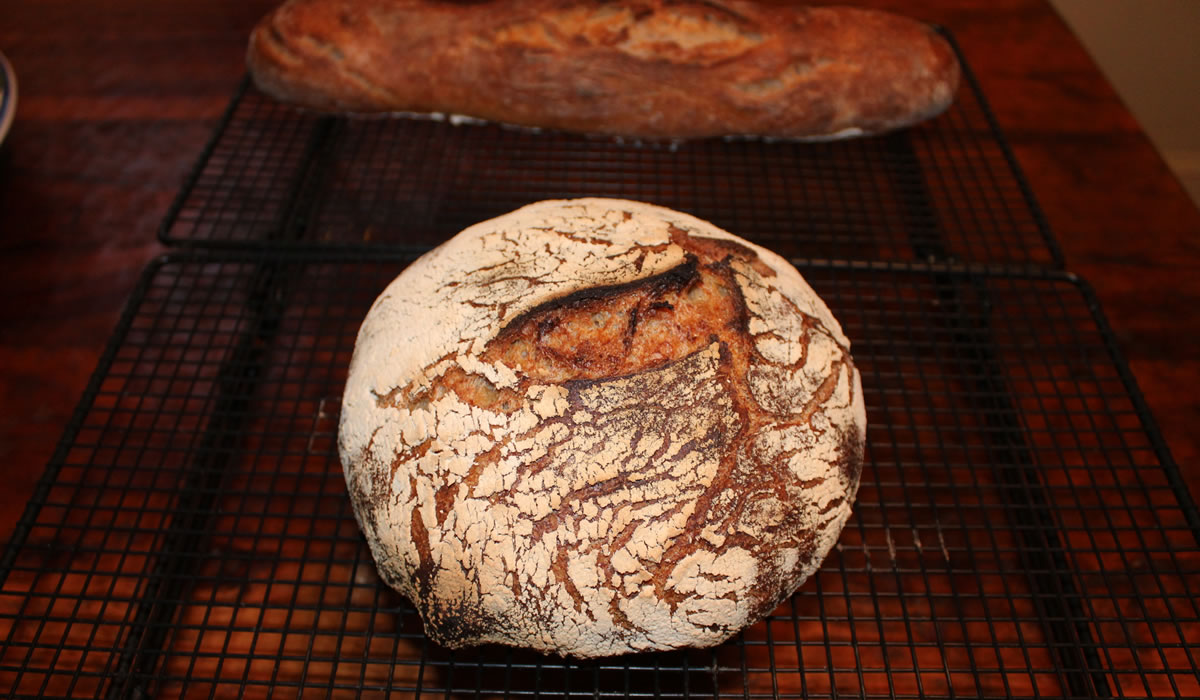
It is good. Nice crust, good crumb. It also works well just baking it in an oven on a stone – with water underneath to steam.
It’s another keeper.
