
Baking Cookies
We've barely even started when Uncle Victor whacks Gino in the face with a handful of flour. let the baking begin!
While I was at work, the gang made Aunt Emma's dough, and pizzelle dough.

They then started working on sugar cookies.


We decided decorating these would be free-form/ecclectic. I mean, anyone can make a snowman look like a snowman, right?!? It takes talent to step outside of the box!

We're talented!

Very talented!

Next was a batch of sugar-free Biscotti for Nonna. Victor came up with a Slenda recipe a few years ago that's actually edible.
We then got back to some serious candy-making. Aunt Dolores' Rum Balls. The kids rolled and then chocolate-dipped all of them.


The Rum Balls may be just the best, ever. I think these are the most like what Auntie made that I've ever made. I could eat these all night! {{{hic}}}
We also got Vanilla Almond Thumbprints baked off and then made caramels.

Tomorrow is going to be an early start - making Aunt Emma's cookies, biscotti, pizzelles... Plus the Walnut Logs, the Peppermint Patties, the Pfeffernusse...
Boy, am I glad we've cut back! :)
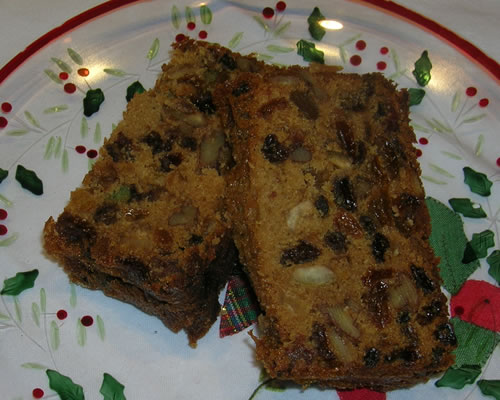
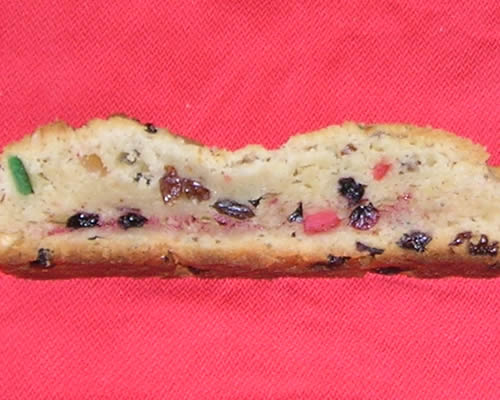
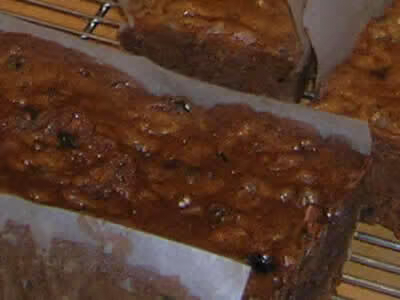
Christmas Fruitcake
The picture is just not doing this justice. This really looks so much better in person - and wow! Does it ever taste good!
I'm a little late making the fruitcakes this year. Usually they're done by late October and definitely before Thanksgiving. But since I'm less than 2 weeks past "Stir-Up Sunday" - the traditional day of making fruitcakes in Britain - I'm not too concerned.
I went hunting for a new recipe this year. I've tired of the Apricot Macadamia Fruitcake I've made for the past 20-odd years and while the cakes I made last year were okay, they were just okay. I wanted something better.
I didn't find a recipe I really like, so I found one I knew I could reinvent.
It worked.
The 2009 Fruitcake
- 5 cups golden raisins
- 4 cups dark raisins
- 3 cups dried currants
- 5 cups chopped glacéed fruits
- 1 cup water
- 1 cup dark rum
- 1 tbsp Lyle's Golden Syrup
- 1 1/2 tsp baking soda
- 4 1/4 cups all purpose flour
- 1 tsp baking powder
- 1 tsp salt
- 1 1/4 lb unsalted butter, room temperature
- 3 cups (packed) dark brown sugar
- 10 large eggs
- 3 cups pecans
Mix dried fruits in large bowl. Heat water and rum and pour over fruit. Mix well. Mix in syrup and baking soda. Let stand until fruit mixture absorbs liquid, stirring often, about 1 hour.
Preheat oven to 325°. Butter 9 full-sized loaf pans.
Sift flour, baking powder,and salt into medium bowl. Beat butter and sugar in large bowl until well blended. Beat in eggs 1 at a time.
Add flour. Mix until just blended.
Mix batter and fruit mixture. Divide mixture among pans. Cover pans with foil.
Bake at 325° about 1 1/2 hours. Reduce oven temperature to 275°and continue to bake covered until tester comes out clean but slightly moist, about 30 minutes longer.
Transfer pans to cooling rack. Remove foil and drizzle about a tablespoon (or more) rum on each cake while hot.
Wrap and store in a cool place, adding more rum weekly.
I actually had Lyle's Golden Syrup (available at Wegmans) but if you don't, use a light molasses. I also resisted using any other spices and I'm really glad I did. The flavors worked perfectly and will only improve with age - and a bit more rum!
A Food Fest
We have friends in town. It's 6pm... We've been eating since yesterday... There's still more to come!
It started with New England Clam Chowder yesterday. I was so excited to have them here I forgot to put the potatoes in the chowder. So much for pretending I know what I'm doing!

And I forgot the cukes for the salad...

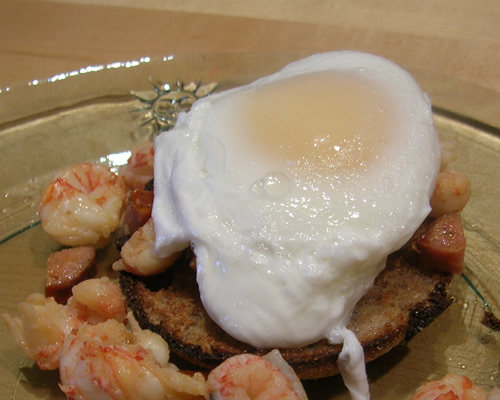
Breakfast this morning was our spin on Eggs Benedict - poached eggs on whole wheat English muffins, with andouille sausage and langostino, topped with a jalapeno hollandaise sauce...

We skipped lunch so we could start dinner at 3pm. We invited Victor's mom over to meet the girls and have dinner with us; Brasiole, Italian sausage, meatballs, pork, rigatoni and sauce, salad, tomato basil bread... and later tonight a puff pastry and apple dessert...

Brasiole...

Meatballs and the homemade Italian sausage

Pork

Rigatoni

The simmering sauce...

Fresh-baked croissants and omeletes tomorrow for breakfast...
We are having so much fun!
Sunday Supper and Saturday's Dessert

Instead of cooking, today, I spent a few hours putting in a new screen door in the front of the house. Actually, it's a "storm" door. But what do I know - we don't have screen-or-storm doors where I come from. Or air conditioning, either.
I actually liked the old pitted metal screen/storm door. Totally 1950. What I didn't like was unscrewing the screen and hauling it down to the basement and getting the 987 pound (at least) pane of glass up the stairs and screwed in. Twice a year I had to do it. Pretty strenuous. Twice a year. And rescreening. Can't forget that. And whatever spline I had was always the wrong size.
So... with a new roof, dry rot gone, and a new paint job, it just seemed fitting that we do an upgrade. We looked online to see what was out there and headed off to the local home improvement store to see them in person. Found what we were looking for, put it into the back of the truck - and off to home we went.
While it wasn't difficult to install, it was tedious. It was a big box of pieces. Not a hole was drilled not a thing attached. And I'm not a picture/icon person. I want to see the parts and see how they fit together. Little blow-up line drawings of one corner just do not make sense to me.
But I persevered...
And got it done except for a trim piece and the self-closer. Tomorrow is another day...
So...
While I was playing My Favorite Drill Bit, Victor decided it would probably be a smart move if he made dinner tonight. (He's very perceptive - just one of the reasons I love 'im!)
Out of the freezer came a small container of sauce he has made a while back, and a couple of sausages. Some papardelle pasta, a mini loaf of bread from Panera, and dinner was served.
Just in time. I was almost starting to get cranky.
++++++++++++++++++++
And speaking of cranky... can anyone tell me what's wrong with this recipe for Pumpkin Bread?!? It's from Bon Appetit.
Pumpkin-Walnut Bread
Yield: Makes 1 loaf
ingredients
- 2 cups all purpose flour
- 1 teaspoon baking soda
- 1 teaspoon baking powder
- 1 teaspoon salt
- 1/2 teaspoon ground cinnamon
- 1/2 teaspoon ground cloves
- 1/2 teaspoon ground ginger
- 1/2 cup (1 stick) unsalted butter, room temperature
- 3/4 cup plus 1 tablespoon sugar
- 2 large eggs, room temperature
- 1 cup canned pure pumpkin
- 1 1/2 teaspoons grated lemon peel
- 1 teaspoon vanilla extract
- 1/2 cup sour cream
- 1/2 cup whole milk
- 1 1/2 cups chopped walnuts
Position rack in center of oven; preheat to 325°F. Butter 9x5x3-inch metal loaf pan. Sift first 7 ingredients into medium bowl. Using electric mixer, beat butter in large bowl until light. Gradually beat in 3/4 cup sugar. Beat in eggs 1 at a time. Beat in pumpkin, lemon peel and vanilla. Whisk sour cream and milk in small bowl. Beat flour and sour cream mixtures alternately into batter in 2 additions each. Fold in nuts. Transfer batter to pan; smooth top. Sprinkle with 1 tablespoon sugar.
Bake bread until tester inserted into center comes out clean, about 1 hour 10 minutes. Cool in pan 10 minutes. Turn out onto rack; cool. (Can be made 2 days ahead. Wrap in foil; store at room temperature.)
It was intriguing. Lemon zest and sour cream in a pumpkin bread. The only change I made was to use half walnuts and half raisins.
And it ooooozed out of the pan all over the oven... what a mess.
I've done my share of baking and can throw together a quick bread fairly quick-ly. But I also get tired of making the same ol' thing and decided to waste some time looking through old magazines. This one won.
There was way more batter than I would normally put in a bread pan, but... I let the printed page over-rule experience. Dumb move.
I actually went back into the kitchen after about 15 minutes and it was already too late. Disaster had already struck.
I put a foil collar on the pan to contain the rest and it helped - but the 1 hr and 10 minute baking time was way off. I left it in the oven for about an hour and 40 minutes.
The smell of burnt cake batter and smoke billowing through the kitchen just added to my pleasant disposition. After letting it cool a bit, I took it out of the pan - it was hot and... soggy is not really the right word... extremely moist. I left it on the cooling rack, turned off the light and decided to deal with it later.
That later came this evening.
It had a great flavor, although it was still a little more moist than I like. Not underbaked, just a bit... gummy...
With so many fabulous recipes out there, there's just no reason to make this one.
What's Wrong With This Picture?
If you guessed "That brownie isn't cooked!" you win the kewpie doll!
I was in the mood for a peanut butter chocolate brownie. I went to Epicurious and found several. This one seemed easy enough, so I copied it down and in just a few minutes, they were happily baking away.
What I failed to do was pay attention to the reader comments that said 33 minutes wasn't enough time to bake them. My favorite type of brownie is a bit chewy in the center, and I thought the folks commenting were just whining because they like cake-like brownies, better.
I was wrong.
The brownies were RAW in the center. I did the requisite toothpick check, but moist crumbs mixed with melted chocolate pieces gave me a false reading.
After cutting into them and seeing how undercooked they were, I put the pan back into the over for another 30 minutes - knowing that I really wasn't going to cook them any more, but I felt good doing it.
So out from the oven they came - still under-baked - but we ate them, anyway. They actually tasted pretty good - and I'm sure they would have been wonderful had they cooked correctly to begin with.
Besides... Even a bad dessert is better than no dessert at all.
If you do decide to make these, make one of these changes. Bake at least 55 minutes in an 8x8 pan, or try baking for the 33 minutes in a 9x13 pan.
Peanut Butter and Chocolate Chunk Brownies Bon Appétit | January 1996
ingredients
- 6 tablespoons (3/4 stick) unsalted butter, room temperature
- 1/2 cup nutty old-fashioned-style or freshly ground peanut butter
- 1 1/4 cups (packed) golden brown sugar
- 2 large eggs
- 2 teaspoons vanilla extract
- 3/4 cup all purpose flour
- 1 teaspoon baking powder
- 1/4 teaspoon salt
- 4 ounces bittersweet (not unsweetened) or semisweet chocolate, coarsely chopped
preparation
Preheat oven to 350°F. Generously butter and flour 8-inch square baking pan. Using electric mixer, beat butter in large bowl until smooth. If oil has separated from peanut butter, stir to blend. Add peanut butter to butter; beat until well blended, scraping down sides of bowl occasionally. Beat in brown sugar. Add eggs 1 at a time, beating well after each addition. Beat in vanilla. Sift flour, baking powder and salt into medium bowl. Add to peanut butter mixture; beat until blended. Stir in chocolate.
Transfer batter to pan. Using spatula, smooth top. Bake until toothpick inserted 2 inches from edge of pan comes out with moist crumbs attached, about 33 minutes. Transfer pan to rack and cool completely. (Can be made 3 days ahead. Cover; store at room temperature.)
Cut brownies into squares.
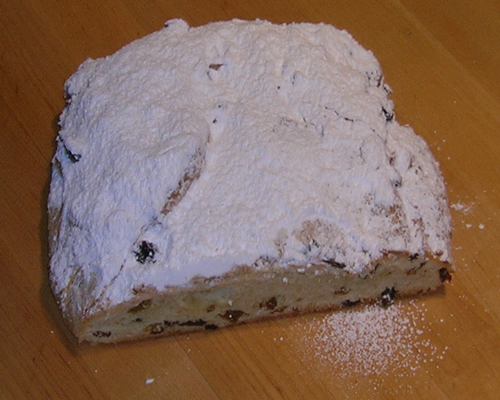
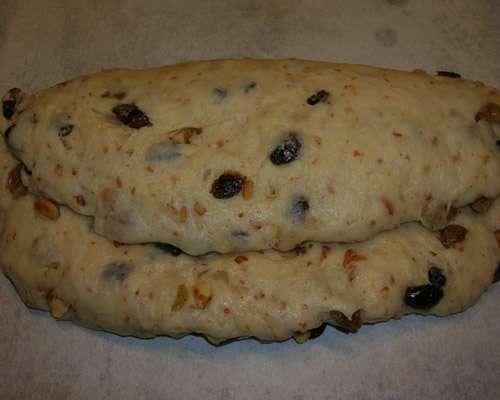
Stollen Still Eludes Me
The taste is fantastic, but it's still not quite right. I'm fighting the recipe or something. I dunno.
The first batch of dough I made this morning was the same greasy nightmare dough I first made last year. I knew before finishing it that it was wrong. Into the garbage it went. I have a reasonably good idea of what the dough should feel like, but it's not coming together for me. One of the issues is I'm not used to dealing with adding flour to a liquid that has so much fat in it. I'm more used to adding the fat after the flour and liquid have come together. And somewhere along the line, I'm just not hitting that magic moment when everything just comes together.
I know that I added a bit too much flour to this batch, and that had dire consequencse when I did the final roll and form. The 1/3 fold-over started coming apart while it was going through its final proofing, and it completely came apart in the oven, making a flat bread instead of the taller and narrower bread it's supposed to be.
But it sure does taste good, and in the grand scheme of things, I'd rather have tastes good but doesn't look perfect rather than looks perfect but doesn't taste good. (Actually, I'd rather have looks and tastes perfect, but I'm not losing any sleep over this... )

I'm also finishing up the Peppermint Patties. These have to dry before getting dipped in chocolate. They're the best (and easiest!) Peppermint Patty you'll ever have!
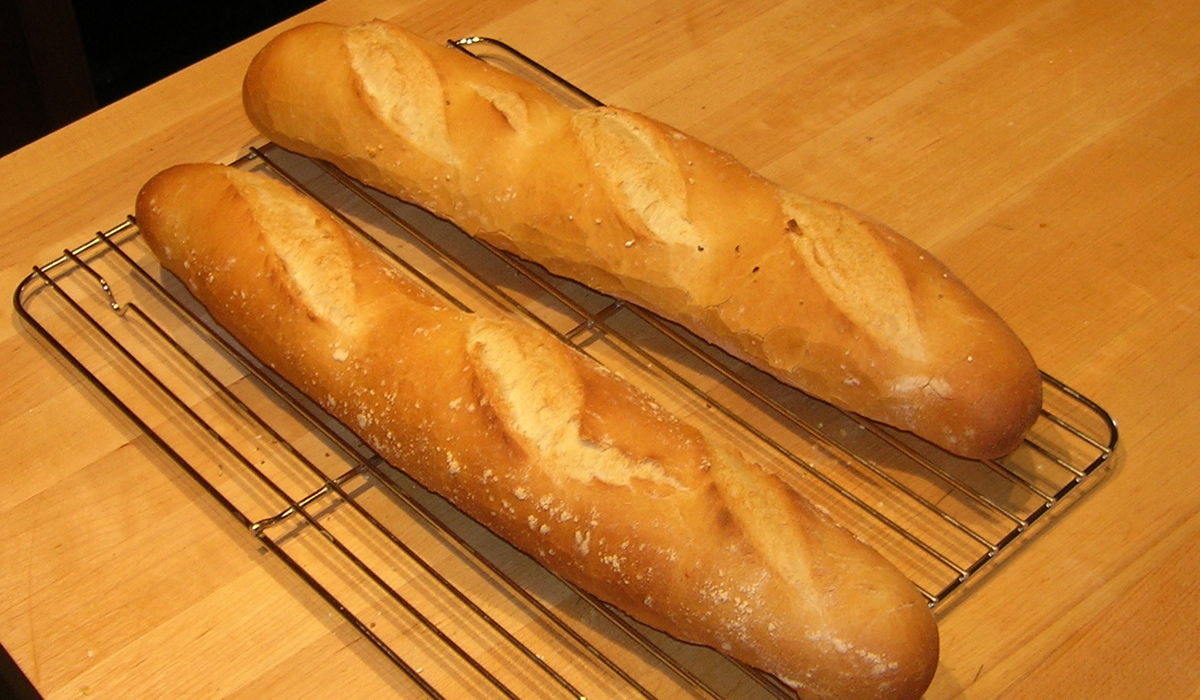
Fresh French Bread
I brought home a ton of cheese yesterday. It happens every time I work the cheese section in the morning. I just go crazy. I want everything and... well... I like cheese. It's one of the most versatile foods in the universe.
I decided that good cheese needed good bread, so I set out this morning to make Julia Child's French Bread. It's a bit of a long recipe...
Pain Francais (French Bread)
(From Mastering the Art of French Cooking: Volume Two by Julia Child and Simone Beck)
Recipe Quantity:
3 - baguettes (24” x 2”) or batards (16” x 3”) or
6 – short loaves, ficelles, 12 – 16” x 2” or
3 – round loaves, boules, 7 – 8” in diameter or
12 – round or oval rolls, petits pains or
1 – large round or oval loaf, pain de menage or miche; pain boulot
Recipe Time: 7 – 9 hours
Additional Information About the Recipe Flour: French bakers make plain French bread out of unbleached flour that has gluten strength of 8 to 9 per cent. Most American all-purpose flour is bleached and has slightly higher gluten content as well as being slightly finer in texture. It is easier to make bread with French flour than with American flour.
Bakers’ Oven Versus Home Ovens: Bakers’ ovens are so constructed that one slides the formed bread dough from a wooden panel right onto the hot, fire-brick oven floor, a steam injection system humidifies the oven for the first few minutes of baking. Steam allows the yeast to work a little longer in the dough and this, combined with the hot baking surface, produced an extra push of volume. In addition, steam coagulating the starch on the surface of the dough gives the crust its characteristic brown color. Although you can produce a good loaf of French bread without steam or a hot baking surface, you will a larger and handsomer loaf when you simulate professional conditions.
Stand Mixer Mixing and Kneading of French Bread Dough: French bread dough is too soft to work in the electric food processor, but the heavy-duty mixer with dough hook works perfectly. The double-hook attachment that comes with some hand held mixers and the hand-cranking bread pails are slower and less efficient, to our mind, than hand kneading. In any case, when you are using electricity, follow the steps in the recipe as outlined, including the rests; do not over-knead and for the heavy duty mixer, do not go over a moderate speed of number 3 or 4, or you risk breaking down the gluten in the dough.
Equipment Needed: Unless you plan to go into the more elaborate simulation of a baker’s oven, you need no unusual equipment for the following recipe. Here are the requirements, some of which may sound odd but will explain themselves when you read the recipe.
- 4 to 5 quart mixing bowl with fairly vertical rather than outward slanting sides
- a kneading surface of some sort, 1 1/2 to 2 square feet
- a rubber spatula or either a metal scraper or a stiff wide metal spatula
- 1 to 2 unwrinkled canvas pastry cloths or stiff linen towels upon which the dough may rise
- a stiff piece of cardboard or plywood 18 – 20 inches long and 6 – 8 inches wide, for unmolding dough from canvas to baking sheet
- finely ground cornmeal or pasta pulverized in an electric blender to sprinkle on unmolding board so as to prevent dough from sticking
- the largest baking sheet that will fit in your oven
- a razor blade or extremely sharp knife for slashing the top of the dough
- a soft pastry brush or fine spray atomizer for moistening dough before and during baking
- a room thermometer to verify rising temperature
Making French Bread:
Step 1: The Dough Mixture – le fraisage (or frasage)
- 1 cake (0.6 ounce) (20grams) fresh yeast or 1 package dry active yeast
- 1/3 cup (75ml) warm water, not over 100 degrees F/38C in a glass measure
- 3 1/2 cup (about 1 lb) (490 gr) all purpose flour, measured by scooping dry measure cups into flour and sweeping off excess
- 2 1/4 tsp (12 gr) salt
- 1 1/4 cups (280 - 300ml) tepid water at 70 – 74 degrees/21 - 23C
Both Methods: Stir the yeast in the 1/3 cup warm water and let liquefy completely while measuring flour into mixing bowl. When yeast has liquefied, pour it into the flour along with the salt and the rest of the water.
Hand Method: Stir and cut the liquids into the flour with a rubber spatula, pressing firmly to form a dough and making sure that all the bits of flour and unmassed pieces are gathered in. Turn dough out onto kneading surface, scraping bowl clean. Dough will be soft and sticky.
Stand Mixer: Combine the ingredients using the dough hook.
Both Methods: Turn dough out onto kneading surface, scraping bowl clean. Dough will be soft and sticky. Let the dough rest for 2 – 3 minutes while you wash and dry the bowl (and the dough hook if using a stand mixer).
Step 2: Kneading – petrissage
The flour will have absorbed the liquid during this short rest, and the dough will have a little more cohesion for the kneading that is about to begin. Use one hand only for kneading and keep the other clean to hold a pastry scrapper, to dip out extra flour, to answer the telephone, and so forth. Your object in kneading is to render the dough perfectly smooth and to work it sufficiently so that all the gluten molecules are moistened and joined together into an interlocking web. You cannot see this happen, of course, but you can feel it because the dough will become elastic and will retract into shape when you push it out.
Hand Method: Start kneading by lifting the near edge of the dough, using a pastry scraper or stiff wide spatula to help you if necessary, and flipping the dough over onto itself. Scrape dough off the surface and slap it down; lift edge and flip it over again, repeating the movement rapidly.
In 2 -3 minutes the dough should have enough body so that you can give it a quick forward push with the heel of your hand as you flip it over.
Continue to knead rapidly and vigorously in this way. If the dough remains too sticky, knead in a sprinkling of flour. The whole kneading process will take 5 – 10 minutes, depending on how expert you become.
Shortly after this point, the dough should have developed enough elasticity so it draws back into shape when pushed, indicating the gluten molecules have united and are under tension like a thin web of rubber; the dough should also begin to clean itself off the kneading surface, although it will stick to your fingers if you hold a pinch of dough for more than a second or two.
Stand Mixer: Knead.
Both Methods: Let dough rest for 3 – 4 minutes. Knead by hand for a minute. The surface should now look smooth; the dough will be less sticky but will still remain soft. It is now ready for its first rise.
Step 3: First Rising – pointage premier temps (3-5 hours at around 70 degrees)
You now have approximately 3 cups of dough that is to rise to 3 1/2 times its original volume, or to about 10 1/2 cups. Wash and fill the mixing bowl with 10 1/2 cups of tepid water (70 – 80 degrees) and make a mark to indicate that level on the outside of the bowl. Note, that the bowl should have fairly upright sides; if they are too outward slanting, the dough will have difficulty in rising. Pour out the water, dry the bowl, and place the dough in it (Mary and Sara Note: Very lightly grease the bowl with butter or kitchen spray as well to prevent the risen dough from sticking to the bowl).
Slip the bowl into a large plastic bag or cover with plastic, and top with a folded bath towel. Set on a wooden surface, marble or stone are too cold. Or on a folded towel or pillow, and let rise free from drafts anyplace where the temperature is around 70 degrees. If the room is too hot, set bowl in water and keep renewing water to maintain around 70 degrees. Dough should take at least 3 – 4 hours to rise to 10 1/2 cups. If temperature is lower than 70 degrees, it will simply take longer.
When fully risen, the dough will be humped into a slight dome, showing that the yeast is still active; it will be light and spongy when pressed. There will usually be some big bubbly blisters on the surface, and if you are using a glass bowl you will see bubbles through the glass.
Step 4: Deflating and Second Rising – rupture; pointage deuxieme temps (1 1/2 to 2 hours at around 70 degrees)
The dough is now ready to be deflated, which will release the yeast engendered gases and redistribute the yeast cells so that the dough will rise again and continue the fermentation process.
With a rubber spatula, dislodge dough from inside of bowl and turn out onto a lightly floured surface, scraping bowl clean. If dough seems damp and sweaty, sprinkle with a tablespoon of flour.
Lightly flour the palms of your hands and flatten the dough firmly but not too roughly into a circle, deflating any gas bubbles by pinching them.
Lift a corner of the near side and flip it down on the far side.
Do the same with the left side, then the right side. Finally, lift the near side and tuck it just under the edge of the far side. The mass of dough will look like a rounded cushion.
Slip the sides of your hands under the dough and return it to the bowl. Cover and let rise again, this time to not quite triple, but again until it is dome shaped and light and spongy when touched.
Step 5: Cutting and resting dough before forming loaves
Loosen dough all around inside of bowl and turn out onto a lightly floured surface. Because of its two long rises, the dough will have much more body. If it seems damp and sweaty, sprinkle lightly with flour.
Making clean, sure cuts with a large knife or a bench scraper, divide the dough into:
- 3 equal pieces for long loaves (baguettes or batards) or small round loaves (boules only)
- 5 – 6 equal pieces for long thin loaves (ficelles)
- 10 – 12 equal pieces for small oval rolls (petits pains, tire-bouchons) or small round rolls (petits pains, champignons)
- 2 equal pieces for medium round loaves (pain de menage or miche only)
- If you making one large round loaf (pain de menage, miche, or pain boulot), you will not cut the dough at all and just need to follow the directions below.
After you have cut each piece, lift one end and flip it over onto the opposite end to fold the dough into two; place dough at far side of kneading surface. Cover loosely with a sheet of plastic and let rest for 5 minutes before forming. This relaxes the gluten enough for shaping but not long enough for dough to begin rising again.
While the dough is resting, prepare the rising surface; smooth the canvas or linen towelling on a large tray or baking sheet, and rub flour thoroughly into the entire surface of the cloth to prevent the dough from sticking
Step 6: Forming the loaves – la tourne; la mise en forme des patons
Because French bread stands free in the oven and is not baked in a pan, it has to be formed in such a way that the tension of the coagulated gluten cloak on the surface will hold the dough in shape.
For Long Loaves - The Batard: (Baguettes are typically much too long for home ovens but the shaping method is the same)
After the 3 pieces of dough have rested 5 minutes, form one piece at a time, keeping the remaining ones covered.
Working rapidly, turn the dough upside down on a lightly floured kneading surface and pat it firmly but not too roughly into an 8 to 10 inch oval with the lightly floured palms of your hands. Deflate any gas bubbles in the dough by pinching them.
Fold the dough in half lengthwise by bringing the far edge down over the near edge.
Being sure that the working surface is always lightly floured so the dough will not stick and tear, which would break the lightly coagulated gluten cloak that is being formed, seal the edges of the dough together, your hands extended, thumbs out at right angles and touching.
Roll the dough a quarter turn forward so the seal is on top.
Flatten the dough again into an oval with the palms of your hands.
Press a trench along the central length of the oval with the side of one hand.
Fold in half again lengthwise.
This time seal the edges together with the heel of one hand, and roll the dough a quarter of a turn toward you so the seal is on the bottom.
Now, by rolling the dough back and forth with the palms of your hands, you will lengthen it into a sausage shape. Start in the middle, placing your right palm on the dough, and your left palm on top of your right hand.
Roll the dough forward and backward rapidly, gradually sliding your hands towards the two ends as the dough lengthens.
Deflate any gas blisters on the surface by pinching them. Repeat the rolling movement rapidly several times until the dough is 16 inches long, or whatever length will fit on your baking sheet. During the extension rolls, keep circumference of dough as even as possible and try to start each roll with the sealed side of the dough down, twisting the rope of dough to straighten the line of seal as necessary. If seal disappears, as it sometimes does with all purpose flour, do not worry.
Place the shaped piece of dough, sealed side up, at one end of the flour rubbed canvas, leaving a free end of canvas 3 to 4 inches wide.
The top will crust slightly as the dough rises; it is turned over for baking so the soft, smooth underside will be uppermost.
Pinch a ridge 2 1/2 to 3 inches high in the canvas to make a trough, and a place for the next piece. Cover dough with plastic while you are forming the rest of the loaves.
After all the pieces of dough are in place, brace the two sides of the canvas with long rolling pins, baking sheets or books, if the dough seems very soft and wants to spread out. Cover the dough loosely with flour rubbed dish towel or canvas, and a sheet of plastic. Proceed immediately to the final rising, next step.
For Long Thin Loaves – Fincelles: Follow the steps above but making thinner sausage shapes about 1/2 inch in diameter. When they have risen, slash as with the Batard.
For Oval Rolls – Petits Pains, Tire-Bouchons: Form like batards, but you will probably not have to lengthen them at all after the two foldings and sealings. Place rolls on a floured canvas about 2 – 4” apart and cover with plastic to rise. When they have risen, make either 2 parallel slashes or a single slash going from one end to the other.
For Small, Medium, or Large Round Loaves – Pain de Menage, Miches, Boules: The object here is to force the cloak of coagulated gluten to hold the ball of dough in shape: the first movement will make cushion; the second will seal and round the ball, establishing surface tension.
Place the dough on a lightly floured surface.
Lift the left side of the dough with the side of your left hand and bring it down almost to the right side.
Scoop up the right side and push it back almost to the left side. Turn the dough a quarter turn clockwise and repeat the movement 8 – 10 times. The movement gradually smooths the bottom of the dough and establishes the necessary surface tension; think of the surface of the dough as if it were a fine sheet of rubber you were stretching in every direction.
Turn the dough smooth side up and begin rotating it between the palms of your hands, tucking a bit of the dough under the ball as you rotate it. In a dozen turns you should have a neatly shaped ball with a little pucker of dough, le cle, underneath where all the edges have joined together.
Place the dough pucker side up in a flour-rubbed canvas; seal the pucker by pinching with your fingers. Flour lightly, cover loosely and let rise to almost triple its size. After unmolding upside down on the baking sheet, slash with either a long central slash, two long central slashes that cross at right angles, or a semi-circular slash around half the circumference.
For Small Round Rolls – Petits Pains, Champignons: The principles are the same here as for the preceding round loaves, but make the cushion shape with your fingers rather than the palms of your hands.
For the second stage, during which the ball of dough is rotated smooth side up, roll it under the palm of one hand, using your thumb and little finger to push the edges of the dough underneath and to form the pucker, where the edges join together
Place the formed ball of dough pucker side up on the flour rubbed canvas and cover loosely while forming the rest. Space the balls 2 inches apart. When risen to almost triple its size, lift gently with lightly floured fingers and place pucker side down on baking sheet. Rolls are usually too small for a cross so make either one central slash or the semi-circular cut.
For Large Oval Loaf – Pain Boulot: Follow the directions for the round loaves except instead of rotating between the balms of your hands and tucking to form a round loaf, continue to turn the dough from the right to the left, tucking a bit of each end under the oblong loaf. In a dozen turns you should have a neatly shaped oval with tow little puckers of dough, le cles, underneath where all the edges of have joined together.
Place the dough pucker sides up in a flour-rubbed canvas; seal the puckers by pinching with your fingers. Flour lightly, cover loosely and let rise to almost triple its size. After unmolding upside down on the baking sheet, slash with parallel slashes going diagonally across the top starting from the upper left and going to the lower right.
Step 7: Final Rise – l’appret - 1 1/2 to 2 1/2 hours at around 70 degrees
The covered dough is now to rise until almost triple in volume; look carefully at its pre-risen size so that you will be able to judge correctly. It will be light and swollen when risen, but will still feel a little springy when pressed.
It is important that the final rise take place where it is dry; if your kitchen is damp, hot, and steamy, let the bread rise in another room or dough will stick to the canvas and you will have difficulty getting it off and onto another baking sheet. It will turn into bread in the oven whatever happens, but you will have an easier time and a better loaf if you aim for ideal conditions.
Preheat oven to 450 degrees about 30 minutes before estimated baking time.
Step 8: Unmolding risen dough onto baking sheet – le demoulage.
The 3 pieces of risen dough are now to be unmolded from the canvas and arranged upside down on the baking sheet. The reason for this reversal is that the present top of the dough has crusted over during its rise; the smooth, soft underside should be uppermost in the oven so that the dough can expand and allow the loaf its final puff of volume. For the unmolding you will need a non-sticking intermediate surface such as a stiff piece of cardboard or plywood sprinkled with cornmeal or pulverized pasta.
Remove rolling pins or braces. Place the long side of the board at one side of the dough; pull the edge of the canvas to flatten it; then raise and flip the dough softly upside down onto the board.
Dough is now lying along one edge of the unmolding board: rest this edge on the right side of a lightly buttered baking sheet. Gently dislodge dough onto baking sheet, keeping same side of the dough uppermost: this is the soft smooth side, which was underneath while dough rose on canvas. If necessary run sides of hands lightly down the length of the dough to straighten it. Unmold the next piece of dough the same way, placing it to the left of the first, leaving a 3 inch space. Unmold the final piece near the left side of the sheet.
Step 9: Slashing top of the dough – la coupe.
The top of each piece of dough is now to be slashed in several places. This opens the covering cloak of gluten and allows a bulge of dough underneath to swell up through the cuts during the first 10 minutes of baking, making decorative patterns in the crust. These are done with a blade that cuts almost horizontally into the dough to a depth of less than half an inch. Start the cut at the middle of the blade, drawing toward you in a swift clean sweep. This is not quite as easy as it sounds, and you will probably make ragged cuts at first; never mind, you will improve with practice. Use an ordinary razor blade and slide one side of it into a cork for safety; or buy a barbers straight razor at a cutlery store.
For a 16 to 18 inch loaf make 3 slashes. Note that those at the two ends go straight down the loaf but are slightly off centre, while the middle slash is at a slight angle between the two. Make the first cut at the far end, then the middle cut, and finally the third. Remember that the blade should lie almost parallel to the surface of the dough.
Step 10: Baking – about 25 minutes; oven preheated to 450 degrees (230 degrees C).
As soon as the dough has been slashed, moisten the surface either by painting with a soft brush dipped in cold water, or with a fine spray atomizer, and slide the baking sheet onto rack in upper third of preheated oven. Rapidly paint or spray dough with cold water after 3 minutes, again in 3 minutes, and a final time 3 minutes later. Moistening the dough at this point helps the crust to brown and allows the yeast action to continue in the dough a little longer. The bread should be done in about 25 minutes; the crust will be crisp, and the bread will make a hollow sound when thumped.
If you want the crust to shine, paint lightly with a brush dipped in cold water as soon as you slide the baking sheet out of oven.
Step 11: Cooling – 2 to 3 hours.
Cool the bread on a rack or set it upright in a basket or large bowl so that air can circulate freely around each piece. Although bread is always exciting to eat fresh from the oven, it will have a much better taste when the inside is thoroughly cool and has composed itself.
Step 12: Storing French bread
Because it contains no fats or preservatives of any kind, French bread is at its best when eaten the day it is baked. It will keep for a day or two longer, wrapped airtight and refrigerated, but it will keep best if you freeze it – let the loaves cool first, then wrap airtight. To thaw, unwrap and place on a baking sheet in a cold oven; heat the oven to 400 degrees. In about 20 minutes the crust will be hot and crisp, and the bread thawed. The French, of course, never heat French bread except possibly on Monday, the baker’s holiday, when the bread is a day old.
Step 13: Canvas housekeeping
After each bread session, if you have used canvas, brush it thoroughly to remove all traces of flour and hang it out to dry before putting away. Otherwise the canvas could become mouldy and ruin your next batch of dough.
The Simulated Bakers’ Oven
Baking in the ordinary way, as described in the preceding recipe, produces an acceptable loaf of bread but does not nearly approach the glory you can achieve when you turn your home oven into a baker’s oven. Merely providing yourself with the proper amount of steam, if you can do nothing else, will vastly improve the crust, the color, the slash patterns, and the volume of your bread; steam is only a matter of plopping a heated brick or stone into a pan of water in the bottom of the oven. The second provision is a hot surface upon which the naked dough can bake; this gives that added push of volume that improves both the appearance and the slash patterns. When you have the hot baking surface, you will then also need a paddle or board upon which you can transfer dough from canvas to hot baking surface. For the complete set up here is you should have, and any building-supply store stocks these items.
For the hot baking surface: Metal will not do as a hot baking surface because it burns the bottom of the dough. The most practical and easily obtainable substance is ordinary red floor tiles 1/4” thick. They come in various sizes such as 6 x 6, 6 x 3, and you only need enough to line the surface of an oven rack. Look them up under Tiles in your Directory, and ask for “quarry tiles” their official name.
For unmolding the risen dough from its canvas: A piece of 3/16 inch plywood about 20 inches wide.
For sliding the dough onto the hot tiles: When you are doing 3 long loaves, you must slide them together onto the hot tiles; to do so you unmold them one at a time with one board and arrange them side by side on the second board, which takes place on the baker’s paddle, la pelle. Buy a piece of plywood slightly longer but 2 inches narrower than your oven rack.
To prevent dough from sticking to unmolding and sliding boards: White cornmeal or small dried pasta pulverized in the electric blender until it is the consistency of table salt. This is called fleurage.
The steam contraption: Something that you can heat to sizzling hot on top of the stove and then slide into a pan of water in the oven to make a great burst of steam: a brick, a solid 10lb rock, piece of cast iron or other metal. A 9 x 12 inch roasting pan 2 inches deep to hold an inch of water and the hot brick.
+++++++++++++++++++++++++
Okay. Did you get all that?!?
Julia did make this sound a bit more complex that it actually is. On the other hand, I've made a few (thousand) loaves of bread in my time and am not intimidated by long sets of instructions. It's only bread. The ingredients are still relatively inexpensive. The very worst thing that could happen is it wouldn't be as good as Julia's. Oh well.
But... not to worry. The bread was every bit as good as Julia would have baked, and I know she would have enjoyed a slice or two.
Now... getting back to that cheese...

I did mention I went a little crazy with the cheeses... We had:
- Triple Cream Brie
- Saint Andre
- 3 kinds of chevere (plain, 4 pepper, and garlic and herb)
- 3-year-aged Cheddar
- Cotswold (A double Glouster with onions and chives)
- Blue Castello
And I grilled a flank steak and served thin slices of steak with the cheeses and bread. Tres fabu!
Oh. And while I was waiting for dough to rise this morning, I made the first Pumpkin Pies of the season!

Perfect Pumpkin Pie
- 3/4 cup granulated sugar
- 1/2 teaspoon salt
- 2 teaspoon ground cinnamon
- 1/2 teaspoon ground ginger
- 1/4 teaspoon ground cloves
- 1/4 teaspoon freshly ground nutmeg
- 2 large eggs
- 1 can (15 oz.) pumpkin
- 1 can (12 fl. oz.) evaporated milk
- 1 unbaked 10" pie shell
- Whipped cream
Preheat oven to 425°. Beat eggs, sugar, and spices in large bowl. Add pumpkin amd mix well. Gradually stir in evaporated milk.
Pour into pie shell. Bake at 425° for 15 minutes. Reduce temperature to 350° and bake for 40 to 50 minutes or until knife inserted near center comes out clean. Top with whipped cream before serving.
I topped mine with a ginger whipped cream.
I shall not be eating anything more today.
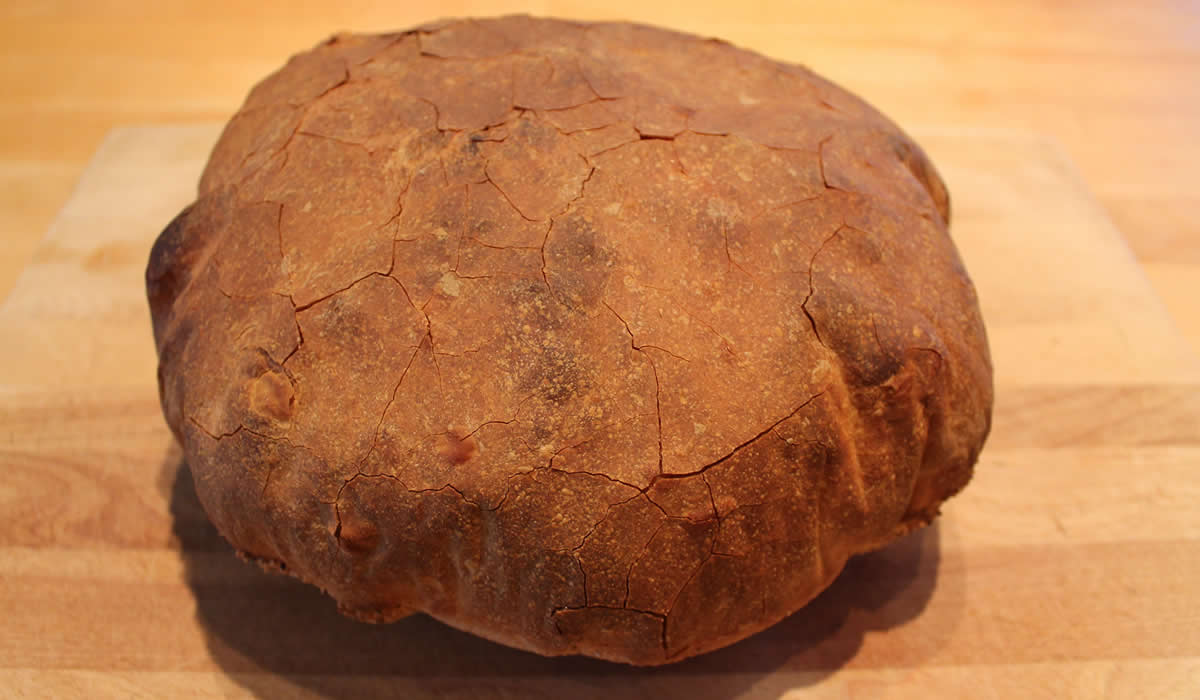
Pane Italiano, parte due
Okay... so it was a day later than anticipated, but OMG! what a fantastic bread! I've been making this particular bread for years, and it never disappoints. It is just perfect every time.
It is a crusty, crusty bread with a really light interior. There's no fat - just light, fresh, crusty, crunchy goodness!

Pane Pugliese
- 1 packet dry yeast
- 1/4 cup Warm water
- 1 1/2 cups Water; room temp
- 1/2 cup Biga
- 4 cups All-purpose flour
- 2 teaspoons Salt
Proof the yeast in the warm water. Add 1 1/2 c water and the biga, mix till blended. Add flour and salt, mix till dough comes together and pulls off the sides of the bowl. Knead 3-5 minutes in a mixer, longer by hand. Dough will be very soft and elastic. Let rise about 3 hours, shape into 2 small round loaves or 1 big flattish one. If you have baking stones, place loaves on baking peel or on baking sheets sprinkled corn meal. Let rise about 1 hour. Preheat oven to 450F, and 5 to 10 minutes before baking flour the loaves' tops and dimple them with your fingers. Bake 50-60 minutes for big loaves, 30-35 minutes for small. Tap the loaves to test for doneness (hollow=done) and cool on a rack.
Victor is making a pasta dish right now that he saw on Lidia's TV show yesterday. It's made with almonds, cherry tomatoes, and garlic... And it's from Pulia! How perfect is that?
My stomach is smiling. :)

I'm back. I'm stuffed. My stomach is really smiling! WOW! What a great pasta! The sauce is almonds, cheese, cherry tomatoes, fresh basil, olive oil, garlic, fresh oregano... All ground up in the food processor.
It was really fantastic.
YUM!
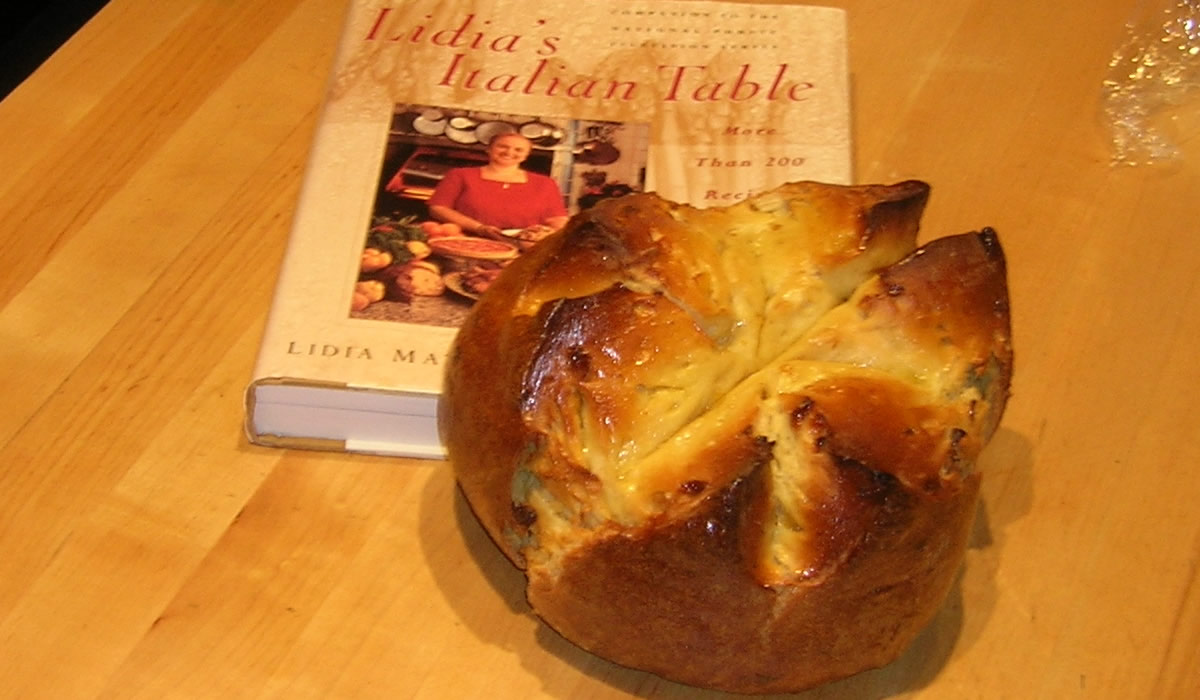
Italian Easter Bread (Pinza)
Having never made something before has never stopped me from 1) making it, and 2) serving it to a large gathering of people. My thought process is the worst thing that can happen is it's inedible and I throw it away. Since that really hasn't happened in 30 or so years, I don't worry about it.
And on that note, I started making Lidia's Easter Bread. Her Pinza.
I love Lidia's cooking. For the most part it is simple mixing of simple flavors to get anything-but-simple results. But every once in awhile she throws a curve-ball. And the Pinza is one...
Reading through the recipe, I realize that this is going to be a process. I didn't have the probably 12 hour stretch the bread needs to make, so I figured I'd break it up over a couple of days. It worked, more or less (actually, the flavor of the bread came out fantastic!) but I do think that I 1) needed more yeast, and 2) really should have let it rise more.
The recipe calls for 4 ea 3/5 oz cakes of fresh yeast or 4 ea 1 oz packages of dry yeast. Basic dry yeast comes in 1/4 oz packages and I haven't used fresh yeast in 45 years - since I worked at The Donut Center. Having done a considerable amount of baking in my time, I thought that even using 4 packages of yeast for three loaves of bread was a lot. I figured the 1 oz was a typo. But I put in 4 packages, nonetheless.
So... Friday after work I started the bread. It doesn't take much work, but there is a lot of wait time. At $3.50 a gallon for heating oil, our house is not exactly a baker's paradise. It easily took 2 1/2 hours for the first risings. I completed the next step - the 5 cups of flour, and then placed it in the fridge. (It was late and I didn't want to leave it out overnight. I probably should have...)
When I got home from work on Saturday, I took it out and started where I had left off. Again, not the warmest place in town. It took forever just to reach room temperature. It sat out while we all colored eggs.
I finally got it formed into the three balls and late Saturday night and it went back into the fridge. Early Sunday morning, it was back out, again.
I made the traditional cuts along the top and set it out to warm and rise. I turned on the heat, I turned on the oven. I set them in the sun. S-L-O-W-L-Y they were rising. Very slowly. They had not completely doubled in size when I had to get them in the oven. We had to be at Steve and Marie's at 2. It was 12:30pm. The bread had been out for almost 6 hours.
They came out delicious! Having never made them before, I still don't know exactly how they should have turned out, but I do think they should have been a bit lighter. They were absolutely wonderful the way they were, but... I don't think they were quite right. Folks raved about it and everyone was going back for more so I know it wasn't folks just taking a 'polite' piece - they really did like it!
I'm going to make it again one of these days - when I have the time to complete them start-to-finish in one day.
I'll let ya know how they come out!
Easter Bread
Lidia Matticchio Bastianich
- 1 1/2 cups golden raisins
- 1/2 cup dark rum
- 1 cup milk
- 1 cup granulated sugar plus 2 tablespoons
- Four 3/5-ounce cakes fresh yeast, crumbled (1/3 cup), or four 1-ounce packages instant dry yeast
- 9 cups unbleached all-purpose flour, or as needed, sifted
- 3 large eggs, at room temperature
- 6 large eggs yolks, at room temperature
- 1/2 cup (1 stick) unsalted butter, at room temperature, plus more for the bowl of dough
- 1/2 cup Vin Santo, Verduzzo, or other sweet white wine
- Grated zest (yellow part only, without the underlying white pith) of 2 large lemons
- Grated zest (orange part only, without the white pith) of 1 orange
- 1 1/2 teaspoons salt
- 2 teaspoons pure vanilla extract
- 2 tablespoons water
Combine the raisins with the rum in a small bowl and toss to mix. Let soak, tossing occasionally, while preparing the bread.
In a medium-size saucepan, heat the milk over medium heat to lukewarm, about 100°F.
Pour the warmed milk into a large bowl and add 1/2 cup of the sugar and the yeast. Stir until they are dissolved. Add 1 cup of the flour and stir until the mixture is smooth.
Cover the bowl with a kitchen towel and let it rise in a warm, draft-free place (such as on top of the refrigerator or in a gas oven with the pilot light on) until frothy. (If it doesn’t get frothy, that means the yeast is no longer active and you will have to start again with fresh yeast.)
Stir the dough with a fork to deflate it, then let it rise and froth two more times, stirring it down thoroughly and covering it again after each time. Depending on the environment, these three risings can take from 20 minutes to 45 minutes each.
In the bowl of a heavy-duty electric mixer fitted with the paddle attachment, whip 2 of the whole eggs, 2 of the yolks, and the remaining 1/2 cup sugar together at medium speed until foamy and pale yellow.
Add 1/4 cup (1/2 stick) of the butter, the wine, zests, salt, and vanilla. Beat until only small pieces of butter remain. Scrape the yeast mixture into the mixer bowl and beat until blended. Change to the dough hook attachment of the mixer and reduce the speed to low.
Add 5 cups of the remaining flour, 1 cup at a time, beating until the mixture forms a sticky dough. Wait for each cup of flour to be incorporated before adding the next and stop the machine occasionally to scrape any unmixed ingredients from the sides and bottom of the bowl into the dough. The dough will be quite sticky; form it into a rough ball, clean the sides of the bowl, and cover the bowl with a kitchen towel. Let the dough rise in a warm, draft-free place until doubled in bulk, 1 to 2 hours.
Return the bowl of dough to the mixer fitted with the dough hook.
Mix the dough at medium-low speed until deflated. Add the remaining 4 egg yolks and 1/4 cup (1/2 stick) butter and beat until incorporated. Gradually add enough of the remaining flour — about 2 cups — to form a firm but slightly sticky dough, stopping the mixer occasionally to scrape any unmixed ingredients from the bottom of the bowl into the dough. Add the raisins and rum and mix until incorporated. Dough will be quite wet and sticky at this point.
Turn the dough out onto a well-floured surface.
Knead the dough, adding as much of the remaining 1 cup flour as necessary to prevent the dough from sticking to your hands and to the table, until the dough is smooth, soft, and only very slightly sticky if left to rest a minute.
Place the dough in a large lightly buttered bowl and turn the dough to butter all sides of it.
Cover the bowl with a kitchen towel and set the dough to rise in a warm, draft-free place until doubled in bulk, 1/2 to 2 hours, depending on the environment.
Turn the risen dough out onto the floured work surface and knead until deflated.
Cut the dough into three equal pieces and knead each into a ball, gathering and pinching the seam side of the dough together to form as smooth a ball as possible. (These formed loaves can be tightly wrapped in plastic wrap and refrigerated overnight. Allow extra time for refrigerated loaves to rise in the following step.)
Line two baking sheets with parchment paper.
Place two loaves on one of the baking sheets, leaving as much space between them and the edges of the pan as possible. Place the third loaf in the center of the other baking sheet. With a pair of kitchen scissors, make three 1 1/2-inch-deep, 3-inch long intersecting cuts that meet at the center to form a six-pointed star pattern on the rounded top of each loaf. The cuts should be quite deep — at least halfway through the loaf — to allow the dough to rise up from the center and form the traditional crests on the loaf.
Cover the loaves lightly with kitchen towels and let rise in a warm, draft-free place until doubled in bulk, 1 to 2 hours.
Preheat oven to 325°F.
Bake the bread for 35 minutes. Whisk the remaining whole egg with the remaining 2 tablespoons sugar and the water until very smooth and the sugar is dissolved. Brush the pinze with this egg mixture, return them to the oven, and continue baking until very deep golden brown and a knife inserted into the center of the loaves comes out clean, about another 20 minutes.
Cool the pinze completely on a wire rack before slicing.
Christmas Stollen
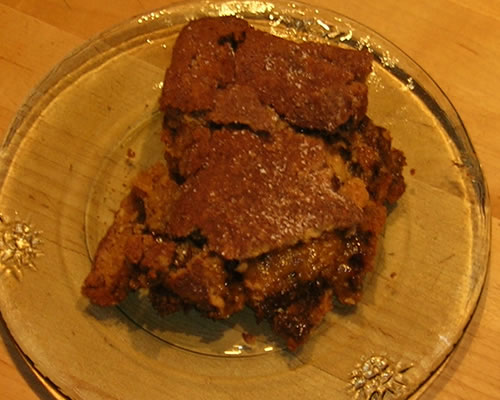
It's not often that I totally and completely screw something up - but when I do, I really do it big-time! Welcome to one of those times!
A friend of ours gave us her Oma's Christmas Stollen recipe last year and I've thought of making it ever since. Thought of it. I hadn't made it. On Thursday, in the midst of baking Christmas Cookies, making candy, and being my festive little self, I decided it was time to make it. (I also want to make a traditional Christmas Pudding and about a bazillion other things, but we can only haul so much stuff up to North Jersey.) But I digress...
I had all the ingredients (no big surprise here) and decided to make a half-recipe. Even I couldn't eat 8 loaves of Stollen.
I am not sure exactly what went wrong, but the dough just never came together right. I'll use the excuse that I was interupted a couple of times, but I just wasn't paying attention when I started out the mixing. The recipe calls for lots of butter and it just never incorporated with the flour right. It was heavy. It was greasy. It wasn't right. I had never made this recipe before, but I've made enough different doughs to know when one is "smooth and elastic" and when it's tough and greasy. This one was not smooth and elastic. But Mr. Determination had to follow it through. I did the first pitiful rise, and then formed into loaves and did the second. Pitiful. Recipe says 350F for 35 minutes. At 55 minutes it wasn't baked inside.
The loaves spread forever but didn't rise as I imagined they should have. It smelled fabulous. It wasn't baked inside. I tried to convince myself it tasted great. The following morning, Victor toasted two slices for breakfast. It was okay, but it wasn't Stollen. We tossed them. I conceded defeat - for the moment.
Saturday dawned, and I decided I was going to make them, again. I was not about to let a supposedly fabulous recipe get the better of me. Am I ever glad I did!
I followed the recipe once again. This time I paid attention. I worked the dough. I made sure the flour incorporated correctly. It was night and day different. Smooth and elastic. Silken perfection. Rise. Form. Rise, again. Into the oven.

Exactly 35 minutes later, they were ready. Rich, light, buttery heaven! We pretty much devoured one on the spot. And two of them are hading up with us to North Jersey.
Merry Christmas, indeed!
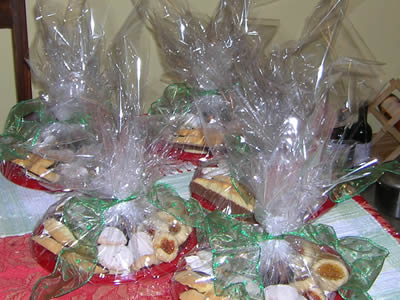
And speaking of Merry Christmas, the cookies are done, as well! I made up a huge tray for work, today, and have started on trays for the neighbors...

And I am going to have to work twice as hard at the Gym... I've been eating an awful lot of them...
Mike's Crusty Cornbread
I have been having a great time chatting with and getting recipes from a friend down in South Carolina. His name is Mike and has a great wife, Barbara, who bakes - and wins all sorts of ribbons and such. Lots of them. I admire folks who have the patience to create recipes and enter contests. It's a lot of work. And I really love recipes with a story. Real food with history.
I won 2nd Prize in a Cherry Pie Bakeoff once - and the People's Choice Award for my White Bean Chili when I was on staff at UCSF. Neither were State fair-type competitions, but they were fun. But I digress...

This recipe (as all great recipes do) comes with a great story - and pictures!
Crusty Cornbread
Mike Amason
Rural South Carolina during and after the Great Depression was a lot like a third world country. There was little to eat if you didn’t produce it on the farm. Everyone had a few chickens and a couple of hogs, both very efficient animals at producing meat from whatever could be foraged. Lots of farms had a single cow for milk and butter. With chickens came eggs. The only groceries that were purchased were coffee, flour, salt, corn oil, and on occasion a bag of sugar. Everything else was grown at home or done without.
Many farms had small patches of corn of a variety suitable for grinding at the grist mill for grits and cornmeal (My grandfather grew a white corn called “Hickory King” just for this purpose). The miller ground and bagged your corn and kept a portion as his payment which he later sold. Biscuits ruled at breakfast, but cornbread was the staple quick bread for lunch and dinner. Many a child in the South in the 30s and 40s went to school carrying a pint jar of buttermilk and a large slice of cornbread for lunch, with a slice of fried fatback if times were good.
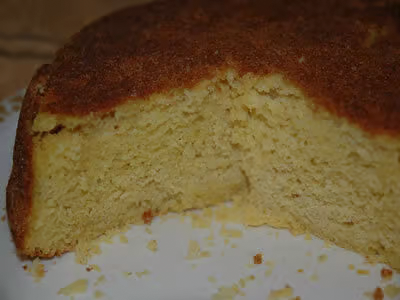
The secret to the crust:

This is the way all six of my great aunts and my grandmother made it, baking it in a cast iron frying pan which gives it a crust like no other bread in the world. Cast iron holds heat better than anything else, and that is really the secret of this bread. You can make suitable cornbread in a roasting pan or a casserole dish if you have to, and some modern cookware may be up to the task, but I have never been able to get this crust from any other cookware I have owned. Other materials simply lose too much heat while you are pouring the batter into the pan. If you don’t have a cast iron pan, you can pick one up at a junk store or thrift shop for a couple of dollars. I use a 7” pan for mine, but an 8” works just as well. My Mother still uses a 6”pan she bought in 1944 for fifteen cents, and her cornbread beats mine every time. But I think she cheats.
Serves 6-8 Quick breads are only good the day they are baked. Leftovers don’t freeze well for reheating to eat, but should be frozen to use later in pan dressing to go with chicken or turkey. If you already have a freezer full, toss the leftovers out for the birds. They love it.
Ingredients:
Preheat oven to 450.
- Two cups self-rising white or yellow cornmeal, or add 3 tsp baking powder and 1 tsp salt to plain cornmeal
- 1 Tbsp sugar
- One egg, beaten
- 3 Tbsp vegetable oil or melted fat
- 1-1/4 cups buttermilk (or plain milk with 2 tsp vinegar to sour it)
- 1/4 cup vegetable oil to coat pan
Take the 1/4 cup of the vegetable oil and put it in the frying pan. Turn the pan to coat the bottom and sides well. Too much is better than not enough. You should be able to see a shallow pool of oil in the bottom of the pan. Put pan in oven to heat.
Put dry ingredients in a bowl and mix well. Add the wet ingredients all at once and stir to make the batter.
When the oil is HOT! (smoking slightly), pour the batter into the pan and enjoy the sizzle. Return it to the oven for 20 minutes. It is done when a knife inserted into the top comes out clean.
Turn out of pan upside-down onto a plate. Stand and be amazed at the reddish brown crackled crust approximately 1/8” thick covering it. Do not sample at this point if you plan to serve for dinner. You may not have any left by the time everyone gets to the table. It slices better when it cools for a few minutes, anyway.
Outstanding with any vegetables (especially a thick vegetable soup!) or by itself with butter.
WARNING: South of Pennsylvania it is illegal to serve collard or turnip greens or any type of beans without cornbread.
It is a capital offense in some states to serve black-eyed peas and collards with pepper vinegar on New Year’s Day and not cook a cornbread to accompany them. And it well should be.


Variations:
1) Any type of onions are great chopped and sautéed for a couple of minutes before adding to the batter. The result is like a hush puppy but not as greasy.
2) A chopped jalapeno pepper added to the batter improves any bland side dish.
3) ½ cup whole corn makes a good addition. Drain whole corn well if you use it. For creamed corn, use ¾ cup, reduce the milk to 3/4 cup and reduce sugar to 1 tsp.
4) ½ cup finely chopped broccoli florets gives the bread a flavor that surprised me the first time I tried it.
5) Cracklins. Many people have never heard of them. These are bits of pigskin (cured bacon rind) that have been chopped and cooked and are available in groceries all over the South. ½ cup of them make a cornbread you will talk about for years.
Fruit Cake

The traditional store-bought canned fruitcake is the scourge of the universe, the butt of many jokes, but a homemade fruitcake is downright delicious! My father's mother made a great fruitcake, but I never did see that recipe. In my own baking, I've tended to go with the white fruitcakses, such as my Apricot Macadamia Nut Fruitcake, and leave the dark fruitcakes to someone else. However, at the store this morning, I saw a display of all the candied fruit - and impulse buying at it's finest - bought it!
Not having made a dark fruitcake in years, I decided to just go online and see what was out there. Lots - and a few of them actually looked good. But one that stuck out was on about.com called "Spiced Dark Fruitcake."
I changed ingredients around a bit to match what I had bought and here's the final recipe I used. It's an interesting recipe in that one makes the batter on day one, and bakes it on day two - allowing the cake to really meld before going into a slow oven for several hours. It seemed like the sort of recipe that would have been used back when fruitcakes were held in high esteem. We shall see.
Spiced Dark Fruitcake
• 4 ounces diced candied orange peel
• 4 ounces diced candied lemon peel
• 8 ounces diced fruitcake mixed fruit
• 8 ounces whole red candied cherries
• 4 ounces whole green candied cherries
• 1 cup currants
• 1/2 cup golden raisins
• 1/2 cup dark raisins
• 2 cups chopped walnuts
• 1/2 cup orange juice
• 1/4 cup brandy
• 1/4 cup bourbon
• 3 1/2 cups all-purpose flour
• 1 1/2 teaspoons ground cinnamon
• 2 teaspoons ground nutmeg
• 1/4 teaspoon ground cloves
• 1/2 teaspoon ground allspice
• 1/2 teaspoon ground mace
• 1 teaspoon baking powder
• 1/2 teaspoon salt
• 1 cup plus 6 tablespoons butter, room temperature
• 2 cups brown sugar, firmly packed
• 5 eggs, separated
• 1/2 cup molassesPREPARATION:
This batter is quite heavy, but a heavy-duty stand mixer can handle it.Mix the fruit in a large bowl with the orange juice and brandy. Stir gently and set aside to marinate for a few hours.
Generously butter bottom and sides of two 9 x 5 x 3-inch loaf pans and line them with parchment paper. Butter the paper thoroughly. You can use brown paper for this if you don't have parchment paper.
Sift the flour with the spices twice. Add the baking powder and salt and sift again.
Put the butter into a large mixing bowl and cream until smooth. Add sugar; using an electric mixer, cream until light and fluffy. Beat the egg yolks slightly and then add them to the bowl. Mix the batter well before you start to add the flour and spice mixture. Stir the batter as you add the flour, a little at a time, stirring well after each addition. When the flour is thoroughly incorporated, add the molasses and stir. Finally, stir in the fruit, along with any soaking liquid left in the bowl.
Put the egg whites in a stainless steel or glass bowl and beat with a clean beater to stiff peaks. Fold them into the batter thoroughly and then spoon the batter into the prepared pans. Cover loosely with a clean cloth and let the batter sit overnight in a cool place to mellow.
On the next day, heat the oven to 250°. Place the fruitcake on the middle rack of the oven and bake for 3 1/2 to 4 hours. After 1 1/2 hours, cover the pan with a piece of brown paper (do not use foil) or set the pan in a paper bag and return it to the oven.
When the cake has baked for 3 1/2 hours, test the with a toothpick or cake tester. If the tester comes out of the center of the cake clean, the cake is done. Leave the cake in the pan and set on wire rack to cool.
When the cakes are completely cooled, turn out of the pans, leaving the paper lining on the cake. Wrap the cake with parchment, then foil, and pack the cake in a tin. Homemade fruitcakes need air, so punch a few holes in the lid of the tin or set the cover loosely on the tin.
Set the tin in a cool, undisturbed place, and every 3 or 4 days before Christmas, open the foil and drizzle a small amount of bourbon or brandy over the cake. The liquor will keep the cake most and flavorful and help preserve it as well.
I've been emailing my Aunt Kathleen about fruitcake the past few days. I have this vague memory of having fruitcake with my Paternal Grandmother a bazillion years ago, and asked her if 1) Grandma ever made fruitcake and 2) did she have her recipe, if she did.
Auntie wrote back and said her mother never made fruitcake, but that my mother made the best fruitcake - and she thought she had the recipe. Memories are funny. I have a stronger memory of my grandmother's non-fruitcake than I do my mom's real one. (Actually, the memory is having fruitcake and my grandmother explaining what some of the candied fruit was. I guess I just assumed she made it because back in those days, everybody made everything.)
I went looking through mom's cookbooks but didn't find a recipe. Hopefully, Auntie has it! If so, I'll be making that fruitcake also, this year. Three different styles.
Did I mention that I like fruitcake?