Holiday Cooking
These are all recipes submitted from all our wonderful family and friends. Recipes that have been handed down over the years as well as fun foods newly created. A one-stop-shop for all your Holiday Cooking!
We’re always looking for more fun holiday foods so send a favorite recipe or ten off to us and we’ll get them included!
Thanks – and enjoy!
Beverages
Cookies
- Amaretti
- Aunt Dolores’ Rum Balls
- Aunt Emma’s Apricot Cookies
- Butter Rum Biscotti
- Cannoli Biscotti
- Cedro/Citron Biscotti
- Chocolate Amarena Cherry Biscotti
- Chocolate Peppermint Biscotti
- Chocolate Peppermint Biscotti
- Chocolate Sambuca Biscotti
- Chocolate Snowballs
- Christmas Turtles
- Coconut Balls
- Cuccidati
- Debbie’s Ginger Snaps
- Frosted Nutmeg Logs
- German Spritzer Cookies
- Gina Lollobrigida’s Wreath Cookies
- Gingerbread Biscotti
- Joanna’s Wedding Rings
- Karabij
- Kwachy’s Cut-Out Cookies
- Kwachy’s Melt-A-Ways
- Lemon Coconut Cookies
- Marie’s Jelly Strips
- Orange Macadamia Biscotti
- Pecan Balls
- Peppermint Patties
- Pfeffernusse
- Pistachio Biscotti
- Quadruple Orange Biscotti
- Ricotta Cookies
- Rolled Cut-Out Cookies
- See’s Original Fudge
- Spice Christmas Cookies
- Springerle Cookies
- Tequila Mockingbird Biscotti
- The Justin Trudeau Biscotti
- Torrone
- Torrone al Cioccolato
- Uncle Rudy’s Pizzelle’s
- Uncle Rudy’s Biscotti
- Vanilla Almond Cookies
- Walnut Butter Cookies
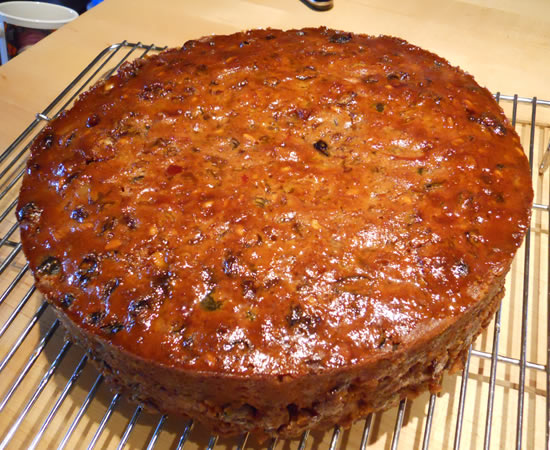
Christmas Fruit Cake
It's beginning to smell a lot like Christmas!
While we're not doing the mega-baking of years past, I do have to make a few things for the holidays - and fruitcake is really one of my favorites.
I know.. I know... Fruitcake has a really bad rap. Many moons ago I started making an Apricot and Macadamia Nut Fruitcake just to ease folks back into the mood. The past couple of years I've abandoned all pretense and have gone for the real McCoy.
This year I made one fruitcake. Just one. And as soon as it is completely cooled it's going down into the basement until Christmas.
It's an easy cake to make - and well worth the cost of ingredients.
While there are often very traditional dried fruits used. I chose what we had in the house already. 8 cups or so of dried and candied fruit and a hefty cup of nuts.
Mix 'em up.
Christmas Fruit Cake
- 2 cups mixed diced glacéed fruits
- 3 cups golden raisins
- 1 cup dried cranberries
- 1 cup dried cherries
- 1 cup dried apricots, chopped
- 3/4 cup rum
- 1 1/2 cups all-purpose flour
- 1/2 tsp baking powder
- 1/2 tsp salt
- 1/2 tsp nutmeg
- 1 tsp ginger
- 1/2 tsp cloves
- 1 cup butter, softened
- 1 cup packed brown sugar
- 5 large eggs
- 1 cup almond meal
- 1 1/2 cups chopped assorted nuts
- 1/4 cup peach jam mixed with 1 tbsp rum
In a large bowl combine all of the fruits with the rum and let macerate overnight.
Line the bottom of a well-buttered 9 1/2-inch springform pan with a round of parchment paper and butter the paper. Into a small bowl sift together the flour, the baking powder, and the spices.
Cream together the butter and the brown sugar until the mixture is light and fluffy and beat in 4 of the eggs, 1 at a time, beating well after each addition.
Drain the fruit mixture well and mix the juices into the batter.
Stir the flour mixture into the batter, one fourth at a time, stir in the fruit mixture, the almond meal, and the nuts, stirring until the mixture is just combined, and turn the batter out into the prepared pan.
Put 2 loaf pans, each filled with hot water, in a preheated 300°F. oven and put the springform pan between them. Bake the cake for 1 hour, brush the top with the remaining egg, beaten lightly, and bake the cake for 1 hour more. While the cake is baking, in a saucepan melt the peach jam with the remaining 1 tablespoon rum over moderate heat, bring the mixture to a boil, and strain it through a fine sieve into a bowl, pressing hard on the solids.
Cool cake in the pan on a rack for 30 minutes. Remove from pan. Brush the top of the cake with glaze.
The cake will keep, covered, for 6 months.
2010 Fruitcake
Fruitcake is one of my more favorite holiday treats. It’s definitely gotten a bad rap over the years – mainly due to the canned grocery store cakes that were mass-produced over the years.
A real, homemade fruitcake is different.
We had a lot of dried fruit in the house so I used it instead of going out and getting currants and glacéed cherries and the like. I also found small tubs of the glacéed fruits that were not full of high fructose corn syrup and red dye No. 3. It’s not easy to find, so choose your battles.
This recipe is a variation of a Gourmet recipe from 1991.
- 2 cups mixed diced glacéed fruits
- 3 cups golden raisins
- 1 cup dried cranberries
- 1 cup dried cherries
- 1 cup dried apricots, chopped
- 3/4 cup rum
- 1 1/2 cups all-purpose flour
- 1/2 tsp baking powder
- 1/2 tsp salt
- 1/2 tsp nutmeg
- 1 tsp ginger
- 1/2 tsp cloves
- 1 cup butter, softened
- 1 cup packed brown sugar
- 5 large eggs
- 1 cup almond meal
- 1 1/2 cups chopped assorted nuts
- 1/4 cup peach jam mixed with 1 tbsp rum
In a large bowl combine all of the fruits with the rum and let macerate overnight.
Line the bottom of a well-buttered 9 1/2-inch springform pan with a round of parchment paper and butter the paper. Into a small bowl sift together the flour, the baking powder, and the spices.
Cream together the butter and the brown sugar until the mixture is light and fluffy and beat in 4 of the eggs, 1 at a time, beating well after each addition.
Drain the fruit mixture in a sieve set over the batter and beat the juices into the batter.
Stir the flour mixture into the batter, one fourth at a time, stir in the fruit mixture, the almond meal, and the nuts, stirring until the mixture is just combined, and turn the batter out into the prepared pan.
Put 2 loaf pans, each filled with hot water, in a preheated 300°F. oven and put the springform pan between them. Bake the cake for 1 hour, brush the top with the remaining egg, beaten lightly, and bake the cake for 1 hour more. While the cake is baking, in a saucepan melt the peach jam with the remaining 1 tablespoon rum over moderate heat, bring the mixture to a boil, and strain it through a fine sieve into a bowl, pressing hard on the solids.
Cool cake in the pan on a rack for 30 minutes. Remove from pan. Brush the top of the cake with glaze.
The cake will keep, covered, for 6 months.
- Amaretti
- Aunt Dolores’ Rum Balls
- Aunt Emma’s Apricot Cookies
- Butter Rum Biscotti
- Cannoli Biscotti
- Cedro/Citron Biscotti
- Chocolate Amarena Cherry Biscotti
- Chocolate Peppermint Biscotti
- Chocolate Peppermint Biscotti
- Chocolate Sambuca Biscotti
- Chocolate Snowballs
- Christmas Turtles
- Coconut Balls
- Cuccidati
- Debbie’s Ginger Snaps
- Frosted Nutmeg Logs
- German Spritzer Cookies
- Gina Lollobrigida’s Wreath Cookies
- Gingerbread Biscotti
- Joanna’s Wedding Rings
- Karabij
- Kwachy’s Cut-Out Cookies
- Kwachy’s Melt-A-Ways
- Lemon Coconut Cookies
- Marie’s Jelly Strips
- Orange Macadamia Biscotti
- Pecan Balls
- Peppermint Patties
- Pfeffernusse
- Pistachio Biscotti
- Quadruple Orange Biscotti
- Ricotta Cookies
- Rolled Cut-Out Cookies
- See’s Original Fudge
- Spice Christmas Cookies
- Springerle Cookies
- Tequila Mockingbird Biscotti
- The Justin Trudeau Biscotti
- Torrone
- Torrone al Cioccolato
- Uncle Rudy’s Pizzelle’s
- Uncle Rudy’s Biscotti
- Vanilla Almond Cookies
- Walnut Butter Cookies
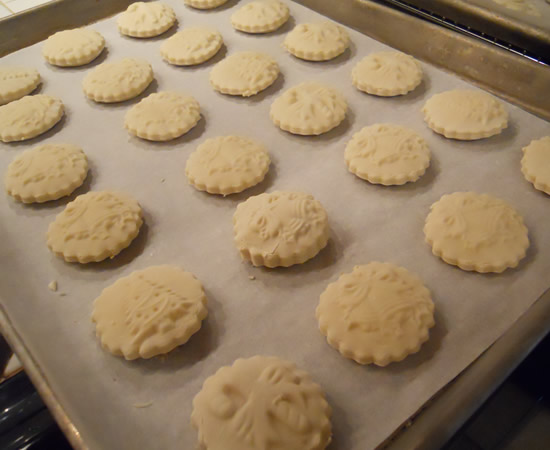
Springerle Cookies

I am one happy baker today! Really happy!
The springerle cookies came out fantastic! Better than fantastic! They're really, really good!
For those not in the know (and that would have been me until a few weeks ago) a springerle cookie is a German cookie that is stamped with a design and then allowed to dry overnight. This sets the design so it doesn't "melt" during baking. They're baked at a low temperature until the bottom is barely browned. The cookie itself stays pretty white. They are also leavened with bakers ammonia - a leavening agent that only reacts with heat - not liquid.
I had never heard of them until our friend Luigi said she was making them. I've made her Oma's stollen for the past few years and love it.
They take a bit of time, but really not a lot of effort. The dough is velvety-smooth and easy to work.

Even a novice baker could make an acceptable cookie with this. The trick - and it's one I am learning - is the pressing and cutting. These cookies came out okay, but I can see where a couple of really good springerele molds would really make a lot of difference.

They really are works of art and while anything will taste good, the artistry is in the pressing and cutting. I shall enjoy practicing!

I did not have a wood-carved traditional springerle mold. I had three ceramic molds that did the trick this year, but I'm going to get a few real ones for next Christmas now that I know how wonderful the cookies are!

I made two shapes with the molds - round where I used a cookie cutter around the imprint and square where I just cut the dough sheet into blocks after pressing.
Both worked well, and while probably not exactly traditional, it does show that just about anyone cold make them at home without having to buy a lot of special equipment.
Luigi doesn't have her Oma's original recipe, but she said the recipe at House on the Hill was pretty close to what she used to make. And they have a ton of springerele molds of every shape, size, and design. Check them out!
This is Nini's Perfection Springerle Cookie Recipe from House on the Hill:
Nini's Perfection Springerle Cookie Recipe
These whisked-egg holiday cookies date back to at least the 1600′s and are made in Bavaria, Switzerland and the Alsace area of France. For eating quality, ease and quality of prints this recipe is just perfection!
What you’ll need:
- 1/2 teaspoon baker’s ammonia (Hartshorn) or baking powder
- 2 tablespoons milk
- 6 large eggs, room temperature
- 6 cups powdered sugar (1 – 1 1/2 #)
- 1/2 cup unsalted butter, softened but not melted
- 1/2 teaspoon salt
- 1/2 teaspoon of anise (if substituting fruit flavored oils, use 3 teaspoons)
- 2 lb. box sifted cake flour (Swansdown or Softasilk)
- grated rind of orange or lemon – optional (enhances flavor of the traditional anise or the citrus flavors)
- more flour as needed
Dissolve hartshorn in milk and set aside. Beat eggs till thick and lemon-colored (10-20 minutes). Slowly beat in the powdered sugar, then the softened butter.
Add the hartshorn and milk, salt, preferred flavoring, and grated rind of lemon or orange, if desired. Gradually beat in as much flour as you can with the mixer, then stir in the remainder of the 2 lbs. of flour to make stiff dough. Turn onto floured surface and knead in enough flour to make a good print without sticking.
Follow general directions for imprinting and drying cookies.Printing Cookies
Method #1 – For most cookies…
Dough will be rolled approximately 1/4″ to 3/8″ thick, like pie crust (deeper molds need thicker dough). Brush confectioner’s sugar or flour on the mold image, then imprint with your press (mold), cut out shape with knife or pastry wheel, dry and bake. Remember to “press and cut, press and cut” so that adjacent images are not distorted.Method #2 – For very deep or large cookies…
Roll out dough to desired thickness and, using a dry, clean pastry brush, apply flour or sugar and cut a piece of dough the approximate size needed for the mold. Press dough into the mold with fingers, working from center outward. You may lightly roll the back side of the cookie to smooth before turning out of the mold. Trim, dry and bake. To check your print, use light from the side – daylight or light from a floor lamp – so the shadows let you see if your prints are good.Drying
Most printed cookies are dried 2-24 hours before baking (depending on your schedule, humidity, etc.) Drying preserves the image during baking.
Baking
Bake on greased or baker’s parchment-lined cookie sheets at 255° to 325° till barely golden on the bottom, 10-15 minutes or more, depending on size of cookie.
Store in airtight containers or in zipper bags in the freezer. They keep for months, and improve with age. Yield 3 to 12 dozen.
The the drying and baking instructions are extremely vague. In one respect they have to be, because there are so many different sizes and shapes of molds and cookies. That didn't help this first-time springerle baker, however.
I preheated the oven to 255° and baked the smaller round cookies for about 22 minutes. I baked the larger squares almost 30 minutes.
As with any baking, a bit of close watching definitely doesn't hurt. Just keep a close eye and pull them when they're "barely golden on the bottom" and you'll have a perfect cookie!
I definitely want to thank the folks at House on the Hill for sharing their recipe! I can see myself making these for many years to come!
Springerle Cookies

This recipe comes from House on the Hill, Inc. in Elmhurst, IL.
Perfection Springerle Cookies
These whisked-egg holiday cookies date back to at least the 1600’s and are made in Bavaria, Switzerland and the Alsace area of France. For eating quality, ease and quality of prints this recipe is just perfection!
What you’ll need:
- 1/2 teaspoon baker’s ammonia (Hartshorn) or baking powder
- 2 tablespoons milk
- 6 large eggs, room temperature
- 6 cups powdered sugar (1 – 1 1/2 #)
- 1/2 cup unsalted butter, softened but not melted
- 1/2 teaspoon salt
- 1/2 teaspoon of anise (if substituting fruit flavored oils, use 3 teaspoons)
- 2 lb. box sifted cake flour (Swansdown or Softasilk)
- grated rind of orange or lemon – optional (enhances flavor of the traditional anise or the citrus flavors)
- more flour as needed
Dissolve hartshorn in milk and set aside. Beat eggs till thick and lemon-colored (10-20 minutes). Slowly beat in the powdered sugar, then the softened butter.
Add the hartshorn and milk, salt, preferred flavoring, and grated rind of lemon or orange, if desired. Gradually beat in as much flour as you can with the mixer, then stir in the remainder of the 2 lbs. of flour to make stiff dough. Turn onto floured surface and knead in enough flour to make a good print without sticking.
Follow general directions for imprinting and drying cookies.
Printing Cookies
Method #1 – For most cookies…
Dough will be rolled approximately 1/4″ to 3/8″ thick, like pie crust (deeper molds need thicker dough). Brush confectioner’s sugar or flour on the mold image, then imprint with your press (mold), cut out shape with knife or pastry wheel, dry and bake. Remember to “press and cut, press and cut” so that adjacent images are not distorted.
Method #2 – For very deep or large cookies…
Roll out dough to desired thickness and, using a dry, clean pastry brush, apply flour or sugar and cut a piece of dough the approximate size needed for the mold. Press dough into the mold with fingers, working from center outward. You may lightly roll the back side of the cookie to smooth before turning out of the mold. Trim, dry and bake. To check your print, use light from the side – daylight or light from a floor lamp – so the shadows let you see if your prints are good.
Drying
Most printed cookies are dried 2-24 hours before baking (depending on your schedule, humidity, etc.) Drying preserves the image during baking.
Baking
Bake on greased or baker’s parchment-lined cookie sheets at 255° to 325° till barely golden on the bottom, 10-15 minutes or more, depending on size of cookie.
Store in airtight containers or in zipper bags in the freezer. They keep for months, and improve with age. Yield 3 to 12 dozen.
- Amaretti
- Aunt Dolores’ Rum Balls
- Aunt Emma’s Apricot Cookies
- Butter Rum Biscotti
- Cannoli Biscotti
- Cedro/Citron Biscotti
- Chocolate Amarena Cherry Biscotti
- Chocolate Peppermint Biscotti
- Chocolate Peppermint Biscotti
- Chocolate Sambuca Biscotti
- Chocolate Snowballs
- Christmas Turtles
- Coconut Balls
- Cuccidati
- Debbie’s Ginger Snaps
- Frosted Nutmeg Logs
- German Spritzer Cookies
- Gina Lollobrigida’s Wreath Cookies
- Gingerbread Biscotti
- Joanna’s Wedding Rings
- Karabij
- Kwachy’s Cut-Out Cookies
- Kwachy’s Melt-A-Ways
- Lemon Coconut Cookies
- Marie’s Jelly Strips
- Orange Macadamia Biscotti
- Pecan Balls
- Peppermint Patties
- Pfeffernusse
- Pistachio Biscotti
- Quadruple Orange Biscotti
- Ricotta Cookies
- Rolled Cut-Out Cookies
- See’s Original Fudge
- Spice Christmas Cookies
- Springerle Cookies
- Tequila Mockingbird Biscotti
- The Justin Trudeau Biscotti
- Torrone
- Torrone al Cioccolato
- Uncle Rudy’s Pizzelle’s
- Uncle Rudy’s Biscotti
- Vanilla Almond Cookies
- Walnut Butter Cookies
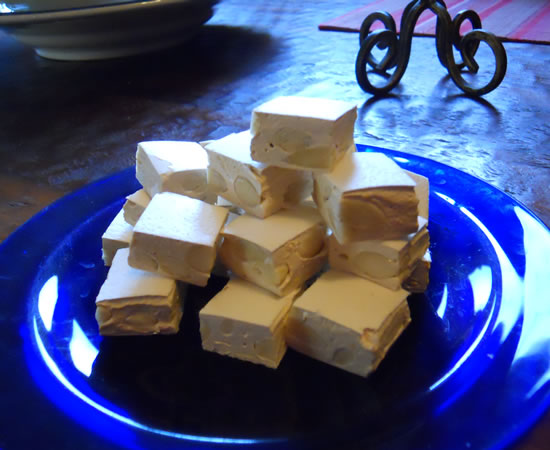
Torrone
I did it!
My first real candy-making attempt in years. I did it!
I have cooked and baked all my life, but candy-making has always juuuust slightly eluded me.
Candy-making is an unforgiving science - and I am not a scientist. The old adage that cooking is an art and baking a science is definitely true. But I've been baking long enough to know where I can change or substitute things and get my desired result. Bread-baking is totally touch and feel. Yes, the science is getting the right ratios of leavening, flour, and liquid, but it is the feel of the dough that lets you know when that balance has been achieved.
Not so with candy.
It is exacting step-by-step, exact temperatures, exact, exact, exact. I am so not an exact person.
But I was today - and it came out great!
The only hassle I had was blanching the almonds. And that wasn't difficult - just time-consuming. There is a suburban conspiracy going on around me. None of the local stores had whole blanched almonds. So... I blanched a pound of them, myself. It's not difficult. Pour boiling water over them, let them sit for 2 minutes, drain, rinse under cold water. Drain, again, and slip off the skins.
There's a lot of almonds in a pound,. It took me about 45 minutes to do them.
The recipe comes from La Cucina Italiana Magazine and it was extremely straightforward and easy to follow. The candy did exactly what it said it was going to do in the recipe at every step. It was great. The one caveat is this is a sticky, sticky candy. And I do mean sticky. I broke a heavy-duty spatula stirring in the nuts. It was old, granted, but it was my favorite. Oh well.
The only change I made was to use edible rice paper instead of cornstarch and parchment paper. I laid out the rice paper on a sheet pan, spread the torrone on it, topped it with rice paper, rolled it to the desired thickness, and then cut it after it had cooled and set.
Sticky.
Torrone
Ingredients
- Cornstarch for dusting
- 3 cups whole blanched almonds
- 3 large egg whites, at room temperature
- 1/4 teaspoon kosher salt
- 3 cups sugar
- 1 cup clover honey
- 1/2 cup confectioners sugar
- 1 teaspoon vanilla extract
- Finely grated zest of 1 large orange
Special equipment: parchment paper; a candy thermometer
Instructions
Heat oven to 350º. Lightly dust a clean work surface with cornstarch. Line a 9- x 13- inch baking dish with parchment paper, letting excess paper hang over edges.
Spread nuts on a rimmed baking sheet. Bake, stirring once halfway through, until fragrant and golden, 10 to 12 minutes. Transfer pan to a rack; let nuts cool completely.
Put egg whites and salt into the bowl of an electric mixer fitted with whisk; set aside.
In a heavy 4-quart saucepan with candy thermometer attached, heat sugar and honey over medium heat, stirring with a wooden spoon, until mixture begins to simmer and sugar is mostly dissolved, 12 to 14 minutes (mixture will be very thick, then begin to loosen and turn cloudy). Continue cooking, stirring occasionally, until candy thermometer reaches 280º degrees. Continue to cook mixture, stirring once or twice, until temperature reaches 315º. It will take the mixture about 15 minutes more to reach that temperature (the mixture will begin to foam and darken in color as temperature increases).
Meanwhile, beat egg whites on medium speed until firm peaks form. Add confectioners sugar and continue to beat until fully incorporated, about 1 minute more. Turn off mixer, leaving bowl in place.
When sugar mixture reaches 315º, remove from heat; stir until temperature reduces to 300º, 1 to 2 minutes, then carefully remove candy thermometer. With mixer on medium speed, slowly pour sugar mixture down the side of the bowl (egg mixture will double in volume, then decrease); continue to beat until mixture is cooled to warm and begins to lighten in color, about 5 minutes. Add vanilla and zest; beat for 1 minute more, then, using a wooden spoon or heatproof spatula, fold in nuts (mixture will be very sticky).
Turn out candy onto prepared work surface; dust hands with cornstarch. Knead for 5 to 6 turns, then transfer to prepared baking dish. Dust hands with more cornstarch, then press candy to flatten and fill pan. Put pan on wire rack and let candy cool completely, about 1 hour.
Using parchment paper overhang, lift out candy from pan; cut candy into pieces. Layer in a sealed container, between sheets of parchment paper and let stand overnight, with container sealed and at room temperature, to dry, at least 8 hours or overnight. Candy can be kept, layered between sheets of parchment paper, in a sealed container at room temperature, for up to 3 weeks.

The recipe makes about 2 1/2 pounds of candy.
There's a recipe for Chocolate Torrone that I'm going to try next... I just have to watch myself. I tend to get a bit cocky after a success like this and not pay attention the second time around.
I really need to pay attention!

Planning the Christmas Baking
It's November 11th. The perfect date to start planning the Christmas baking!
Christmas cookies have been a tradition with us since Christmas One. We have baked thousands of cookies a year. Tens of thousands since getting together. It's been a lot of butter, flour, and fun.
But the past couple of years it hasn't been as much fun. It's been almost mechanical. The bright spot has been having Gino and Elizabeth come down and help with the special family cookies, but the others have been... well... The Same.
We've just made the same cookies for too many years.
So this year, we're doing something completely different.
First is, we're not baking as many cookies as we have in the past. We're doing the family traditions with Gino and Elizabeth but everything else is going to be fresh and new.
We have a recipe for German Springerle cookies. They are cool. Made with carved cookie forms that are pressed into the dough and allowed to dry over night before baking. They're leavened with Hartshorn - bakers ammonia. I have it in the cupboard.
And we're making Torrone - Italian nougat. I've just ordered the edible rice paper. We also have a recipe for a chocolate version. And we're going to make a trio of Italian nut brittles. And authentic English Plum Pudding. And German Stollen. Pinenut Pie. Spiced Nut Tart.
We're going to make a goodly amount of candies - something that I've always wanted to do, but have always shied away from.
Candy-making is just outside of my comfort zone. It's just not something I've done as much of or done as well as other things. It really is the least-forgiving of all cooking.
But what the hell. We're going to go for it! This ain't brain surgery. The absolute worst that can happen is we screw it up and throw it out and start over again. I did that the first time I made the Stollen. Totally screwed it up. And remade it perfectly. I'm getting pretty psyched about the whole idea!
As the new recipes are finalized I'll add them to the Christmas Cookie pages. And we'll take pictures and blog about them as we make them.
I can't wait to start!
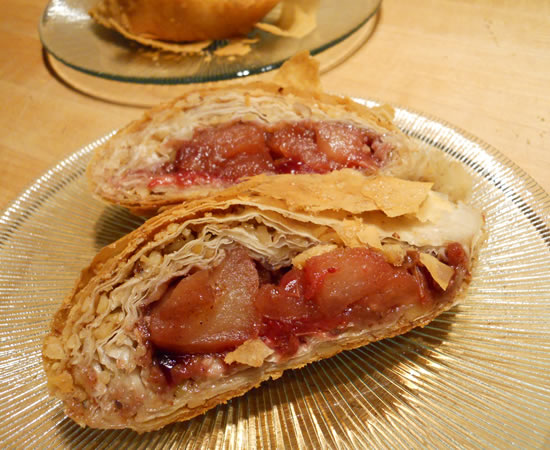
Apple Cranberry Phyllo Rolls
This one got away from me. I really didn't plan to make two huge phyllo rolls. But when you have a one-pound box of frozen phyllo dough thawed, you use it. It's not like it's going to be any good next week.
So... I made two huge phyllo rolls.
And my-oh-my did they come out good! We're definitely set with desserts for a while.
I love phyllo but just don't use it enough. It's good savory, it's good sweet. You can fill it with absolutely anything.
This recipe came about because I had just picked up a couple of apples at the store and had a bag of cranberries sitting in the 'fridge. The phyllo has been in the freezer for a couple of weeks. Time to use stuff!
Buttering every other phyllo layer gives it a bit more substance - and actually cuts down on the calories considerably. Not that I did it for that reason... I wanted a bit more chew in the center and a bit less crumbly. I should freeze one for Thanksgiving...
Cranberry Apple Phyllo Rolls
Makes 2
- 1 tbsp butter
- 5 apples, peeled, cored, and chopped
- 1 cup fresh cranberries
- 1/2 cup packed brown sugar
- 1 teaspoon cinnamon
- 1/2 tsp nutmeg
- 1/2 tsp allspice
- 1 1/2 cups finely-chopped walnuts
- 1/2 cup demerara sugar
- 1 stick butter, melted
- 16 sheets phyllo dough
Preheat the oven to 350. Combine the apples, cranberries, brown sugar and spices in a heavy covered skilletand cook for about 10 minutes or until tender. Cool to room temperature.
Mix walnuts and demerara sugar.
Layer 2 sheets of the phyllo on table and brush with butter. Sprinkle with walnut and sugar mixture. Repeat three times for a total of 4 2-sheet layers per roll.
Heap the apple mixture along (one end if square, long end if rectangular) of the phyllo dough. Carefully roll up, enclosing filling. Place seam-side down on baking sheet lined with parchment paper.
Brush top with butter and sprinkle with additional demerara sugar.
Bake for 35-40 min minutes. Cool and slice.

Seriously. I have two. I need to freeze one!
Easter 2010
 It's over. And what fun we had!
Due to our Anniversary and some scheduling stuff, we ended up swapping our Thanksgiving for Marie's Easter. I think I'm liking Easter even more than Thanksgiving. It's a bit sillier. I mean, Peeps. What more need I say?!?
We did Brunch for 18.
- Mini muffins
- Blackberry Lemon Corn
- Banana Walnut
- Brioche
- cinnamon roll on a stick
- classic
- Gadoodies
- Uncle Rudy's Easter Pie
- Baked Ham with Jameson and Lingonberry glaze
- Irish and Italian Sausages
- Tahoe Brunch
- Roasted teeny potatoes with garlic and rosemary
- Asparagus with chopped heirloom tomatoes
- Marie's pineapple bread pudding
- Leah's fruit salad
- Joann's cannoli
- Mini lemon mousse
- Cannoli
- Strawberry Ricotta pie
- Strawberry Whipped Cream Cake
- Joann's homemade candies
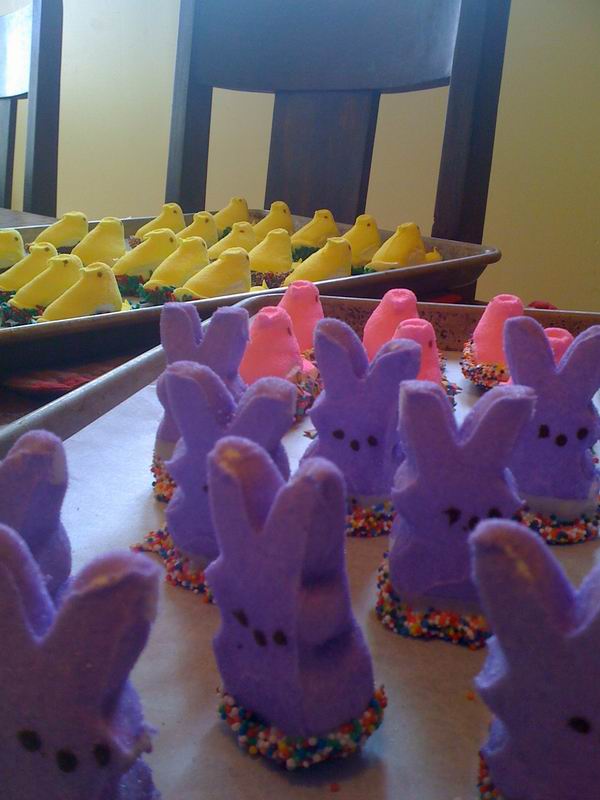
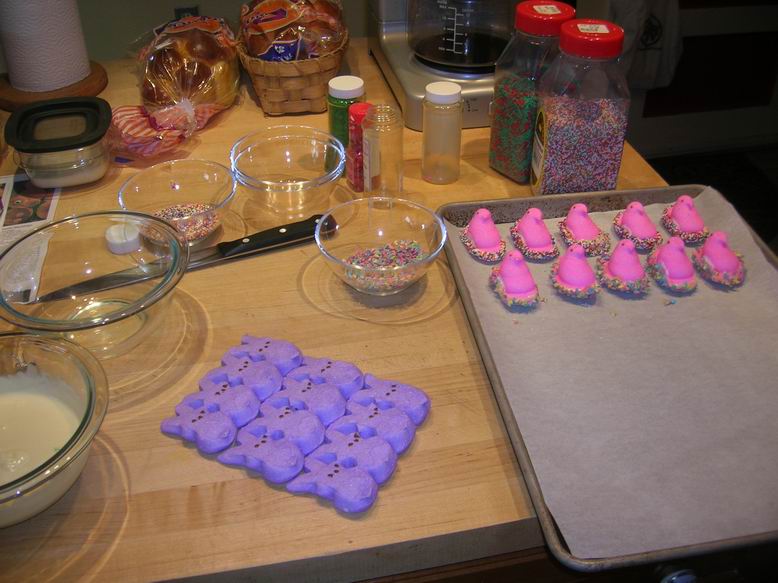
- White and Dark chocolate-dipped Peeps
- Mimosas
I'm sure I'm missing something. There was just so much to eat!
We started planning a couple of weeks ago and pretty much had the menu set last week. And then it was just a matter of doing a little bit now and then. We brought up the Easter decorations last Sunday. There are baskets and bunnies, plates and things we've accumulated over the years. Our starting point is "what do we have and what do we need?" I did as much grocery shopping as I could on Monday.
Tablecloths and napkins were ironed on Wednesday. I folded the Easter Bunny napkins Wednesday night. They sat on the file cabinet in the office. I made the Brioche dough Wednesday. Dipped all the Peeps yesterday. Made the Tahoe Brunch yesterday. I made the butter molds Thursday. They're a bit of a family joke, so I went out and got a lamb butter mold. It's pretty silly. The lamb head looks like a cross between the Sphinx and George Washington. Really silly. Victor made the Easter Pies on Friday. Table was set last night. I made the place-setting Easter Bunny bags Thursday night.
Today was easy. Did all the baking, first thing this morning. My only minor error was dipping the cinnamon brioche rolls and then trying to put them in the planter on the filled plate. I started dripping icing on the lemon corn muffins and the plate, so I did them separately and then assembled the plate when they were set. I finished the mousse, and then filled the double ovens with the ham, the potatoes, the sausages (that I had par-boiled), and the Tahoe Brunch casseroles. Oh, and with 18 people arriving at 1pm, I had to run up and pick up Cybil from the groomer at noon, because Victor was in town picking up his aunt and uncle.
I admit I couldn't do this - or any other holiday meal - without two full-sized ovens. It just wouldn't happen. They were the best investment we ever made. That, and the fact that Victor and I really work well together in the kitchen. We do a great ballet.
And I do plan the menu around how something is going to be cooked, things that can cook together at the same temperature, and how many burners, pans, and pots I need. It's become fairly instinctive at my advanced age, but it really helps to look at the menu and determine cooking needs and times. Timing is everything, but planning even more so.
It also helps to have the menu in the kitchen with you to check things off as they go onto the table. Even though I had the menu written in front of me, in the chaos that was getting the food on the table around all of the people who were in the kitchen even after I had thrown them all out twice, I sat down and forgot the asparagus in the 'fridge. Fortunately, Victor noticed it right away (he made it, after all!) and brought it out.
So we had a great day, great fun, and fun food.
I'm already thinking about next year! Peep Easter Island keeps going through my head.....
Think of the possibilities!
Easter Lambs
Dough
- 4 cups pre-sifted flour
- 1/2 cup sugar
- 3 beaten eggs
- 2 sticks of margarine
- 3 teaspoons baking powder
- 1/2 teaspoon salt
- 1 teaspoon vanilla (optional)
Beat eggs, shortening, sugar, salt. Gradually add flour and powder. Blend well until all moisture has been absorbed. Refrigerate for one hour.
Roll two small pieces about the thickness of a pie crust and about 4 inches in diameter. Put shelled hard boiled egg in center. Cover with the second piece of dough.
Shape into a little lamb or basket. Seal edges with a fork. To shape into lamb, pull a little dough to form head and ears. Add two whole cloves for eyes. To create the illusion of a fluffy lamb, with the points a pair of scissors, cut the dough in little “V’s”. To make basket, follow the instructions for the lamb but do not add head. After sealing edges with a fork, braid two pieces of dough and place on pastry to form handle.
Bake at 375 degrees for 20 minutes or until slightly brown. When cool frost with icing and then sprinkle lambs and baskets with multi-colored sugar decorations.
Makes 8 lambs or baskets.
Icing
Mix one egg white and powdered sugar to make a thin to medium icing depending on personal taste .
We always called this recipe Bubagalo. It means Dolly with an Egg. It’s tradition to make it at Easter time. To this day some of my grandchildren ask me to make them. Well, now they have the recipe and they can make it for thier children and grandchildren. They really look nice on a bed of Easter grass surrounded by candy.
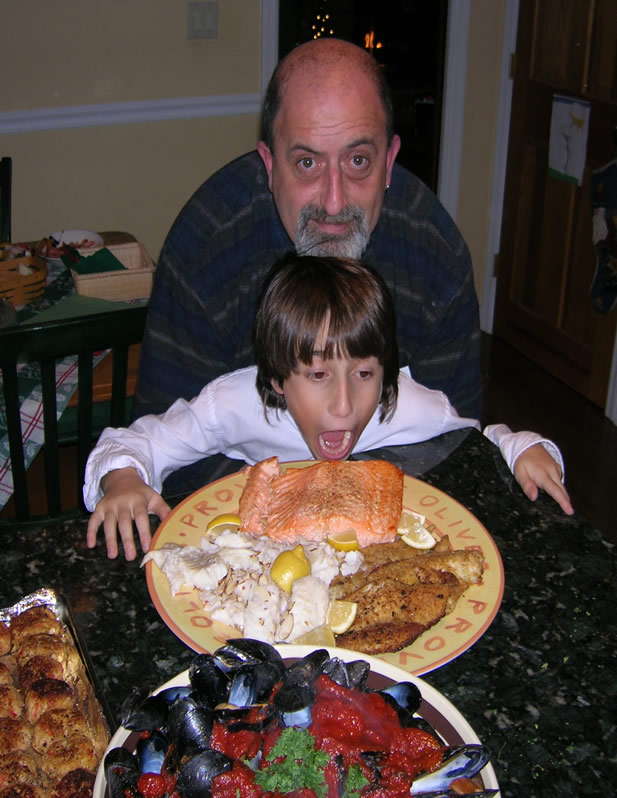
The Feast of the Seven Fishes

It's festa dei sette pesci - Feast of the Seven Fishes. It's an Italian-American (and more Southern Italian and Sicilian than northern) tradition where the family serves seven different seafood dishes on Christmas Eve.
There's a lot of speculation as to where the feast originated, but it's definitely more America-Italian that Italy-Italian where the feast is not something celebrated natioanlly.
Once upon a time, Christmas Eve was a meatless day, so, in true Italian fashion, it became a meatless day with style! But regardless of origin, it's a great tradition and one that I really enjoy. And our Seven Fish were right up there!
It started with Shrimp with both spicy and mild cocktail sauces and a Crab and Whitefish dip...

and went to Linguini with Clams...

to Fried Tilapia...

Baked Cod with Almonds, and...
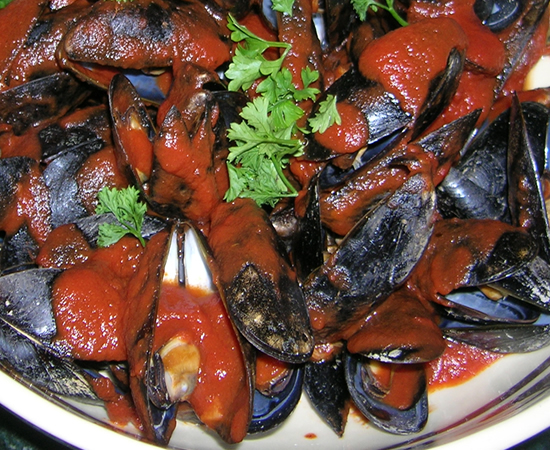
Mussels with Marinara.
All of this was prepared by my brother-in-law, Tom, who really wasn't feeling all that great. He did better on half-power than most of the planet could do at 110%.
We ate well. Very well.