Steaks and Bread

Charcoal grilling is just the best! It may not be as convenient as a gas grill, but there's just no comparing the flavor! And with the thermometer actually hitting 60° today, grilling was definitely called for.
On my Monday grocery shopping trek today, I picked up 8 - yes, eight - bone-in New York strip steaks for a mere $24.00. I love an in-store special! Six of them were vacuum-packed for the freezer, and two became dinner tonight. Grilled perfectly rare and topped first with a bit of Boursin cheese, and then slathered with caramelized onions. Lots and lots of onions.
Baked sweet potatoes and peas rounded out the plate.
But that wasn't all we had!
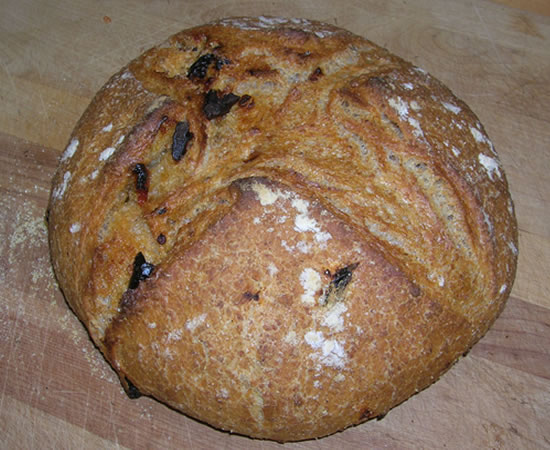
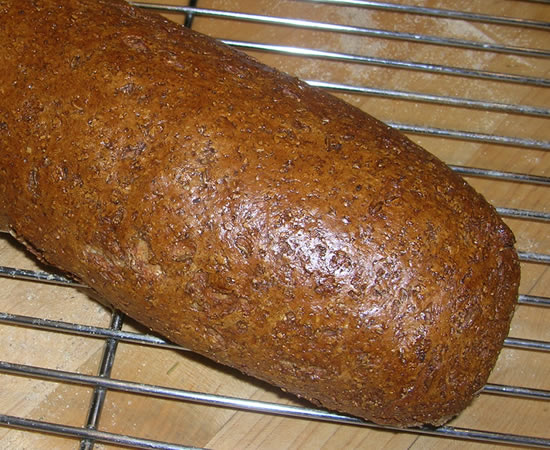
I also made Whole Wheat Sun-Dried Tomato Bread! I took the no-knead recipe and tweaked it a bit and for this loaf, added some chopped sun-dried tomatoes in oil. It was a little messy mixing them in, but the final result was worth it!
Whole Wheat No-Knead Bread
- 3 cups lukewarm water
- 2 pkg yeast
- 1 1/2 tbsp salt
- 4 cups all-purpose flour
- 2 1/2 cups whole wheat flour
Stir ingredients together and let rise 3 hours. Follow instructions for basic no-knead artisan bread.
For sun-dried tomato bread, chop tomatoes and mix into 1lb piece of dough, form into ball and follow instructions for rising and baking.

I really like the whole wheat version better. It has a better crumb - not as chewy as the white, but the crust is still excellent.
And to add just another layer of decadency, Victor made roasted garlic butter to slather on the bread. It's quite simple.
Take a whole head of garlic and slice off the tips to expose the garlic cloves. Drizzle with olive oil and place in a hot oven (450-ish) for about 45 minutes. Let cool, then squeeze out the garlic and mix with softened butter. Use on anything and everything.
And there's flourless chocolate cake later on.....
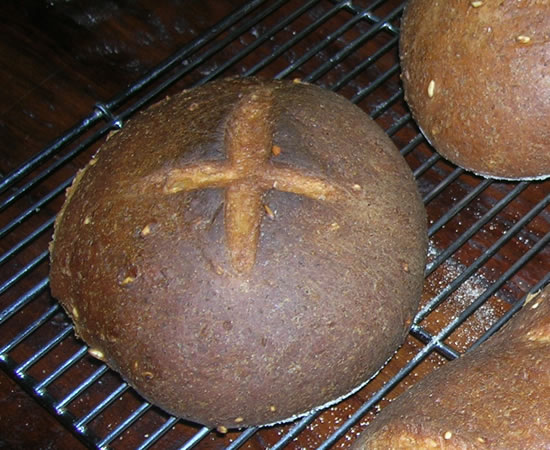
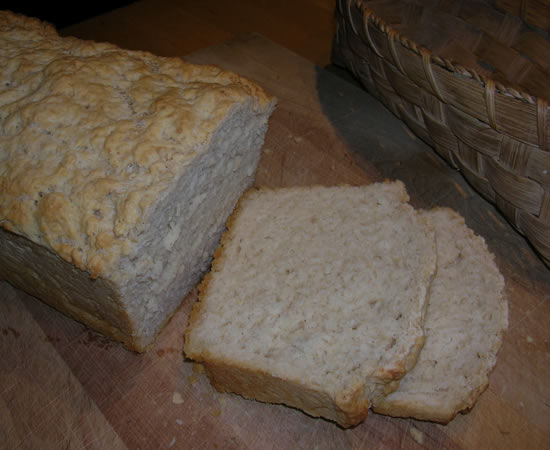
Buttermilk Bulgur Bread
In case you've just crawled out from under a rock, somewhere, it's snowing. A lot. It's wonderful. I'm loving every foot of it - and yes, it's being measured in feet!
We've been eating well since this all began and have a few more fun meals coming up.
We had leftover Chicken Pot Pie for lunch today. It was the perfect winter lunch. And tonight, I'm making New England Clam Chowder - in Bread Bowls.
I was hunting through different bread books when I found this in the Bob's Red Mill Cook Book.
I've never made it before but it seemed like it would compliment clam chowder well.
Buttermilk Bulgur Bread
- 1 Tb Yeast, Active Dry
- 3 Tb Honey
- 1/2 cup Bulgur (ALA) from Hard Red Wheat
- 1/3 cup Unsalted Butter, melted
- 2 cups Whole Wheat Flour
- 2 Tb Cornmeal, Coarse Grind
- 1/4 cup Warm Water (110 degrees)
- 2 tsp Tomato Paste
- 1-1/2 cups Buttermilk, warmed
- 1/2 tsp Sea Salt
- 2 cups White Flour, Unbleached
Place yeast in a large bowl. Cover with warm water; let stand until yeast begins to soften, about 3 minutes. Add honey and tomato paste, and whisk until smooth. Stir in bulgur and buttermilk; let stand 20 minutes.
Stir the butter and salt into the bulgur mixture. Then stir in the whole wheat flour and about 1-1/2 cups unbleached white flour to make a stiff dough. Turn out onto a lightly floured surface. Knead for 15 minutes, adding more flour if necessary to keep dough from sticking. Transfer the dough to a lightly oiled bowl, turn once to coat and cover with plastic wrap. Let rise in a warm place until doubled in volume (about 1-1/2 hours).
Turn dough out onto a lightly floured surface; punch down and divide in half. Roll and pull each half until it resembles a loaf of French or Italian bread.
Sprinkle a baking sheet with coarse cornmeal and place the loaves on the sheet. Brush loaves lightly with water; cover loosely with a towel and let rise in a warm place until doubled in volume, 45 minutes to an hour.
Preheat oven to 400F.
With a sharp knife, slash the surface of the loaves four or five times; brush again with water. Bake until crisp and hollow sounding when tapped with your finger, about 25 minutes. Cool on a wire rack.
I made two individual bowl-sized boules and one large loaf. I really should have used two ovens for this, but I didn't. The loaves were a bit cramped on the stone. Oh well. They may look a bit weird, but they look and smell great!
They should eb perfect foir the clam chowder and Victor made a Cannoli Cake for dessert.
I'm loving this weather!
Pane Pugliese and Lentilles du Puy

More bread. I just can't think of a better food right now. It's still a bazillion degrees below zero (or so it seems) and the only sensible thing is to stay indoors and heat the kitchen.
I've been making this particular bread for years. It may be one of the easiest, no-brainer-fool-proof breads in the world. And one of the absolute best-tasting.
Today, I really proved the fool-proof part.
Our neighbor across the street just had his gall bladder removed. Since he regularly comes over and plows our driveway when it snows, it is imperative that he regain his good health immediately. I thought fresh-baked bread and a no-fat lentil soup was just the thing to help him on the road to recovery.
This is a basic white-flour recipe. I pulled the biga out of the 'fridge (left over from the Pan Siciliano), got it mixed with the yeast and the water and - exactly 6 cups of flour. I needed 7 1/2. I don't think I've ever run out of flour before, but I have been doing a lot of bread-baking. I did another search to make sure there wasn't a 5 lb bag hiding somewhere. I have whole wheat flour, I have rye flour, I have graham flour, I have self-rising flour. There's even corn flour. No more white flour.
There was absolutely no way I was leaving the house. I added a cup and a half of whole wheat.
The dough came out great. Felt good, it had a great smell to it. Into a ball, into a bowl, and into the "proofing room" it went. (For those not in the know... I just open the heater vents in our powder room and it becomes the warmest and best environment for proofing bread.)
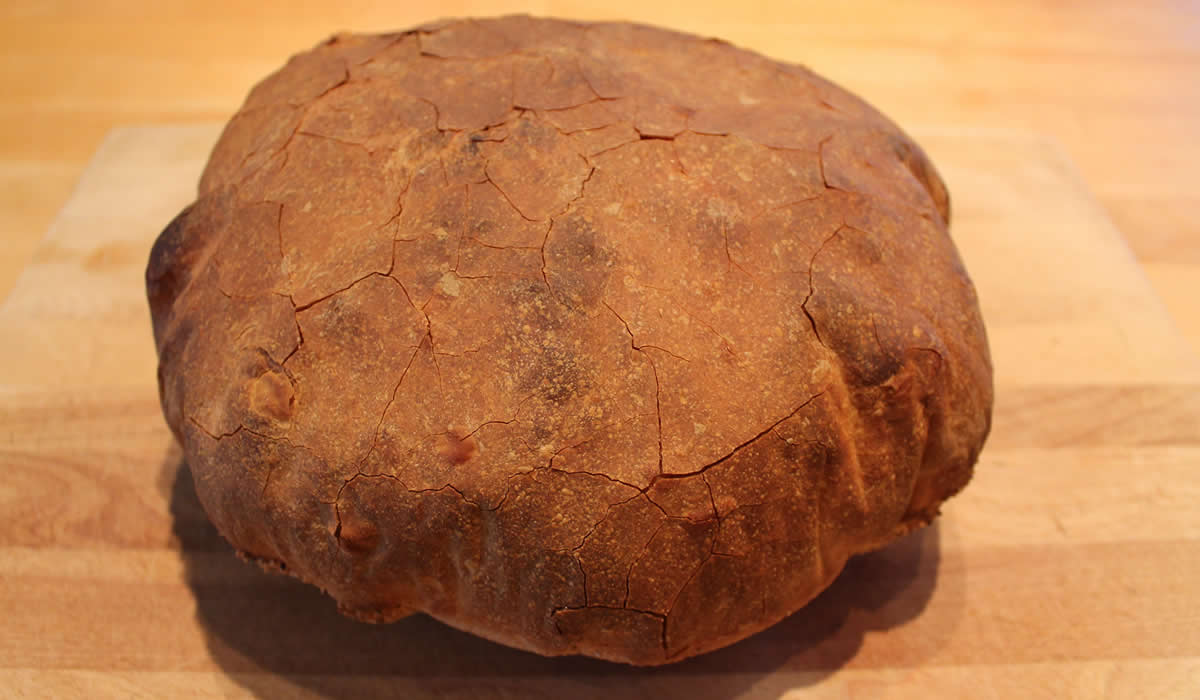
The recipe makes three good-sized loaves and I have generally been able to get them all to fit on one peel. Well... today, they seemed to have a bit more of a mind of their own than usual.
They got big. One was actually hanging off the side a bit.
I already planned to do two loaves in one oven and the third in the other, but as I was sliding the first loaf in, the second fell right off the peel and landed upside down halfway in the oven, laying across the heating element and the door.
Ooops!
I quickly slid the third loaf onto the butcher block and carefully picked up the fallen loaf. I got it into the bottom oven, slid the third one back onto the peel, and got it into the oven.
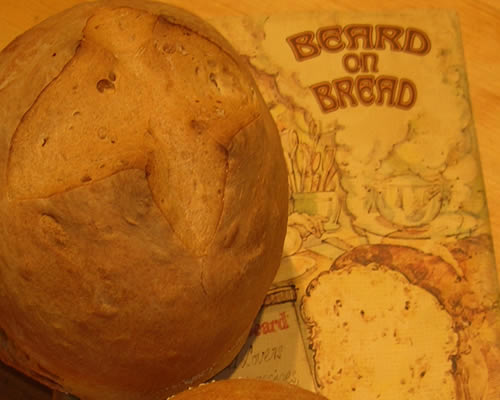
The loaf in the picture above is the one that fell. It came out pretty awesome. A bit misshapen, but awesome.
THAT is a forgiving loaf of bread.
Pane Pugliese
- 1 packet dry yeast
- 1/4 cup warm water
- 3 cups water; room temp
- 1 cup biga
- 7 1/2 cups all-purpose flour
- 1 tbsp salt
Proof the yeast in the warm water. Add 1 1/2 c water and the biga, mix till blended. Add flour and salt, mix till dough comes together and pulls off the sides of the bowl. Knead 3-5 minutes in a mixer, longer by hand. Dough will be very soft and elastic. Let rise about 3 hours, shape into 2 small round loaves or 1 big flattish one. If you have baking stones, place loaves on baking peel or on baking sheets sprinkled corn meal. Let rise about 1 hour. Preheat oven to 450°, and 10 minutes before baking flour the loaf tops and dimple them with your fingers. Bake 50-60 minutes for big loaves, 30-35 minutes for small. Tap the loaves to test for doneness (hollow=done) and cool on a rack.
And the biga. I would imagine it could stay in the 'fridge and just keep adding to it as I used to do with my starters years ago.
Biga
- 1/2 tsp active dry yeast
- 1/4 cup warm water
- 1 1/4 cup water (room temperature)
- 3 3/4 cups unbleached all-purpose flour
Stir the yeast into the warm water and let stand until creamy – about 10 minutes. Stir in the remaining water and then the flour, one cup at a time.
Mix with the paddle attachment on the mixer at the lowest speed about 2 minutes.
Remove to a slightly oiled bowl, cover, and let rise at cool room temperature for 6 to 24 hours. The starter will triple in volume and still be wet and sticky when ready. Cover and refrigerate until ready to use.
During all of this commotion, I was also making lentil soup. With French lentils. Lentilles du Puy. I'm brave. I'll pair Italian bread with French lentils. Fancy restaurants would charge an arm and a leg and call it fusion.
I call it getting my driveway plowed.

I made two versions of the soup. I added cooked sausage and chicken to ours after taking out half for our neighbor. (I wasn't being cheap. Gall bladder removal = low fat diet. Sausage is definitely not on his diet right now.)
The recipe is for making it all at once. I had a chicken breast in the 'fridge that needed cooking, so I cut it up and added it to the sausage when I cooked it. You can make it vegetarian simply by omitting the sausage/chicken.
Potage de lentille du Puy
- 1 onion, diced
- 6 carrots, chopped
- 6 celery stalks, chopped
- 2 cloves garlic, minced
- 1 lb French green lentils (or other lentils)
- 10 cups water
- 1 sm can tomato paste
- 2 tsp Herbs d'Provence
- 2 bay leaves
- salt and pepper, to taste
- 1 lb sausage, sliced
Brown sausage, onions, carrots, cekery, and garlic together in soup pot. When cooked reasonably well, add water, lentils, tomato paste and seasonings.
Bring to boil and then simmer uncovered until lentils are tender and soup has thickened slightly.
Check for seasoning and add additional salt and/or pepper, as desired.
We're not expecting any snow showers until next weekend.
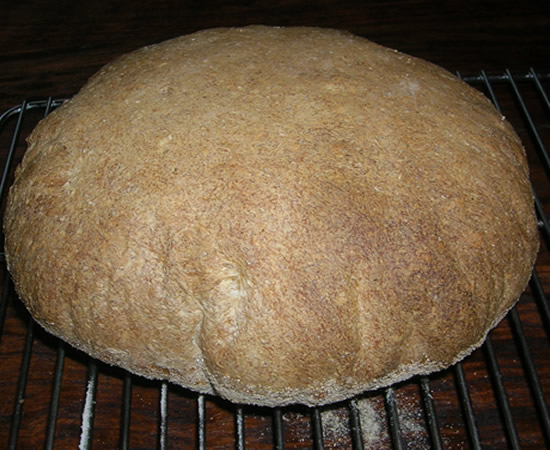
Pane Bigio

Today was another bread-making day. Howling winds, pouring rain... No way was I stepping outside for anything. This was the perfect excuse to stay indoors.
Actually, I knew last night that I was baking bread today. There were 5 pounds of whole wheat flour sitting on the shelf telling me to get it together. I started going through Beard on Bread. Nothing was catching my eye. Nothing was screaming "Bake Me! Bake Me!" So I closed Mr Beard and grabbed my tattered copy of The Italian Baker by Carol Field to check out something Italian and whole wheat. For all of the great recipes in that book, I have to admit that I continually make the same few. I needed to get out of my rut.
I found a bread that sounded intriguing - Pan Bigio. Whole wheat, uses a biga - or starter - and makes two or three loaves. It sounded a lot like my absolute favorite Pane Pugliese except it's whole wheat. Sold.
I made my biga and let it sit out overnight.

Because there's about 4 hours of rising time with this dough, I started off bright and early this morning. As I mentioned earlier, I wasn't going anywhere...
The biga makes about 2 1/2 cups or so and I only needed one for the bread, so I took what I needed and the rest went into the fridge for another day. It actually will only get better the older it gets - it's what gives sourdough its flavor.
Time to make the dough.
Pane Bigio
From The Italian Baker by Carol Field
Makes 2 large or 3 smaller round loaves
- 1 1/4 teaspoons active dry yeast
- 1/4 cup warm water
- 2 1/2 cups water, room temperature
- 1 cup (250 grams) Biga
- Scant 2 cups (250 grams) whole-wheat flour, stone ground if possible
- 3 3/4 cups (500 grams) unbleached all-purpose flour
- 1 Tablespoon salt (1 teaspoon more, optional)
To make Biga:
- 5 1/2 ounces / 150 grams all-purpose flour
- 3 1/2 ounces / 100 grams water
- 1/4 tsp active dry yeast
Mix together, cover and let sit on the counter for 6 to 24 hours to develop.
Dough:
Stir yeast into the warm water in a mixer bowl and let stand until creamy, about 10 minutes. Add 2 1/2 cups water and the biga and mix with the paddle until the water is chalky white and the biga is broken up. Add the flours and salt and mix until the dough comes together. You may need to add a bit more flour, up to 2 tablespoons, but the dough will never pull clean away from the side and bottom of the bowl. Change to the dough hook and knead 5 minutes at medium speed. Finish kneading the sticky, wet dough by hand on a well-floured surface, sprinkling the top with about 3 or 4 more tablespoons of flour.
First Rise: Place the dough in a lightly oiled large bowl, cover tightly with plastic wrap and let rise until tripled and full of large holes, about 3 hours. Do not punch down.
Shaping and Second Rise: Turn the dough out onto a well-floured surface and gently shape into 2 big flat rounds or 3 smaller ones, pulling tight on the surface of the dough with your cupped hands to make a taut loaf. Place the loaves, rough side up, on well-floured baking sheets, peels or parchment paper set on baking sheets. Cover with a towel and let rise until there are lots of aid bubbles under the surface, about 1 hour.
Baking: Thirty minutes before baking, heat the oven with baking stones in it to 450°F. You can also use a cast-iron or aluminuim griddle that is a least 3/8 inch thick or preheated heavy baking sheets. Dimple the tops of the loaves all over with your fingertips or knuckles and let rest for 10 to 15 mintues. Just before baking, sprinkle the stones or griddle with cornmeal. Gently invert the loaves onto the stones. The bread will look deflated when you initially put it in, but it will puff up like a big pillow in no time. Bake for 25 miutes, then shift the loaves to equalize baking. Bake for a total of 45 to 55 minutes, until the loaves are a deep golden brown. Cool on racks.

Mix, knead, and into the bowl it went.
This really is a wet and sticky dough. I had to resist adding more flour. Had I not read that it was supposed to be a wet and sticky dough, I'm sure I would have added way too much more.
But after mixing and kneading - even wet and sticky - it felt right. I knew this one was going to come out!

Three hours later we achieved a most fantastic dough.

It was loose, but it had body.
I made three loaves and let them rise right on the peel.
Into that 450° oven and 40 minutes later...
Three puffy pillows of bread.
There's a chicken and rice casserole in the oven and butter softening on the counter.
C'mon, dinnertime!
Pork Roast, Rye Bread, and an Apple Tart

I decided it was time to do something a tad bit different tonight - a bone-in pork roast!
It's been a while.
The seasonings were pretty basic - garlic, rosemary, salt and pepper. The fun twist cam in the pan - red wine and lingonberry concentrate! (Thank you, Ikea!!) I poured about a cup of wine and a half-cup of the lingonberry concentrate in the pan and used it to baste the pork as it was cooking.

I quartered a couple of potatoes and added them to the pork roast pan about half-way through the cooking. The pan juices made a perfect sauce.
And because I was at the grocery store today... I picked up a bag of rye flour. Which, of course, meant I had to make a loaf of rye bread.
Actually, I made two loaves. James Beard, again.
Rye Bread
- 1 pkg active dry yeast
- 3 tbsp honey
- 1/4 cup warm water
- 1 cup warm milk combined with 1/2 cup warm water
- 2 tbsp softened butter
- 1 heaping tbsp salt
- 1 tbsp caraway seeds
- 2 1/2 cups rye flour
- 3 cups all-purpose flour (or more, if needed)
- 1/4 cup cornmeal
- 1 egg white beaten lightly with 2 tbsp water
Disolve the yeast and honey in the warm water and allow the mixture to proof for 4 or 5 minutes.
Combine the warm milk and warm water with the softened butter and add to the yeast mixture along with the salt and caraway seeds.
Add the flour, 1 cup at a time, stirring well after each addition. When you have addeed about 4 1/2 cups the dough will become difficult to stir and quite sticky, but continue to add the remaining flour a tablespoon at a time.
Scrape out the dough onto a floured board, and using a baker's scraper or a large metal spatula, scrape under the dough and fold the dough over. Continue to lift and fold, and with your free hand start pressing down and away from you on these folded areas, adding more flour as needed to dust your hands and to sprinkle the board.
After 2 or 3 minutes of this procedure you can eliminate the scraper.
Flour both hands and knead for about 10 minutes, until the dough is soft, velvety, and elastic.
Shape the dough into a ball and place in a well-buttered bowl, turning to coat with the butter. Cover with plastic wrap and place in a warm, draft-free area to double in bulk, which will take from 1 to 2 hours.
Punch down, turn out on a lightly floured board, and divide into two equal pieces.
Let the dough rest for 2 or 3 minutes, and then shape into two loaves, either free-form or for well-buttered 8 x 4 x 2-inch loaf pans.
If you are making free-form loaves allow them to rise, covered, on a buttered baking sheet sprinkled with cornmeal until almost doubled in size, and then quickly invert them and brush with the egg and water mixture.
Otherwise, let the loaves rise, covered, in their pans until they have doubled in bulk and then brushing the tops with the egg white and water mixture.
Bake at 400° from 45 to 50 minutes or until the loaves sound hollow when tapped with the knuckles.
Cool thoroughly on racks before slicing.
Beard, like Julia Child, or many other cookbook writers, go into a lot of detail and tend to make things sound more complicated than they really are. This is a pretty easy bread to make.
And tasty, too!
Speaking of tasty...
Guess what Victor made for desert last night?!?

A bit of a free-form puff pastry with apples!
He rolled out a sheet of puff pastry, sauteed a couple of granny smith apples in butter, brown sugar and a bit of white sugar, nutmeg and cinnamon. He sprinkled in a big teaspoon of flour to help thicken it all, and set it in the middle of the pastry, folded up the sides and into the oven it went - following the instructions on the puff pastry package.
Yumlicious!
Bean Soup and Beer Bread
Back in the Saddle, Again... Or, should I say, "back in the kitchen, again"?"
It seems that Victor has been doing a lot of cooking the past few weeks. It's been fun for both of us, but I must admit I do miss making my messes. Uh, er... I mean cooking.
Since it actually made it up to a balmy 22° today with only 40 mph winds, I thought soup and bread would be a good combination. I had soaked a bag of canary beans last night with no real idea of what I was going to do with them, so the frigid weather made up my mind for me.
The bread was my old standby...
Beer Bread
- 3 cups self-rising flour
- 2 tbsp sugar
- 1 12oz can/bottle beer
- 4 tbsp butter, melted
Mix flour, sugar, and beer. Place in buttered bread pan. Pour melted butter on top.
Bake at 350° for one hour.
The type of beer you use will really make a difference! Today, I used Ithaca Beer Co. "Partly Sunny" beer. It's a "wheat ale brewed with spices". Quite good.
I had a ham bone in the freezer, so out it came, along with everything else in the refrigerator. This was really a clean out the refrigerator soup!
Bean Soup
- 1 pound canary (or other) beans, soaked overnight
- 1 ham bone
- 4 quarts water
- 3 bay leaves
- 3 whole cloves
- 6 peppercorns
- pinch salt
- 6 carrots, sliced
- 4 stalks celery, chopped
- 2 heads belgian endive
- 1/2 carton grape tomatoes
- freshly-grated parmesan cheese
Put bean, bay leaves, cloves, peppercorns, and ham bone in pot and add water to cover. Simmer until beans are almost done. Add carrots, celery, and whatever vegetables are in the 'fridge and have to be used up.
Simmer until vegetables are cooked and beans just begin to break down and thicken.
Serve with fresh-baked bread and parmesan cheese.
Simplicity.
Between the simmering soup and the baking bread, the house was totally warm and filled with tantilizing scents.
Tomorrow is supposed to bring more cold weather and some flurries.
Can't wait. <sigh>
Lentil Soup and Fresh-Baked Bread

It's raining outside. It started raining yesterday on our way home from North Jersey. It's been raining ever since. It's melted all of the snow. All of it.
But melted snow or not, it's still cold outside. Damp and cold. Perfect soup weather. And fresh-baked bread weather.
We had the perfect ham bone that just screamed for a pot of water and a couple of bay leaves. It's amazing how so little can give so much. Victor made the soup. I made the bread.
Quantities are mere estimates. Add more or less of something. It's soup. It's flexible.
Victor's Lentil Soup
Large Ham bone – most of the meat cut of and coarsely diced
Large pot of water
- 3 cups Lentils
- 4 stalks Celery, diced
- 4 Carrots, diced
- 1 Onion, chopped
- 2 Garlic Cloves, nimced
- 3-4 Bay Leaves
- S&P
- Tabasco – to taste
Boil the ham bone with the bay leaves a couple of hours.
Add remaining ingredients (except the saved coarsely diced ham).
Simmer, uncovered, until lentils are cooked through.
Add S&P and a generous few splashes of Tabasco.
Remove bone and bay leaves.
Puree about a third of the soup and return to the pot.
Add the reserved ham and heat through.
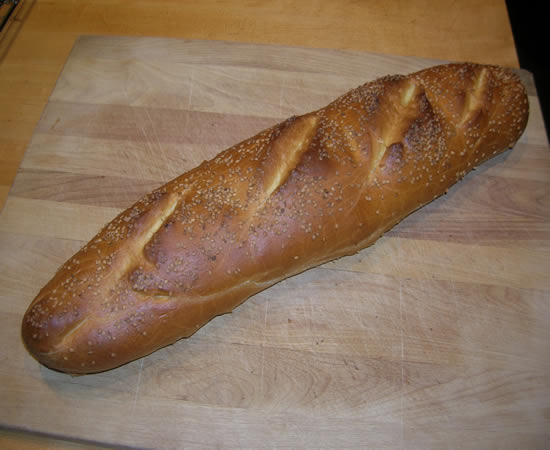
While the soup was simmering, I made a loaf of bread. I used the same recipe as a few days ago. I formed it into a loaf and after brushing with the egg white and water, I generously sprinkled on sesame seeds. This is a half-batch which makes one loaf:
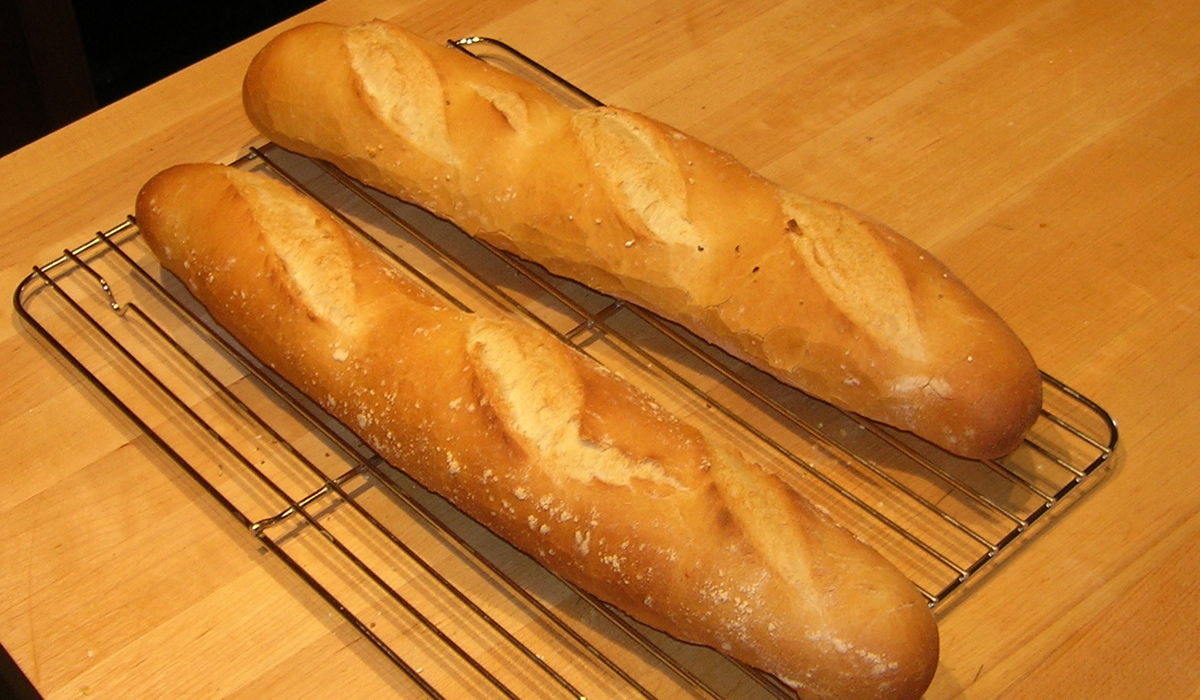
French-Style Bread
Ingredients
- 1 package active dry yeast
- 2 tsp granulated sugar
- 1 cup warm water (l00° to 115°, approximately)
- 1 teaspoon salt
- 3 cups all-purpose or hard-wheat flour
- yellow cornmeal
- 1 egg white, mixed with 1 tablespoon cold water
Directions
Combine the yeast with sugar and warm water in a large bowl and allow to proof. Mix the salt with the flour and add to the yeast mixture, a cup at a time, until you have a stiff dough. Remove to a lightly floured board and knead until no longer sticky, about 10 minutes, adding flour as necessary. Place in a buttered bowl and turn to coat the surface with butter. Cover and let rise in a warm place until doubled in bulk, 1½ to 2 hours.
Punch down the dough. Turn out on a floured board and shape into a long, French bread-style loaf. Place on a baking sheet that has been sprinkled with the cornmeal but not buttered. Slash the top of the loaf diagonally in two or three places, and brush with the egg wash. Place in a cold oven, set the temperature at 400°, and bake 35 minutes, or until well browned and hollow sounding when the top is rapped.
This really is one of the easiest breads in the world to make. It's quick, easy, and foolproof.
So... Tomorrow we are actually going shopping together. Victor hasn't been up to the new Wegmans, yet. This could be dangerous.
We're specifically shopping for Tuesday dinner with Linda and David. Prime Rib au jus, Yorkshire Pudding (instead of the popovers!), Dauphine Potatoes, Stuffed Zucchini, and Baked Alaska for dessert. It's going to be fun, because I haven't made any of these things in quite a while.
The danger is the two of us in a grocery store together. We've been known to spend the GNP of a few small emerging countries when shopping together, which is why I usually shop alone. (Not that I don't keep the economy afloat by myself...) And we even have a gift card.
It's gonna be fun!
Beard on Bread, Tim on Chili
By far, one of the best bread-baking books out there is Beard on Bread.
The beauty of anything written by James Beard is that he writes in a straight-forward way, gives common-sense instructions, and gives a list of variations. His basic premise is "you can't screw it up." I've been following that advice for years.
So after making a big pot of chili today, I thought making some bread bowls would be a fun way to serve them. It's cold outside. I can pretty much justify the calories. Besides, fresh bread is one of life's great pleasures.
My 'go-to' recipe for a quick and easy bread is Beard's French-style (also called Cuban) Bread. It's a one-rise and into a cold oven bread that has a great crust. I thought it would be perfect for bread bowls. They almost were.
I followed the directions and formed into balls instead of loaves and into the oven they went. They actually rose up more than they rose out, so, while they could have worked, I decided to put the chili in bowls and serve the bread on the side. It worked.
Here's the complete 2-page recipe and schpiel from his 1973 cook book.
French-Style Bread
French bread, as we all know, has been praised and prized above all other breads in the world for its distinctive crumb, crisp crust, and superb flavor. However, the carefully controlled preparation of it in commercial bakeries is difficult to duplicate in one’s own kitchen. If you are ready for the challenge, you should search out a recipe that is as complete as the one developed by Julia Child and Simone Beck for Volume 2 of Mastering the Art of French Cooking. Their method seems tremendously complex but it is great fun to follow through to the final goal (and once mastered, not difficult to do again); the loaves are startlingly good and genuinely French.
The bread I am giving here is not truly French, and for that reason it is called “French-style.” Actually it could be called “Continental,” because it is very much like the bread one finds in Italy, Spain, and Portugal. It has also been known for many years as "Cuban Bread." It is a casual, easy-to-make bread that can be played with in several ways. If made according to the basic recipe below it produces a good loaf ready for eating almost the minute it comes from the oven. It will not hold for more than half a day but, of course, can be frozen.
Yield: 2 long loavesIngredients
- 1½ packages active dry yeast
- 1 tablespoon granulated sugar
- 2 cups warm water (l00° to 115°, approximately)
- 1 tablespoon salt
- 5 to 6 cups all-purpose or hard-wheat flour
- 3 tablespoons yellow cornmeal
- 1 tablespoon egg white, mixed with 1 tablespoon cold water
Directions
Combine the yeast with sugar and warm water in a large bowl and allow to proof. Mix the salt with the flour and add to the yeast mixture, a cup at a time, until you have a stiff dough. Remove to a lightly floured board and knead until no longer sticky, about 10 minutes, adding flour as necessary. Place in a buttered bowl and turn to coat the surface with butter. Cover and let rise in a warm place until doubled in bulk, 1½ to 2 hours.
Punch down the dough. Turn out on a floured board and shape into two long, French bread-style loaves. Place on a baking sheet that has been sprinkled with the cornmeal but not buttered. Slash the tops of the loaves diagonally in two or three places, and brush with the egg wash. Place in a cold oven, set the temperature at 400°, and bake 35 minutes, or until well browned and hollow sounding when the tops are rapped.
VARIATIONS
For a wheaten loaf, use half white flour and half whole-wheat flour.
Substitute equal parts of whole-wheat flour and cracked wheat for half of the white flour.
For a more involved, more tightly textured loaf: Use either the original recipe or the whole-wheat variation. After the first rising, remove from the bowl, punch down, and knead again for 5 to 10 minutes. Return to the buttered bowl for a second rising. When it has doubled in bulk, form into two loaves and place on a baking sheet sprinkled with cornmeal. Cover and let rise for 30 minutes. Slash with a sharp razor or knife, brush with slightly beaten egg white or water, and place in a cold oven set for 375° or 400°. Bake until nicely browned and hollow sounding when tapped with the knuckles.
Line the oven rack with tiles (see page 12), preheat the oven to 400°, and slide your bread loaves from the baking sheet directly onto the tiles, which have been sprinkled with cornmeal.
Add to the liquid in the first step 4 to 5 tablespoons olive oil and then proceed with either the original recipe or the whole-wheat variation. You may need to use a small additional amount of flour.
Use 1/3 white flour, 1/3 whole-wheat, and 1/3 cracked-wheat. This will give a very nice coarse, nutlike texture to the bread. With this mixture I would advise adding olive oil in the beginning to give tenderness.
© 1973 James A. Beard

Chili is one of those things I just kinda make. I don't really have a favorite recipe and I more or less make it differently every time I do make it. I make it with ground beef, cubed beef, stew beef, fresh beans, canned beans, dried beans, whole tomatoes, canned tomatoes, fresh chilis or dried or ground.
It's chili. Ya can't really screw it up.
This chili was pretty much a canned affair. Beans and tomatoes were canned and the beef broth came out of a carton. The beef was real.
Canned beans are a great convenience and I always pick up a can or three when when they're on sale. While I was actually planning to use dried beans, Victor gently reminded me last night that we had probably a dozen cans of various beans on the shelf taking up more room than a single bag of beans. I just love a logical man! Canned beans, it was! I used Roman beans, cannellini, pintos, pink beans, and red beans.
5-Bean Chipotle Chili
- 2 pounds beef, cubed
- 1 onion, chopped
- 2 cloves garlic, chopped
- 1 28oz can crushed tomatoes
- 1 14oz can diced tomatoes
- 2 8oz cans tomato sauce
- 1 qt beef broth
- 6 cans assorted beans, drained and rinsed
- 1 tsp chipotle powder
- 1 tbsp cumin
- 1 tbsp chili powder
- salt and pepper
- cheese and sour cream for toppings
Brown beef (I browned it in bacon grease because I had some from breakfast). Add onion and garlic and cook until onion is wilted.
Add spices and cook to rid them of their 'raw' taste.
Add tomatoes and then broth. Bring to a boil and then simmer about an hour.
Add beans and simmer another hour or so.
Check for seasoning and serve with cheese and sour cream.
Bread was served on the side. It was crusty, crunchy, and perfect for dipping and sopping.
And there are leftovers.
Yum.
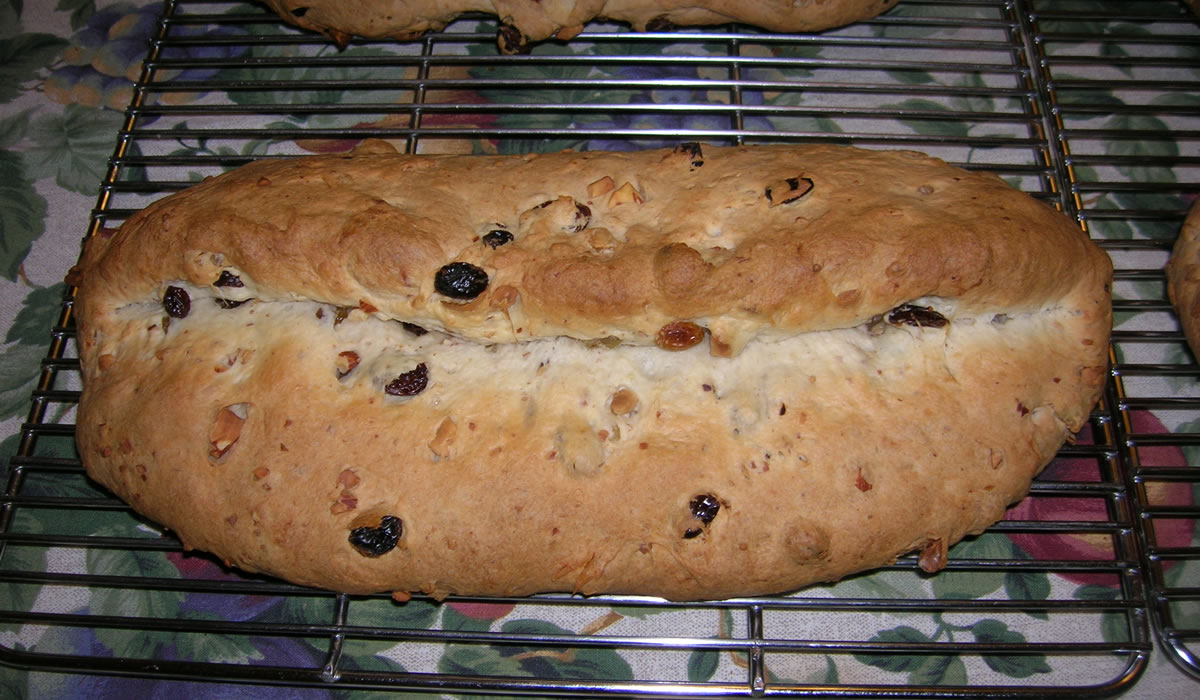
Oma's Christmas Stollen
OMG! You should smell this house right now! I have died and gone to Culinary Heaven!
I've said over and over that our baking has been the best, ever. And I'm here to say it, again. It's the best, ever!
I got the recipe from a friend several years ago and finally decided to make it last year.
The first stollen I made was horrible. I totally and completely screwed it up. Don't ask me how - I just did. I actually threw it all away and re-did it. It was really good the second time, but this year?!? Perfection! Absolute perfection. Oma guided my hand.

It started with the dough. It felt right from the beginning. Even though I'm a baker, there are a lot of things I've just never baked before, and Stollen was one of those things.
When you bake a lot, you learn how to touch and feel dough. It speaks to you - you just need to learn how to listen with your hands. Today it spoke and I listened. It said "be patient".
It takes a lot longer to rise than the breads I'm used to making. It also takes longer to knead. Of course, the breads I'm used to making don't have a pound and a half of butter in them! Patience.

I cut the recipe in half because 4 loaves is more than I really need to have in the house.
Oma's Christmas Stollen
This recipe is huge and makes 8 loaves (it freezes well – in Germany, it’s traditional to consume the last Christmas stollen on Easter) so feel free to cut it in half. It isn’t overly sweet and heavy and nasty like traditional fruitcakes – it’s more like a sweet bread, and the butter in the recipe makes it very flaky.
- 6 pounds flour
- 2 cups white sugar
- 7 oz fresh yeast (about 80 gr dry)
- 1 lb golden raisins
- 1 t almond extract
- 3 t salt
- 3 lb butter
- 1 quart whole milk
- 1 lb dark raisins
- 1 lb blanched almonds, ground finely (but not overly fine – you get it)
- 1/2 lb citron, chopped finely (as above) and floured
In a saucepan, heat the milk. Remove from heat and add butter, sugar and salt. When just warm, add yeast. Put into large mixing bowl and begin to add flour, about five pounds, mixing well after each addition. Stir in raisins, citron and almonds. Add almond extract. Mix well and knead on floured board (dough will be a little sticky – you’ll use probably half a pound of flour doing this, which accounts for the six pound total) until it’s very smooth and elastic (about 20 minutes). Put into a covered bowl and let it rise until doubled. Divide dough into 8 parts and flatten each piece into a circle and fold over *almost* in half – the bottom diameter will be larger than the top. Let rise again until doubled and bake at 350° for 35 minutes. When cool, dust heavily with powdered sugar.

The house really isn't all that warm this time of year, either. I let them rise for several hours, formed the loaves, and let them rise, again, for several hours.

They look beautiful, they smell beautiful, and I know they're going to taste beautiful.
This is our year. No question about it.
And I think I finally figured out why... It's because we decided we weren't going to go crazy and bake a bazillion cookies like we do every year.
Just by cutting back and coming up with fewer batches of everything, the stress went away. Once we decided it just didn't matter, it all fell into place.
There's a few things still planned for the next few days and the weekend. And when we get to them, we get to them.
'Tis the Season to be Jolly!
And we are.
Pasta and Homemade Bread
What a day! The Eagle's beat the Giants, Christmas is finally put away, the basement is (in the process of) getting organized, and the smell of fresh-baked bread is wafting through the house. Do I lead a charmed life, or what?!?
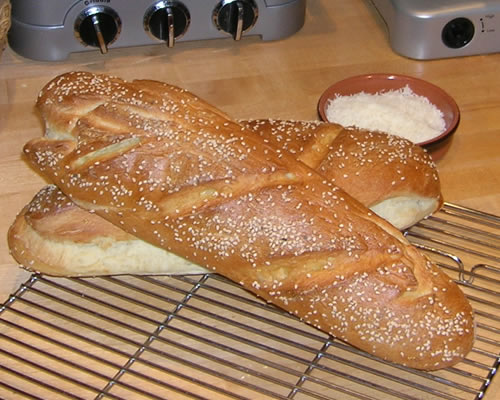
Victor made James Beard's French-Style Bread today. It is quick and easy - and ever-so tasty!
James Beard's French-Style Bread
- 1 pkg dry yeast
- 1 tbsp sugar
- 2 cups wWarm water (100-115 deg.)
- 1 tbsp salt
- 5 cups flour
- 3 tbsp cornmeal
- 1 egg white mixed with 1 tbsp cold water
Combine the yeast with sugar and warm water in a large bowl and allow to proof. Mix the salt with the flour and add to the yeast mixture, a cup at a time, until you have a stiff dough. Remove to a lightly floured board and knead until no longer sticky, about 10 minutes, adding flour as necessary. Place in a buttered bowl and turn to coat the surface with butter.
Cover and let rise in a warm place until doubled in bulk..1 1/2-2 hrs.
Punch down the dough. Turn out on a floured board and shape into two long, French bread-style loaves. Place on a baking sheet that has been sprinkled with the cornmeal, but NOT buttered. Slash the tops of the loaves diagonally in two or three places with a single edge razor blade or sharp knife, brush the loaves with the egg white wash. Place in a COLD oven, set the temperature at 400 degrees, and bake 35 minutes, or until well browned and hollow sounding when the tops are tapped.
It's one of those recipes that comes out perfect, every time. Victor added sesame seeds today which really added to the enjoyment!
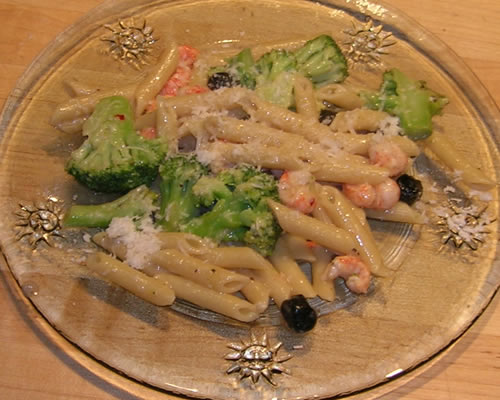
While I was basking in the glory of the Eagle's win (and updating a website for a client) Victor was back in the kitchen making dinner.
Penne pasta with langostino, broccoli, and oil-cured black olives in a garlic butter sauce with lots of parmesan cheese! Simple fare with all the flavors complimenting one another. It was the perfect choice for a cold winter night. And the bread went perfectly with it.
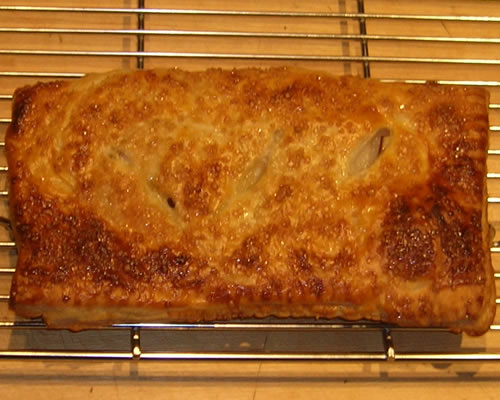
Dessert is going to be something with pears and puff pastry. I can't wait!
And here it is! Thin slices of pear, dotted with butter, sprinkled with brown sugar, and wrapped in puff pastry. A simple egg wash and turbinado sugar sprinkled on top, it was baked at 425° for 15 minutes.
Life is definitely good!
Fresh French Bread
I brought home a ton of cheese yesterday. It happens every time I work the cheese section in the morning. I just go crazy. I want everything and... well... I like cheese. It's one of the most versatile foods in the universe.
I decided that good cheese needed good bread, so I set out this morning to make Julia Child's French Bread. It's a bit of a long recipe...
Pain Francais (French Bread)
(From Mastering the Art of French Cooking: Volume Two by Julia Child and Simone Beck)
Recipe Quantity:
3 - baguettes (24” x 2”) or batards (16” x 3”) or
6 – short loaves, ficelles, 12 – 16” x 2” or
3 – round loaves, boules, 7 – 8” in diameter or
12 – round or oval rolls, petits pains or
1 – large round or oval loaf, pain de menage or miche; pain boulot
Recipe Time: 7 – 9 hours
Additional Information About the Recipe Flour: French bakers make plain French bread out of unbleached flour that has gluten strength of 8 to 9 per cent. Most American all-purpose flour is bleached and has slightly higher gluten content as well as being slightly finer in texture. It is easier to make bread with French flour than with American flour.
Bakers’ Oven Versus Home Ovens: Bakers’ ovens are so constructed that one slides the formed bread dough from a wooden panel right onto the hot, fire-brick oven floor, a steam injection system humidifies the oven for the first few minutes of baking. Steam allows the yeast to work a little longer in the dough and this, combined with the hot baking surface, produced an extra push of volume. In addition, steam coagulating the starch on the surface of the dough gives the crust its characteristic brown color. Although you can produce a good loaf of French bread without steam or a hot baking surface, you will a larger and handsomer loaf when you simulate professional conditions.
Stand Mixer Mixing and Kneading of French Bread Dough: French bread dough is too soft to work in the electric food processor, but the heavy-duty mixer with dough hook works perfectly. The double-hook attachment that comes with some hand held mixers and the hand-cranking bread pails are slower and less efficient, to our mind, than hand kneading. In any case, when you are using electricity, follow the steps in the recipe as outlined, including the rests; do not over-knead and for the heavy duty mixer, do not go over a moderate speed of number 3 or 4, or you risk breaking down the gluten in the dough.
Equipment Needed: Unless you plan to go into the more elaborate simulation of a baker’s oven, you need no unusual equipment for the following recipe. Here are the requirements, some of which may sound odd but will explain themselves when you read the recipe.
- 4 to 5 quart mixing bowl with fairly vertical rather than outward slanting sides
- a kneading surface of some sort, 1 1/2 to 2 square feet
- a rubber spatula or either a metal scraper or a stiff wide metal spatula
- 1 to 2 unwrinkled canvas pastry cloths or stiff linen towels upon which the dough may rise
- a stiff piece of cardboard or plywood 18 – 20 inches long and 6 – 8 inches wide, for unmolding dough from canvas to baking sheet
- finely ground cornmeal or pasta pulverized in an electric blender to sprinkle on unmolding board so as to prevent dough from sticking
- the largest baking sheet that will fit in your oven
- a razor blade or extremely sharp knife for slashing the top of the dough
- a soft pastry brush or fine spray atomizer for moistening dough before and during baking
- a room thermometer to verify rising temperature
Making French Bread:
Step 1: The Dough Mixture – le fraisage (or frasage)
- 1 cake (0.6 ounce) (20grams) fresh yeast or 1 package dry active yeast
- 1/3 cup (75ml) warm water, not over 100 degrees F/38C in a glass measure
- 3 1/2 cup (about 1 lb) (490 gr) all purpose flour, measured by scooping dry measure cups into flour and sweeping off excess
- 2 1/4 tsp (12 gr) salt
- 1 1/4 cups (280 - 300ml) tepid water at 70 – 74 degrees/21 - 23C
Both Methods: Stir the yeast in the 1/3 cup warm water and let liquefy completely while measuring flour into mixing bowl. When yeast has liquefied, pour it into the flour along with the salt and the rest of the water.
Hand Method: Stir and cut the liquids into the flour with a rubber spatula, pressing firmly to form a dough and making sure that all the bits of flour and unmassed pieces are gathered in. Turn dough out onto kneading surface, scraping bowl clean. Dough will be soft and sticky.
Stand Mixer: Combine the ingredients using the dough hook.
Both Methods: Turn dough out onto kneading surface, scraping bowl clean. Dough will be soft and sticky. Let the dough rest for 2 – 3 minutes while you wash and dry the bowl (and the dough hook if using a stand mixer).
Step 2: Kneading – petrissage
The flour will have absorbed the liquid during this short rest, and the dough will have a little more cohesion for the kneading that is about to begin. Use one hand only for kneading and keep the other clean to hold a pastry scrapper, to dip out extra flour, to answer the telephone, and so forth. Your object in kneading is to render the dough perfectly smooth and to work it sufficiently so that all the gluten molecules are moistened and joined together into an interlocking web. You cannot see this happen, of course, but you can feel it because the dough will become elastic and will retract into shape when you push it out.
Hand Method: Start kneading by lifting the near edge of the dough, using a pastry scraper or stiff wide spatula to help you if necessary, and flipping the dough over onto itself. Scrape dough off the surface and slap it down; lift edge and flip it over again, repeating the movement rapidly.
In 2 -3 minutes the dough should have enough body so that you can give it a quick forward push with the heel of your hand as you flip it over.
Continue to knead rapidly and vigorously in this way. If the dough remains too sticky, knead in a sprinkling of flour. The whole kneading process will take 5 – 10 minutes, depending on how expert you become.
Shortly after this point, the dough should have developed enough elasticity so it draws back into shape when pushed, indicating the gluten molecules have united and are under tension like a thin web of rubber; the dough should also begin to clean itself off the kneading surface, although it will stick to your fingers if you hold a pinch of dough for more than a second or two.
Stand Mixer: Knead.
Both Methods: Let dough rest for 3 – 4 minutes. Knead by hand for a minute. The surface should now look smooth; the dough will be less sticky but will still remain soft. It is now ready for its first rise.
Step 3: First Rising – pointage premier temps (3-5 hours at around 70 degrees)
You now have approximately 3 cups of dough that is to rise to 3 1/2 times its original volume, or to about 10 1/2 cups. Wash and fill the mixing bowl with 10 1/2 cups of tepid water (70 – 80 degrees) and make a mark to indicate that level on the outside of the bowl. Note, that the bowl should have fairly upright sides; if they are too outward slanting, the dough will have difficulty in rising. Pour out the water, dry the bowl, and place the dough in it (Mary and Sara Note: Very lightly grease the bowl with butter or kitchen spray as well to prevent the risen dough from sticking to the bowl).
Slip the bowl into a large plastic bag or cover with plastic, and top with a folded bath towel. Set on a wooden surface, marble or stone are too cold. Or on a folded towel or pillow, and let rise free from drafts anyplace where the temperature is around 70 degrees. If the room is too hot, set bowl in water and keep renewing water to maintain around 70 degrees. Dough should take at least 3 – 4 hours to rise to 10 1/2 cups. If temperature is lower than 70 degrees, it will simply take longer.
When fully risen, the dough will be humped into a slight dome, showing that the yeast is still active; it will be light and spongy when pressed. There will usually be some big bubbly blisters on the surface, and if you are using a glass bowl you will see bubbles through the glass.
Step 4: Deflating and Second Rising – rupture; pointage deuxieme temps (1 1/2 to 2 hours at around 70 degrees)
The dough is now ready to be deflated, which will release the yeast engendered gases and redistribute the yeast cells so that the dough will rise again and continue the fermentation process.
With a rubber spatula, dislodge dough from inside of bowl and turn out onto a lightly floured surface, scraping bowl clean. If dough seems damp and sweaty, sprinkle with a tablespoon of flour.
Lightly flour the palms of your hands and flatten the dough firmly but not too roughly into a circle, deflating any gas bubbles by pinching them.
Lift a corner of the near side and flip it down on the far side.
Do the same with the left side, then the right side. Finally, lift the near side and tuck it just under the edge of the far side. The mass of dough will look like a rounded cushion.
Slip the sides of your hands under the dough and return it to the bowl. Cover and let rise again, this time to not quite triple, but again until it is dome shaped and light and spongy when touched.
Step 5: Cutting and resting dough before forming loaves
Loosen dough all around inside of bowl and turn out onto a lightly floured surface. Because of its two long rises, the dough will have much more body. If it seems damp and sweaty, sprinkle lightly with flour.
Making clean, sure cuts with a large knife or a bench scraper, divide the dough into:
- 3 equal pieces for long loaves (baguettes or batards) or small round loaves (boules only)
- 5 – 6 equal pieces for long thin loaves (ficelles)
- 10 – 12 equal pieces for small oval rolls (petits pains, tire-bouchons) or small round rolls (petits pains, champignons)
- 2 equal pieces for medium round loaves (pain de menage or miche only)
- If you making one large round loaf (pain de menage, miche, or pain boulot), you will not cut the dough at all and just need to follow the directions below.
After you have cut each piece, lift one end and flip it over onto the opposite end to fold the dough into two; place dough at far side of kneading surface. Cover loosely with a sheet of plastic and let rest for 5 minutes before forming. This relaxes the gluten enough for shaping but not long enough for dough to begin rising again.
While the dough is resting, prepare the rising surface; smooth the canvas or linen towelling on a large tray or baking sheet, and rub flour thoroughly into the entire surface of the cloth to prevent the dough from sticking
Step 6: Forming the loaves – la tourne; la mise en forme des patons
Because French bread stands free in the oven and is not baked in a pan, it has to be formed in such a way that the tension of the coagulated gluten cloak on the surface will hold the dough in shape.
For Long Loaves - The Batard: (Baguettes are typically much too long for home ovens but the shaping method is the same)
After the 3 pieces of dough have rested 5 minutes, form one piece at a time, keeping the remaining ones covered.
Working rapidly, turn the dough upside down on a lightly floured kneading surface and pat it firmly but not too roughly into an 8 to 10 inch oval with the lightly floured palms of your hands. Deflate any gas bubbles in the dough by pinching them.
Fold the dough in half lengthwise by bringing the far edge down over the near edge.
Being sure that the working surface is always lightly floured so the dough will not stick and tear, which would break the lightly coagulated gluten cloak that is being formed, seal the edges of the dough together, your hands extended, thumbs out at right angles and touching.
Roll the dough a quarter turn forward so the seal is on top.
Flatten the dough again into an oval with the palms of your hands.
Press a trench along the central length of the oval with the side of one hand.
Fold in half again lengthwise.
This time seal the edges together with the heel of one hand, and roll the dough a quarter of a turn toward you so the seal is on the bottom.
Now, by rolling the dough back and forth with the palms of your hands, you will lengthen it into a sausage shape. Start in the middle, placing your right palm on the dough, and your left palm on top of your right hand.
Roll the dough forward and backward rapidly, gradually sliding your hands towards the two ends as the dough lengthens.
Deflate any gas blisters on the surface by pinching them. Repeat the rolling movement rapidly several times until the dough is 16 inches long, or whatever length will fit on your baking sheet. During the extension rolls, keep circumference of dough as even as possible and try to start each roll with the sealed side of the dough down, twisting the rope of dough to straighten the line of seal as necessary. If seal disappears, as it sometimes does with all purpose flour, do not worry.
Place the shaped piece of dough, sealed side up, at one end of the flour rubbed canvas, leaving a free end of canvas 3 to 4 inches wide.
The top will crust slightly as the dough rises; it is turned over for baking so the soft, smooth underside will be uppermost.
Pinch a ridge 2 1/2 to 3 inches high in the canvas to make a trough, and a place for the next piece. Cover dough with plastic while you are forming the rest of the loaves.
After all the pieces of dough are in place, brace the two sides of the canvas with long rolling pins, baking sheets or books, if the dough seems very soft and wants to spread out. Cover the dough loosely with flour rubbed dish towel or canvas, and a sheet of plastic. Proceed immediately to the final rising, next step.
For Long Thin Loaves – Fincelles: Follow the steps above but making thinner sausage shapes about 1/2 inch in diameter. When they have risen, slash as with the Batard.
For Oval Rolls – Petits Pains, Tire-Bouchons: Form like batards, but you will probably not have to lengthen them at all after the two foldings and sealings. Place rolls on a floured canvas about 2 – 4” apart and cover with plastic to rise. When they have risen, make either 2 parallel slashes or a single slash going from one end to the other.
For Small, Medium, or Large Round Loaves – Pain de Menage, Miches, Boules: The object here is to force the cloak of coagulated gluten to hold the ball of dough in shape: the first movement will make cushion; the second will seal and round the ball, establishing surface tension.
Place the dough on a lightly floured surface.
Lift the left side of the dough with the side of your left hand and bring it down almost to the right side.
Scoop up the right side and push it back almost to the left side. Turn the dough a quarter turn clockwise and repeat the movement 8 – 10 times. The movement gradually smooths the bottom of the dough and establishes the necessary surface tension; think of the surface of the dough as if it were a fine sheet of rubber you were stretching in every direction.
Turn the dough smooth side up and begin rotating it between the palms of your hands, tucking a bit of the dough under the ball as you rotate it. In a dozen turns you should have a neatly shaped ball with a little pucker of dough, le cle, underneath where all the edges have joined together.
Place the dough pucker side up in a flour-rubbed canvas; seal the pucker by pinching with your fingers. Flour lightly, cover loosely and let rise to almost triple its size. After unmolding upside down on the baking sheet, slash with either a long central slash, two long central slashes that cross at right angles, or a semi-circular slash around half the circumference.
For Small Round Rolls – Petits Pains, Champignons: The principles are the same here as for the preceding round loaves, but make the cushion shape with your fingers rather than the palms of your hands.
For the second stage, during which the ball of dough is rotated smooth side up, roll it under the palm of one hand, using your thumb and little finger to push the edges of the dough underneath and to form the pucker, where the edges join together
Place the formed ball of dough pucker side up on the flour rubbed canvas and cover loosely while forming the rest. Space the balls 2 inches apart. When risen to almost triple its size, lift gently with lightly floured fingers and place pucker side down on baking sheet. Rolls are usually too small for a cross so make either one central slash or the semi-circular cut.
For Large Oval Loaf – Pain Boulot: Follow the directions for the round loaves except instead of rotating between the balms of your hands and tucking to form a round loaf, continue to turn the dough from the right to the left, tucking a bit of each end under the oblong loaf. In a dozen turns you should have a neatly shaped oval with tow little puckers of dough, le cles, underneath where all the edges of have joined together.
Place the dough pucker sides up in a flour-rubbed canvas; seal the puckers by pinching with your fingers. Flour lightly, cover loosely and let rise to almost triple its size. After unmolding upside down on the baking sheet, slash with parallel slashes going diagonally across the top starting from the upper left and going to the lower right.
Step 7: Final Rise – l’appret - 1 1/2 to 2 1/2 hours at around 70 degrees
The covered dough is now to rise until almost triple in volume; look carefully at its pre-risen size so that you will be able to judge correctly. It will be light and swollen when risen, but will still feel a little springy when pressed.
It is important that the final rise take place where it is dry; if your kitchen is damp, hot, and steamy, let the bread rise in another room or dough will stick to the canvas and you will have difficulty getting it off and onto another baking sheet. It will turn into bread in the oven whatever happens, but you will have an easier time and a better loaf if you aim for ideal conditions.
Preheat oven to 450 degrees about 30 minutes before estimated baking time.
Step 8: Unmolding risen dough onto baking sheet – le demoulage.
The 3 pieces of risen dough are now to be unmolded from the canvas and arranged upside down on the baking sheet. The reason for this reversal is that the present top of the dough has crusted over during its rise; the smooth, soft underside should be uppermost in the oven so that the dough can expand and allow the loaf its final puff of volume. For the unmolding you will need a non-sticking intermediate surface such as a stiff piece of cardboard or plywood sprinkled with cornmeal or pulverized pasta.
Remove rolling pins or braces. Place the long side of the board at one side of the dough; pull the edge of the canvas to flatten it; then raise and flip the dough softly upside down onto the board.
Dough is now lying along one edge of the unmolding board: rest this edge on the right side of a lightly buttered baking sheet. Gently dislodge dough onto baking sheet, keeping same side of the dough uppermost: this is the soft smooth side, which was underneath while dough rose on canvas. If necessary run sides of hands lightly down the length of the dough to straighten it. Unmold the next piece of dough the same way, placing it to the left of the first, leaving a 3 inch space. Unmold the final piece near the left side of the sheet.
Step 9: Slashing top of the dough – la coupe.
The top of each piece of dough is now to be slashed in several places. This opens the covering cloak of gluten and allows a bulge of dough underneath to swell up through the cuts during the first 10 minutes of baking, making decorative patterns in the crust. These are done with a blade that cuts almost horizontally into the dough to a depth of less than half an inch. Start the cut at the middle of the blade, drawing toward you in a swift clean sweep. This is not quite as easy as it sounds, and you will probably make ragged cuts at first; never mind, you will improve with practice. Use an ordinary razor blade and slide one side of it into a cork for safety; or buy a barbers straight razor at a cutlery store.
For a 16 to 18 inch loaf make 3 slashes. Note that those at the two ends go straight down the loaf but are slightly off centre, while the middle slash is at a slight angle between the two. Make the first cut at the far end, then the middle cut, and finally the third. Remember that the blade should lie almost parallel to the surface of the dough.
Step 10: Baking – about 25 minutes; oven preheated to 450 degrees (230 degrees C).
As soon as the dough has been slashed, moisten the surface either by painting with a soft brush dipped in cold water, or with a fine spray atomizer, and slide the baking sheet onto rack in upper third of preheated oven. Rapidly paint or spray dough with cold water after 3 minutes, again in 3 minutes, and a final time 3 minutes later. Moistening the dough at this point helps the crust to brown and allows the yeast action to continue in the dough a little longer. The bread should be done in about 25 minutes; the crust will be crisp, and the bread will make a hollow sound when thumped.
If you want the crust to shine, paint lightly with a brush dipped in cold water as soon as you slide the baking sheet out of oven.
Step 11: Cooling – 2 to 3 hours.
Cool the bread on a rack or set it upright in a basket or large bowl so that air can circulate freely around each piece. Although bread is always exciting to eat fresh from the oven, it will have a much better taste when the inside is thoroughly cool and has composed itself.
Step 12: Storing French bread
Because it contains no fats or preservatives of any kind, French bread is at its best when eaten the day it is baked. It will keep for a day or two longer, wrapped airtight and refrigerated, but it will keep best if you freeze it – let the loaves cool first, then wrap airtight. To thaw, unwrap and place on a baking sheet in a cold oven; heat the oven to 400 degrees. In about 20 minutes the crust will be hot and crisp, and the bread thawed. The French, of course, never heat French bread except possibly on Monday, the baker’s holiday, when the bread is a day old.
Step 13: Canvas housekeeping
After each bread session, if you have used canvas, brush it thoroughly to remove all traces of flour and hang it out to dry before putting away. Otherwise the canvas could become mouldy and ruin your next batch of dough.
The Simulated Bakers’ Oven
Baking in the ordinary way, as described in the preceding recipe, produces an acceptable loaf of bread but does not nearly approach the glory you can achieve when you turn your home oven into a baker’s oven. Merely providing yourself with the proper amount of steam, if you can do nothing else, will vastly improve the crust, the color, the slash patterns, and the volume of your bread; steam is only a matter of plopping a heated brick or stone into a pan of water in the bottom of the oven. The second provision is a hot surface upon which the naked dough can bake; this gives that added push of volume that improves both the appearance and the slash patterns. When you have the hot baking surface, you will then also need a paddle or board upon which you can transfer dough from canvas to hot baking surface. For the complete set up here is you should have, and any building-supply store stocks these items.
For the hot baking surface: Metal will not do as a hot baking surface because it burns the bottom of the dough. The most practical and easily obtainable substance is ordinary red floor tiles 1/4” thick. They come in various sizes such as 6 x 6, 6 x 3, and you only need enough to line the surface of an oven rack. Look them up under Tiles in your Directory, and ask for “quarry tiles” their official name.
For unmolding the risen dough from its canvas: A piece of 3/16 inch plywood about 20 inches wide.
For sliding the dough onto the hot tiles: When you are doing 3 long loaves, you must slide them together onto the hot tiles; to do so you unmold them one at a time with one board and arrange them side by side on the second board, which takes place on the baker’s paddle, la pelle. Buy a piece of plywood slightly longer but 2 inches narrower than your oven rack.
To prevent dough from sticking to unmolding and sliding boards: White cornmeal or small dried pasta pulverized in the electric blender until it is the consistency of table salt. This is called fleurage.
The steam contraption: Something that you can heat to sizzling hot on top of the stove and then slide into a pan of water in the oven to make a great burst of steam: a brick, a solid 10lb rock, piece of cast iron or other metal. A 9 x 12 inch roasting pan 2 inches deep to hold an inch of water and the hot brick.
+++++++++++++++++++++++++
Okay. Did you get all that?!?
Julia did make this sound a bit more complex that it actually is. On the other hand, I've made a few (thousand) loaves of bread in my time and am not intimidated by long sets of instructions. It's only bread. The ingredients are still relatively inexpensive. The very worst thing that could happen is it wouldn't be as good as Julia's. Oh well.
But... not to worry. The bread was every bit as good as Julia would have baked, and I know she would have enjoyed a slice or two.
Now... getting back to that cheese...

I did mention I went a little crazy with the cheeses... We had:
- Triple Cream Brie
- Saint Andre
- 3 kinds of chevere (plain, 4 pepper, and garlic and herb)
- 3-year-aged Cheddar
- Cotswold (A double Glouster with onions and chives)
- Blue Castello
And I grilled a flank steak and served thin slices of steak with the cheeses and bread. Tres fabu!
Oh. And while I was waiting for dough to rise this morning, I made the first Pumpkin Pies of the season!

Perfect Pumpkin Pie
- 3/4 cup granulated sugar
- 1/2 teaspoon salt
- 2 teaspoon ground cinnamon
- 1/2 teaspoon ground ginger
- 1/4 teaspoon ground cloves
- 1/4 teaspoon freshly ground nutmeg
- 2 large eggs
- 1 can (15 oz.) pumpkin
- 1 can (12 fl. oz.) evaporated milk
- 1 unbaked 10" pie shell
- Whipped cream
Preheat oven to 425°. Beat eggs, sugar, and spices in large bowl. Add pumpkin amd mix well. Gradually stir in evaporated milk.
Pour into pie shell. Bake at 425° for 15 minutes. Reduce temperature to 350° and bake for 40 to 50 minutes or until knife inserted near center comes out clean. Top with whipped cream before serving.
I topped mine with a ginger whipped cream.
I shall not be eating anything more today.
Pane Italiano, parte due
Okay... so it was a day later than anticipated, but OMG! what a fantastic bread! I've been making this particular bread for years, and it never disappoints. It is just perfect every time.
It is a crusty, crusty bread with a really light interior. There's no fat - just light, fresh, crusty, crunchy goodness!

Pane Pugliese
- 1 packet dry yeast
- 1/4 cup Warm water
- 1 1/2 cups Water; room temp
- 1/2 cup Biga
- 4 cups All-purpose flour
- 2 teaspoons Salt
Proof the yeast in the warm water. Add 1 1/2 c water and the biga, mix till blended. Add flour and salt, mix till dough comes together and pulls off the sides of the bowl. Knead 3-5 minutes in a mixer, longer by hand. Dough will be very soft and elastic. Let rise about 3 hours, shape into 2 small round loaves or 1 big flattish one. If you have baking stones, place loaves on baking peel or on baking sheets sprinkled corn meal. Let rise about 1 hour. Preheat oven to 450F, and 5 to 10 minutes before baking flour the loaves' tops and dimple them with your fingers. Bake 50-60 minutes for big loaves, 30-35 minutes for small. Tap the loaves to test for doneness (hollow=done) and cool on a rack.
Victor is making a pasta dish right now that he saw on Lidia's TV show yesterday. It's made with almonds, cherry tomatoes, and garlic... And it's from Pulia! How perfect is that?
My stomach is smiling. :)

I'm back. I'm stuffed. My stomach is really smiling! WOW! What a great pasta! The sauce is almonds, cheese, cherry tomatoes, fresh basil, olive oil, garlic, fresh oregano... All ground up in the food processor.
It was really fantastic.
YUM!