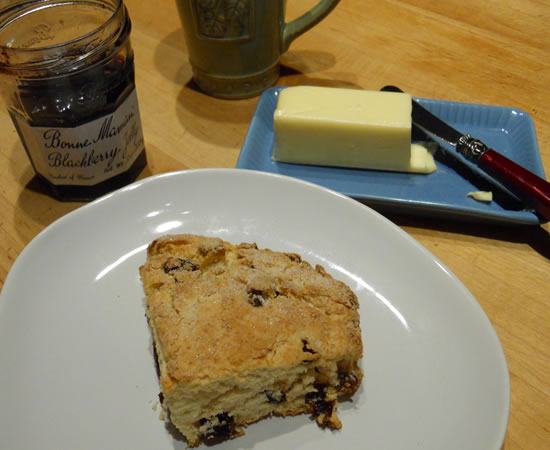
Raisin Scones
Victor saw scones being made on not one, but two different cooking shows this week. He took that as an omen that he needed to make some for us.
I like omens like that!
These are very simple and really good. Perfectly light and crumbly.
Raisin Scones
- 2 cups flour
- 2 tsp baking soda
- 1/4 tsp salt
- 1/3 cup butter, very cold and cut into small cubes
- 1 egg
- 1/2 cup cream or whole milk
- 3/4 cup raisins
Preheat oven to 375°Mix flour, soda, and salt. Cut in butter, being careful not to over-work it. Mix egg with cream and add. Mix very lightly - just until it holds together. mix in raisins.
Spread onto a floured surface and pat into a circle. Cut scones into 4-to-8 wedges.
Sprinkle with sugar and bake about 20 minutes.
I had mine plain, Victor had his with butter and blueberry jam.
Freshly-brewed Black Lab coffee from local roaster Kimberton Coffee Roasting Company finished the meal.
What a way to start a Sunday!
Rustic Summer Tart and Tomato Salad
We had our semi-annual dinner with Linda and David on Saturday. It's always a really fun time - and there is always so much food it's ridiculous. They're under the impression we like to eat, and they really like to eat, so the food just keeps coming!
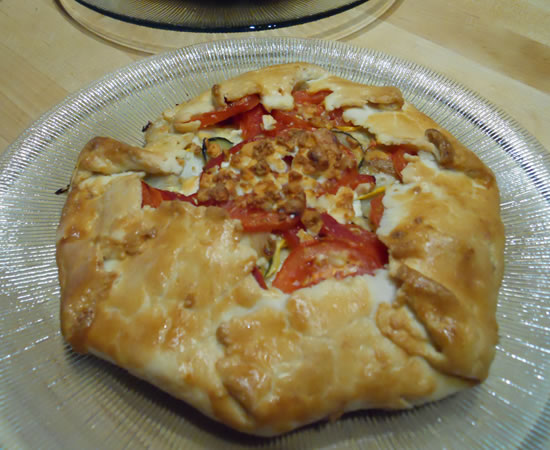
One fun thing Linda made was a Rustic Summer Squash Tart. She cut the recipe out of a Woman's Day magazine a couple of years ago and decided we were just the folks to try it out on.
I'm glad she did.

It was really good! The photo above is from the magazine. The actual recipe makes a single large tart. Linda served hers as an appetizer, so she made it thinner and wider. Her version was a lot easier to eat standing!
I decided to make two individual tarts for our dinner tonight. It also calls for a refrigerated pie crust. Naturally, I had to make my own, because... well... they're so easy to make and they taste so much better.
I followed the concept, but tweaked the filling a bit to use up some things in the refrigerator.
Rustic Summer Squash Tart Recipe
By Woman's Day Kitchen from Woman's Day | August 1, 2008
Active Time: 25 minutes
Total Time: 1 hour 5 minutesRecipe Ingredients
- 1 Tbsp extra-virgin olive oil
- 1 lb mixed summer squash (zucchini, yellow squash and pattypan), cut in 1/4-in. rounds
- 2 shallots, thinly sliced
- 2 tsp chopped fresh thyme or marjoram, plus sprigs for garnish
- 1 tsp chopped garlic
- Freshly ground pepper
- 1 refrigerated pie crust (from a 15-oz. box)
- 4 oz Roquefort cheese, Gorgonzola or other good-quality blue cheese
- 1 roasted yellow or red pepper (freshly roasted or from a jar), cut in strips
- 1 large plum tomato, sliced, seeds removed
- 1 large egg, beaten
Recipe Preparation
- Heat oil in large nonstick skillet over medium heat. Add squash and shallots and cook, turning pieces as they start to color, 7 minutes or until crisp-tender. Remove from heat; stir in thyme, garlic and pepper to taste. Cool to room temperature.
- Heat oven to 400° F. Line a baking sheet with parchment paper; unroll or unfold pie crust on the parchment. With a rolling pin, roll crust to a 13-in. round. Crumble half the cheese over crust to within 2 in. of edge. Arrange squash mixture, pepper strips and tomato slices on cheese; fold edge of the crust over filling and brush crust with egg.
- Bake 35 to 40 minutes until pastry is golden. Slide tart, still on parchment, onto a wire rack. Crumble remaining cheese over top. Let cool before serving.
For the filling, I used 2 pattypan squash, 1 zucchini, fresh spinach, and an andouille sausage that I sliced into rings and sauteed - and the other stuff listed.
I made my basic food-processor pie crust and put the remaining half in the freezer for another day.
And while I was relaxing, waiting for the tarts to cook, Victor moved into the kitchen and made Tomato Salad from some of our bounty of tomatoes from the garden!

Amounts are going to be determined by how many tomatoes you have. Don't worry. Just make it. Ya can't screw it up!
Tomato Salad
- Fresh tomatoes, sliced
- red onion, sliced
- minced garlic
- red wine vinegar
- olive oil
- fresh basil
- salt and pepper
Mix and refrigerate.
One of life's great pleasures is to have some fresh crusty bread to sop up all of that lovely juice in the plate. I didn't make any today because we were having the tart with a crust, but I did make a batch of dough so we can sop tomorrow!
Perfect.
TastyKakes and Sunday Dinner
Question... When is a TastyKake not a TastyKake?!?
Answer... When it's homemade, of course!
We spent the day with our friends KJ and Debbie yesterday. Typical Sunday Italian Dinner. Start eating at one, finish 4 hours later.
Everything was great! Debbie made a fantastic meat sauce that perfectly covered mounds of spaghetti. I had two helpings. And salad... antipasta... Of course I didn't take any pictures, but I was able to convince them that we just had to take a bit more dessert home!
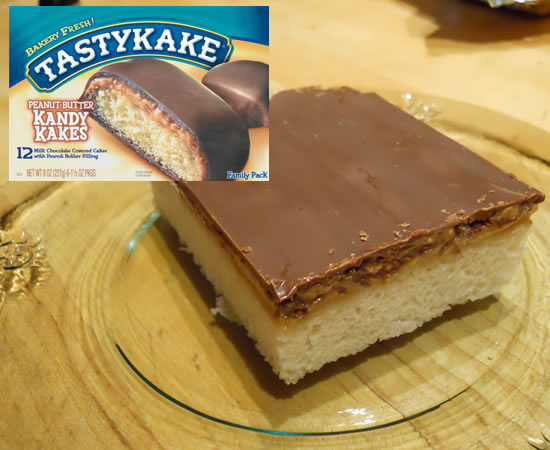
KJ's birthday is the day after mine so Debbie made her her favorite birthday cake; a homemade version of a TastyKake Peanut Butter Kandy Kake.
Okay. We all know I'm not from the area and have no real allegiance to things like TastyKakes. They're just not something I'm going to run out and buy.
But MAKE?!? OMG! I could eat one of these every night!
I didn't get the recipe - yet - but the concept is fairly clear... It's a white cake (not a cake-mix white cake) that, after it comes out of the oven, peanut butter is smeared on it while it's still hot, and then melted chocolate is spread over that.
It's brilliant!
Ok here it is!
Candy Cake Recipe
- 1 cup milk
- 2 Tbs butter
Scald and set aside
- 4 egg whites
- Dash of salt
- 2 cups flour
- 1 tsp vanilla
- 2 cups sugar
- 2 tsp baking powder
Mix egg whites, sugar, and vanilla until light. Mix in flour, salt, and baking powder. Add cooled milk/butter.
Put in jelly roll pan and bake at 350° for 20 minutes. Take out and spread 12 oz peanut butter on top. Put in fridge to chill.
Melt 8 oz. Hershey chocolate in double boiler and spread on top of cool cake. Refrigerate to harden.
Peach Pie
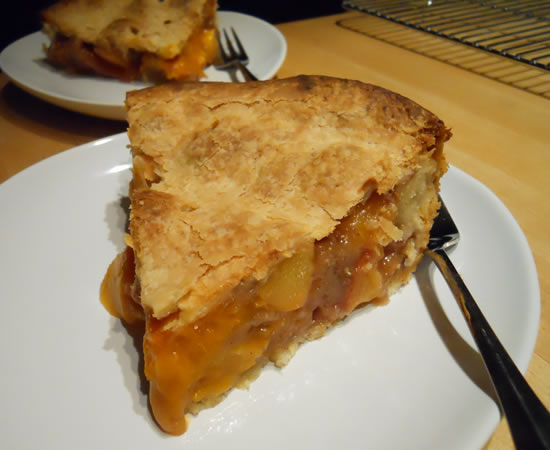
The baking gods were smiling down upon me for this one. This came out just like they always should - and rarely do.
The crust was perfectly flaky (just like me!) and the filling was rich and flavorful -and- held its shape without being pasty. Just like it's supposed to!
I used 4 peaches and 2 apricots - because that's what was in the house. But any combination would work.
A bit of pastry flour helps to lighten the crust a bit and make it more tender. If you don't have any, just use the flour you have.
Peach Pie
Crust:
- 2 cups flour
- 1/3 cup pastry/cake flour
- 2 sticks butter, frozen
- pinch salt
- 2 tbsp sugar
- 1/2 cup ice water
Using a food processor, add flours, salt, and sugar. Pulse to mix.
Chop up frozen butter and add. Pulse until butter is incorporated and mixture looks grainy.
Slowly add ice water and pulse until mixed.
Turn out onto counter. Press and form mixture into two disks - one larger and one smaller (bottom crust, top crust). Wrap in plastic and refrigerate about an hour to allow the flour to properly absorb the water and to relax the gluten.
Roll out bottom crust and place in pie plate.

Make Filling.
- 4 peaches and 2 apricots (or any combination)
- 2/3 cup sugar
- 1/3 cup flour
- 1 tsp cinnamon
- 1/4 tsp ginger
- 1/4 tsp cardamom
- 2 tbsp butter, melted
Preheat oven to 400°.
Cut peaches into chunks. (I very rarely peel fruit.) Place into bowl and then add sugar, flour, and spices. Mix very well - until filling is a bit gluey. Add melted butter and mix well. Pour into crust.
Roll out top crust and place over top. Seal edges and make a decorative crimp, if desired.
Cut vent holes in top crust and bake about 1 hour to an hour and 10 minutes or so.
Cover crust with a bit of foil if it gets too brown.

Guaranteed good!
The food processor really does make the quickest and easiest pie crust. I used to use 3:1 butter to shortening back in the day, but I've found that the all-butter food processor crust is every bit as light, flaky, and tender without the partially-hydrogenated fats. 2 tbsp butter per serving isn't exactly health food to begin with.
But boy was it good!
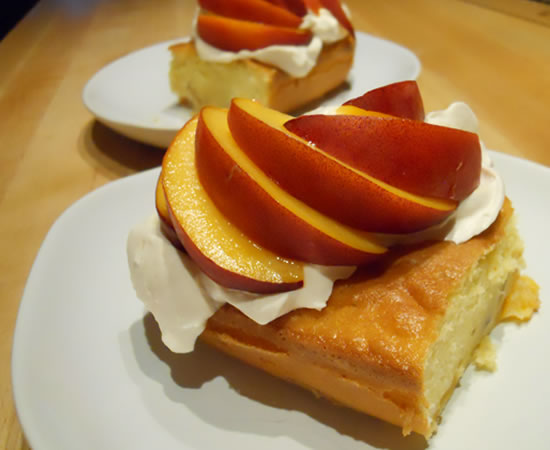
Feed-A-Cold Peach Cake
Feed a cold, starve a fever. That's what we learned as kids. So I'm feeding this cold, whether I can fully taste it, or not.
It's just a basic yellow cake with fresh peaches mixed in, whipped cream on top, and a half-peach sliced atop that.
Really simple. Really good.
I even broke down and used a cake mix tonight. Shocking, I know, but illness does require sacrifice. I have actually found *one* store-brand cake mix without partially-hydrogenated fats or high fructose corn syrup. And it's only the yellow. All the others have mega-crap in them. Of course, all of the national brands have 'em and I don't buy 'em.
One thing to note... When you add things like fresh fruit chucks to cake batter, they will sink to the bottom unless you coat them with flour before gently stirring in. 99% of the time I don't bother, but if you want the fruit to be more-or-less evenly disperseed throughout the layer, you should.
Dinner done. Dessert done. I'm off to bed. I need to make an appearance at work tomorrow.
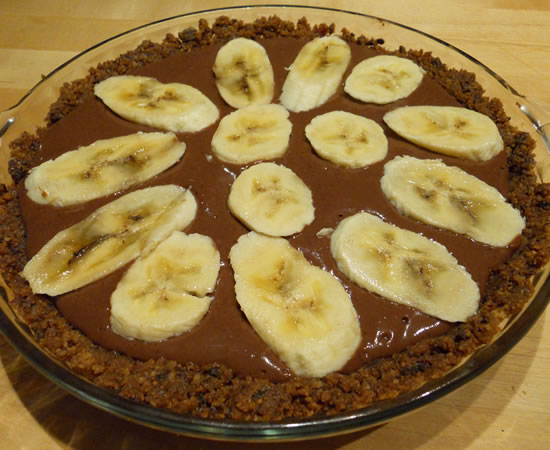
Chocolate Banana Pie
Think OMG delicious! And then multiply it. That's what you get when Victor heads into the kitchen and makes a clean out the refrigerator pie! This was last night's dessert that I didn't get posted.
The cookie crust started out as the chocolate chip cookies I made last week and froze. The chocolate pudding to use up some whole milk we had on hand from making ice cream, the bananas were getting to the use me today or make banana bread tomorrow stage...
And then we topped it with whipped cream.
It didn't come out of the pie plate in perfect wedges. But it didn't matter.
It rocked!
And there's more for tonight.
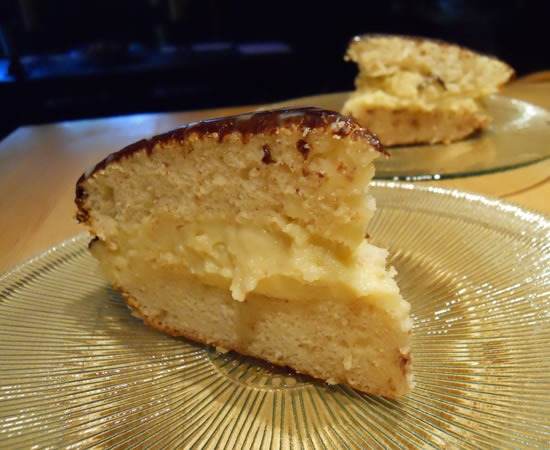
Boston Cream Pie

Tonight's dessert was going to be peach ice cream. Until, that is, Victor caught sight of a Boston Cream Pie on a TV show. he casually mentioned that he'd love for me to make on, one of these days. So, of course, I took the hint.
It's definitely been a while since I made one. I know that nowadays even the Parker House - where the Boston Cream Pie originated - makes them in cake pans. But I decided to follow tradition and make it in a pie plate.
This recipe comes from the Food Network.
Boston Cream Pie
Cake
- 1 cup plus 2 tablespoons sifted cake flour
- 2/3 cup sugar
- 1 1/2 teaspoons baking powder
- 1/4 teaspoon salt
- 1/2 cup milk
- 1/4 cup cooking oil
- 2 egg yolks
- 1 teaspoon vanilla
- 2 egg whites
- 1/4 teaspoon cream of tartar
- Pastry cream, recipe follows
- Ganache, recipe follows
Pastry Cream Filling:
- 2 cups whole, 2 percent fat, or 1 percent fat milk
- 1/2 vanilla bean, split lengthwise, seeds scraped out
- 6 egg yolks
- 2/3 cup granulated sugar
- 1/4 cup cornstarch
- 1 tablespoon unsalted butter
Ganache:
- 8 ounces semisweet chocolate
- 1 cup heavy cream, boiling
Directions
Preheat oven to 350 degrees. In a medium mixing bowl combine flour, sugar, baking powder, and salt. Make a well in the center of the flour mixture. Add milk, oil, egg yolks, and vanilla. Beat with an electric mixer on low to medium speed until combined. Beat an additional 3 minutes on high speed and set aside.
In a large mixing bowl, beat egg whites and cream of tartar on medium to high speed until soft peaks form. Pour the egg yolk mixture over the egg white mixture and fold in. Gently pour the batter into a 9-inch greased pie pan. Bake for 25 to 30 minutes or until the top springs back when lightly touched. Invert the pan onto a wire rack. Cool completely.
Pastry Cream Filling: In a medium saucepan, heat the milk and vanilla bean to a boil over medium heat. Immediately turn off the heat and set aside to infuse for 10 to 15 minutes. In a bowl, whisk the egg yolks and granulated sugar until light and fluffy. Add the cornstarch and whisk vigorously until no lumps remain. Whisk in 1/4 cup of the hot milk mixture until incorporated. Whisk in the remaining hot milk mixture, reserving the empty saucepan.
Pour the mixture through a strainer back into the saucepan. Cook over medium-high heat, whisking constantly, until thickened and slowly boiling. Remove from the heat and stir in the butter. Let cool slightly. Cover with plastic wrap, lightly pressing the plastic against the surface to prevent a skin from forming. Chill at least 2 hours or until ready to serve. (The custard can be made up to 24 hours in advance. Refrigerate until 1 hour before using.)
Ganache: In a medium bowl, pour the boiling cream over the chopped chocolate and stir until melted.
To assemble pie, remove the cake from the pan. Cut the cake in half horizontally. Place bottom layer on a serving plate or board, and spread with the pastry cream. Top with second cake layer. Pour chocolate ganache over and down the sides of the cake. Store in refrigerator.
It came out great! Just like all the ones I ate when I lived in Boston! It's definitely not that Betty Crocker box mix! I am pleased with it.
And speaking of pleased...
This is what I look at every moment I am in the kitchen.

Cybil lays on her side of the kitchen (she knows not to snoop around the island when "Daddy Means It" is cooking) hoping that I will drop something she can have. I almost always do. Sometimes even on purpose!
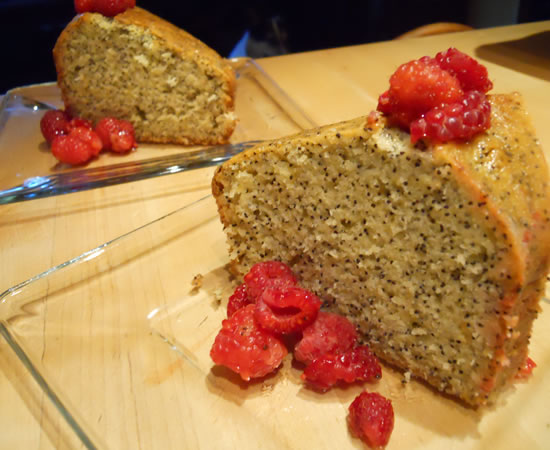
'In Flanders Field' Poppy Seed Cake With Lemon Glaze and Strawberries
I'm actually old enough to remember WWI Veterans selling real poppies with real ribbons and cards that read...
In Flanders Fields the poppies blow
Between the crosses row on row...
We all memorized the poem as kids. But those ancient-to-me veterans didn't sell them around Memorial Day - Flanders Field was all about Armistice Day - Veteran's Day. November 11th. It's an almost forgotten holiday. Not much is closed. It's certainly not a paid holiday for 99% of the population. (It made the Uniform Monday Holiday Act in 1968 and the 4th Monday in October was designated Veteran's Day, but was it removed in 1975 to its original November 11th date.)
But I digress...
This cake was in Thursday's Philadelphia Inquirer and Victor was going to make it, but I beat him to the dessert punch with the Raspberry Banana Tart.
So he made it for us, today. I'm glad he saved the paper. It was really good!
'In Flanders Field' Poppy Seed Cake With Lemon Glaze and Strawberries
Makes 10-12 servings
- 3 1/2 cups flour
- 1 teaspoon baking powder
- Scant 1 teaspoon baking soda
- 1/2 teaspoon salt
- 1/2 pound (two sticks) unsalted butter
- 2 cups sugar
- 4 eggs
- 1 1/4 cups buttermilk
- Rind of two lemons, zested or grated fine
- 1/2 cup fresh poppy seeds
- For the glaze:
- Juice of two lemons
- 2/3 cup sugar
Optional Memorial Day garnish:
- Fresh strawberries, washed, hulled, and sliced (leave two or three perfect berries)
- Whipped cream
- Fresh mint
- Small American flags
1. Preheat oven to 350. Prepare a bundt or tube pan by greasing and flouring.
2. Combine the dry ingredients in a small bowl. Set aside.
3. Beat the butter and sugar with an electric mixer until creamy and smooth, scraping the bowl from time to time to ensure complete mixing. Add eggs one at a time, beating well after each addition. Add a third of the flour mixture and a third of the buttermilk and mix until the flour is just incorporated. Repeat twice more, adding the rind with the last bit of buttermilk, scrape down the sides of the mixing bowl, and mix until the batter is smooth.
4. Bake in the center of the oven for 40 to 50 minutes until lightly browned and a toothpick inserted in the center comes out clean. Cool on a rack for about a half hour and invert onto serving plate.
5. Mix the glaze ingredients together and brush onto the cake while it is still warm.
6. Garnish with small American flags and serve the berries on the side, or use them to fill the hole in the center of the cake.
Per serving (based on 12): 482 calories, 7 grams protein, 71 grams carbohydrates, 45 grams sugar, 20 grams fat, 112 milligrams cholesterol, 276 milligrams sodium, 1 gram dietary fiber.
So... the timing of the Flanders Field reference may be a bit off, but the cake certainly wasn't. It's real good.
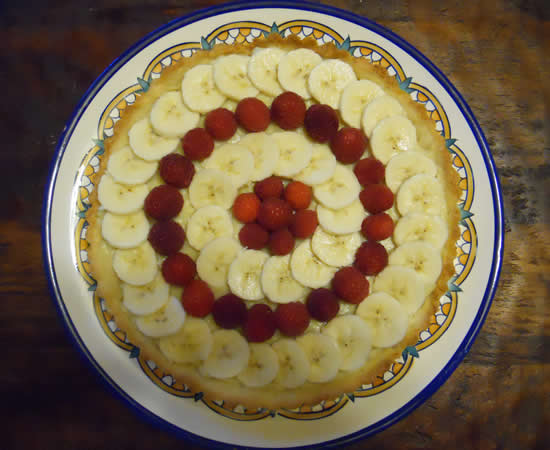
Raspberry and Banana Tart

This months La Cucina Italiana magazine has a series of recipes on raspberries. And a full-page picture of a raspberry and banana tart.
Now, I have no idea what makes a raspberry and banana tart Italian, but, after looking at the picture, I didn't really care. I wanted to make the tart.
So I did.
Either they're growing their bananas smaller over there in Italy, or their 9 1/2 inch tart pans are bigger than ours, because I couldn't get the same number of concentric circles, but it hardly mattered. It was good!
Raspberry and Banana Tart
La Cucina Italiana Magazine
Ingredients
DOUGH
- 1 cup unbleached all-purpose flour plus more for dusting
- 3 tablespoons sugar
- Pinch salt
- 1 stick (1/2 cup) unsalted butter, cold, cut into
- small pieces, plus more for greasing pans
- 2 tablespoons cold water
PASTRY CREAM AND TOPPING
- 2 large egg yolks
- 1/4 cup plus 1 tablespoon sugar
- Pinch fine sea salt
- 1 1/2 tablespoons cornstarch
- 1 cup whole milk
- 2 teaspoons vanilla
- 2 bananas
- 1 cup raspberries (about 5 ounces)
SPECIAL EQUIPMENT: a 9 1/2-inch tart pan with removable bottom
Instructions
FOR DOUGH: In a large bowl, whisk together flour, sugar and salt. Add butter and rub mixture between fingers until it resembles coarse meal. Make a well in center, add water and mix together to form a dough. Knead dough 3 to 4 times, flatten into a disc, wrap in plastic and chill for at least 1 hour.
FOR PASTRY CREAM AND TOPPING: In a bowl, vigorously whisk together egg yolks, sugar and salt until thick and pale, about 2 minutes. Add cornstarch and whisk until smooth.
In a medium saucepan, bring milk to a boil over medium heat; remove from heat.
In a slow and steady stream, whisking constantly, add about 2 tablespoons hot milk to egg mixture, then, whisking, add remaining milk. Pour mixture back into saucepan, return to medium heat and, whisking constantly and vigorously, bring to a boil. Cook, whisking constantly and into the edges of the pot, until mixture is thickened, about 1 minute. Remove from heat, whisk in vanilla and let stand for 5 minutes.
Transfer Pastry Cream to a clean bowl, immediately cover the surface with plastic wrap to prevent a crust from forming and chill until cold, about 1 hour. (Pastry Cream can be made up to 1 day ahead.)
Butter tart pan and dust with flour.
On a lightly floured work surface, roll out dough to a 12-inch round. Fit dough into prepared tart pan, pressing into edges. Prick bottom of dough all over with fork and chill until firm, about 30 minutes. Meanwhile, heat oven to 400º with rack in middle.
Line tart pan with parchment paper, leaving at least a 1-inch overhang. Fill with pie weights or dried beans. Bake until edges are pale golden, about 10 minutes. Remove parchment and weights; continue to bake until bottom of crust is pale golden and edges are beginning to brown, about 5 minutes more. Cool shell completely on wire rack.
Fill shell with pastry cream and spread evenly. Peel bananas and slice crosswise into 1/4-inch pieces. Arrange banana pieces and raspberries in alternating concentric circles.
NOTE: Finished tart can be refrigerated, loosely covered with plastic, for up to 1 hour.
It was just what I wanted.
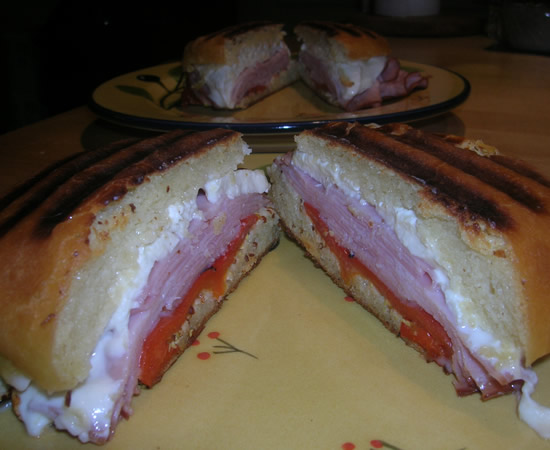
Panini
The experiment with the brioche dough to make buns worked! I patted out the dough on a floured counter and cut them out with a big biscuit cutter. I let them rise for about 45 minutes and then baked at 350° for about 25 minutes.
They made excellent panini!
Mayo and dijon mustard, sliced ham, roasted red peppers, and fresh mozzarella.
Simplicity.
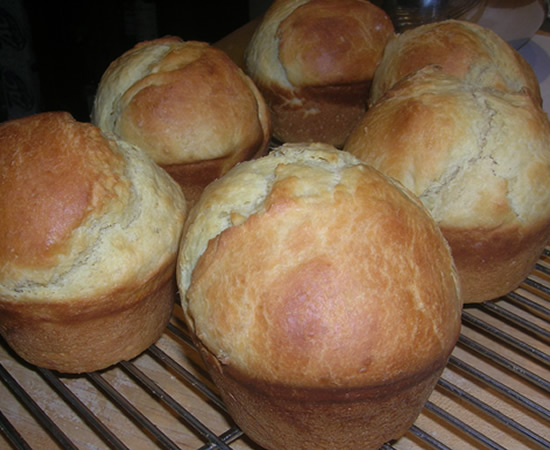
Brioche and Beef
I've been thinking that the no-knead brioche dough would make great hamburger buns so tonight I did a bit of an experiment...
Using over-sized muffin tins, I made some rolls. Fantastic tasting. A wee bit too big! Definitely no way they could be used as a bun, although I did make sandwiches with them tonight with grilled london broil. Did I say a wee bit too big?!? Let me rephrase that... really too big! But dayum, were they good!
I made the dough last night using the basic recipe. I didn't weigh them when I made them today, but I have a pretty good idea of how big they were - a little larger than a jumbo egg. I'll need to cut the size in half, at least. I see another experiment in a day or so!
In the meantime, here's what I did for dinner tonight. Sliced grilled london broil with a chipotle powder rub on the rolls with a green chili mayonnaise. And fries.

I didn't even try to pick it up. I made it open-faced and ate it with a knife and fork.
This recipe is direct from the Artisan Bread in Five Minutes a Day website. I have now made it twice and it's completely foolproof!
Brioche dough
(makes about 4 loaves)
- 1 1/2 cups lukewarm water
- 1 1/2 tablespoons granulated yeast (2 packets)
- 1 1/2 tablespoons kosher salt
- 8 large eggs, lightly beaten
- 1/2 cup honey (this is my all time favorite!)
- 1 1/2 cups (3 sticks) unsalted butter, melted
- 7 1/2 cups unbleached all-purpose flour
Mix the yeast, salt, eggs honey and melted butter with the water in a 5-quart bowl, or lidded (not airtight) food container.
Mix in the flour, using a spoon until all of the flour is incorporated.
Cover (not airtight), and allow to sit at room temperature for about two hours.
The dough can be used as soon as it is chilled. This dough is way too sticky to use after the initial rise, but once it is chilled it is very easy to handle. It can be used to create the Tatin or any of these brioche recipes: caramel sticky buns, grilled fruit tart, Fresh Fruit Muffins, Brioche à tête, apricot pastries and fabulous doughnuts! The dough can be stored in the refrigerator for up to 5 days. After that you can freeze the dough.
It's gonna make an awesome burger bun!
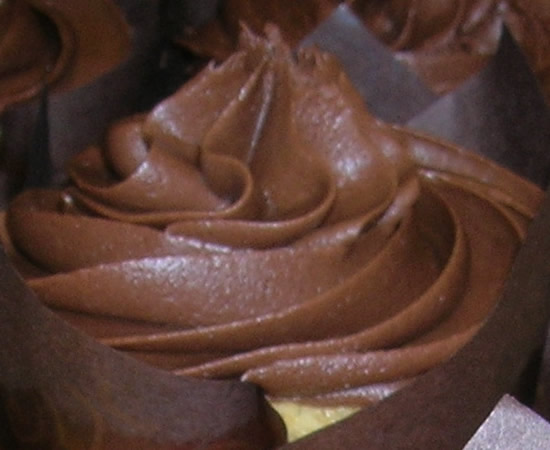
Cupcakes

I am finally using these way-fun cupcake holders! I first saw them on Trevor's blog and knew I had to get some. I picked them up at Fante's on 9th Street in South Philadelphia for a couple of bucks. They are not free-standing. You need to still put them in a muffin tin, but they pop right out!
I made a basic yellow cupcake and frosted with Chocolate Buttercream. The recipe makes about 16 cupcakes, but I divided it into 12 and baked about 6 minutes longer.
Yellow Cupcakes
- 2 cups cake flour
- 1 teaspoon baking powder
- 1/2 teaspoon salt
- 2 sticks unsalted butter, softened
- 1 1/2 cups granulated sugar
- 4 large eggs
- 1/4 cup whole milk
- 1 teaspoon vanilla
Preheat oven to 350° and line 16 muffin cups with paper liners.
Sift together flour, baking powder, and salt. Beat together butter and sugar until light and fluffy. Add eggs 1 at a time, beating well after each addition. Mix in milk and vanilla until just combined. Add flour mixture in 3 batches, beating until just combined after each addition.
Divide batter among muffin cups and bake in middle of oven about 20 minutes.

I was just slightly neurotic about filling them - not wanting any batter on the "wings" (neurotic?!? MOI?!?) - so I used a pastry bag without a tip. Worked like a charm.
Same with the icing.
They're yummy!