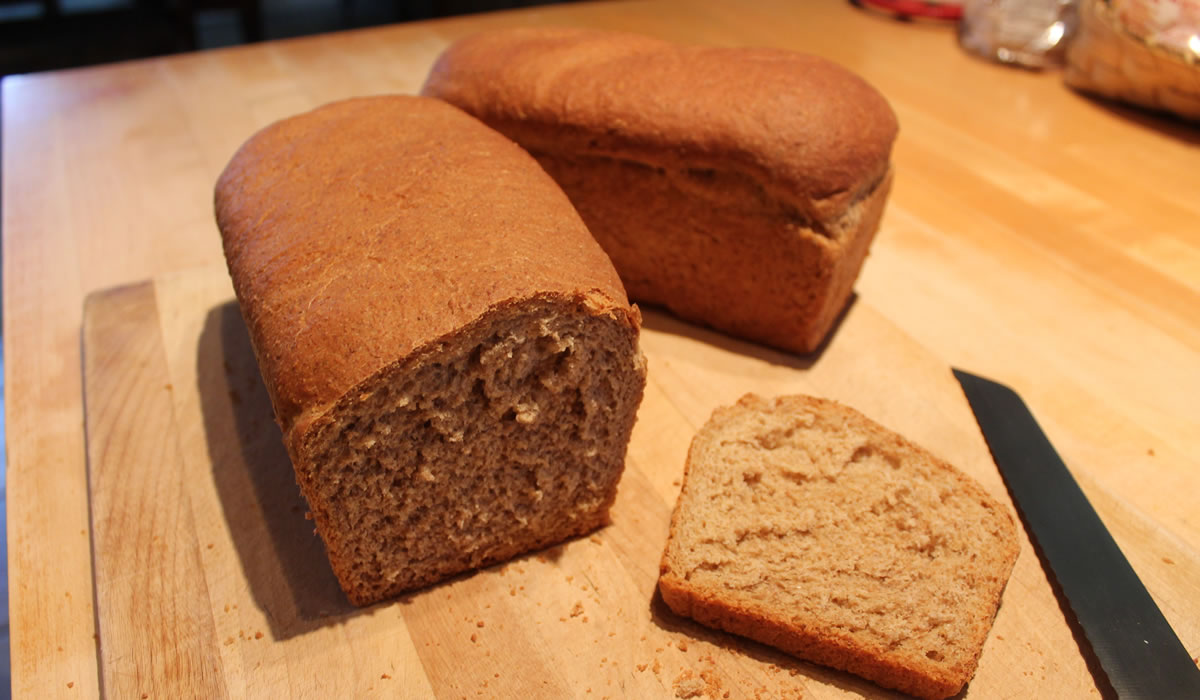
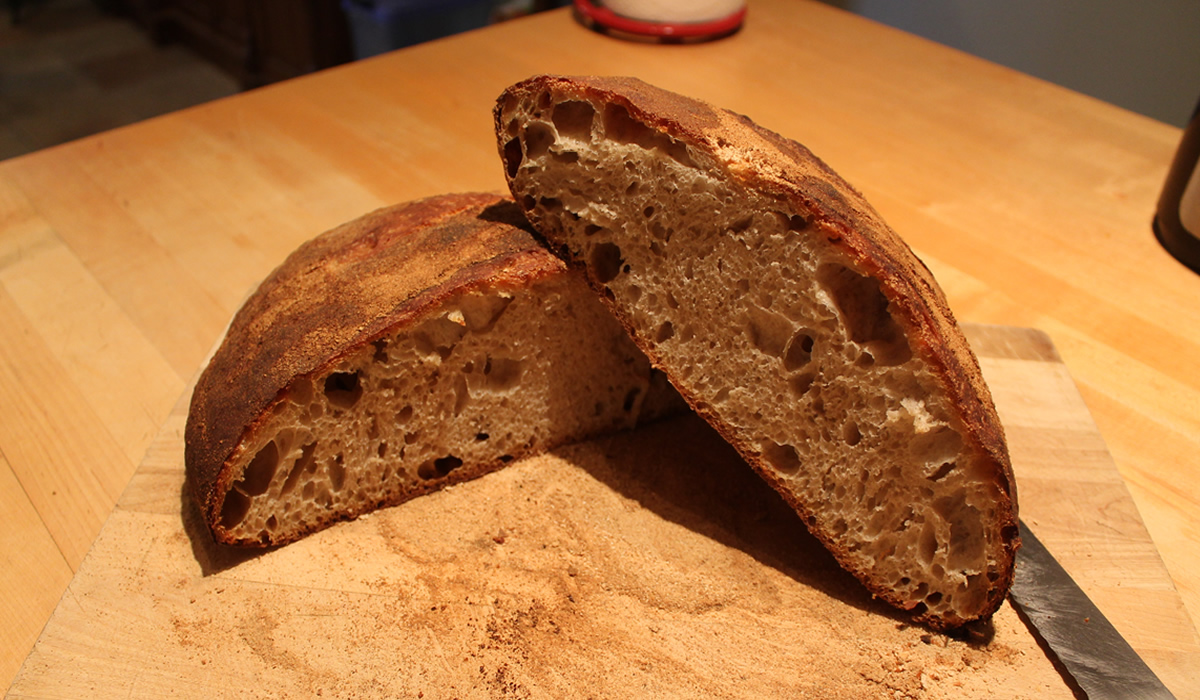
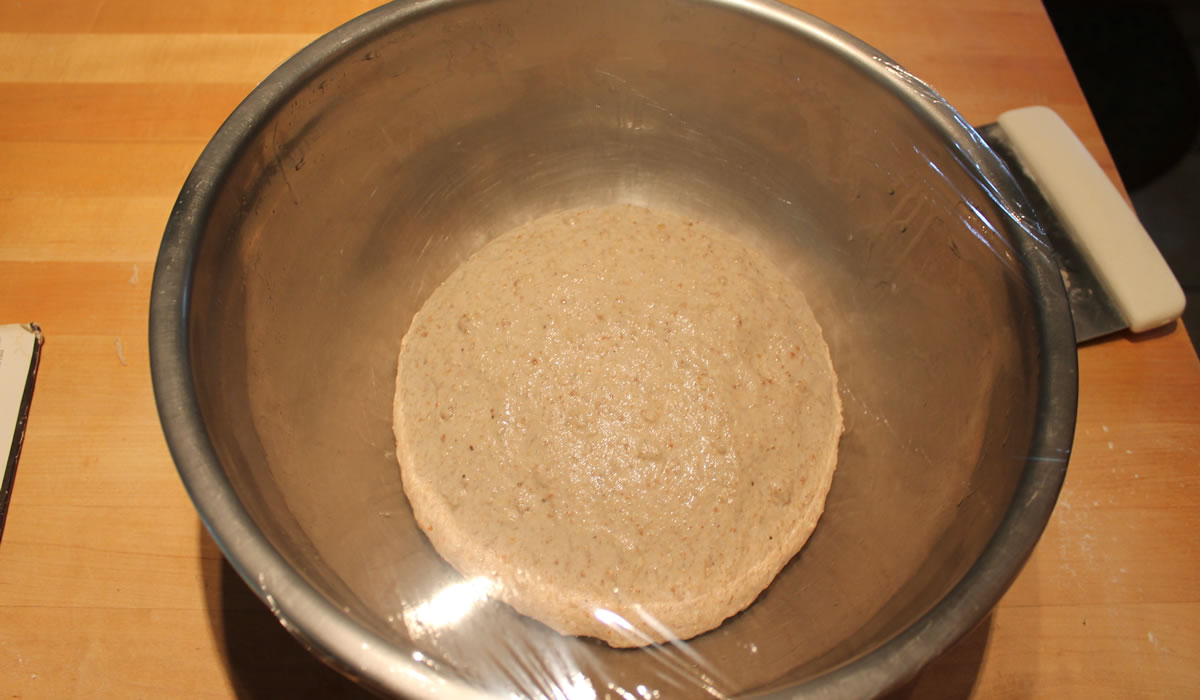
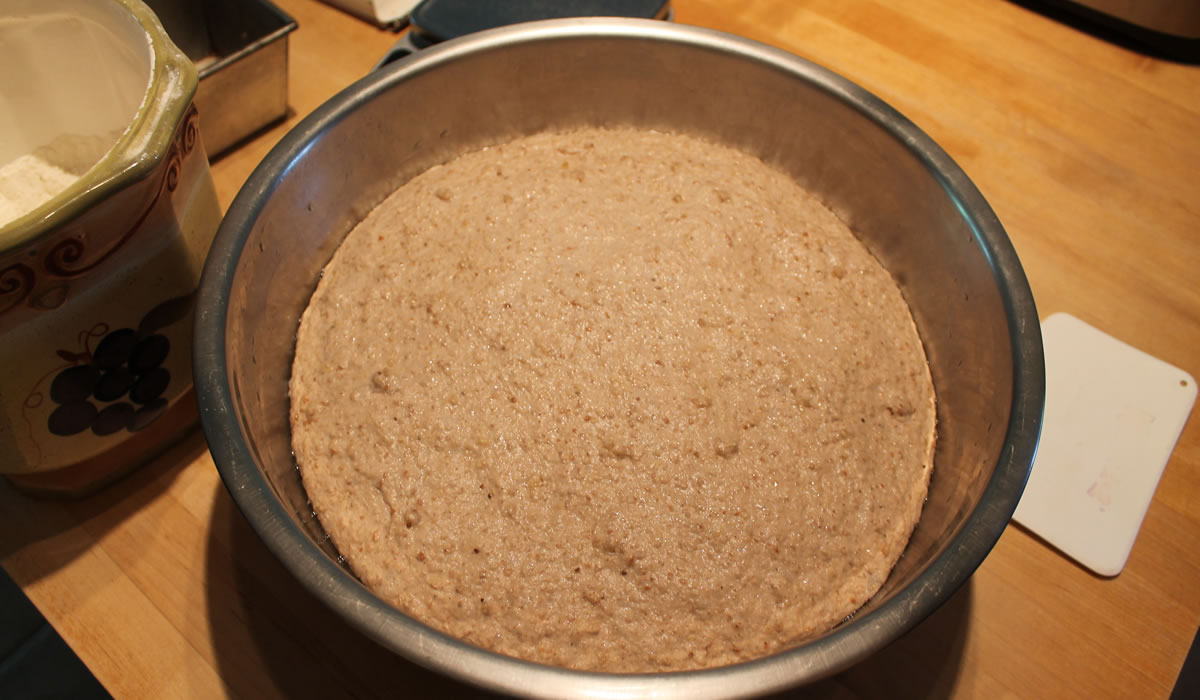
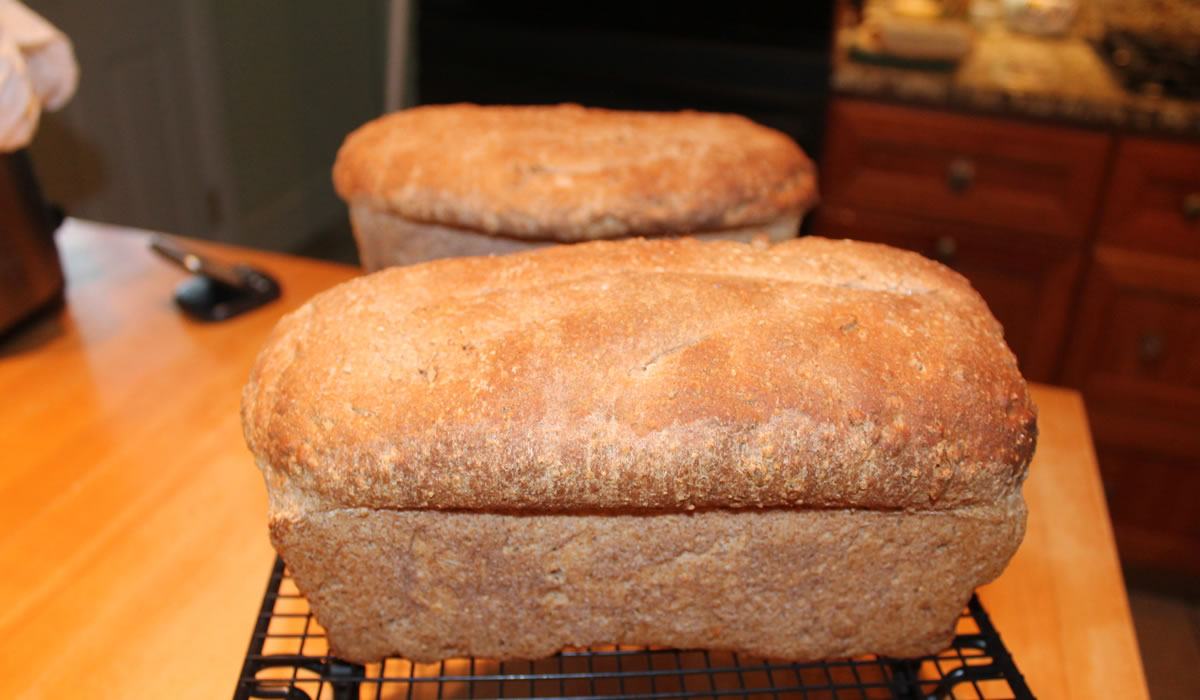
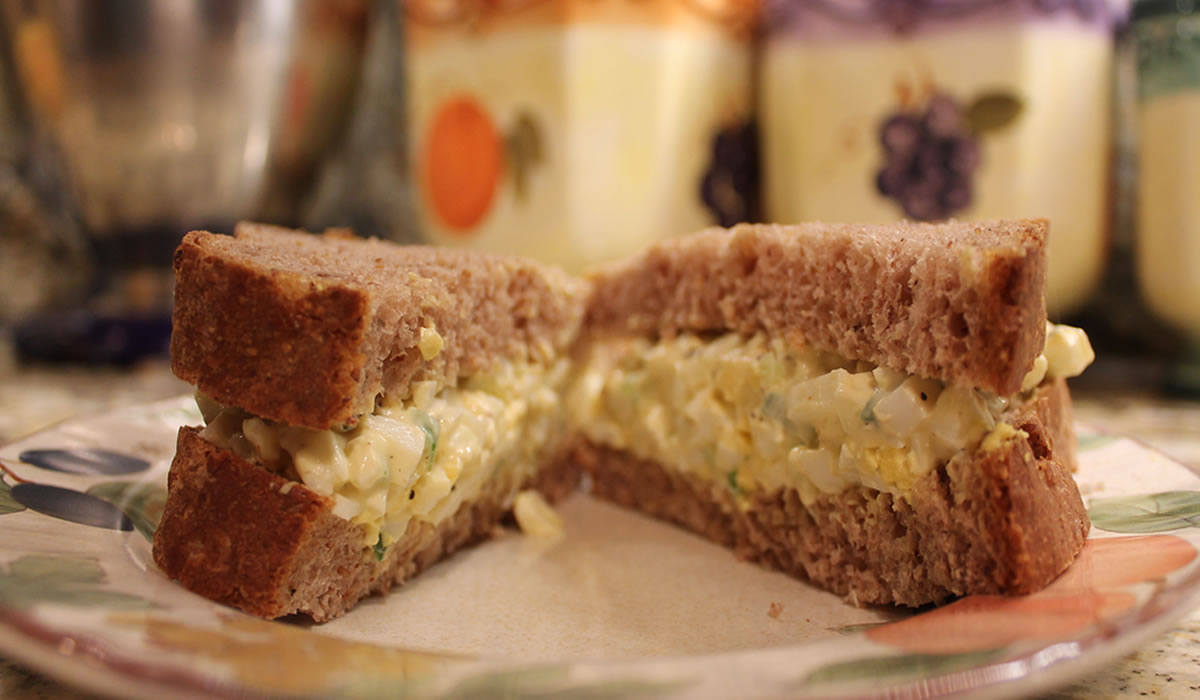
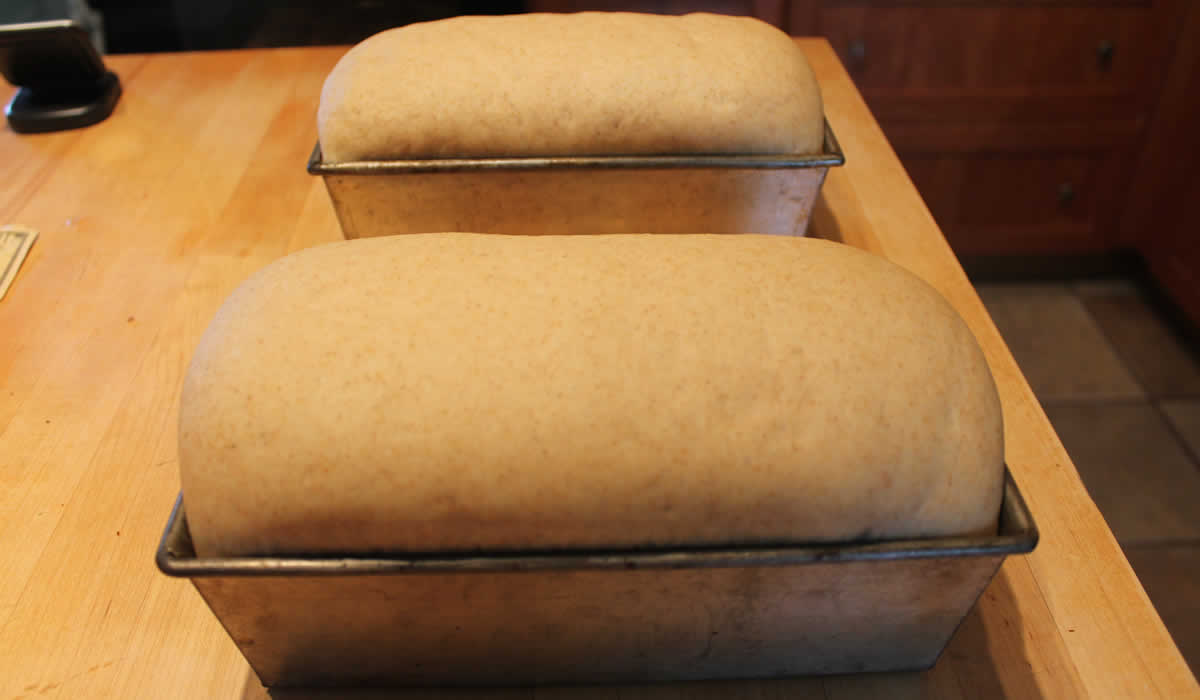
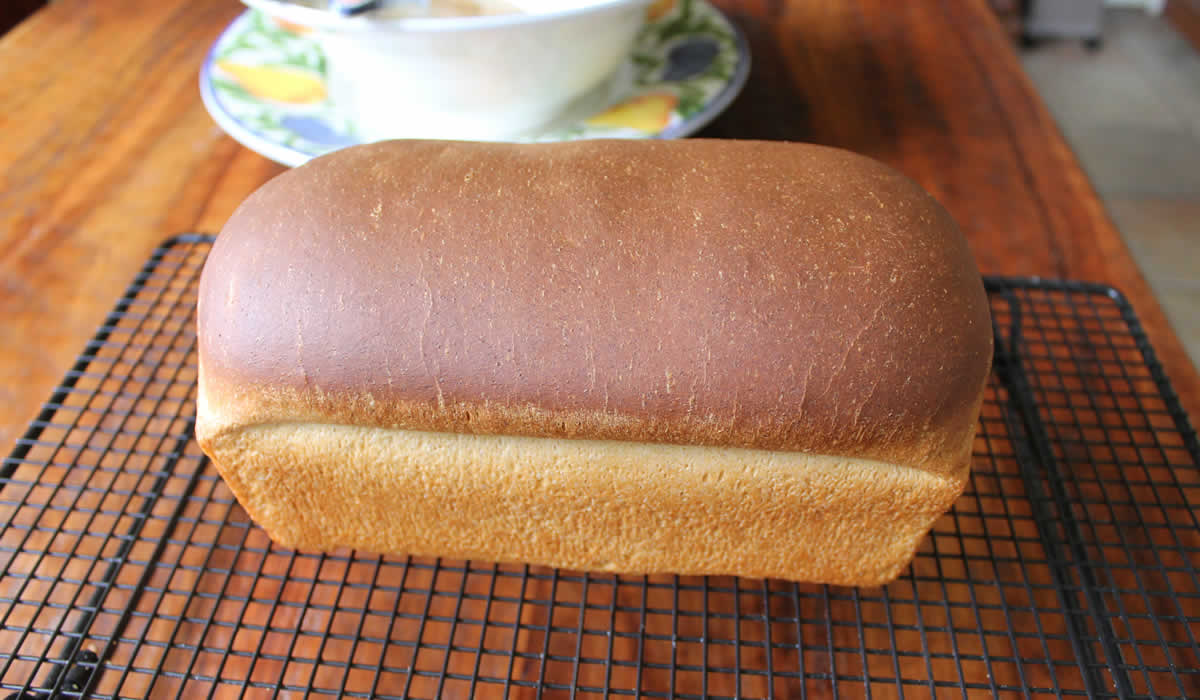
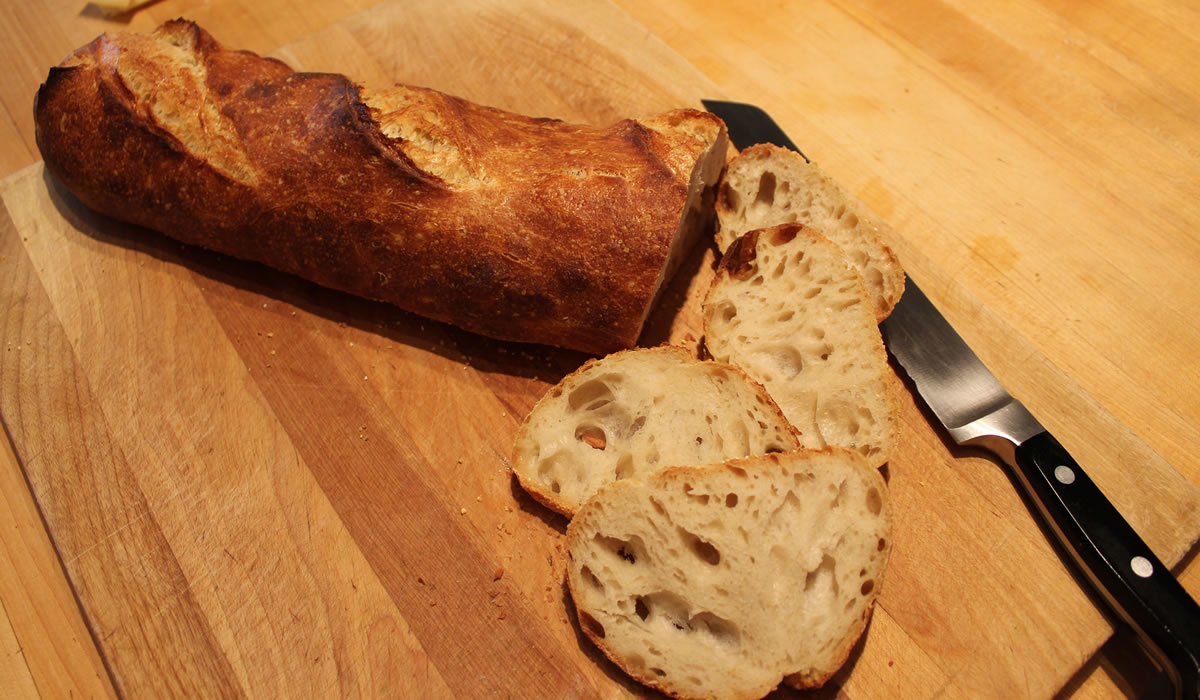
Rye Bread
I've been going through the recipe site redoing pages to make them 1) look better and 2) easier to navigate. While I'm able to make templates, it's still a page-by-page process to apply them - and there are over 1200 pages of recipes. That doesn't count the 2400 pages of blog posts.
That's a lot of cooking. And a lot of editing. Fortunately, I'm retired.
One of the best things about doing this is it's re-familiarizing me with stuff I haven't looked at in a really long time. Case in point, The Family Reunion Cookbooks. There are a lot of really good recipes in those two collections! Granted, there are a few things that haven't translated as well to 2018 diet sensibilities, but there are some fun things waiting to be cooked - like Rye Bread from my dad's cousin Betty. Betty is the daughter of one of my grandfather's sisters. They were Omaha clan and we really didn't know them very well growing up.
Her brother, Jerry, moved to California and he and my dad were pretty close. Pop came really close to cashing in his Fire Department pension and going into partnership in a Tahoe-Truckee Ambulance Service sometime in the '70s. I think my mom kinda talked him out of it - she wasn't ready to move to the mountains even though she loved it there. She really was a city girl.
Back to bread...
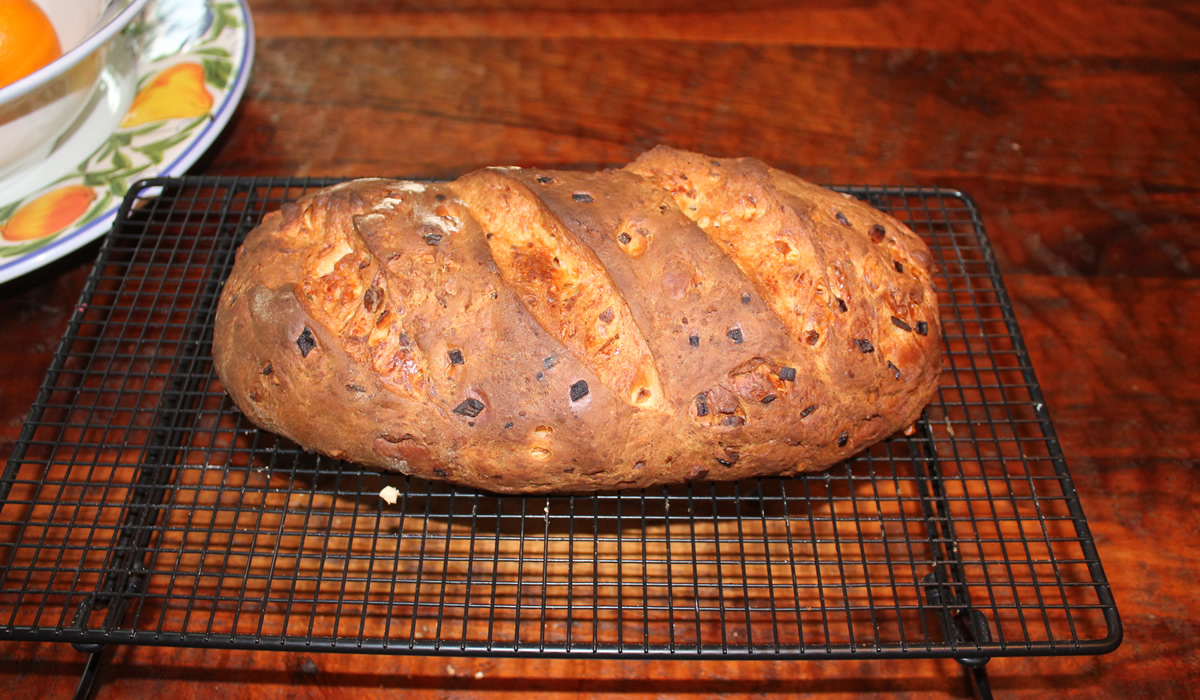
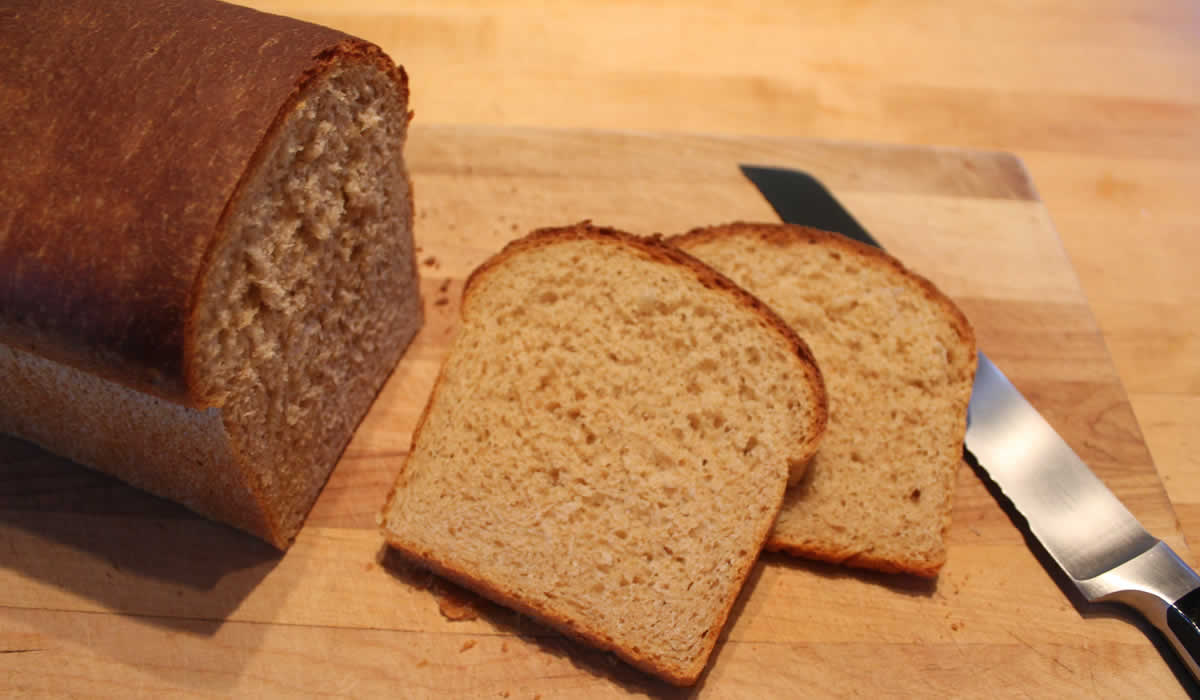
This is one I don't think I have ever made before, but after having a slice, it definitely won't be the last! It's a 50% rye flour and 50% white flour recipe, so the rye is definitely not overpowering. It has a great texture and is a perfect sandwich bread!
Betty's recipe - actually, her mom's recipe - makes four loaves, so I cut the recipe in half. I highly recommend this one!
Rye Bread
Claire Dineen Fitzsimmons via Betty Fitzsimmons Seymore
(Sponge)
- 1 cup lukewarm water
- 1 tsp. sugar
- 2 pkgs. dry yeast
- 1 cup white flour
Dissolve yeast in water, add sugar. then flour. Let rise while mixing other ingredients.
Melt ½ cup shortening (crisco) in 2 cups hot waterAdd:
- 1 good Tbsp. salt
- 1 Tbsp. molasses
- ½ cup brown sugar
- 1 cup dark Karo syrup
When cool, add sponge. Add 4 cups medium rye flour. Add about 4 cups white flour. Knead. Let rise until double. Roll and cut into 4 loaves. Put into bread pans and let rise until double.
Bake at 350 degrees for 15 minutes, then at 325 degrees for 30 minutes. Makes 4 loaves.
Sourdough Bread - Two Ways
I've just spent the past 10 days making sourdough bread. Well... Most of the time was sitting around and waiting for the starter to start - and then throwing out one batch that didn't start - but methinks the end result was worth it. Really worth it!
Today was the long day - I started at 7:00am and pulled the bread out of the oven at 4:00pm. It's a rather involved process. Easy to do - but involved.
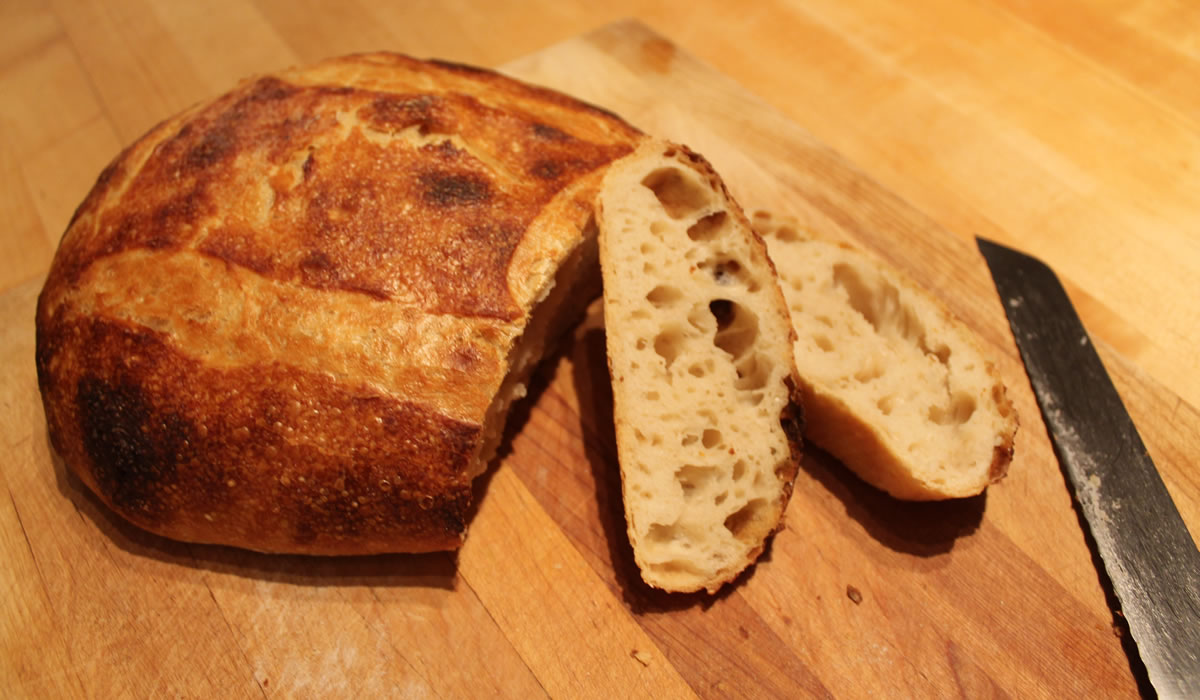
I made the Tartine Sourdough that I have made before - but never followed their baking instructions. I've always taken shortcuts and made long loaves. Nor have I spent the time doing the numerous folds, et al. It really is an all-day process. I've baked enough to be able to coax an acceptable loaf of bread out of just about anything - and also long enough to know that you can get stellar results when you take your time and do it right.
Every now and then, I need a reminder - and I got it today!
I'll be doing it - mostly - their way, from now on! The bread is simply awesome. A really crusty crust and a really light, chewy, and flavorful interior. I was a good boy, I only ate two slices - I could have eaten the loaf!
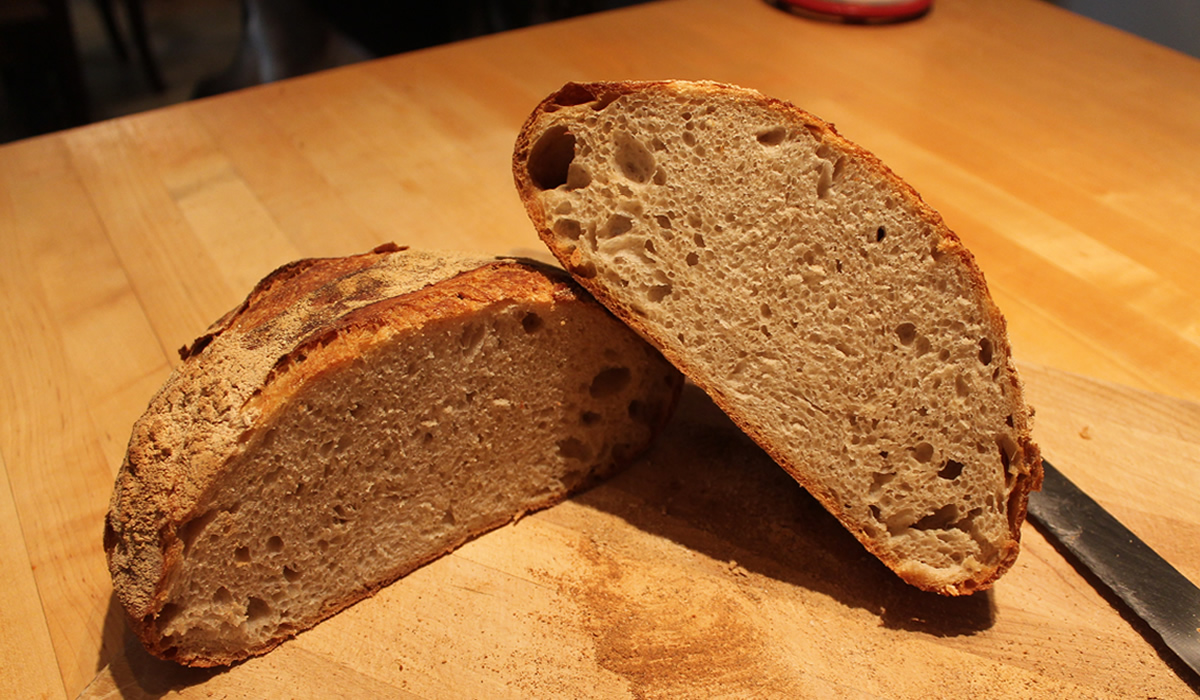
This really is the bread of my youth - when Larraburu reigned supreme in San Francisco. That dark crusty, chewy crust and the interior pocketed with holes. It was perfect. The difference is back then, the bread was made with all white flour - and this is 10% whole wheat. It makes a difference.
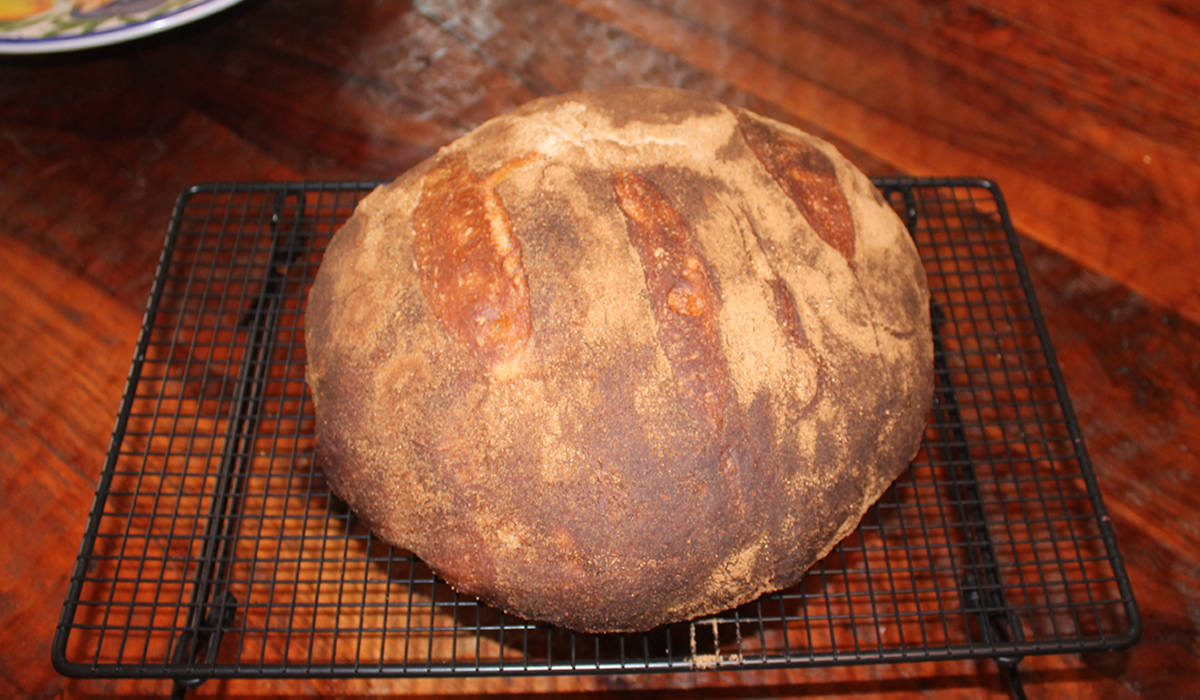
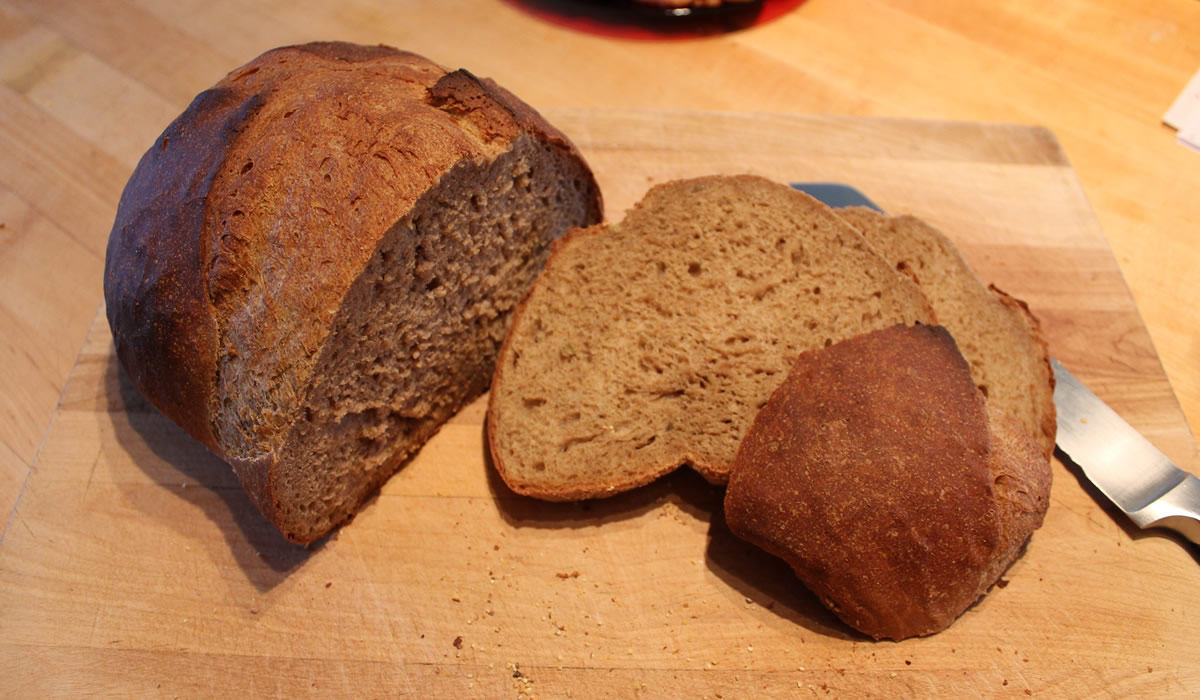
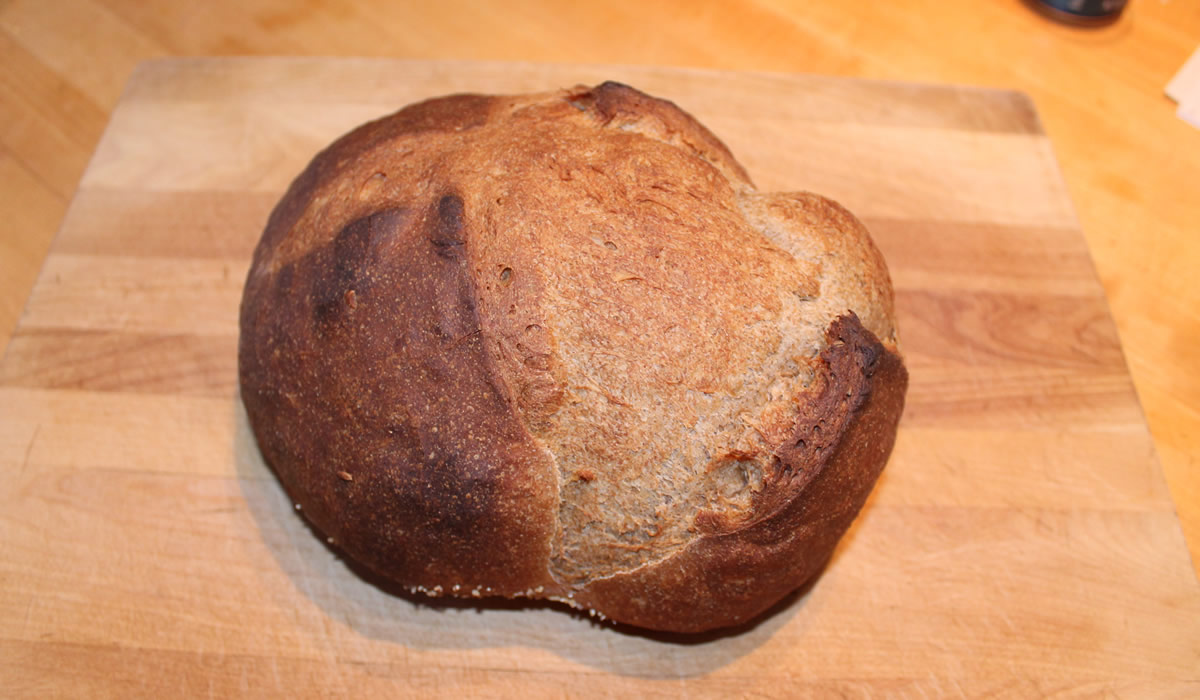
The recipe calls for baking the bread in a cast iron dutch oven - something I have always resisted doing, since it just didn't seem right. But, as you can see, it works. Here's the loaf from the dutch oven...
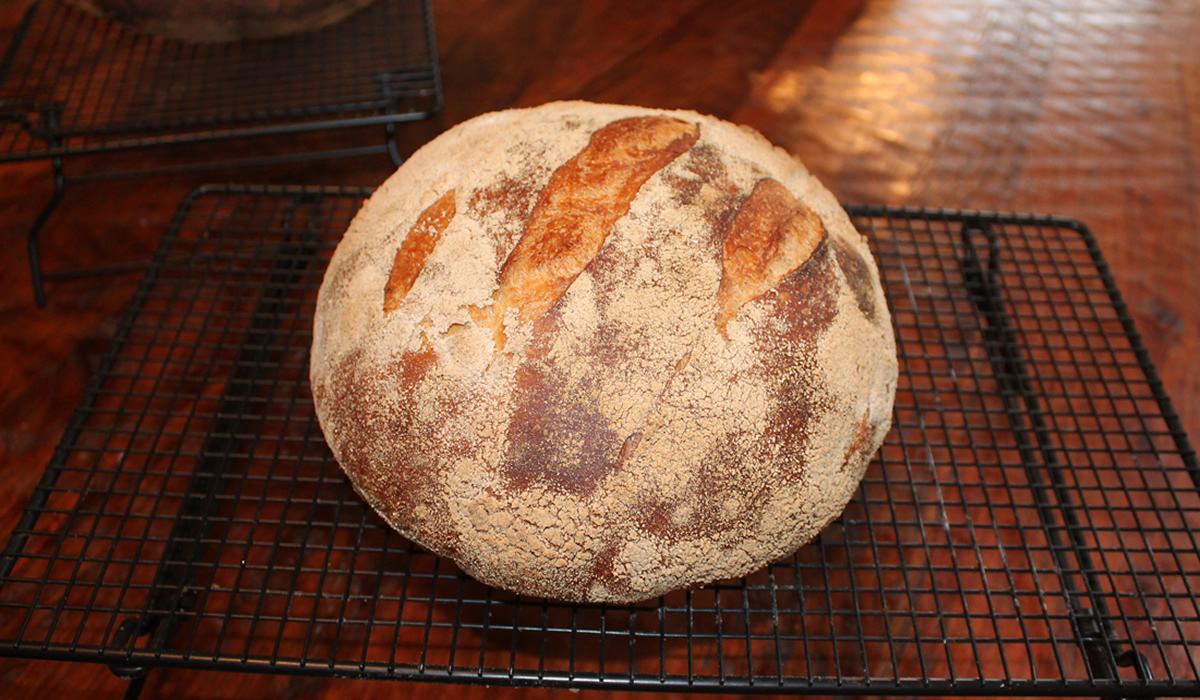
A picture perfect round loaf! And here it is, sliced in half...
Since the recipe makes two loaves - and we have double ovens - I made one in the dutch oven and one on the baking stones.
And here it is sliced...
You'll notice that the dutch oven loaf has a bit of a finer crumb and less holes. The free-form round is definitely a bit more rustic. I think in the grand scheme of things, I actually prefer the freeform loaf with the larger holes.
Flavor-wise, they were pretty indistinguishable. I just like the larger holes - it's the type of bread I grew up on.
One and a half loaves went into the freezer - I'm not going to start eating bread at the same rate that I used to - but I do see some paninis or other sandwiches in our future.
And there's more leaven in the 'fridge for those rapidly-approaching cold, winter days... This would be so good with a pot of vegetable soup!
The End of Week Five
We're both down ten pounds! What a way to go!
It's pretty crazy. I feel good - sore, but good. I honestly never saw myself as a person who would go to a gym - let alone semi-enjoy it! It's rather amazing how 1) difficult it is and 2) easy it is. I know that's a complete contradiction, but it's strangely true.
Our trainer has figured us out in these five weeks. He's now pushing harder, making us do more difficult tasks with more repetitions - but the more we do them the easier they finally become - until he drops the next bombshell and picks up the pace. I am just no good at doing dumbbells over my head. He has me doing dumbbells over my head. My arms feel like they want to fall off and refuse to lift that damned thing one more time - and he tells me I only have five more to go. I'd call him a cruel, heartless man if it wasn't for the encouragement he also continually gives. He's an encouraging cruel, heartless man - and we're down ten pounds because he's giving us the motivation to succeed.
Ten Pounds! I'm pretty psyched!
You've noticed that we most certainly are not depriving ourselves in the food department. Desserts are pretty much off the table but we're getting by really well with fresh fruit. And the cakes and pies and cookies will be back, but probably not with the frequency they once were. This is the new normal for us - and it's not bad, at all.
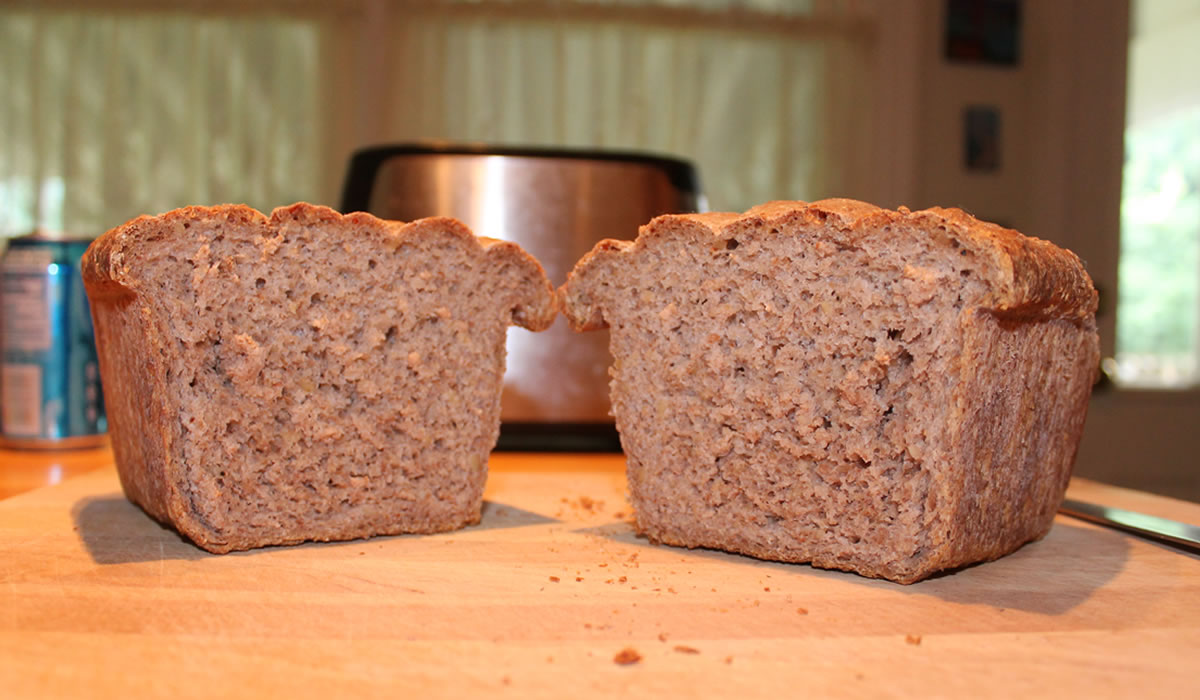
Another thing I've pretty much knocked off is bread at dinner every night - although we're still eating bread and we often have sandwiches for lunch. I've missed my bread-baking, so I decided I'd bake some, today - a nice Five-Grain with Walnuts from Carol Field. It has a little bit of everything in it. I didn't feel like transcribing the entire recipe, so the link above will take you to the recipe on Google Books.
But I did take pictures of the process... This is mixing the five flours and the walnuts... white flour, sprouted wheat flour, rice flour, rye flour, and oat flour.
Mixed and out of the Kitchen-Aid... Slightly sticky. You want a bit of a wetter dough for sandwich bread.
Rolled into a ball and into a pan for the first rise. It's 90°F/32°C outside with really high humidity - perfect for Mother Nature's All-Natural Proofing Box.
And then after a mere hour...
Loaves formed and back out to Mother Nature's All-Natural Proofing Box for the final rise. I left them out for an hour - I really should have pulled them in after about 30 minutes because they over-proofed, a bit and then fell a bit as I put them into the oven.

But... they still came out great. I took one loaf and cut it in half and gave it to two neighbors - because I didn't want two loaves of bread in the house. We have great neighbors - directly next door is a young couple with two really cute girls who are very skeptical of Blanche, and the other side of them are two sisters probably 20 years older than us. We have a fun time with all of them and they said I could make too much bread any time!
And as a side note...
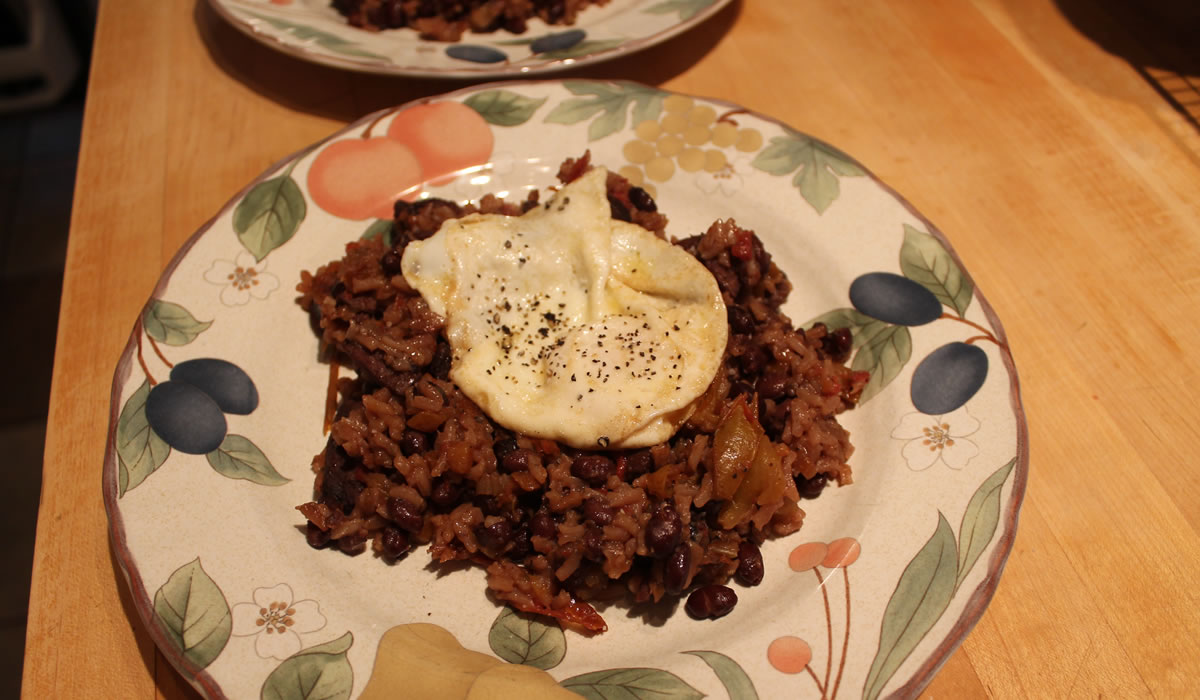
Dinner tonight was leftover Jambalaya with a fried egg on top.
Without bread. That's for lunch!
Added on Saturday:
Here's Lunch!
Victor just said I never have to buy bread, again...
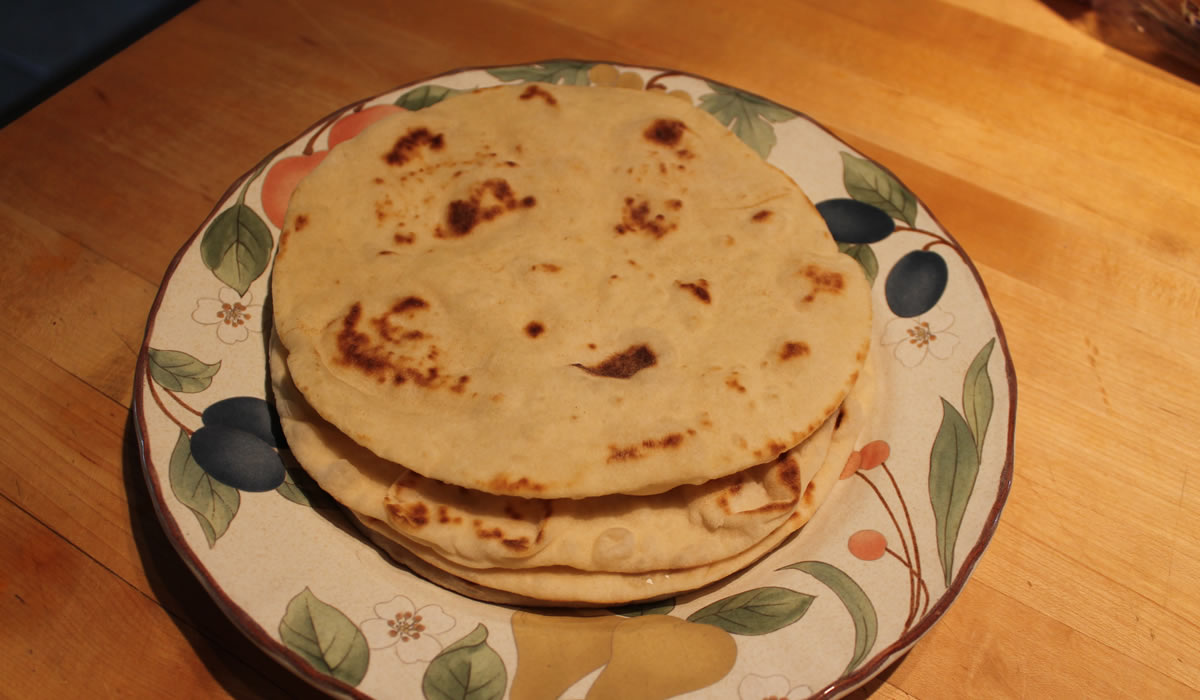
Homemade Flour Tortillas
The downside of our new eating regime is I haven't been baking any bread. Baking bread is one of my more favorite things to do, and while I will be getting back to it, I haven't taken the time to start reworking recipes for smaller loaves and the like. One of the things I'm learning is I need to make what we need for the meal at hand and not cook with abandon - as was my wont.
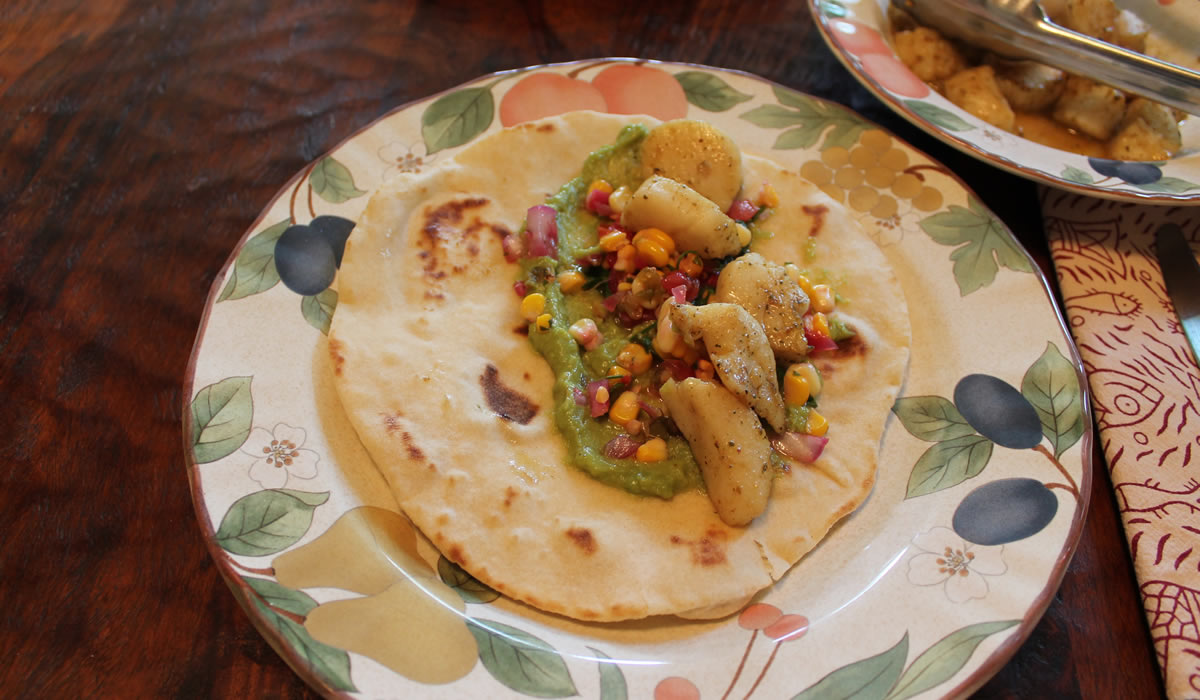
I have been thinking about making tortillas for quite a while, now - I have not made them in years and years - and tonight proved to be the perfect time to do it. Cooking Light had a recipe this month for Tilapia and Summer Squash Tacos and it set the thinking gears a'spinnin'.
I had just bought some fresh scallops, I had fresh corn, I had tomatoes and peppers from the yard. All I needed were the tortillas - and since I have a pretty foolproof recipe, my bread-making needs were being met. Dinner started coming together...
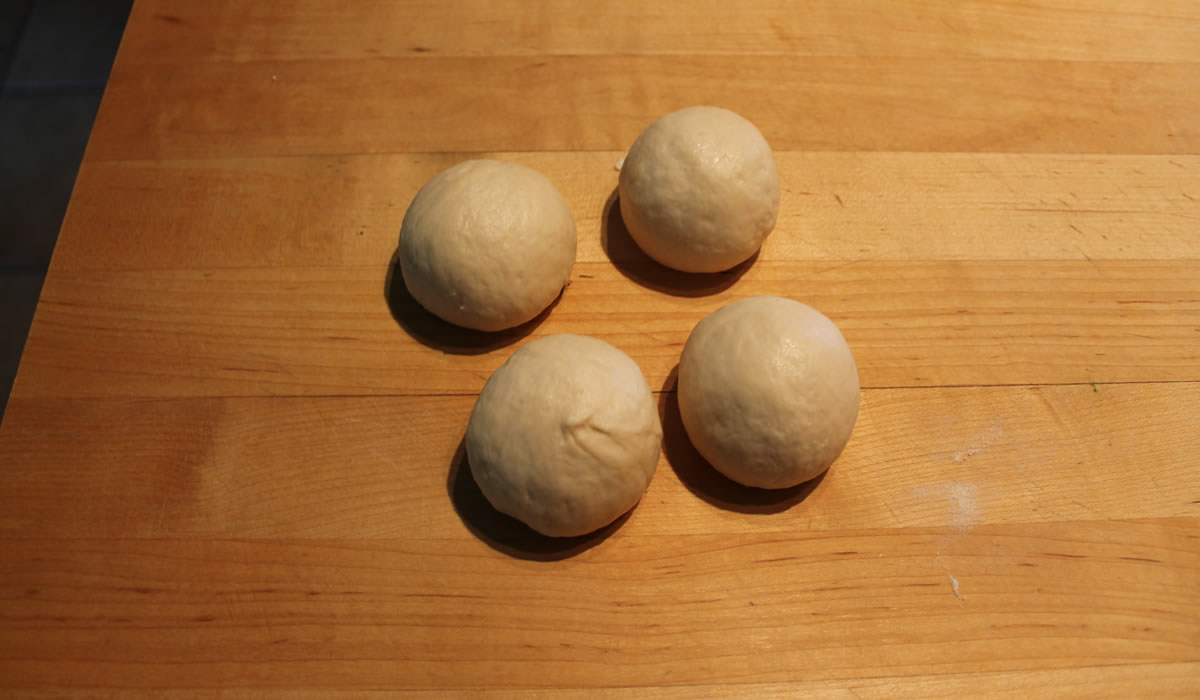
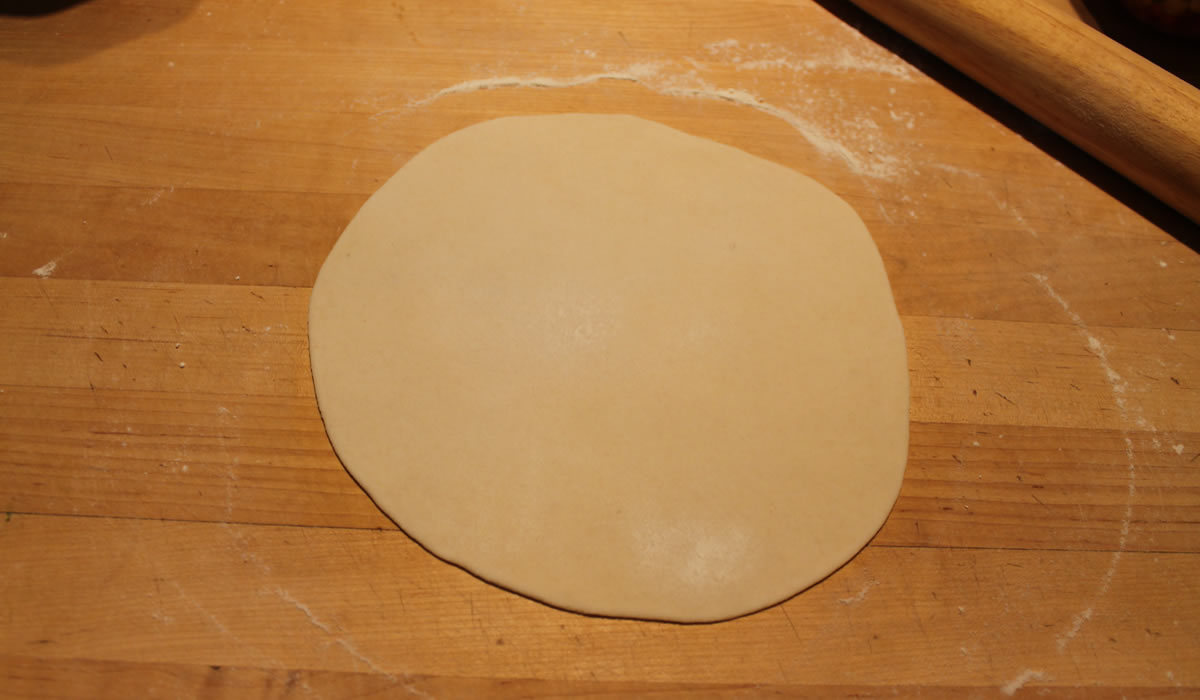
Tortillas are easy to make - they're just a bit time-consuming to make for a crowd. I cut this recipe in half to make four tortillas, so I definitely didn't have that issue.
Flour Tortillas
Makes 8 tortillas
Ingredients
- 2 cups all-purpose flour
- 1 1/2 tsp baking powder
- 1 tsp kosher salt
- 3 tbsp lard or vegetable shortening
- 3/4 cups warm water
Directions
Whisk together flour, baking powder, and salt in a medium bowl. Rub lard into flour mixture using your fingertips until mixture resembles coarse crumbs. Add warm water and work dough with hands until completely combined and no dry flour is left in bowl.
Turn dough out onto a lightly floured work surface and knead until smooth, about 1 minute. Cover with a damp cloth or plastic wrap and let rest for 10 minutes. Divide dough into 8 equal pieces; roll each piece of dough into a ball. Cover dough balls with a damp cloth or plastic wrap and let rest an additional 15 minutes.
Preheat cast iron skillet, griddle, or comal to 500°F. Place one ball of dough on a lightly floured surface and pat down into a flat disc. Using a rolling pin, roll dough out to an 8-inch round.
Place dough in skillet and cook until bubbles form on top side and bottom side has brown spots, 30-60 seconds. Flip tortilla and cook until second side develops brown spots, 30-60 seconds longer.
Transfer tortilla to a plate and cover with clean dish cloth. Repeat with remaining balls of dough. Serve immediately while still warm.

I had guacamole in the freezer, so that came out, and I then made a corn salsa.
Corn Salsa
- 2 ears corn, roasted and cut from cobs
- 2 hot peppers, roasted, skinned, and chopped
- 1/2 red onion, roasted and chopped
- 1 tomato, chopped
- 1 bunch parsley, chopped
- juice of 1 lemon
- salt and pepper, as desired
Cook corn, peppers, and onion on grill until each is done. Cut kernels from the corn, skin and mince the peppers, and chop the onion. Place it all in a bowl with the chopped tomato, parsley, lemon juice, and salt and pepper, to taste.
For the scallops, I just liberally doused them with Penzey's Salsa and Pico spice blend and quickly sauteed them in a hot skillet. I added a splash of vermouth because... well... old habits die hard.

It really was a great combo. The corn salsa was spicy, the guacamole mild, and the scallops nicely flavored, and with a fresh, warm tortilla to hold it all together, it was the perfect dinner!
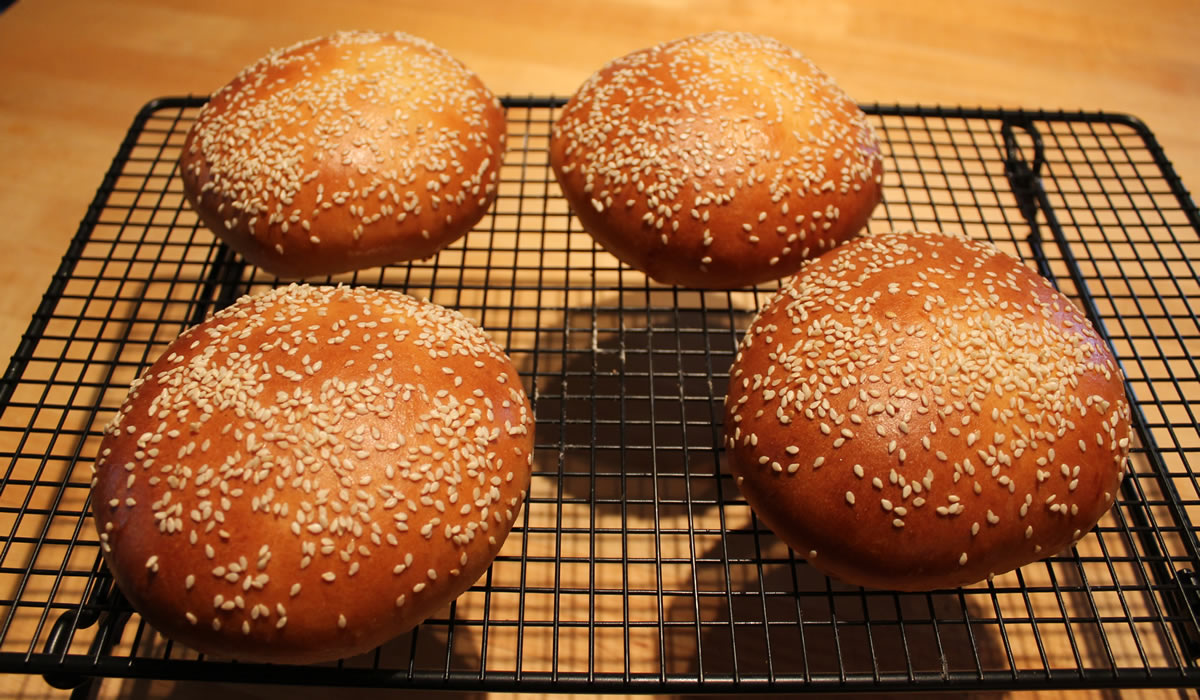
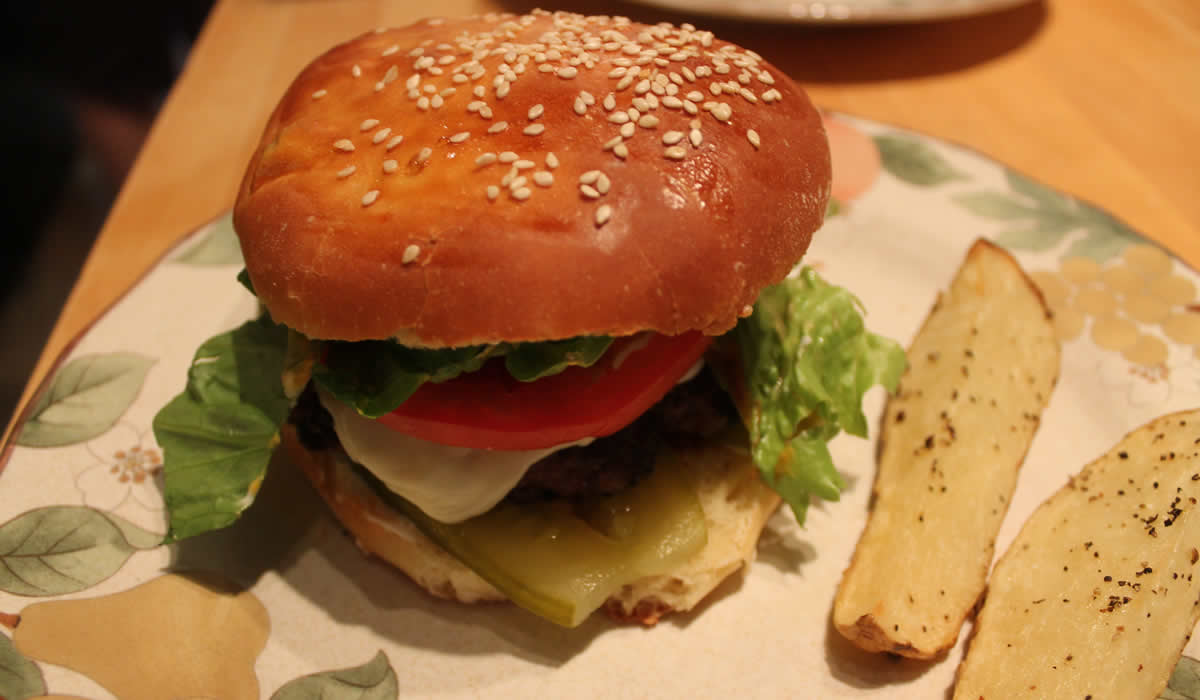
Hamburger Buns
It's an absolutely gorgeous, sunny day, out there - a perfect day for firing up the grill and cooking some burgers. That, of course, means making hamburger buns! I know that any normal person would run down to the store and pick up a pack. And we all know that the last thing I am is normal.
I go back-and-forth on buns. I love a burger served on crusty sourdough like the ones they used to have at Original Joe's on Taylor Street in San Francisco. I haven't been to the newer incarnations, but the crusty, crunchy, chewy - and totally greasy and messy - burger was one that dreams are made of.
And... I love a burger on a soft, gooey, bun that barely contains all of the greasy goodness packed between the top and bottom layers.
One of the best indications of how good a burger was is how many napkins did it take for me to get through it? The more napkins, the better the burger. Barely able to take a bite, with grease and goo running down the arms - unable to put it down because it will completely fall apart when I try to pick it back up... The Perfect Burger!
In making these, today, I decided to aim for something in between the two extremes - a soft bun with a bit more structure than those found at the grocery store.
I took the recipe I used a couple of weeks ago and reworked it to make 4 buns, pulled out the egg, added milk powder and whole milk.
Hamburger Buns
- 1 packet yeast
- 3/4 cup milk
- 2 tbsp sugar
- 2 cups flour
- 2 tbsp nonfat milk powder
- 2 tbsp butter, softened
- 1 tsp salt
Proof yeast in warm milk and sugar.
Add flour, milk powder, and salt to liquid and mix on low speed until all flour is incorporated. Add softened butter and continue mixing for 7 or 8 minutes. Dough will be soft and not pull away from bottom of bowl, but it shouldn’t be overly sticky.
Form into a ball and place in an oiled bowl. Cover, and allow to rise until doubled.
Punch down dough and form into 4 balls. Place on a floured sheet pan and flatten. Cover with a towel and allow to rise, again, until doubled.
Brush with egg mixed with a bit of water and sprinkle with sesame seeds, if desired.
Place in a preheated 375°F oven for about 15 minutes.
Remove from oven and cover pan with a clean dishtowel to steam buns as they cool to help soften.
And... since every good burger needs a good side dish, I made a South of the Wall-Style Corn Salad.
As an aside... I find it interesting that, as a nation, we embrace Mexican food with a score of national chain restaurants, we embrace Mexican culture, we embrace Mexican tequila, Mexican beer, Mexican agave nectar... Avocados, tortilla chips, tomatillos, chili peppers and salsas of every sort... We flock to Mexican resorts like Cancun, Mazatlan, Puerto Vallarta, Cabo San Lucas, Acapulco... but we don't seem to like Mexicans and want to build a wall to keep them out. In the words of Mr Spock, it's totally illogical. And very very sad.
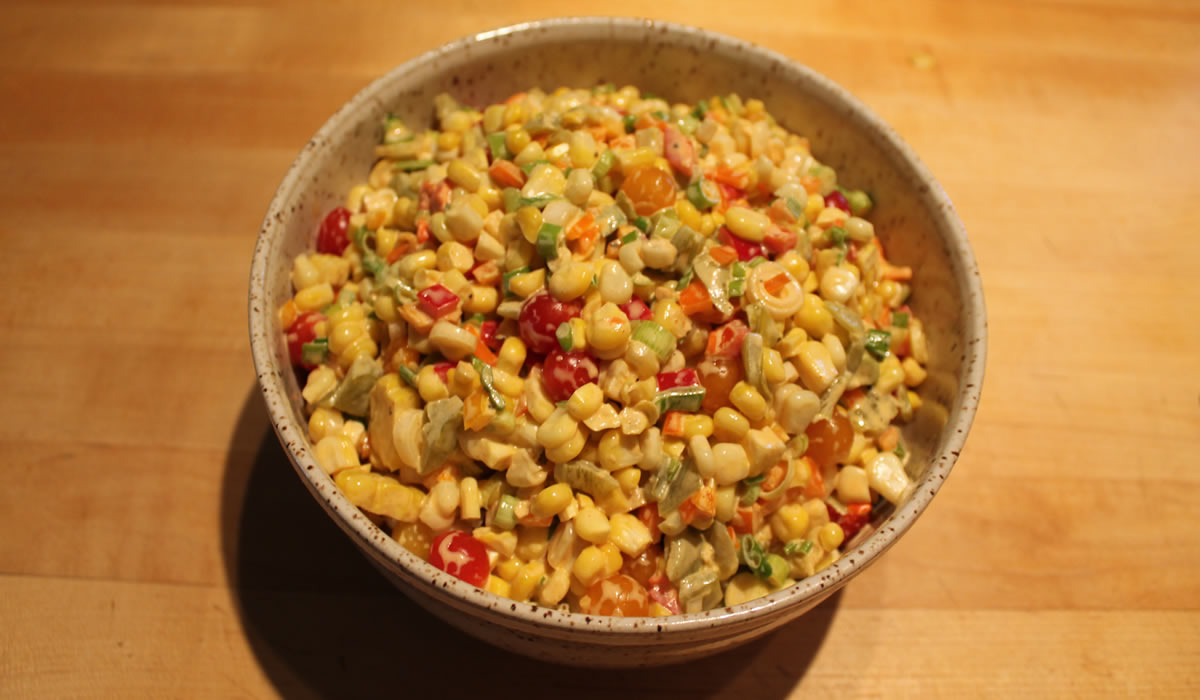
South of the Wall Corn Salad
- 4 ears of corn, cooked, cooled and corn cut from the cobs
- 1 pkg mini cherry tomatoes
- 8 mini sweet peppers
- 1 can diced green chilis
- 1 bunch green onions, chopped
- 1/2 cup mayonnaise
- 1/4 cup enchilada sauce
- salt and pepper
Mix all ingredients. Check for seasoning and add salt and pepper, as desired.
The salad had just enough kick to make it interesting and the buns came out great!
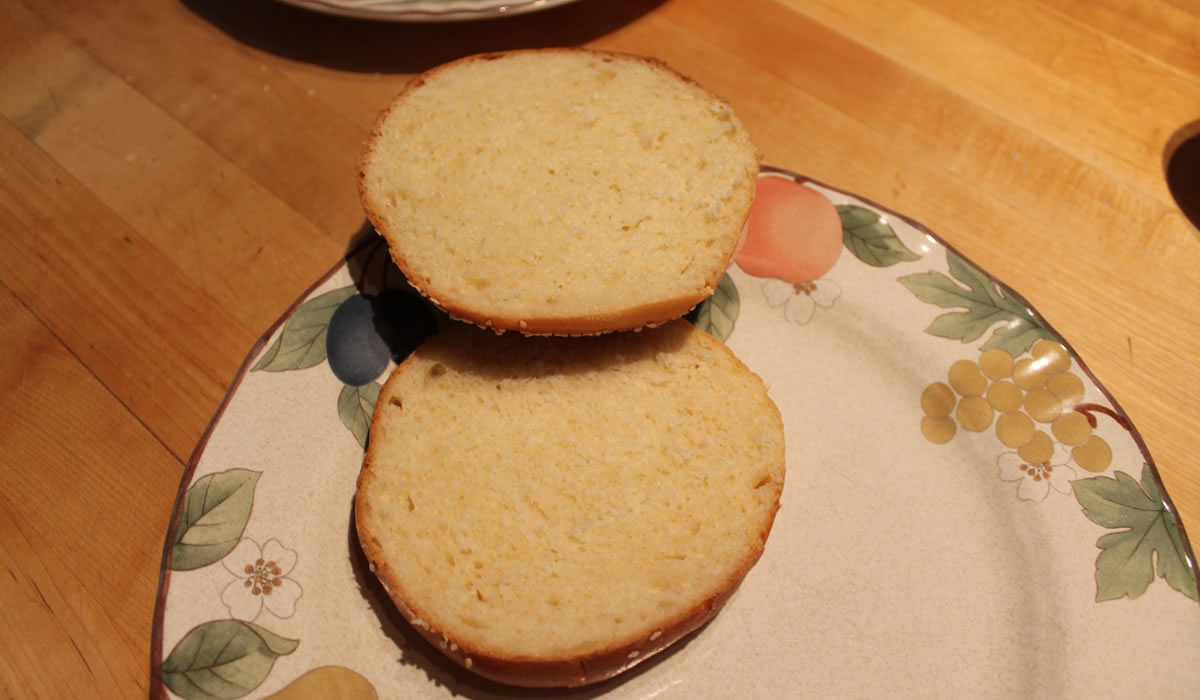
And the burgers came out great, too!
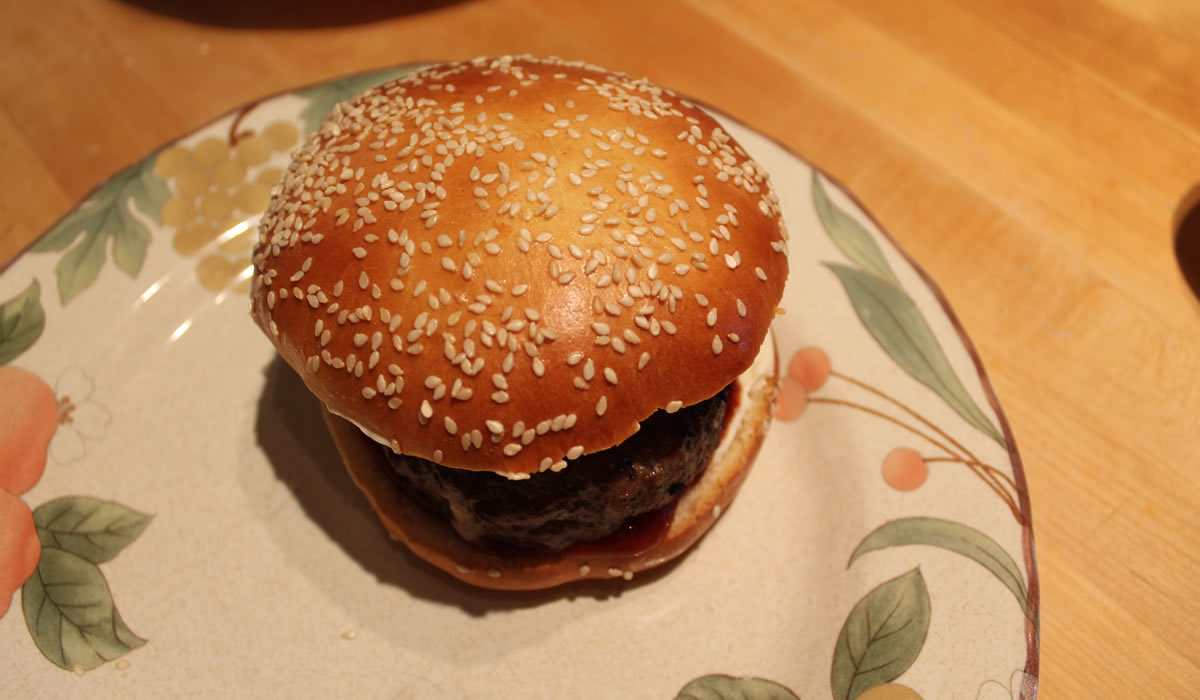
I stuffed them with quattro formaggio - a 4-cheese Italian blend - and grilled them on my spankin' clean grill that I took apart and gave an annual tune-up.
I'm practicing for retirement. Putter. Putter. Sit. relax. Repeat.
I'm looking forward to this!
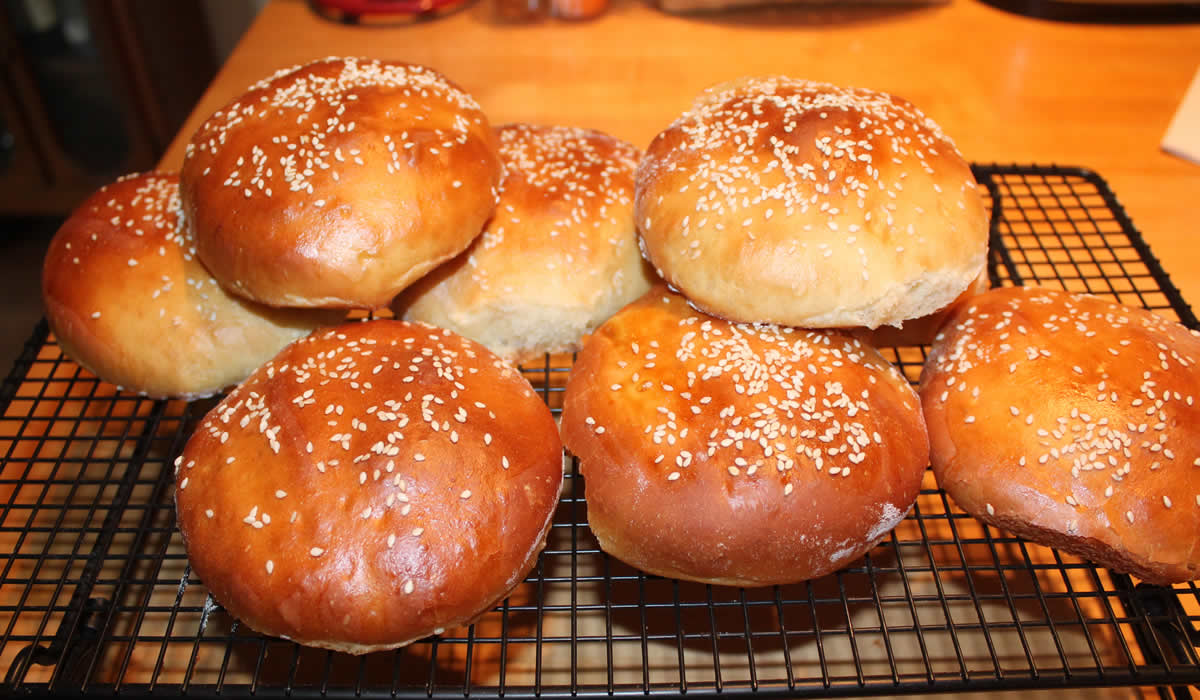
Hamburger Buns
I'm not sure what it says about me when I'd rather bake homemade hamburger buns than drive a mile to the grocery store. I'm not in a real people mood, today, so it's probably best that I don't head out in public. My outrage level is past critical and I swear if I saw a MAGA hat on someone I'd have to cold-cock the SOB just on principle.
Best that I stay indoors. Besides, I haven't made buns in a while.
Hamburger Buns
- 1 packet yeast (2 1/4 tsp)
- 1 cup warm nonfat milk
- 2 tbsp sugar
- 3 cups flour
- 2 large eggs, divided
- 3 tbsp butter, softened
- 1 tsp salt
- sesame seeds
Proof yeast in warm milk and sugar. Mix in 1 whole egg and 1 egg yolk. Save egg white for brushing on buns, later.
Add flour and salt to liquid and mix on low speed until all flour is incorporated. Add softened butter and continue mixing for 7 or 8 minutes. Dough will be soft and not pull away from bottom of bowl, but it shouldn't be overly sticky.
Form into a ball and place in an oiled bowl. Cover, and allow to rise until doubled.
Punch down dough and form into 8 balls - each about 3 1/2 ounces. Place on a floured sheet pan and flatten. Cover with a towel and allow to rise, again, until doubled.
Brush with reserved egg white mixed with a bit of water. Sprinkle with sesame seeds, if desired.
Place in a preheated 375°F oven for about 15 minutes.
Split, and fill with your favorite burger and toppings.
Pistachio, Onion, and Cheese Bread
We've gone from 90°F to 50°F in mere days, with wind, rain, thunderstorms, and tornado watches... Right now, it's pouring rain outside and my sunburn from the baseball game on Thursday is rapidly fading.
Welcome to Spring in Pennsylvania.
Inclement weather means bake a loaf of bread, since we already have cake. Rotten weather outside usually brings me into the kitchen - any excuse to turn on the oven and use my baking stones. I do like these baking stones. I also like the double ovens and the fact that I can leave them in the oven all of the time. It makes bread and pizza-making so much easier. And I do like easy. Or, rather, convenience. It's why the mixer is on the counter. If we had more room, the food processor would be there, too.
Convenience.
We all have our own idea of what convenience is... One of mine is the ability to keep baking stones in the oven. For others, it's having a bakery next door. Neither is wrong. It's your world and your reality.
I think what truly brought that home to me was when I first started demo cooking. I would come up with these grandiose ideas and my dear friend and demo partner, Ruth, would smack me upside the head and say "I have two screaming kids and 20 minutes to get dinner on the table. Simplify that." Having children in the house wasn't my reality. Having to have dinner on the table at a set time wasn't my reality. I learned to step outside of myself and think in terms of other people.
That really helped when we moved Victor's mom in with us 5 years ago. Set meal times and constantly changing food likes and dislikes are now the norm around here.
Welcome to my new reality.
Our other new reality is we can't be locked into her dietary whims. Cooking two meals is a reality - as much as I swore it would never happen and I would never do it. It's amazing how mindsets can change.
The good thing about changing the mindset was being able to have fun in the kitchen, again, and not dread the will she eat this? scenario. I flat-out know she will not eat any bread I bake - she only eats store-bought potato bread - preferably Stroehmann Dutch Country Premium Potato Bread. It frees me from having to worry about her liking it. I get to bake what I want and she has her own loaf that neither of us will touch.
Other things can still be a bit more iffy, but I'm learning...
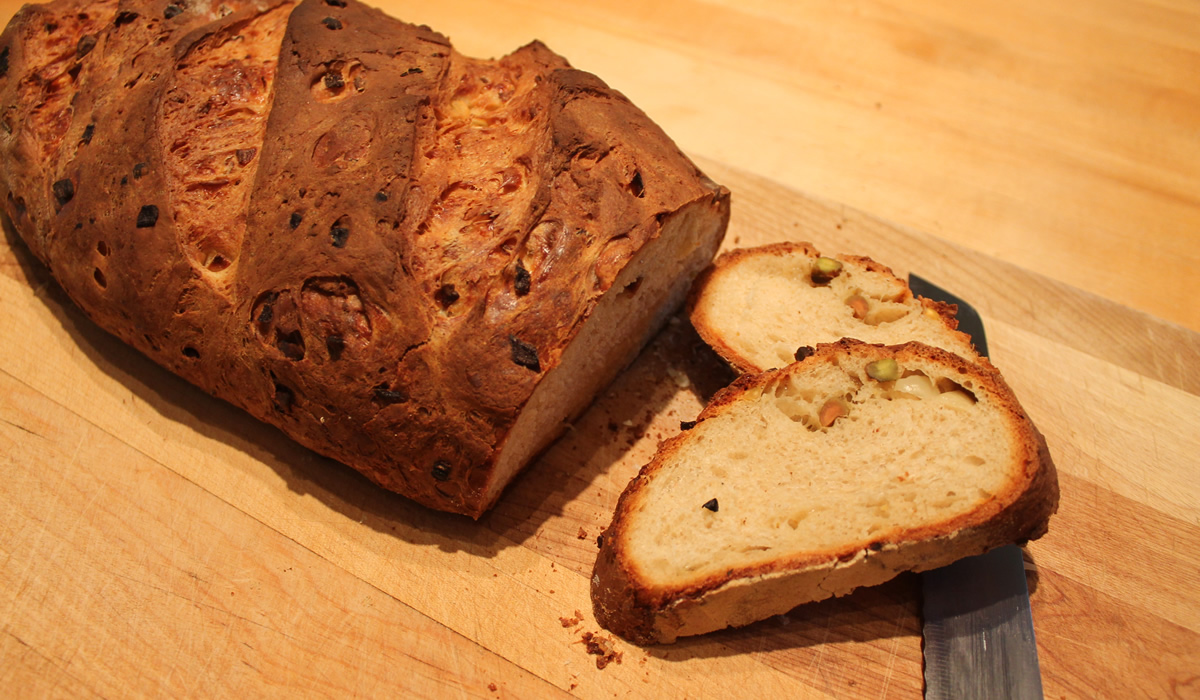
What I baked, today, was a loaf of Pistachio, Onion, and Cheese Bread.
A relatively easy loaf to pull together, with a crusty crust and a really soft crumb. The milk, the oil, and that little bit of sugar really add tenderness.
Pistachio, Onion, and Cheese Bread
- 1 3/4 cup white flour (I use Italian "00")
- 1/2 cup sprouted wheat flour
- 1/4 cup rye flour
- 1 tsp salt
- 1 tbsp sugar
- 2 1/4 tsp - 1 package - active dry yeast
- 1 cup warm milk
- 1/4 cup olive oil
- 1/2 cup pistachios, roughly chopped
- 1/2 cup onion, finely chopped
- 1/2 cup provolone cheese, diced
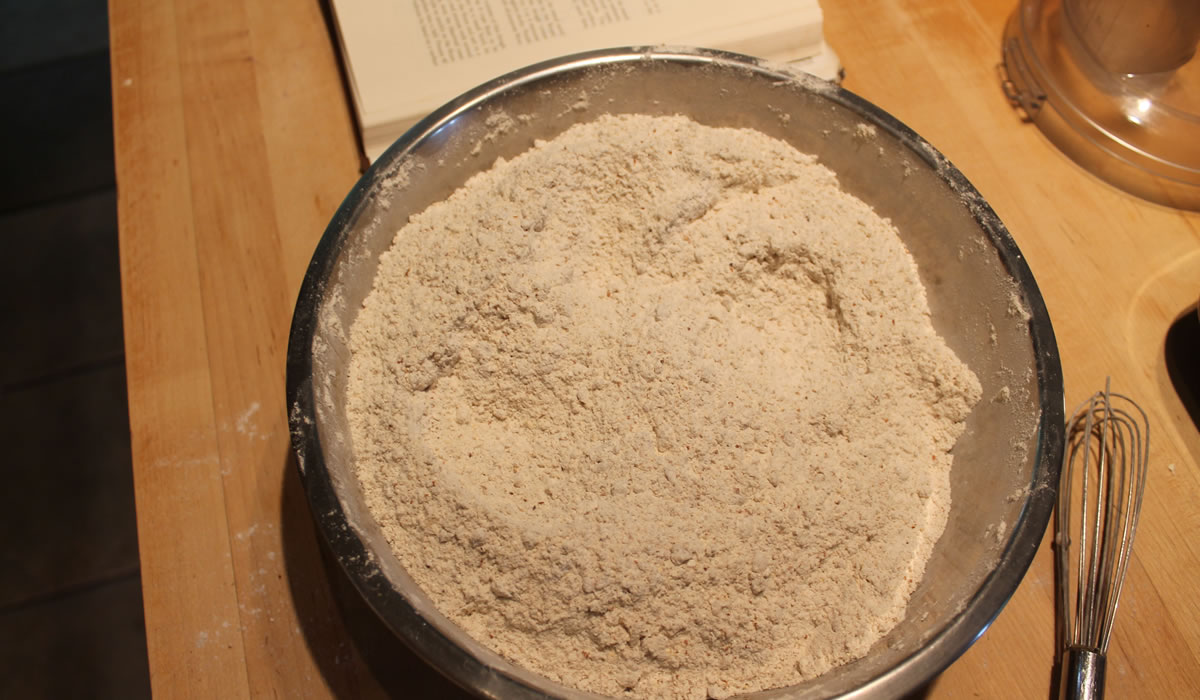
Sift flour, salt and sugar into a large bowl.
Dissolve the yeast in 1/2 cup of the warm milk. Pour it into the middle of the flour together with the oil and rest of the milk.
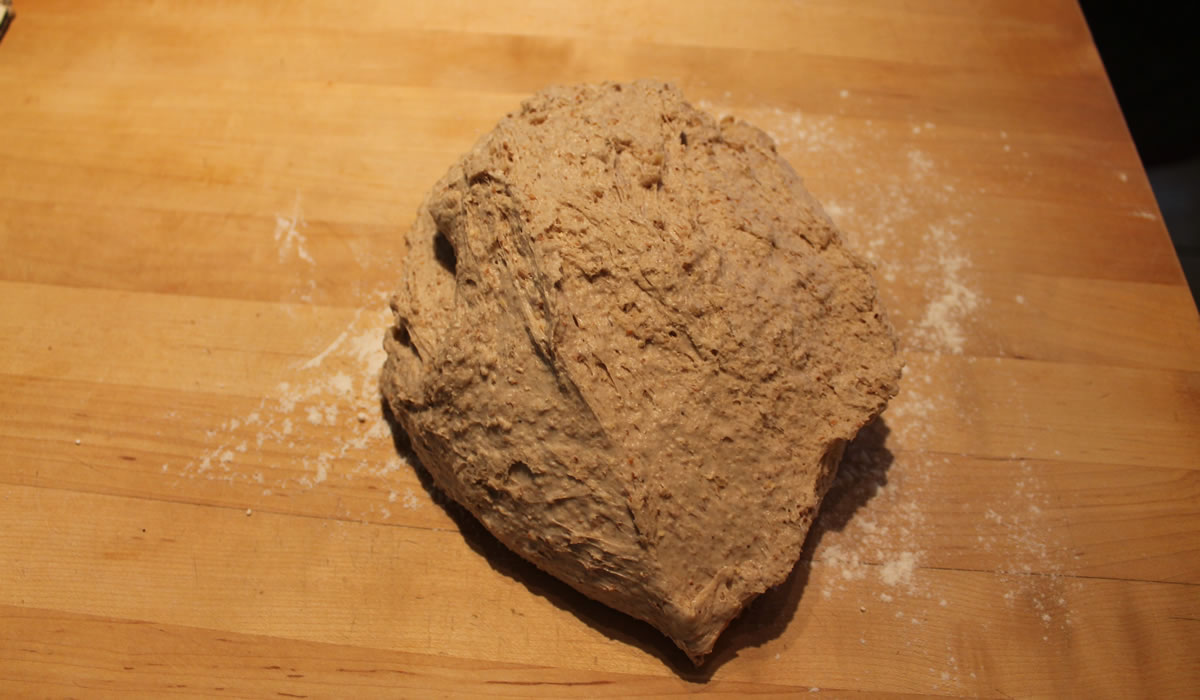
Knead well until the dough is firm and blended into a smooth, springy ball (about 10 minutes.) Leave in a warm place to rise for about 2 hours.
Punch down, mix in pistachios, cheese, and onions. Shape into loaf and let rise for about 45 minutes.
Bake at 400° for 35-40 minutes or until the loaf is nicely-browned and sounds hollow when tapped on the bottom.
Can be baked on greased baking sheet or bread stone.
This smelled heavenly when it was baking and I barely waited for it to cool before slicing into it. My excuse was I wanted to write this post before dinner. The reality was I wanted a piece of bread with butter - immediately.
The recipe needs about 2 1/2 cups of flour, so play with it and use what you like. These proportions work well for me, but your results can vary. Add more wheat or rye - just make sure at least one full cup of the flour is white to keep it from being too dense.
And have fun!
Multi Grain Sandwich Bread
When you make a lot of bread, you get a feel for the dough. It speaks to you as you're kneading or forming. This dough didn't just speak to me - it sang! From the minute I started I knew it was going to be a winner.
I usually make rustic loaves, but today I wanted to make a couple of loaves of sandwich bread. I don't make a lot of loaf-type breads and their approach and structure is different from those I usually make.
The rustic breads are simply flour, water, salt, and yeast - sometimes with a starter and sometimes without. Mixing methods, ratios, baking temperatures, and other variables change the outcome - but they all have the same four ingredients.
Sandwich breads, however, are approached more like cakes. They need sugar and fat for tenderness. Milk replaces water, the dough is a tad softer - the flour to liquid ratio is slightly different. You bake a lot of bread and these become things you pretty much do by rote. Your eyes and hands tell you what you need, but you need to know what you're looking for in the first place.
I have a cupboard full of different flours, so I thought a multigrain bread would help to use up some of the stockpile. I grabbed sprouted wheat, whole wheat, rye, and my Italian "00" flours and went to work.
I generally don't care for 100% whole wheat breads. I often find them too dense and the flavor overwhelming. They can work great for a specific purpose, but I'm a multi-purpose kinda guy. I find that a 50/50 blend of white to other flours is a good start, along with a liquid to flour ratio of about 1 cup liquid to 3 cups flour. There are very specific ratios of liquid to flour to yeast and salt that are used commercially to scale recipes up and down - and are especially useful when making sourdough breads and replenishing starters - but for making a couple of loaves at home, I usually rely on sight and touch - and start with 1 cup 3 cups.
Bread baking is not difficult. It's simply getting the ratios right - and you can easily do that by following a trusted recipe. I made this up using stuff I had in the kitchen. You can, as well.
And... don't try to "make it healthier" by omitting the butter or cutting down on the salt, using all whole wheat flour or water instead of whole milk... This is science. You need certain properties in specific ratios to work. The simple fact that you're making it at home is making it healthier than anything you'll buy in a grocery store.
Multi Grain Sandwich Bread
- 2 1/2 tsp yeast
- 1/4 cup water
- 1 tsp sugar
- 2 cups whole milk - room temperature
- 1/2 stick butter - softened
- 3 cups white flour
- 1 cup sprouted wheat flour
- 1 cup whole wheat flour
- 1/2 cup rye flour
- 1 tbsp salt
- 2 tbsp sugar
Mix yeast with water and sugar and proof for 5 minutes.
Add milk and white flour and blend on low speed with dough hook. Slowly add very soft butter, remaining flours, sugar, and salt.
Continue mixing for about 8 minutes. Dough should completely pull away from the sides of the bowl, but won't pull away completely from bottom. Add water or flour by tablespoons, if needed.
Roll dough into a ball and place in a buttered bowl.
Cover, and allow to rise in a warm, draft-free spot until doubled. I use the microwave with a 2-cup Pyrex measuring cup filled with boiling water.
When doubled, form into two loaves, place in buttered bread pans, and allow to rise, again, until doubled.
Bake in a preheated 400°F/200°C oven for about 40 minutes, or until baked through and hollow-sounding when tapped.
Remove from pans and cool on racks completely, before slicing.
Light and delicate with a nice, crispy crust. I prefer a bit of crunch to my crust, but you can always brush on some melted butter right after it comes out of the oven to soften it a bit, if you like.
There are a lot of bread cook books out there - and the sheer volume of them can make bread making intimidating - but the one book that can really guide anyone though the process is Beard on Bread by James Beard.
James Beard really is my culinary hero and his approach to cooking and baking is simply follow the instructions and learn what happens when you change things. The forward to his original 1959 cookbook states:
Cooking is one everyday task that can be creative. You become a creative cook by first becoming a good basic cook. Your transition from basic to creative cooking takes some doing, some actual experience in finding out what happens when you add this or change that. Once you have made this transition, you will never lack admirers. Good food has a magic appeal. You may grow old, even ugly, but if you are a good cook, people will always find the path to your door.
How can you not love a guy who thinks like this?
Guinness Rye Bread
I went searching for a yeasted Guinness bread since I had this six-pack of Guinness and had a hellava time finding a decent recipe. Just about everything coming up in Chef Google was a soda bread - even after specifically stating yeast. The few that were yeast were more fruit-related like the Barmbrack I'm making later in the week. Not what I was looking for.
I did find one recipe at Wild Yeast Blog that had a bit of promise, so I sat down to see how I could make it work for me. The story behind the loaf is pretty funny if you have the time to read about kitchen disasters... The blog hasn't been active in several years, but it looks as if there may be some good recipes to play with!
Guinness Rye Bread
adapted from Wild Yeast Blog
sponge:
- 1 2/3 cups bread flour
- 1 cup rye flour
- 1 packet yeast
- 1/4 cup water
- 1 bottle Guinness Extra Stout
for the dough:
- 1 2/3 cups bread flour
- 2 tsp salt
- 1 tsp fennel seeds
- the sponge
method:
Make the sponge: In a mixing bowl proof yeast in the 1/4 cup water and Guinness. Add the two flours and mix well. Cover and place in a warm spot and let rise about an hour. I use my microwave with a 2 cup measuring cup of hot water.
Make the dough: Add the remaining flour, fennel seeds, and salt to the sponge and mix with dough hook about 7 or 8 minutes. The dough will be soft and a tad sticky, but should pull completely away from the sides of the bowl and just barely stick to the bottom.
Form into a ball and place into an oiled bowl and let rise in a warm place - back in that microwave, for me - for another hour.
Make the loaf: Place dough on a lightly floured board and form into a ball. Cover with a kitchen towel and let rest about 15 minutes.
Reform into a tight ball and place on a peel liberally coated with cornmeal. Cover, and let rise 30 minutes.
Carefully slash top with sharp knife or razor blade and slide onto baking stones preheated to 425°F.
Bake 30 minutes or until completely done and sounding hollow when bottom is tapped.
The bread has great flavor, a wonderful, light crumb, and just the right amount of chew in the crust. The fennel comes through pretty strong, and the malty Guinness is there, as well. The rye compliments everything.
We used it to sop up a rich Guinness Beef Stew based on my Braised Beef with Guinness. The flavors all worked great together.
Here's my kitchen mantra:
Here's to a fellow who smiles
When life runs along like a song.
And here's to the lad who can smile
When everything goes dead wrong.
Be the one who smiles when it goes wrong. Worst thing that can happen is you throw it all out and call for pizza.
Sláinte!
More Sourdough
This is classic the more I learn, the less I know. Which, of course, means I need to learn more. To know less. Or something...
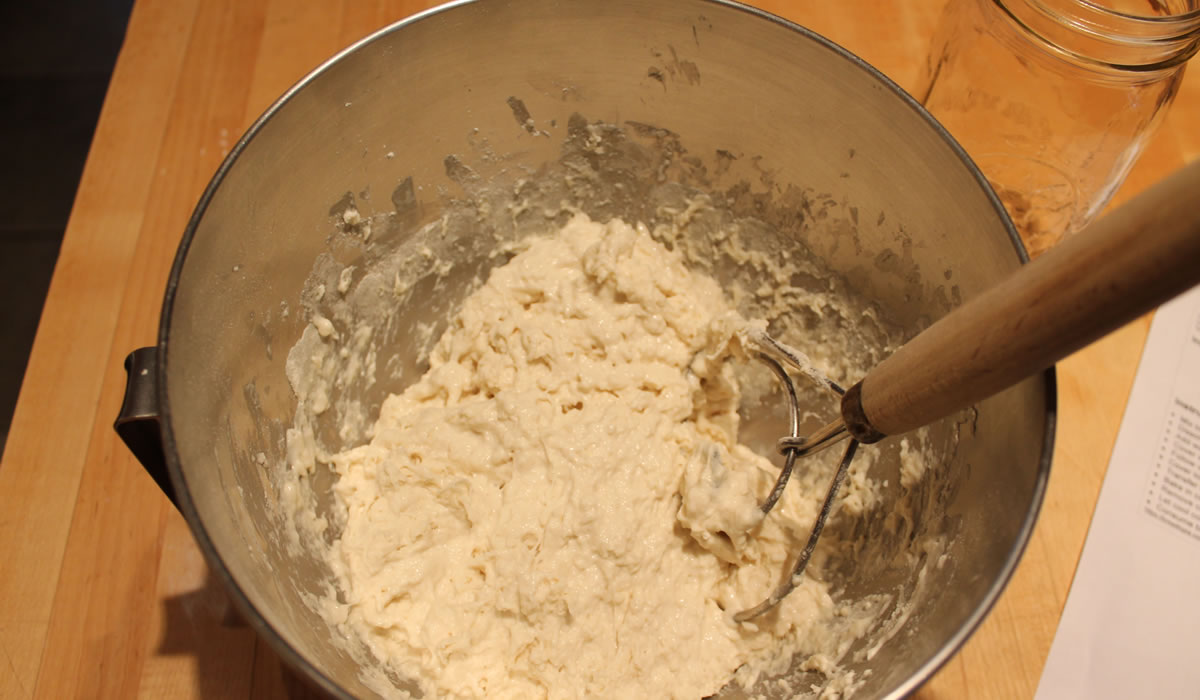
Yesterday's sourdough got me thinking about the things I liked in bread. Today, I started out with a new idea - and immediately screwed up the measurements. I had to go back and redo things a bit - so I ended up with more dough than I had anticipated.
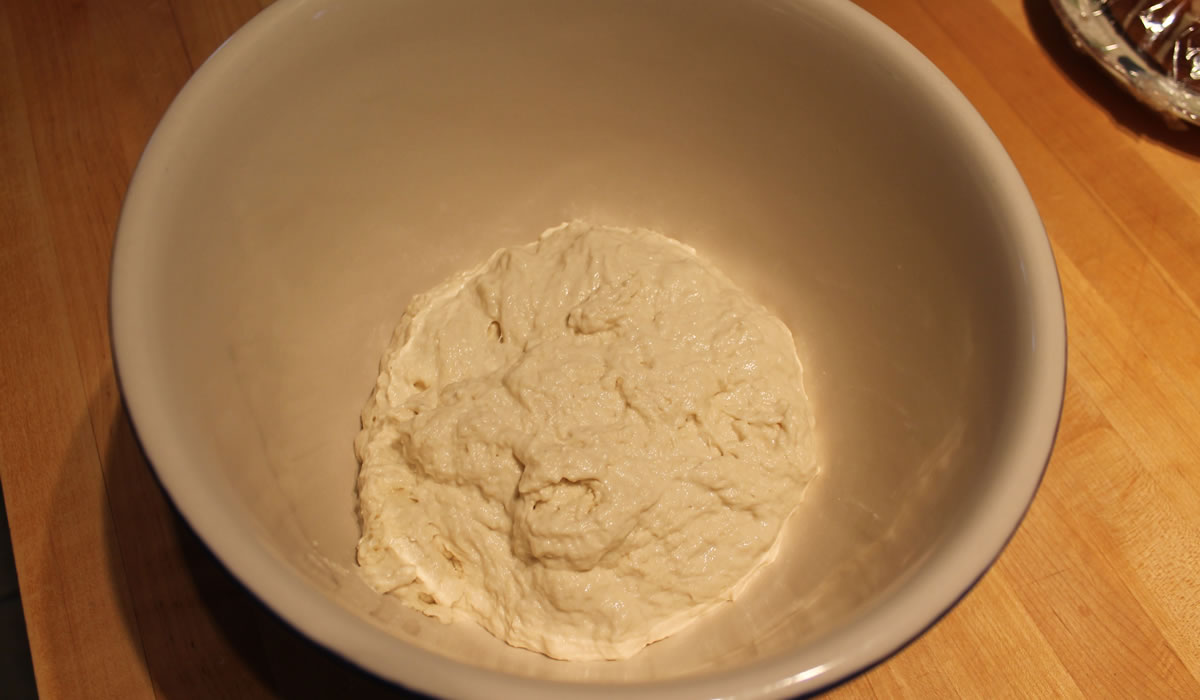
I decided to use the microwave as a proofing box. I boiled a 2 cup measuring cup full of water, set it off to the side, and put the bowl of dough inside. For the first hour, it just sat there. It seemed like it didn't want to rise. Victor told me I make good bread, so don't worry about it. Dump it and move on. Great advice except I'm stubborn and pigheaded. Or, indefatigable. Or... stubborn and pigheaded. Then... I noticed a bubble. It was tiny, but it was there! I did a pull, fold, and stretch after an hour and a half. It almost looked promising. After two hours, it had actually increased in size a bit. In three, the dough was like magic. Rising, folding, forming, resting... Another classic lesson in patience. I have so much of it. I formed two loaves and patiently let them rise, again...
I really wanted to see if I could mimic the Larraburu sourdough of my youth. My starter isn't nearly sour enough to accomplish something like that and I didn't want to do an 18 hour or overnight-in-the-refrigerator rise to increase the sourness. I wanted the bread today! Plus, my oven isn't big enough for a real loaf. Nor do I have steam injectors. But... I am stubborn and pigheaded. I hit a few San Francisco websites and searched for Larraburu - and got some good ideas and information.
What's interesting about this is I have never in my life tried to replicate something I had elsewhere. I have gotten great ideas and I have made often things based upon things I've had or seen, but I've always been too much of a realist to think I could make at home something a commercial kitchen produced. I've worked in too many commercial kitchens. I know better.
But knowing I couldn't make it the same meant I needed to delve into it more deeply if I really wanted a certain outcome. It started me thinking - and learning - more about the science of bread making. I know how to bake bread. I know what different types of dough should feel like. I have made lots of breads - my favorite Italian rustic breads use bigas - starters. And, it seems I've been doing a lot of things right - without actually knowing why it was important or necessary. But there's so much more to learn...
I finally have a bit of a grasp on Baker's Percentage in a recipe - so that's a start. The more I know the more I need to learn...
Here's the basic recipe for today's bread. I actually made almost 1 1/2 of this because I screwed up my initial measurements - and I wasn't going to toss out perfectly good flour and water! I made two loaves - the recipe should only make one large loaf.

Measurements are in grams.
Sourdough Bread
- 565 gr flour
- 339 gr water
- 11 gr salt
- 85 gr starter
**About an hour before baking, preheat oven with baking stone to 500°F. Have a sheet pan on the rack under for boiling water for steam.
Mix the flour and water in a stand mixer for 1-2 minutes. Cover the mixer bowl tightly and autolyse* for about an hour.
*Autolyse is a method whereby the flour and water (of a bread recipe) are first mixed together, then rested for a period of time. This helps make exceptionally extensible dough.
Sprinkle the salt on the dough and add the starter. Mix for 1-2 minutes to incorporate everything and then mix for 5 minutes. If necessary, adjust the dough consistency by adding small amounts of water or flour. The dough should be tacky but not sticky and should clean both the sides and bottom of the mixing bowl.
Transfer the dough to a clean, lightly oiled bowl. Cover tightly.
Ferment at 105º F for 2 1/2 to 3 hours in a humid environment. A microwave with a cup of boiling water works well for this. Stretch and fold once at 1 1/4 hours.
Remove from bowl, form into a ball, and let rest on the counter for 20 minutes - covered with a towel.
Shape into a boule or bâtard and place on cornmeal-covered peel.
Cover with a towel and let proof another 30-40 minutes.
Make several slits on dough with razor blade or very sharp knife. Transfer the loaf to the baking stone. Pour 1 cup boiling water into pan under baking stone and quickly close oven door. Turn down the oven to 450º F.
Bake about 40 minutes for a bâtard or 40-45 minutes for a boule. Look for a nice, dark crust.
Cool on rack completely before devouring.
If I only made this bread for the rest of my life, it would not be a bad thing. It really came out great! But it won't be the only bread I ever bake, again, because I have a dozen ideas forming in my little mind...
I just put a loaf in the freezer so I'm not going to be making any more bread for a few days, at least... but I see a sourdough walnut raisin in our future...
This is fun!
Sourdough Bread
The sourdough bread of my youth doesn't exist, anymore. The very best - in my not so humble opinion - was Larraburu. Dark, crusty, crunchy crust and a rich interior, filled with holes. The kind of bread that when you toasted it, the butter - or peanut butter - would flow through the holes making a mess everywhere. It was a kid's gastronomic dream come true.
Larraburu went out of business in 1976 - the result of a lawsuit over a 6 year old being hit by a bread delivery truck - and that left Parisian pretty much the sole sourdough survivor. Boudin calls itself the Original San Francisco Sourdough, but I don't remember them at all until they started up a bakery/cafe at the remodeled Stonestown Galleria. The 1976 San Francisco Chronicle article talking of Larraburu's demise doesn't mention Boudin, either...
Larraburu also had the best sourdough rolls. Edgewater Delicatessen right up the street from us sold them for 10¢ each. I'd buy a roll and 25¢ worth of salami and have a feast - when I actually had 35¢ to spend.
Quite a while ago, I bought the Tartine Bread cookbook, read through a bit of it, and decided that making starter from scratch was a waste of time and energy. The tone of the book just came across as a bit elitist, to me. Lord knows I'm not even remotely opinionated or food-snobish, myself... ::ducking the lightning bolts aimed at me from the sky::
Once again, I was wrong. It's not, and creating a starter is actually really easy. What I ended up doing, though, was buying a starter from a bakery called Breadtopia. It was after buying the starter and dealing with the 3 days of feeding and regenerating it that I read the Tartine book, again, and realized I had just done what they were talking about - minus something like one step.
Okay... I'm not the brightest color in the crayon box... what can I say? I have live starter and a loaf of really good bread - and the ability to make many more.
So here's my take on a loaf of sourdough... It's a bit Breadtopia and a bit me. I didn't want to use the Dutch Oven process so I played with it and baked it on oven tiles.
Sourdough Bread
- 16 oz flour
- 1 1/2 tsp. salt
- 1 1/2 cups water
- 1/4 cup starter
Instructions
Mix together the dry ingredients.
Dissolve 1/4 cup starter into purified water
Add water / starter to dry ingredients and stir until the water is incorporated.
Cover with plastic and let sit roughly 10-14 hours at room temperature (~ 68 - 72F).
Stretch and fold dough over itself several times.
Cover loosely with plastic and rest for 15 minutes. Form into boule.
Transfer to floured parchment on a peel, cover with a towel, and let rise about 1 1/2 hours.
Bake at6 475°F for about 33 minutes.
Let cool completely on rack.


This particular bread had a very lightly-sourdough flavor. Great taste, but just a tad gummier than I like. That probably had nothing to do with the fact that we cut into it almost straight out of the oven! It is a wetter dough than I'm used to dealing with. I think future loaves will be a little less so.
The crust was excellent and had a really great crunch and texture, but the bread I remember so well had a dull crust - thick and dark and it crackled and crunched when you bit into it. And it left crumbs everywhere.
I think I may try a loaf without the steam to see what a dry oven will give me.
Stay tuned...

Pane Bianco
It's raining outside.
It started yesterday and will continue through tonight. Lots and lots of rain. It's also pushing 60°F outside. Just a tad unseasonable for the Mid-Atlantic states in early February. The radio pundit said this would have been three feet of snow if it had been cold. I'm not sure if I'm happy or sad that it's not.
I've always loved a good close-down-the-eastern-seaboard snow, but, all of a sudden this year, I'm kinda over snow. I refuse to admit that it's old age on my part, so I'm going to blame Nonna. If we get snow and the power goes out, we're screwed. Victor and I can handle it - we have books, we can read, we can cook, and even play on our phones - and stay warm with a fire in the fireplace. Nonna can't do any of the above. Without her TV, space heater, and electric throw set on high, she would be miserable - and so would we.
Nah... I'd rather it be rain.
In honor of the rain, I decided to bake a loaf of bread. I know... how unusual for me to be baking bread, eh?!? But since it's raining and I had decided soup was on the menu for dinner, bread seemed like a good idea. And since a simple soup was for dinner, I decided we needed a bread I hadn't made before. I headed over to the King Arthur website to see what was up.
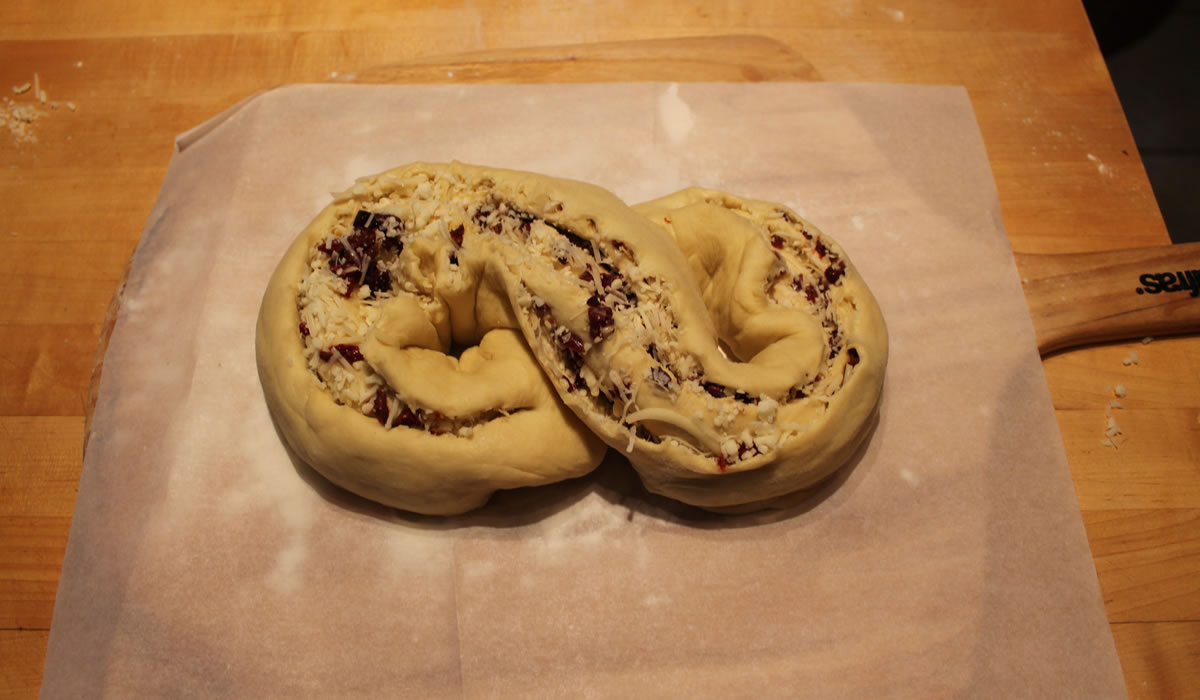
I was scrolling through the French and Italian bread recipes and a figure-8 loaf caught my eye. It was stuffed with cheese, sun-dried tomatoes, garlic, basil... sounded pretty good.
I have to admit that I don't have a lot of luck with King Arthur recipes. Their measurements and what I should be achieving never seem to jive with what is happening in reality. Today was no exception.
The cooks notes at the end of the recipe stated if I was using all-purpose flour instead of bread flour, I should decrease the water from 1/3 cup to 1/4 cup. It also stated that I should have a smooth and very soft dough, slightly sticking to the bottom of the mixer. I started with the full 1/3 cup and had to add another 1/4 cup of water to make that smooth dough. I also take issue with a recipe that calls for adding oil at the beginning. Flour need to be hydrated with water before oil is added. Adding the oil directly to dry flour inhibits water absorption.
It also stated I should loosely cover the baking bread after 20 minutes to prevent over-browning. I didn't cover it and you can see that after 40 minutes in the oven, it did not over-brown by any stretch of the imagination.
Complaints aside, I ended up with a really good loaf of bread!
I changed the filling, a bit, using my favorite Italian cheese blend, sun-dried tomatoes, garlic, and kalamata olives.
Pane Bianco
adapted from King Arthur Flour
Dough
- 3 cups King Arthur Unbleached Bread Flour
- 2 teaspoons instant yeast
- 1/4 teaspoons salt
- 1 large egg
- 1/2 cup lukewarm milk
- 1/3 cup lukewarm water
- 3 tablespoons olive oil
Filling
- 1 cup shredded Italian-blend cheese
- 1/3 cup oil-packed sun-dried tomatoes, chopped
- 3 cloves garlic, minced
- 10 chopped kalamata olives
Directions
To make the dough:
Combine all of the dough ingredients in a bowl and mix and knead to make a smooth, very soft dough. The dough should stick a bit to the bottom of the bowl if you're using a stand mixer.
Place the dough in a lightly greased bowl, cover, and let it rise for 45 to 60 minutes, or until it's doubled in size.
On a lightly-floured board, gently deflate the dough. Flatten and pat it into a 22" x 8 1/2" rectangle. Spread with the cheese, tomatoes, garlic, and olives.
Starting with one long edge, roll the dough into a log. Pinch the edges to seal. Place the log seam-side down on a lightly greased or parchment-lined baking sheet.
Using kitchen shears, start 1/2" from one end and cut the log lengthwise down the center about 1" deep, to within 1/2" of the other end. Keeping the cut side up, form an "S" shape. Tuck both ends under the center of the "S" to form a "figure 8;" pinch the ends together to seal.
Cover and let rise in a warm place until double, 45 to 60 minutes. While the loaf is rising, preheat the oven to 350°F.
Uncover the bread, and bake it for 35 to 40 minutes, tenting it with foil after 20 to 25 minutes to prevent over-browning. Remove the bread from the oven, and transfer it to a rack to cool.

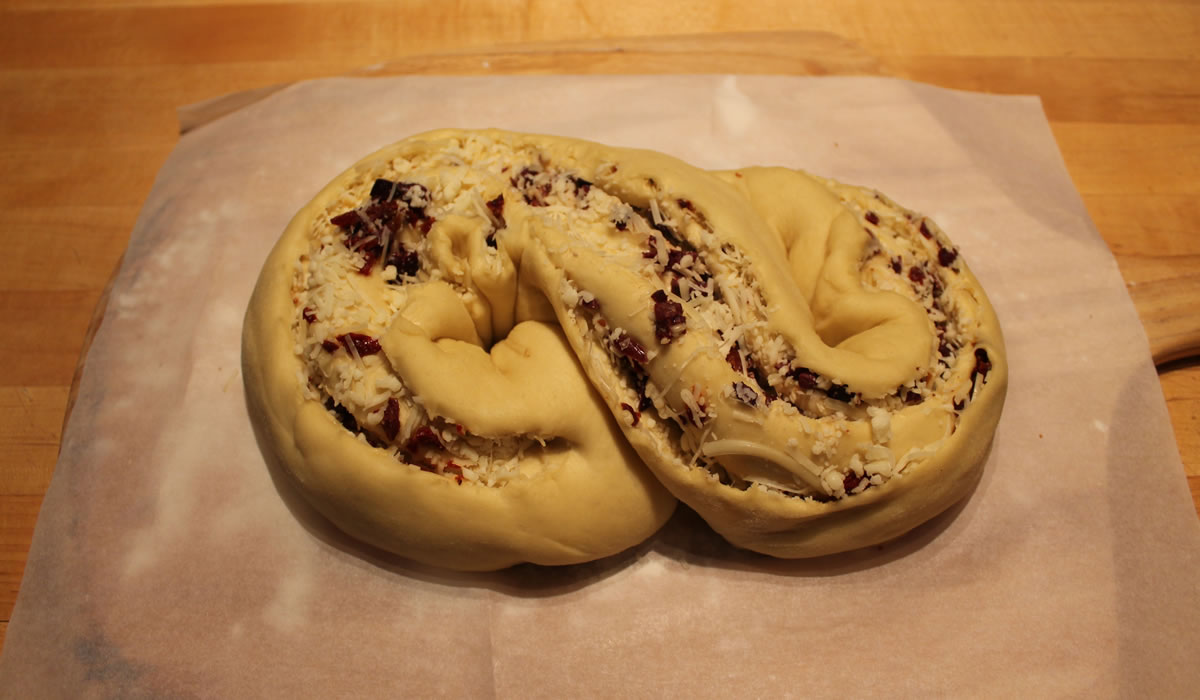
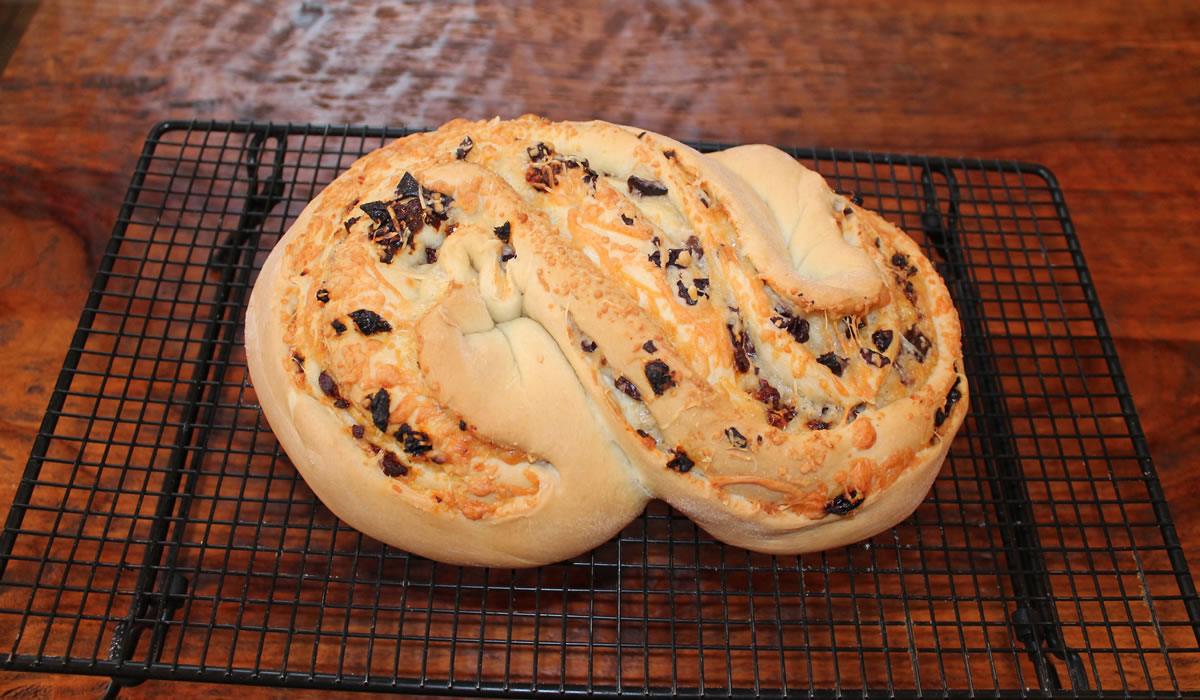
The crumb is light and rich just as an egg bread should be. The filling ingredients are strong, so a little goes a long way. You could probably up the cheese a bit, but I wouldn't add too many more olives or tomatoes. This is one of those less is more moments.
Even though I usually have issues with the King Arthur recipes, I'll be back there again and again for ideas. I think with any recipe it's important to read them through before beginning, and use your best judgement when making them. If a recipe states you should have a soft dough and you're dealing with a brick, slowly add some water. If it says it should be pulling away from the bowl and yours looks like plaster of paris, slowly add flour.
Recipes just can't take in every variable there is... age and moisture content of flour, humidity, kitchen temperature, temperature of all the ingredients, and the relative hardness or softness of your water can really play havoc with bread. Water that is too hard toughens the gluten structure and screws up fermentation. Water that is too soft does the opposite and creates soft, sticky dough.
The only real solution is to bake lots of bread and learn by touch and feel what a good dough should be!
So start baking!
The simple soup for dinner became A Chicken Vegetable soup with little noodles, rice, farro, carrots, onion, celery, shallots, peas, green beans, navy beans... throw it in the pot and make it all hot!