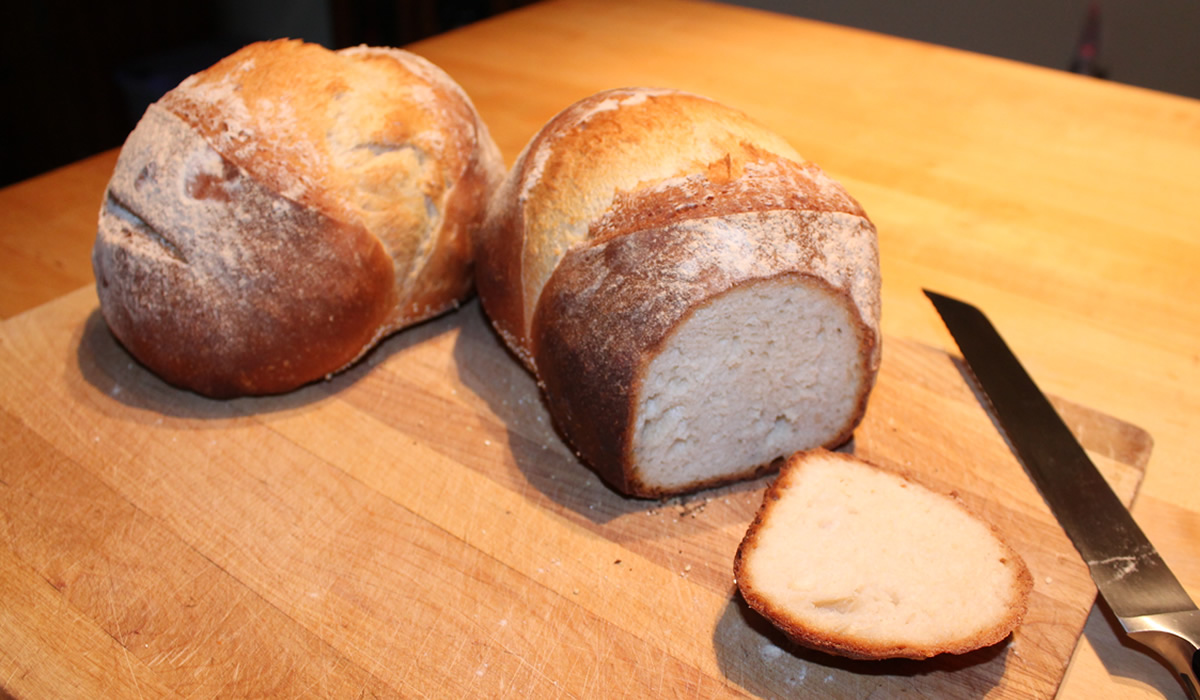
More Pitas
Pita has become my new favorite bread - this week.
I tend to go through stages with types of breads - artisans, sourdoughs, sandwich loaves, Italian rustic - just to name a few. It's fun to make several loaves of something to get a good feel for the dough and what to expect. Once I get the basic down, I can play with different flours and the like.
It's pita's turn.
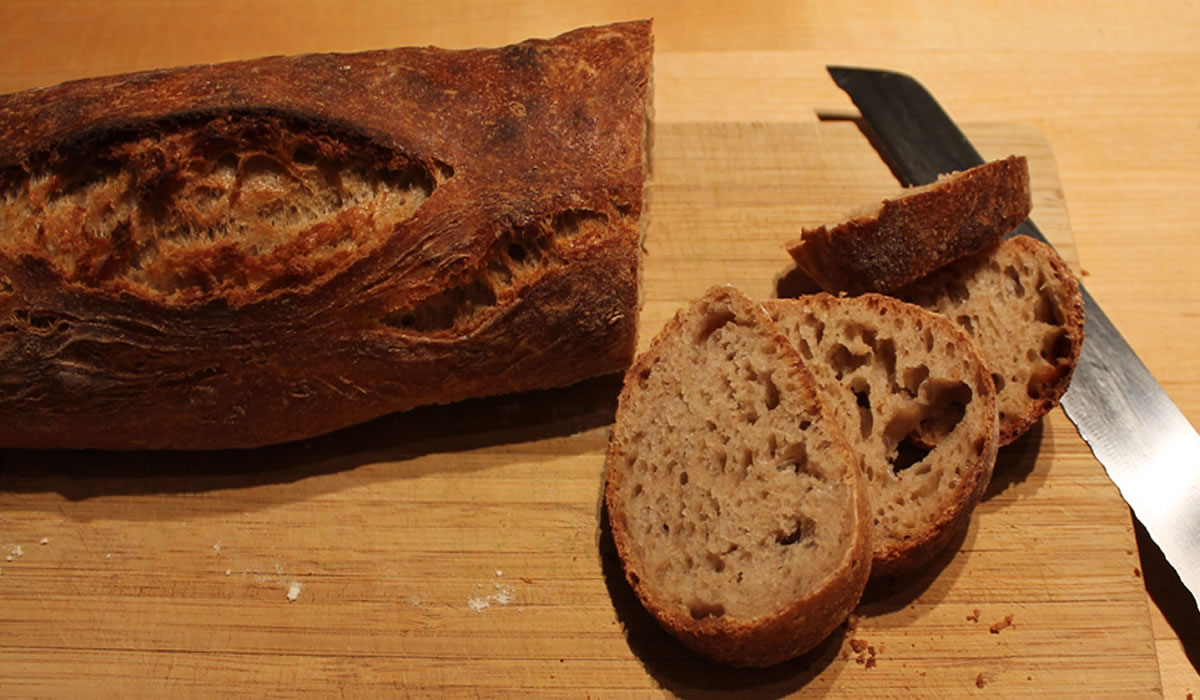
I took the recipe for the taboun I made a few days ago and tweaked the flours. it made for a bit more robust and flavorful bread.
Pita
- 1 cup lukewarm water
- 1 tsp honey
- 2 tsp yeast
- 1 1/2 cups '00' flour
- 1 cup bread flour
- 1/2 cup sprouted wheat flour
- 1/2 cup rye flour
- 1 tsp salt
- 2 tbsp olive oil
Combine the water, honey, and yeast. Let it stand for about 10 minutes until foamy.
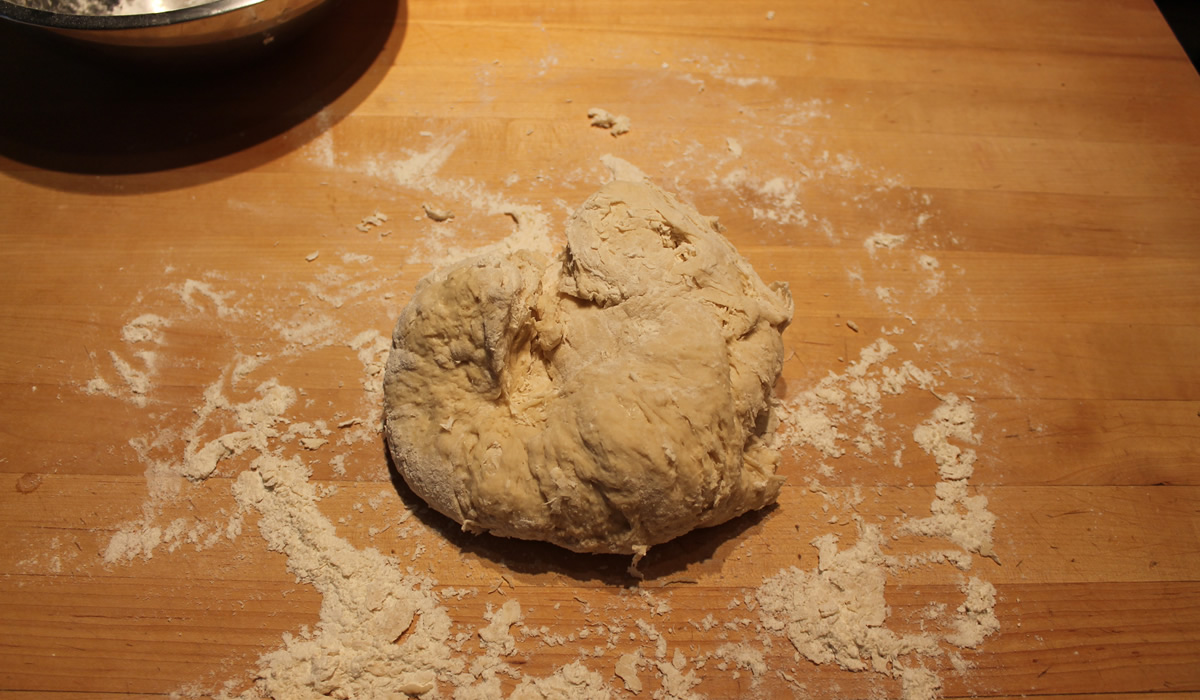
Combine the flours and salt with the yeast and water mixture, and stir to form a soft dough.
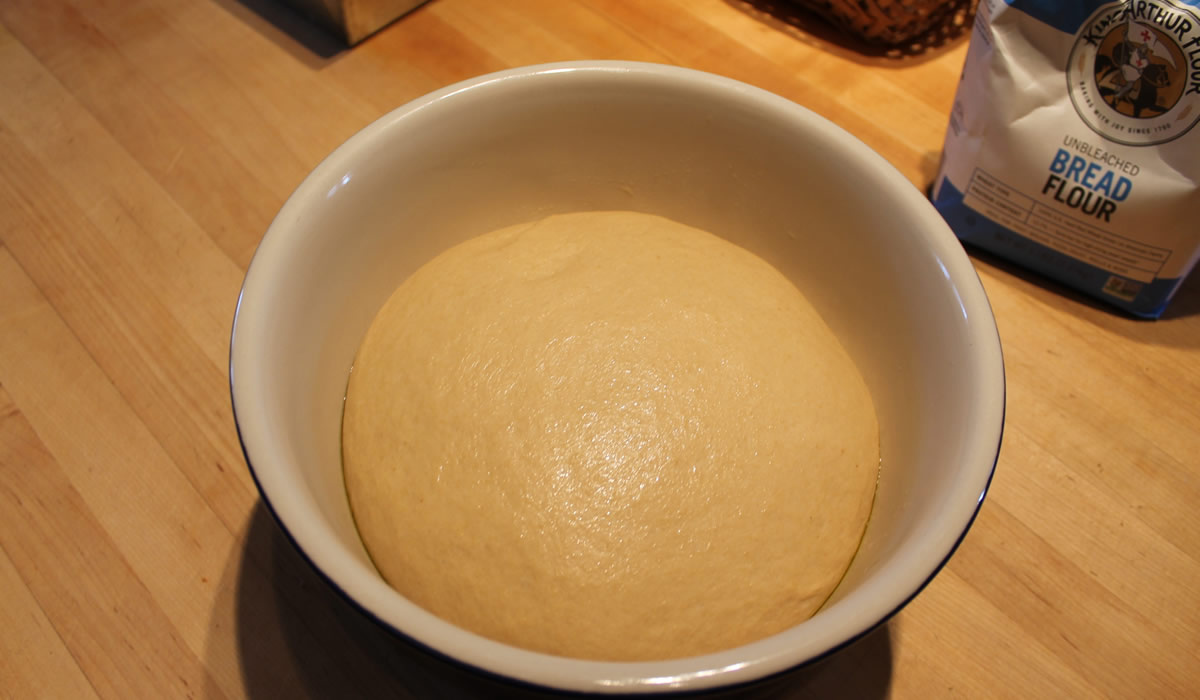
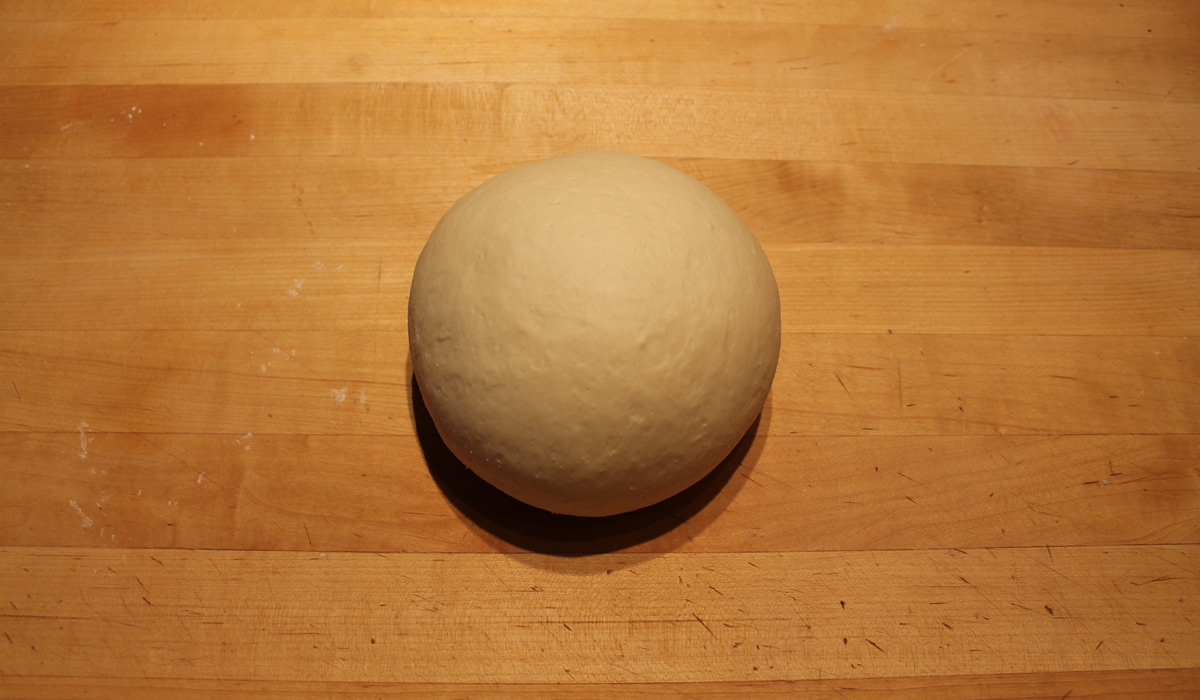
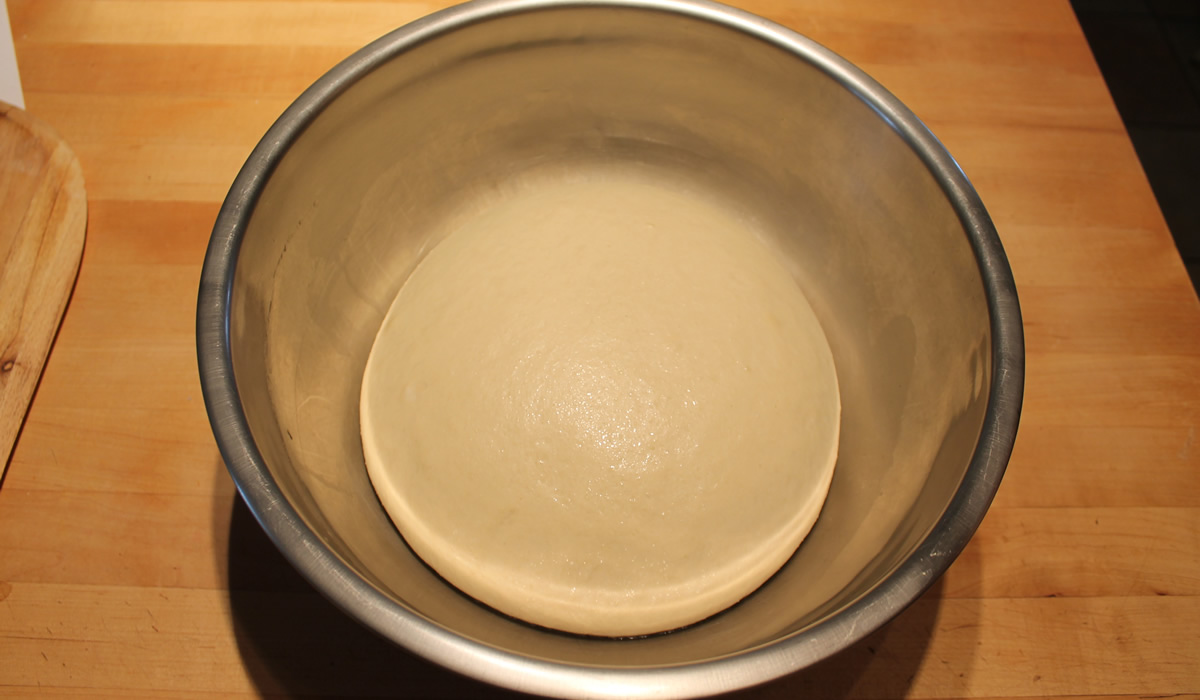
Add the olive oil and knead for about 10 minutes until smooth and elastic. Form it into a ball and place it in a lightly oiled bowl. Cover the bowl and leave the dough to rise in a warm place for about 1 hour until it doubles in size.
Preheat oven to 400°F. Place a baking stone or baking sheet in the oven as it heats.
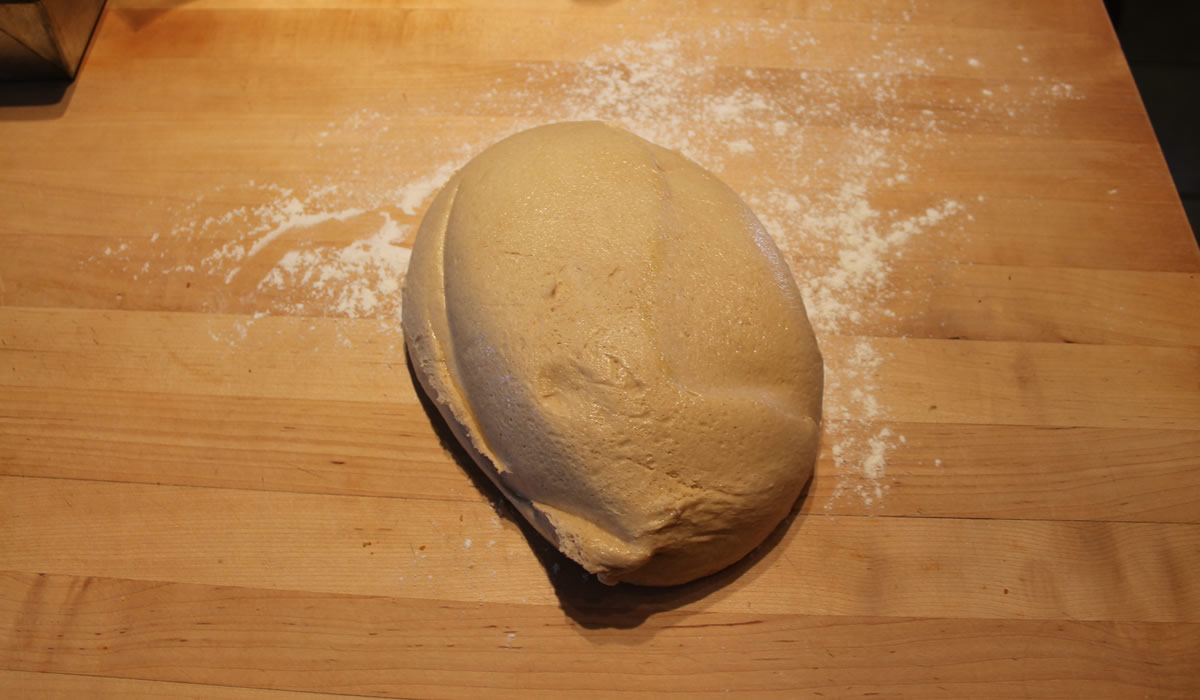
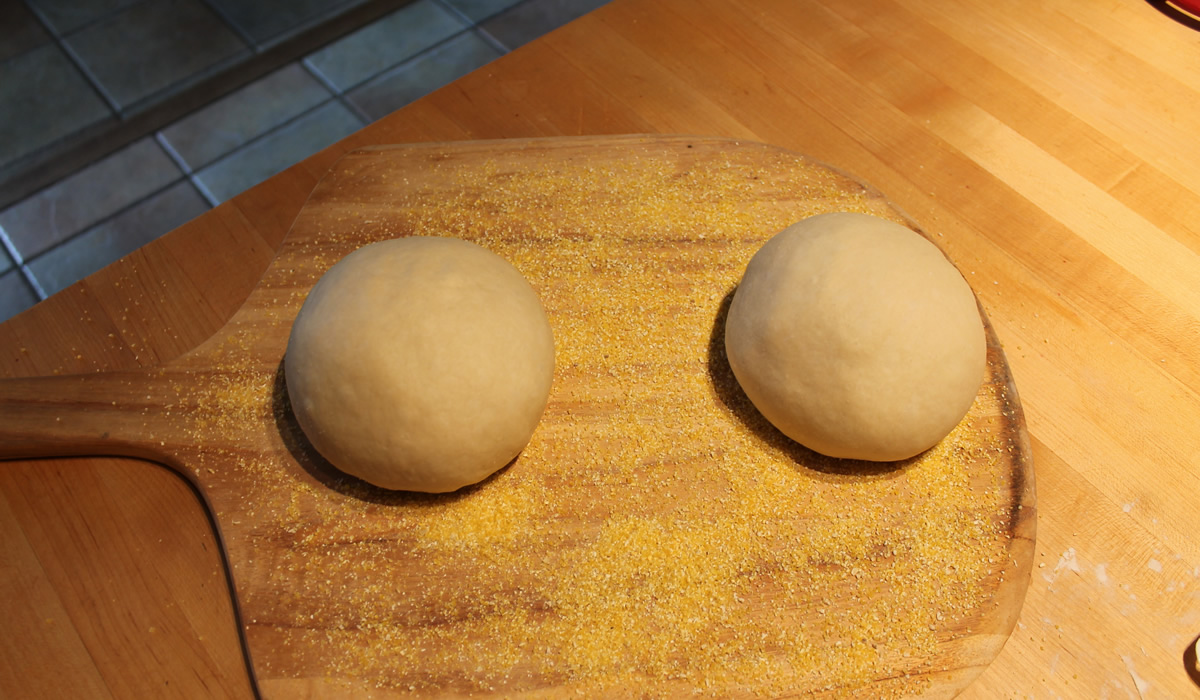
Knead the dough briefly and divide it into 8 balls. Place the balls on a lightly oiled baking sheet, cover, and let stand for about 15 minutes.
On a lightly floured surface, flatten each ball of dough and roll it into a circle 1/8-inch thick and about 7-8 inches in diameter.
Place on baking stone and bake until lightly browned and crisp, about 7 minutes.
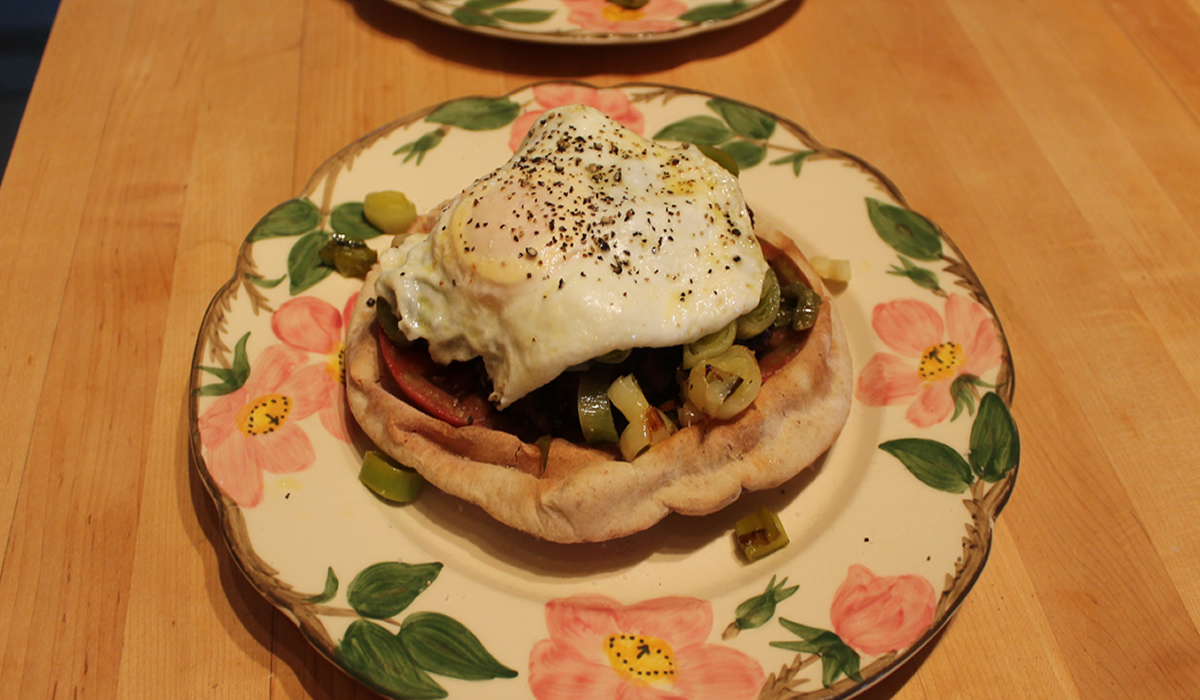
They became the perfect base for grilled burgers.
The pita went down, and then thick slices of tomatoes from the garden. On top of the tomatoes went fried hot peppers. next went the burger, and on top of the burger went lots of sauteed leeks. A runny fried egg finished it off.
A fried egg on anything is good, but when it's on top of something like this - it's downright excellent!
Taboun and Spiced Chicken
It seems that the more I learn, the less I know. I learn a bit of something and next thing I know, I need to learn a dozen more things to learn the how's and why's for the first thing to make sense - or to put something in perspective. The minutiae...
We were watching a Netflix show on street food and the host was in Amman, Jordan. One of the things he focused on was refugees bringing different foods to the table. Amman has welcomed literally millions of refugees from throughout the Middle East - Iraqi, Palestinian, Syrian to name but a few - and is one of the oldest continually inhabited cities in the world. Much of the street food reflects these different groups.
The show had a lot of different flatbreads being made. I know that different cultures have different versions of flatbreads - from injera to lavosh to focaccia or pizza - but I didn't know of the bazillion cooking techniques that can turn the basic ingredients into such different things. As a guy who has never been to the middle east, I kinda figured your basic pita was pretty universal. It is - and it isn't. From baking on a rounded dome, baking on stones, in an oven, on a flat stove... the same but different. For someone who loves to bake, it's fascinating to see.
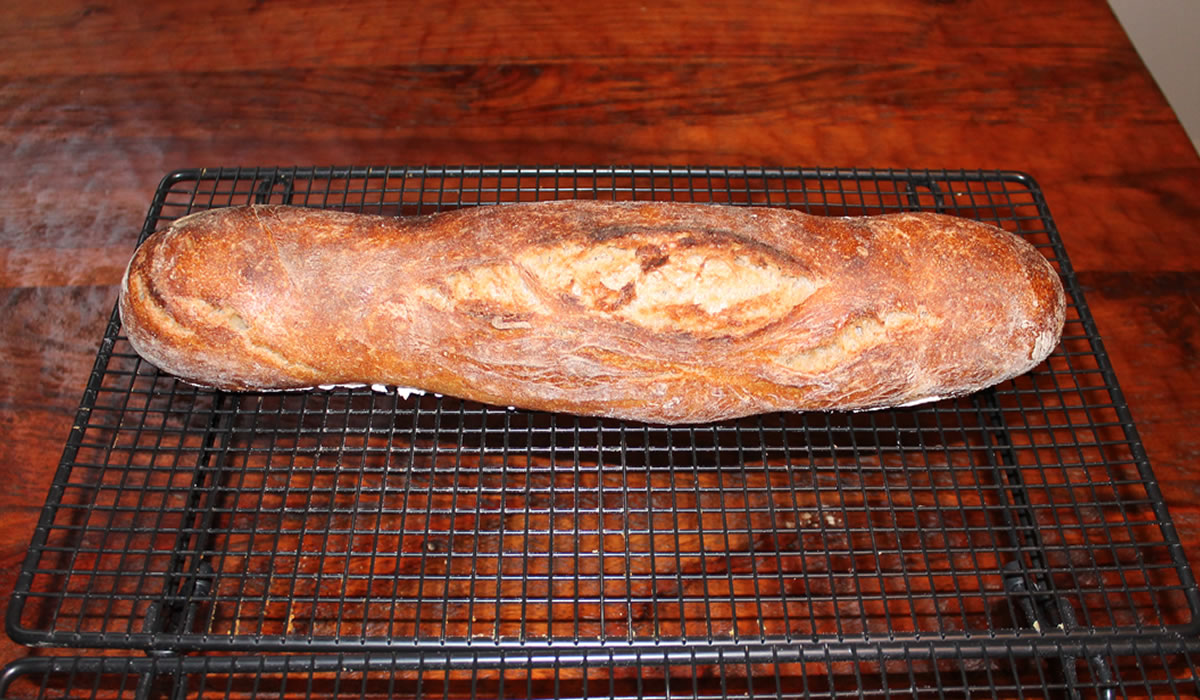
The flatbread I made today is based on a taboun - but baked on a flat baking stone, not rounded stones - so, I guess it's really just a pita. Another thing I've learned over time is there is really no such thing as a single authentic recipe of anything. Every home has their own authentic version.
Taboun Flatbread
based on several internet recipes
- 1 cup lukewarm water
- 1 tsp honey
- 2 tsp yeast
- 3 cups flour
- 1 tsp salt
- 2 tbsp olive oil
Combine the water, honey, and yeast. Let it stand for about 10 minutes until foamy.
Combine the flour and salt with the yeast and water mixture, and stir to form a soft dough.
Add the olive oil and knead for about 10 minutes until smooth and elastic. Form it into a ball and place it in a lightly oiled bowl. Cover the bowl and leave the dough to rise in a warm place for about 1 hour until it doubles in size.
Preheat oven to 400°F. Place a baking stone or baking sheet in the oven as it heats.
Knead the dough briefly and divide it into 8 balls. Place the balls on a lightly oiled baking sheet, cover, and let stand for about 15 minutes.
On a lightly floured surface, flatten each ball of dough and roll it into a circle 1/8-inch thick and about 7-8 inches in diameter.
Place on baking stone and bake until lightly browned and crisp, about 6 minutes.

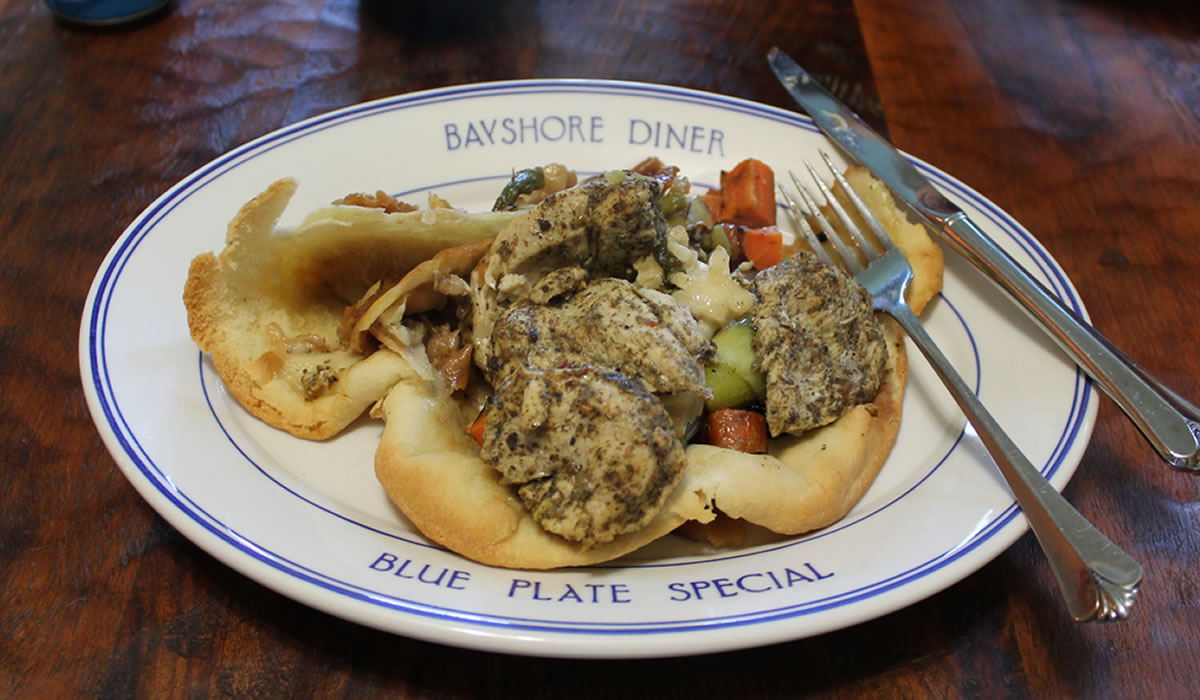
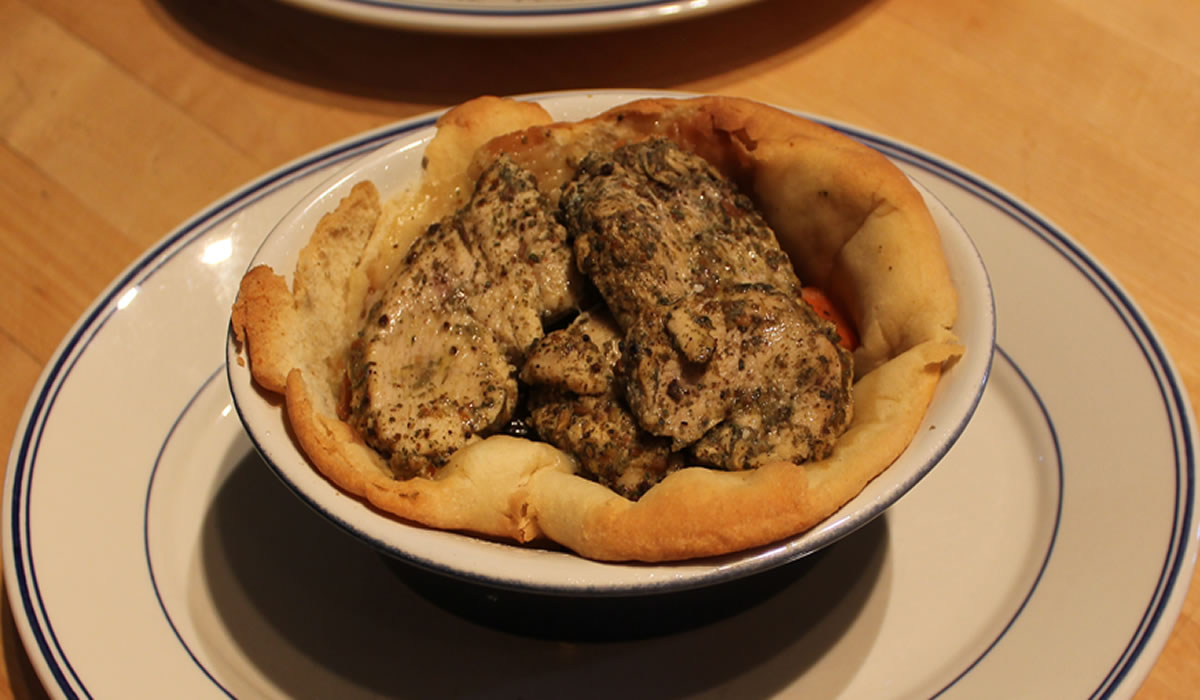
The final dish is based on a Palestinian dish called Msakhan - a sumac chicken with sautéed onions.
Za'atar Chicken with Grilled Vegetables
Ingredients
- 2 tbsp Za'atar
- 1 lemon, juiced
- 1 chicken breast, sliced
- 3 cups mixed grilled vegetables
- 2 large thick flatbreads (taboun, lavash, pita, or Syrian saj)
Instructions
Combine the sumac with the lemon juice. Rub the mixture all over the chicken, then place in a baggie and refrigerate for 1-2 hours.
Preheat the oven to 425°F. Heat olive oil in a large frying pan over medium heat. Add the grilled mixed vegetables and heat through. Add a splash of wine and simmer until wine is almost evaporated - but not quite. Transfer to a bowl with all the juices.
Wipe out the pan and place over medium heat. Add a bit of olive oil and when hot, lightly brown the chicken pieces.
Arrange the flatbreads in an overlapping layer in a large, lightly oiled shallow baking dish. Spoon over the roasted vegetables, then top with the chicken pieces and drizzle any pan juices on top. Cover the dish tightly with foil and bake for 30-40 minutes or until the chicken is cooked through and tender.
I made two individual dishes because I tend to really over-do it when making things like this. I'd have enough food to feed the neighborhood, if left to my own devices...
And then, because eating them out of the casserole was impractical, we just slid them out onto plates.
A really fun and flavorful dinner. There was chewy bread, there was bread that had sopped up the juices from the vegetables and the chicken. It was pull-apart eat-with-fingers and a bit of knife and fork. The perfect meal. And you could make this in no time with store-bought pitas.
One of these days we really need to travel the Mediterranean countries from Morocco to Turkey.
There's a lot of good food to be had.....
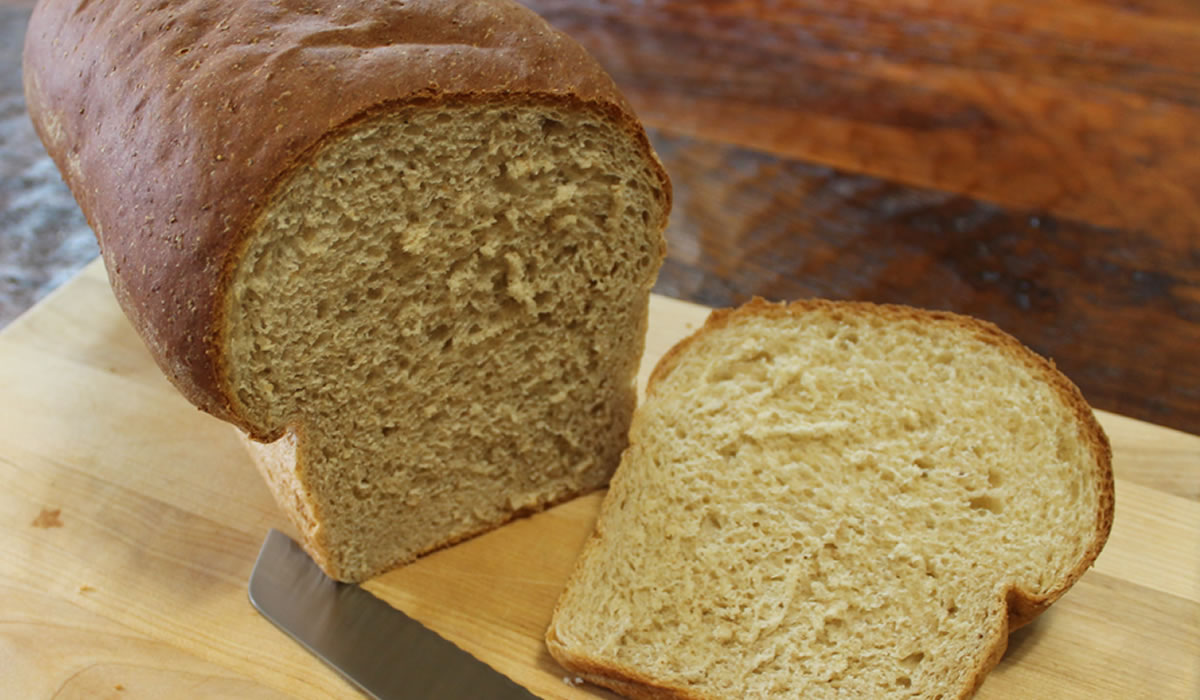
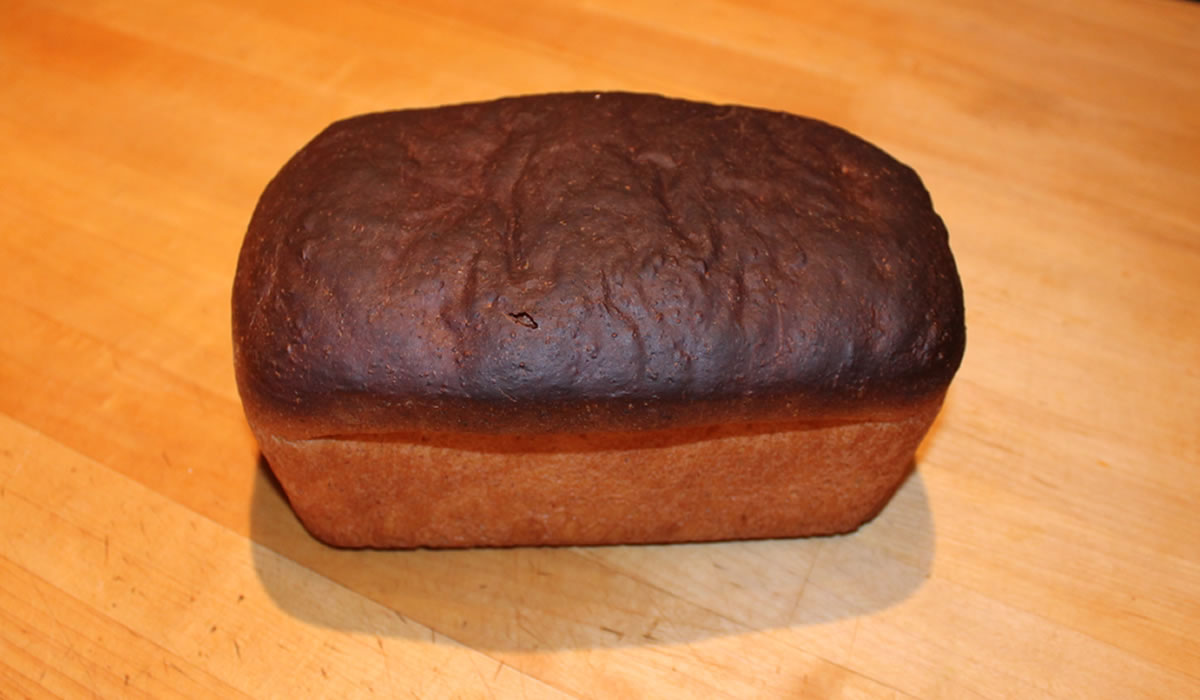
Whole Wheat Buttermilk Bread
Ever notice that you can only find buttermilk in quarts? And you almost always only need less than a cup for something? Not wanting to waste it, I made two fun things, this morning - Buttermilk Ranch Dressing and Buttermilk Whole Wheat Bread.
The buttermilk adds a tenderness to the bread that is awesome - it is feathery-light.
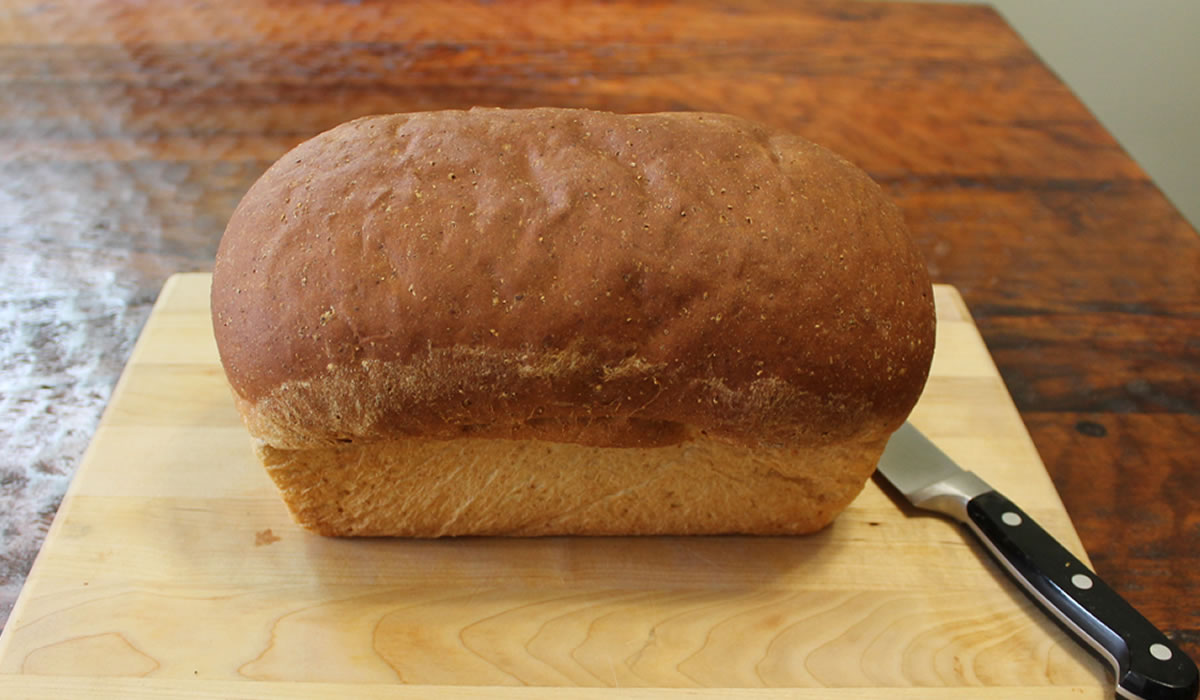
It's a really easy bread to make - either by mixer or by hand.
Buttermilk Whole Wheat Bread
- 1 tbsp yeast
- 1 1/2 cups buttermilk
- 2 tbsp butter, melted and cooled
- 2 tbsp sugar
- 1 tsp salt
- 2 cups bread flour
- 1 cup whole wheat flour
- 1/2 cup rye flour
Dissolve yeast in the sugar and a bit of the buttermilk. Blend flours and salt together.
Add remaining milk, to yeast mixture. Add butter. Mix in flour.
Knead by machine for about 8 minutes or by hand for 10 - until dough is smooth.
Roll into a ball and proof until double in size - about an hour.
On a lightly floured board, form dough into a loaf and place into a well-greased standard bread pan.
Lightly cover and proof, again, until double in size.
Bake in a pre-heated 350°F oven for about 35 minutes - until top is nicely browned.
Immediately remove from pan and cool before slicing.
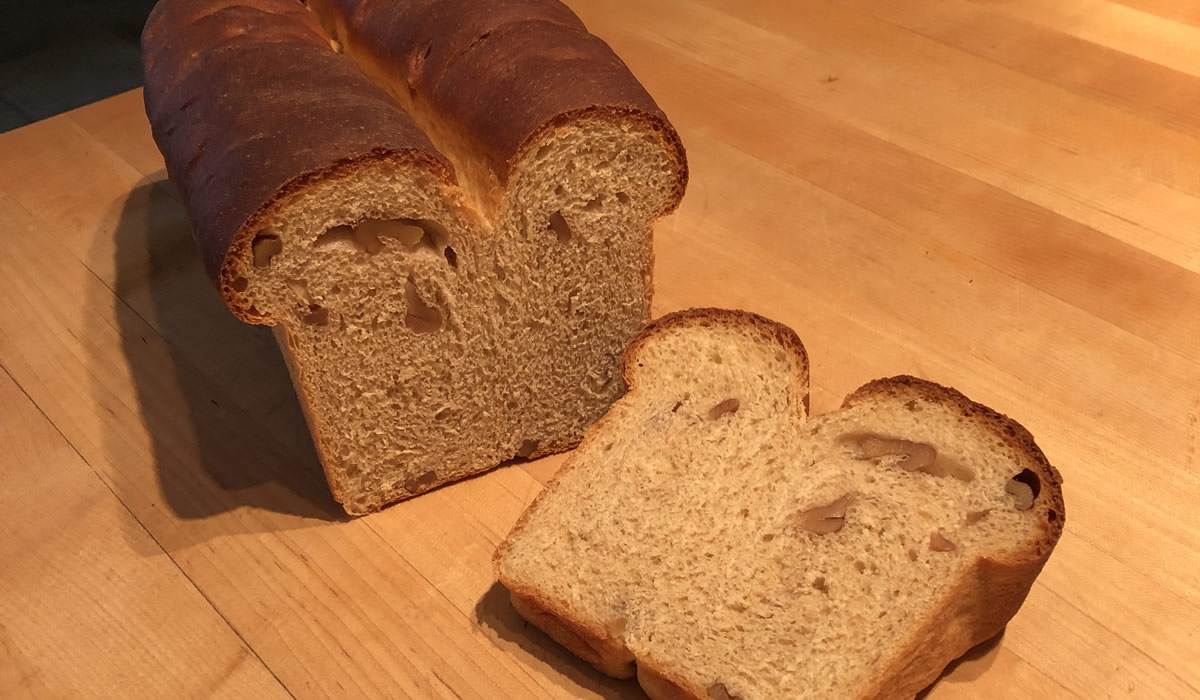
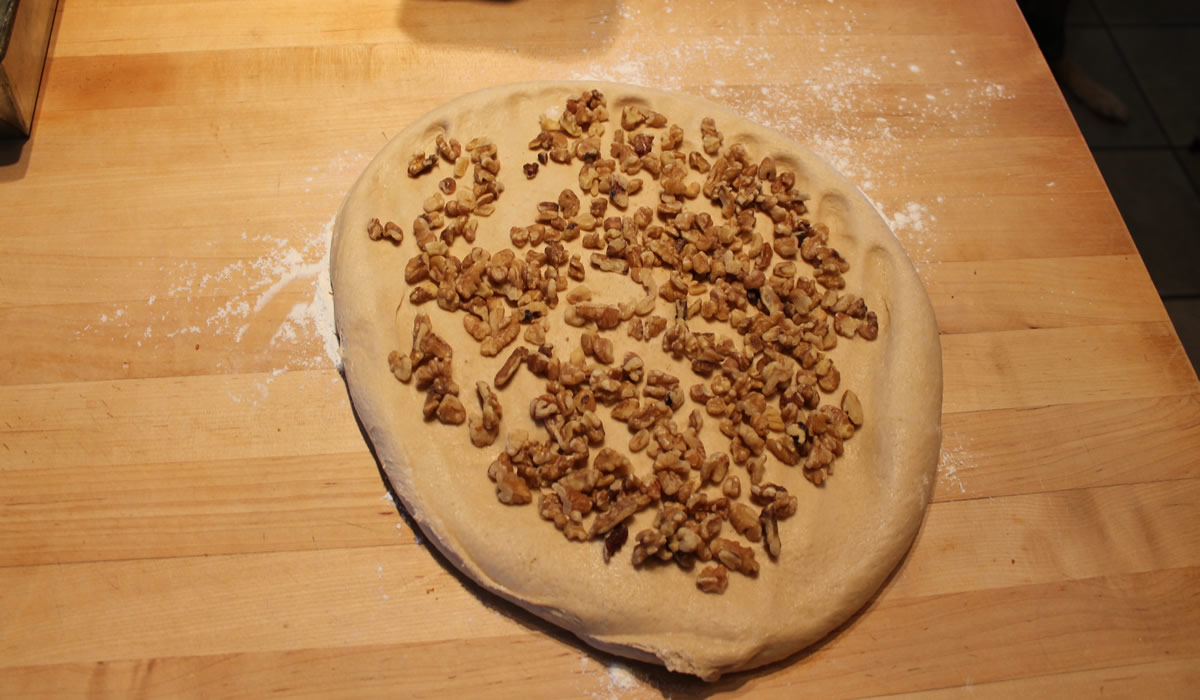
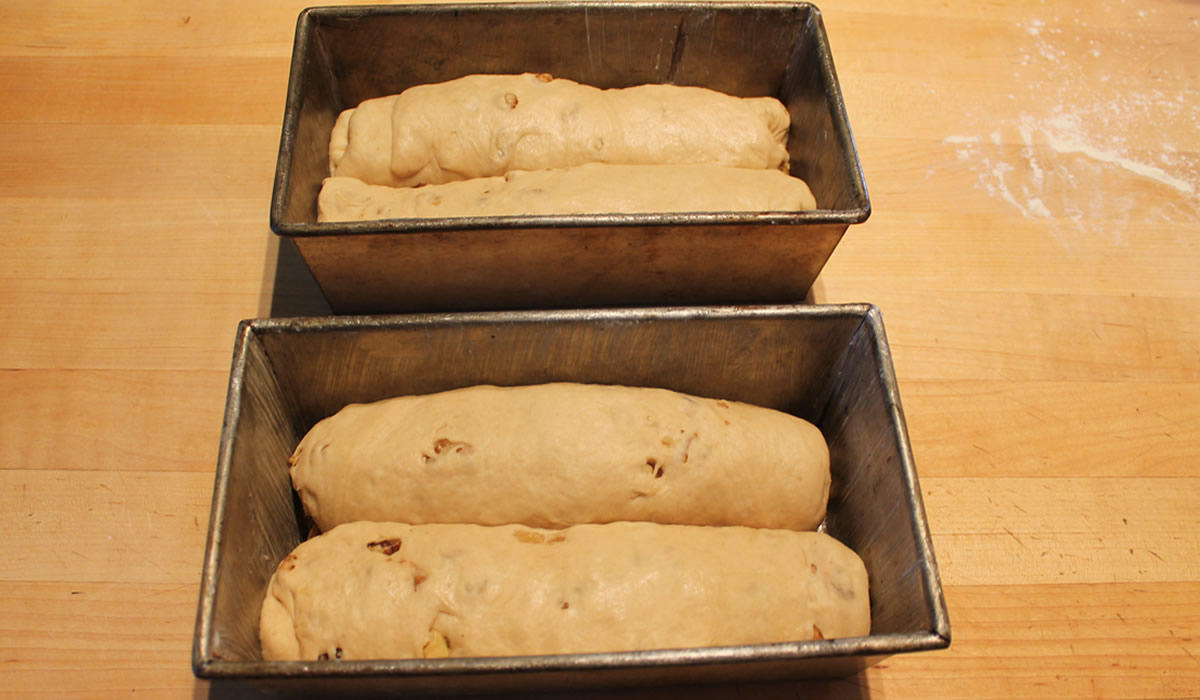
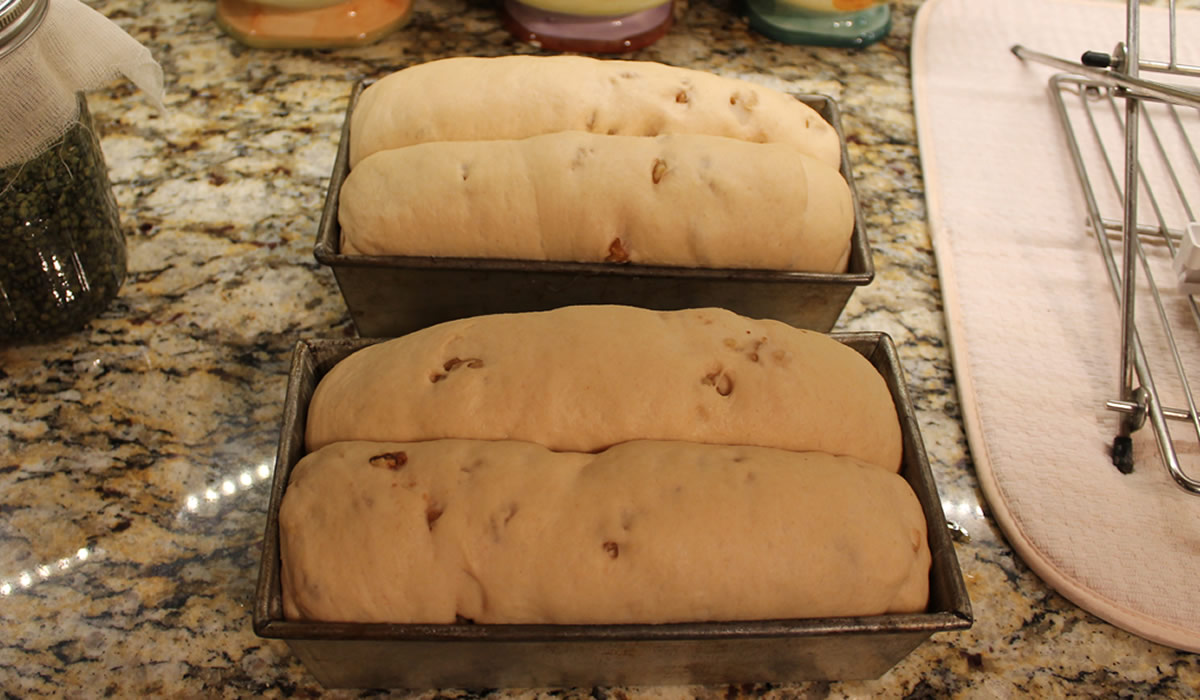
Whole Wheat Walnut Bread
I'm always looking for another loaf of bread to bake and usually stop by my Mom's old cookbooks to see what she had collected. She really did love her baking - especially desserts. The ooier and gooier, the better.
She was no slouch in the bread department, though, and without benefit of a Kitchen Aid mixer, did all her kneading by hand. Me?!? I use the mixer most of the time...
The bread is really good - great crumb, great crust, just soft enough and just enough structure. The little bits of walnut add a fun element - a nice crunch in an otherwise soft world...
My only changes to the recipe were to use butter instead of margarine, sprouted whole wheat flour, and white bread flour.
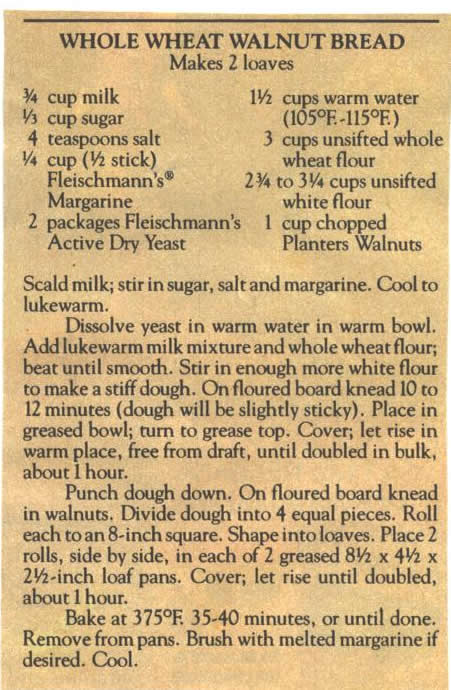
Place in greased bowl; turn to grease top.
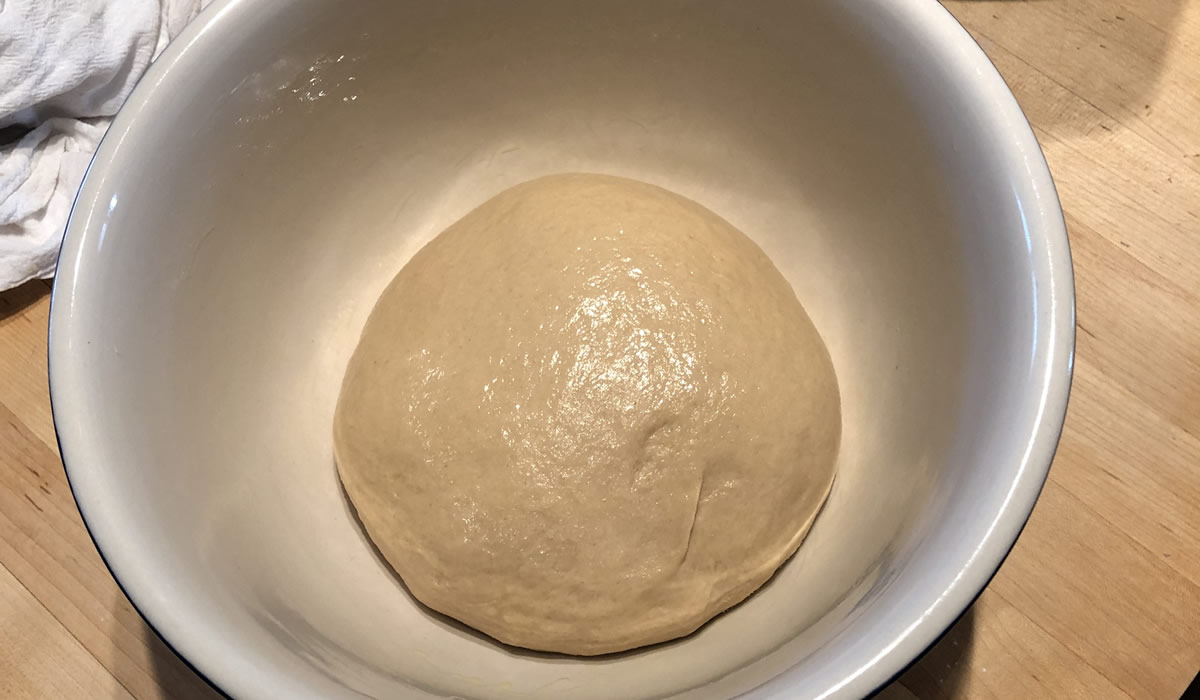
Let rise until doubled in bulk.
Punch down.
Knead in nuts.
Divide into four equal pieces.
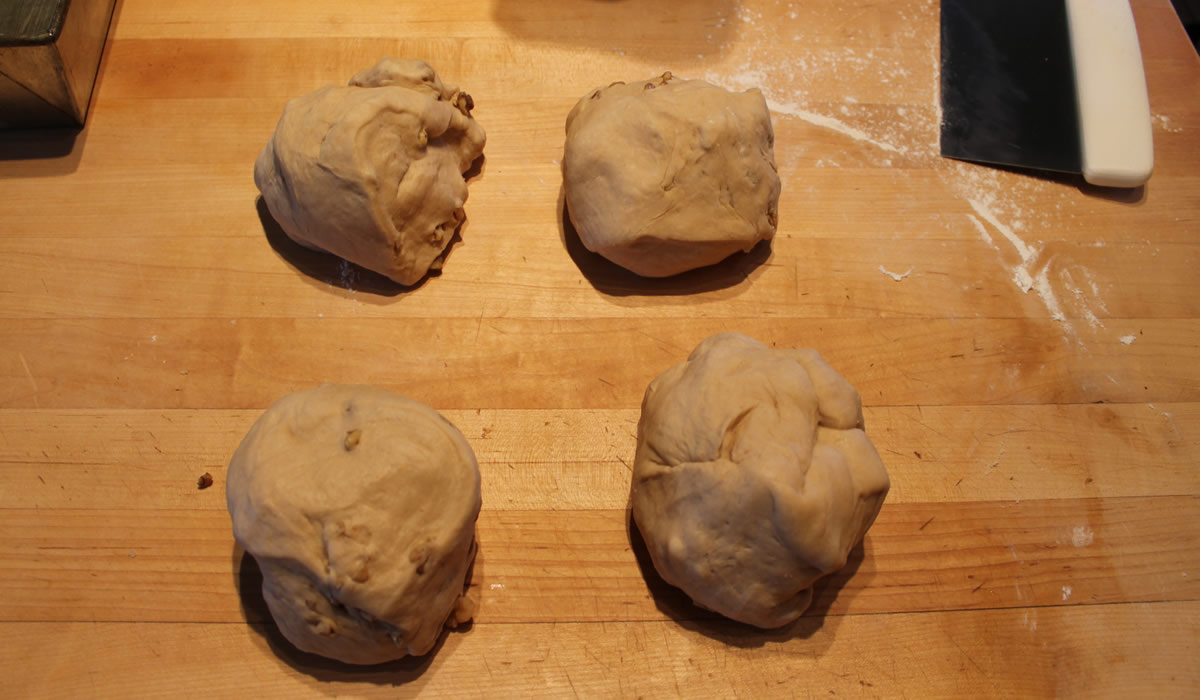
Shape into loaves. Place two rolls side by side.
Let rise until doubled.
Bake.
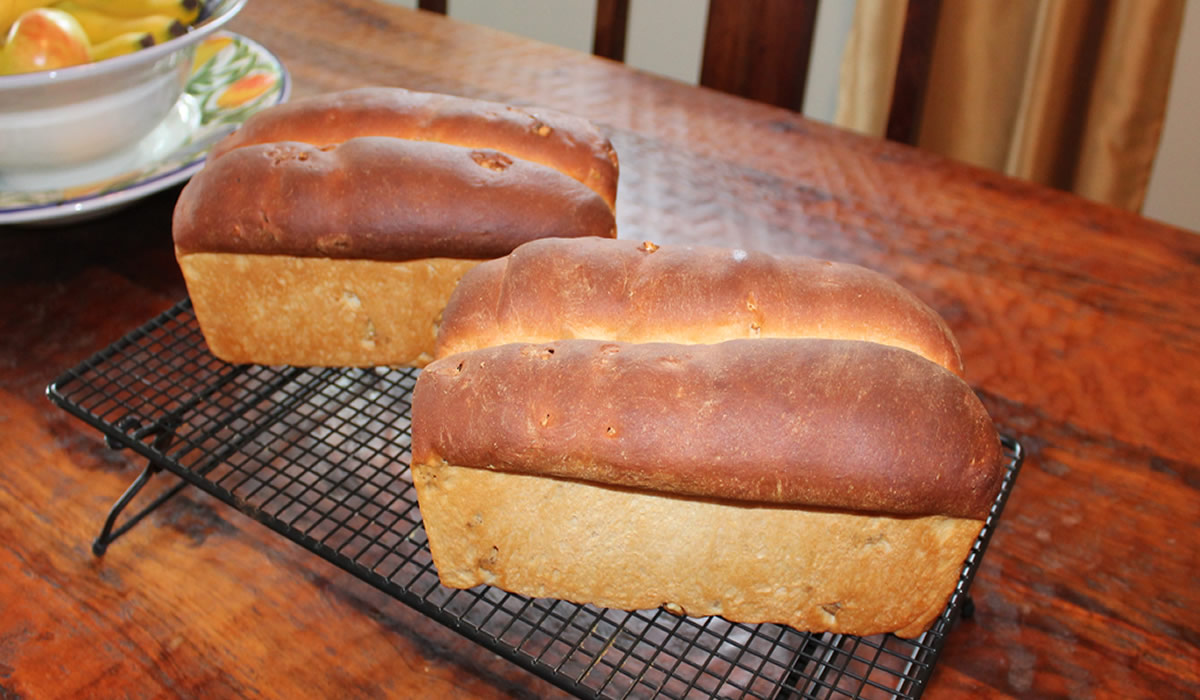
A definite keeper.
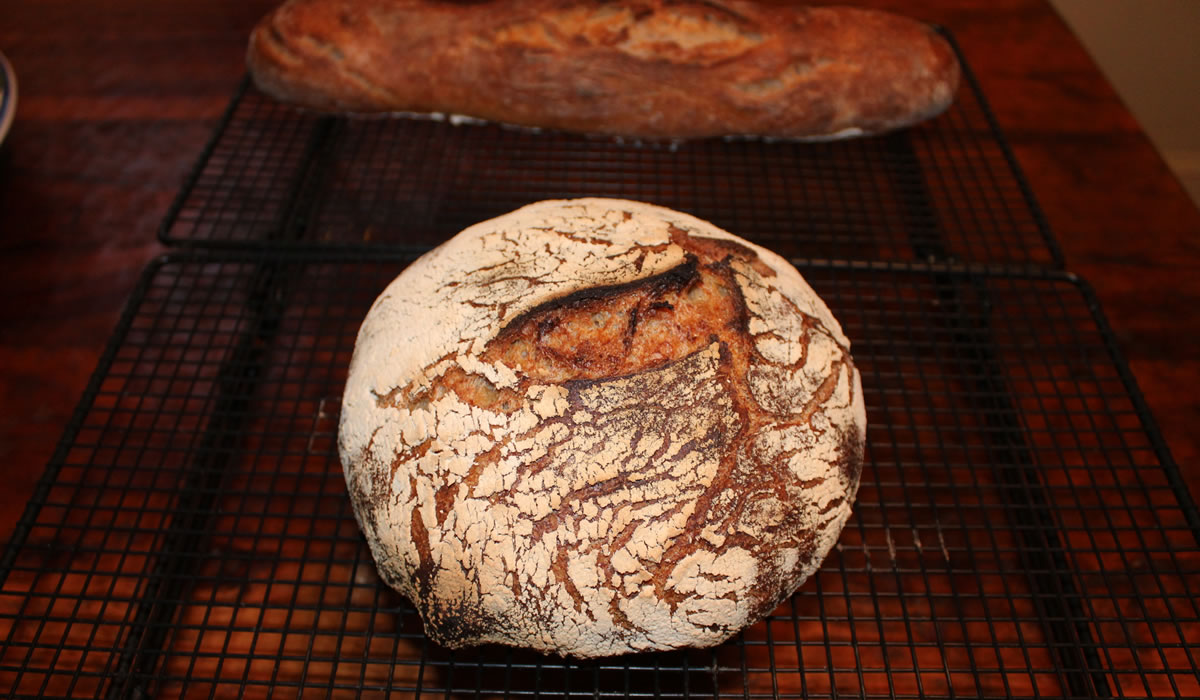
Pan Rustico
We've found a new fun food show on BritBox - The Hairy Bikers. These guys are hysterical - and they actually can cook and bake! One of the great things about them is they take it serious - but don't take it serious. It's definitely my approach and attitude towards food - have fun with it.
They had one series that was their Bakeation - where they traveled around Europe baking different regional items. They would locate someone who was known for the item, join them in their kitchen, and make it. It made for some fun TV.
I plan to make several of their recipes and decided to start with a rustic Spanish bread - Pan Rustica - made with a starter.
I made the dough in the mixer because it was a timing thing - I made the dough after we got back from the gym and before we took off to the dump to get rid of a truckload of branches and trimmings from the yard. One of those multi-tasking things so the dough would be ready when we got back.
It's a fairly loose dough, so kneading by hand would be a lot more time-consuming.
Pan Rustica
From The Hairy Bikers
Ingredients
For the starter dough
- 150ml/5fl oz warm water
- 1 tsp caster sugar
- 3 tsp fast-action dried yeast
- 125g/4½oz white bread flour
For the bread dough
- 200ml/7fl oz warm water
- 1 tsp caster sugar
- 1 tsp fast-action dried yeast
- 225g/8oz white bread flour, plus extra for dusting
- 100g/3½oz whole wheat bread flour
- 1 tsp salt
- 1 tbsp olive oil, plus extra for greasing
Method
For the starter, pour the water into a medium bowl and stir in the sugar. Lightly stir in the yeast and leave in a warm place for about 10 minutes or until a beige foam floats on the surface. Stir in the flour to make a thick paste, then cover with cling film and leave at room temperature for 24 hours. At the end of the 24 hours the paste will smell yeasty and slightly fermented – a bit like beer.
For the bread dough, pour the water into a jug and stir in the sugar. Lightly stir in the yeast and leave in a warm place for about 10 minutes or until a beige foam floats on the surface.
Stir the flours and salt together in a large bowl, then make a well in the center and add the yeast and water mixture, the starter dough and the oil.
Mix with a wooden spoon and then with your hands until the mixture comes together and forms a slightly lumpy and sticky dough. If the dough feels a little dry, add another tablespoon or two of water.
Transfer the dough to a work surface and knead for a good 10 minutes until it’s smooth and elastic. As you knead, push the dough away from you with the heel of your hand to stretch it as long as possible, then fold it back towards you. This will help strengthen the flour and trap air bubbles inside the loaf. Resist the temptation to add too much extra flour as it could make the dough dry. You should feel the dough change in texture as you work, so don’t be afraid to be fairly robust with your stretching and folding. Put the dough in an oiled mixing bowl, cover it loosely with oiled cling film and leave it to rise for about an hour or until it has doubled in size.
Line a baking tray with parchment and dust with flour.
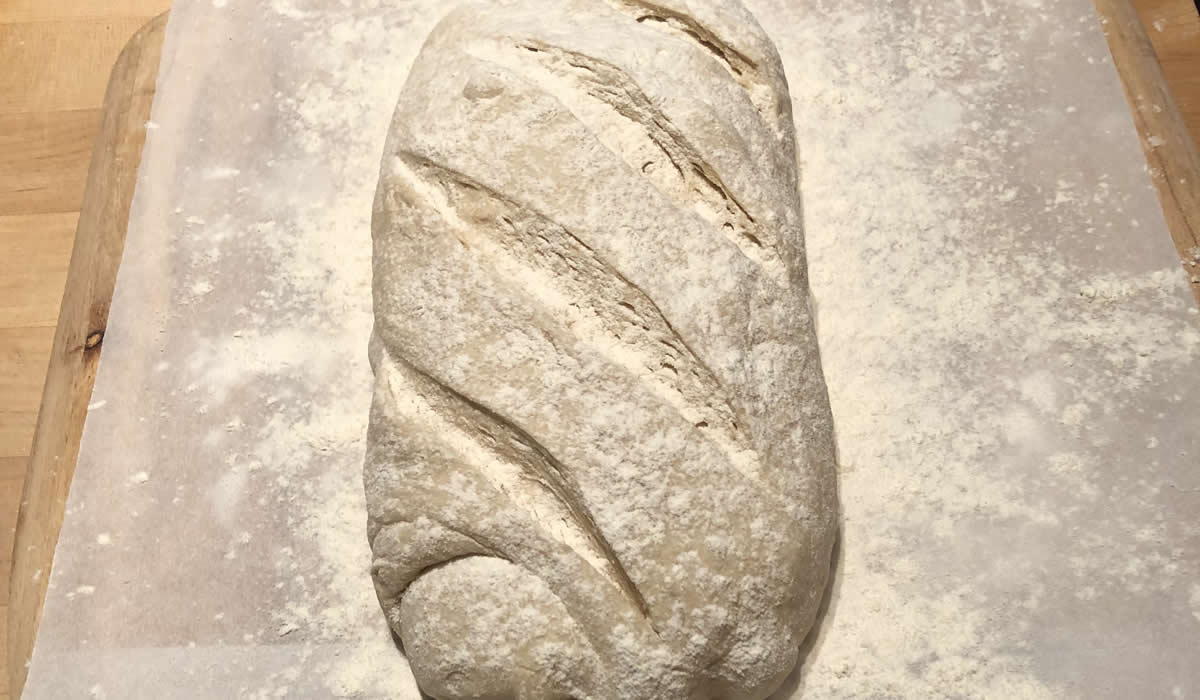
Loosen the dough with a spatula and tip it on to the baking tray. Stretch the dough very gently until it’s about 30cm/12in long, then fold it in half and stretch again. Do the same thing twice more. This should help to give the dough a more holey texture.
After the third stretch, shape the dough into a long loaf shape and slash the top a few times with a sharp knife.
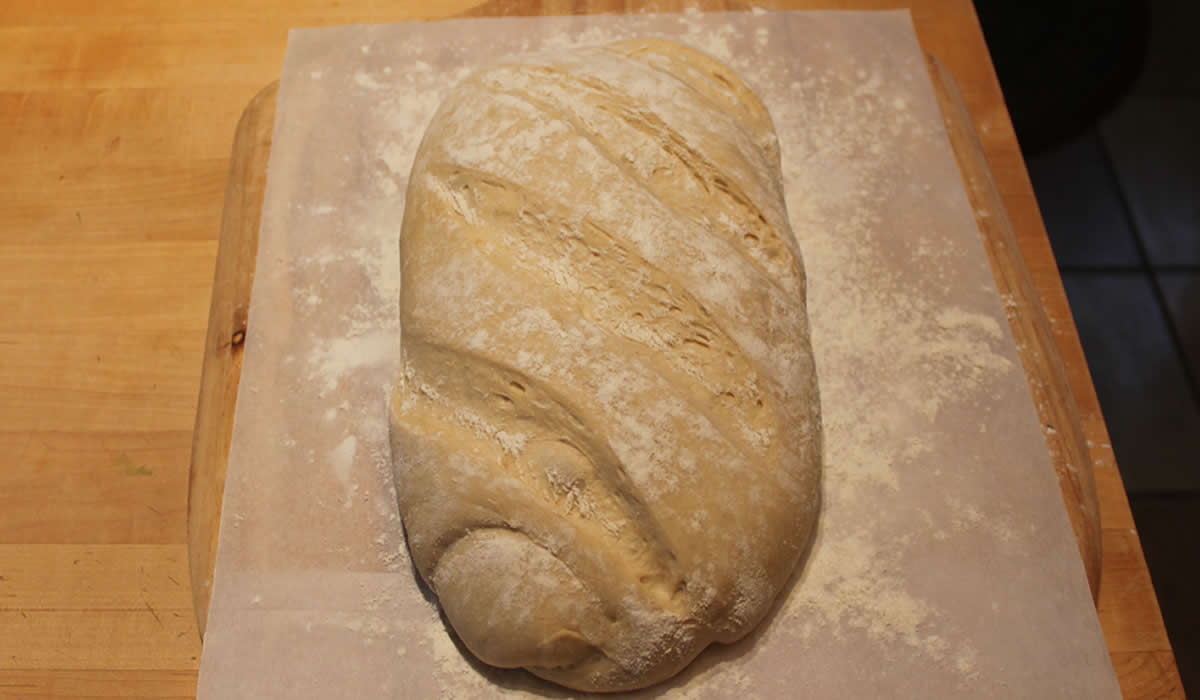
Dust with a little flour and leave to prove in a warm place for 45–60 minutes or until it has risen again and feels light and puffy.
Preheat the oven to 240C°/450F°.
Bake the loaf for 20–25 minutes or until golden-brown and crusty. The base should sound hollow when tapped. Cool on a wire rack.
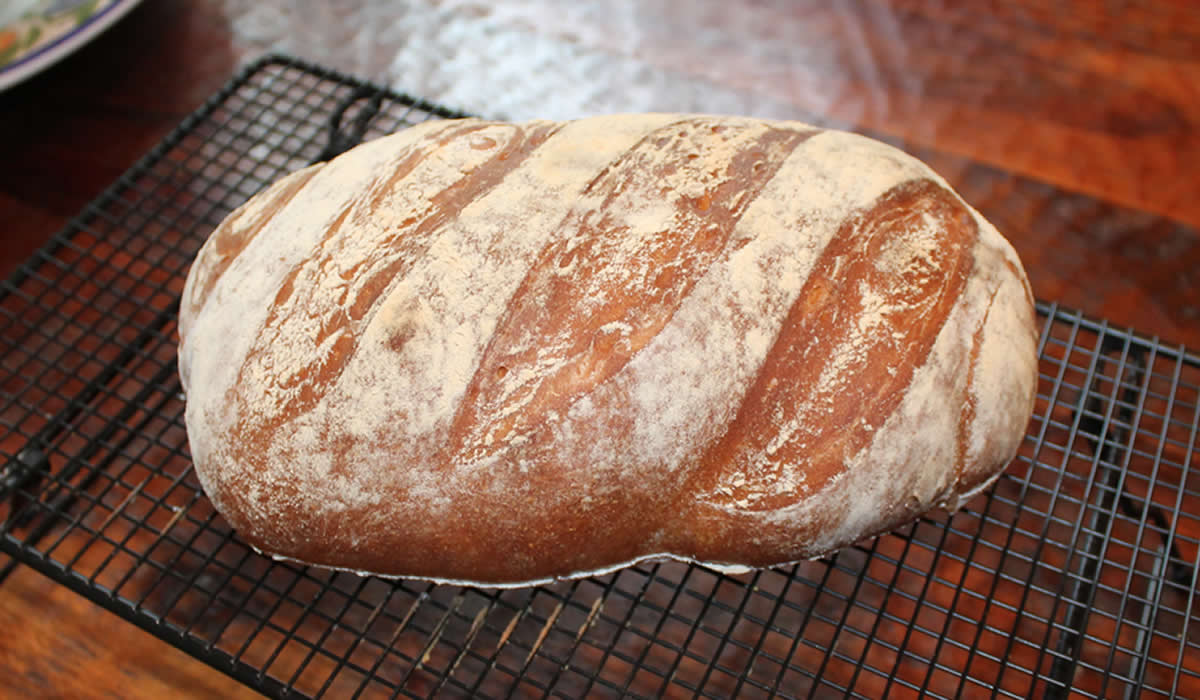
It's amazing how many variations one can get from flour, water, salt, and yeast. And this really is one of my favorite kinds of bread - simple, but with tons of flavor! The crumb is soft and the crust is slightly chewy.
The perfect loaf.
I think next up will be a loaf of rye bread from Norway.
Stay tuned.
Soda Bread with Cayenne
Happy Saint Patrick's Day. Or... Lá Fhéile Pádraig sona as they say in Munster...
My plan for the day was to make my Beef Braised in Guinness for dinner. Victor's still not much of a cooked cabbage person, so there's no real reason to cook it just for myself. Besides... I like the Beef in Guinness!
I then thought of making a soda bread. I have a recipe I've used for years, but thought something new might be fun. I went to an Irish newspaper - The Irish Examiner - to see if there was anything promising. I'm glad I took the time to search!
I found a recipe - Honey and Oat Loaf with Cayenne - that sounded so different I knew I had found today's bread!
Honey and Oat Loaf with Cayenne
adapted from the Irish Examiner
Ingredients:
- 250g of brown flour
- 250g of plain flour
- 1 tsp of bread soda
- 1 tsp of cayenne pepper
- ½ tsp of cracked black pepper
- 1 tsp of sea salt
- 4 tsp of honey
- 420mls of buttermilk
- 20g of porridge oats
Method
Heat your oven to 200 degrees. Mix the flours with the bread soda, both peppers and salt in a large bowl. Mix until they are completely combined.
Make a well in the centre of the dry ingredients and add the honey and buttermilk. Bring everything together with your hands. Add in the oats and kneed them into the dough. Form a neat ball.
Turn the dough onto a floured baking tray and pat into the shape of a round loaf. Cut a cross in the top of the loaf and if you want to let the fairies out, prick each quarter with the knife.
Bake for about 40 minutes until it is golden on top and hollow sounding when you tap the base.
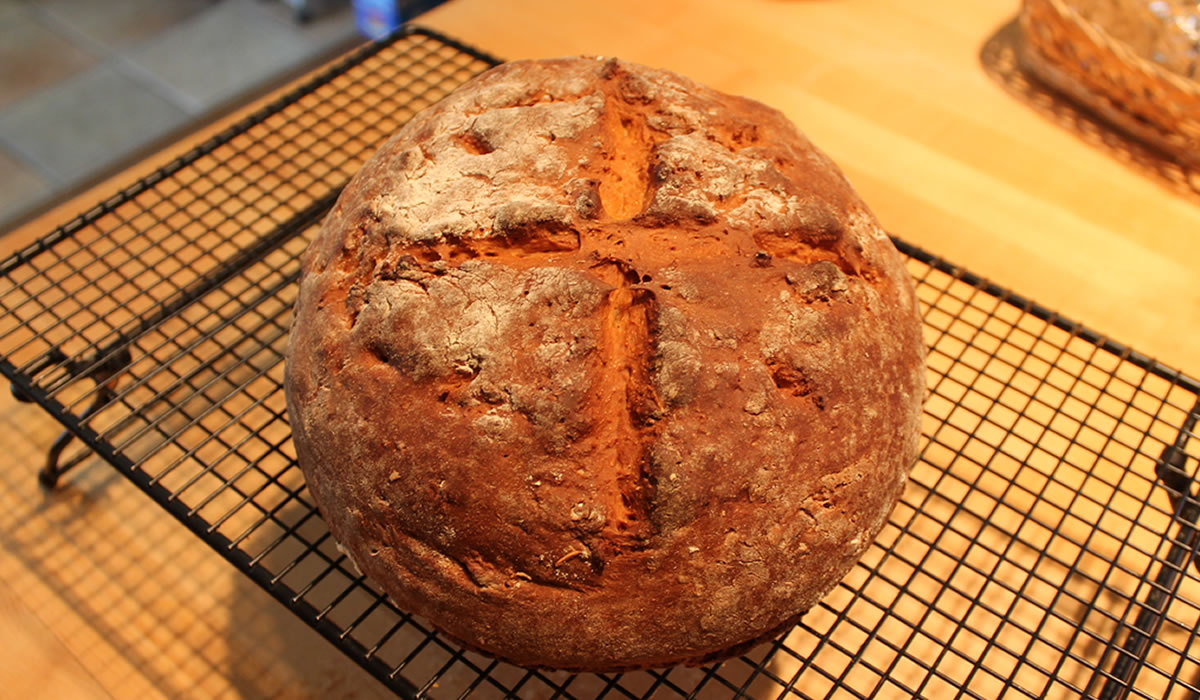
I have made many loaves of soda bread in my time, with varying degrees of success. Some have been too dry and crumbly, others a bit dense. Others, still have been more cake-like than bread.
This one is bread. Real, honest bread. Bread with a bit of a kick you don't notice right away - it sneaks up on you and then lingers gently on the tongue. A soda bread with all of the qualities and characteristics of a yeast bread.
I can see more of this happening - and not just on March 17th!
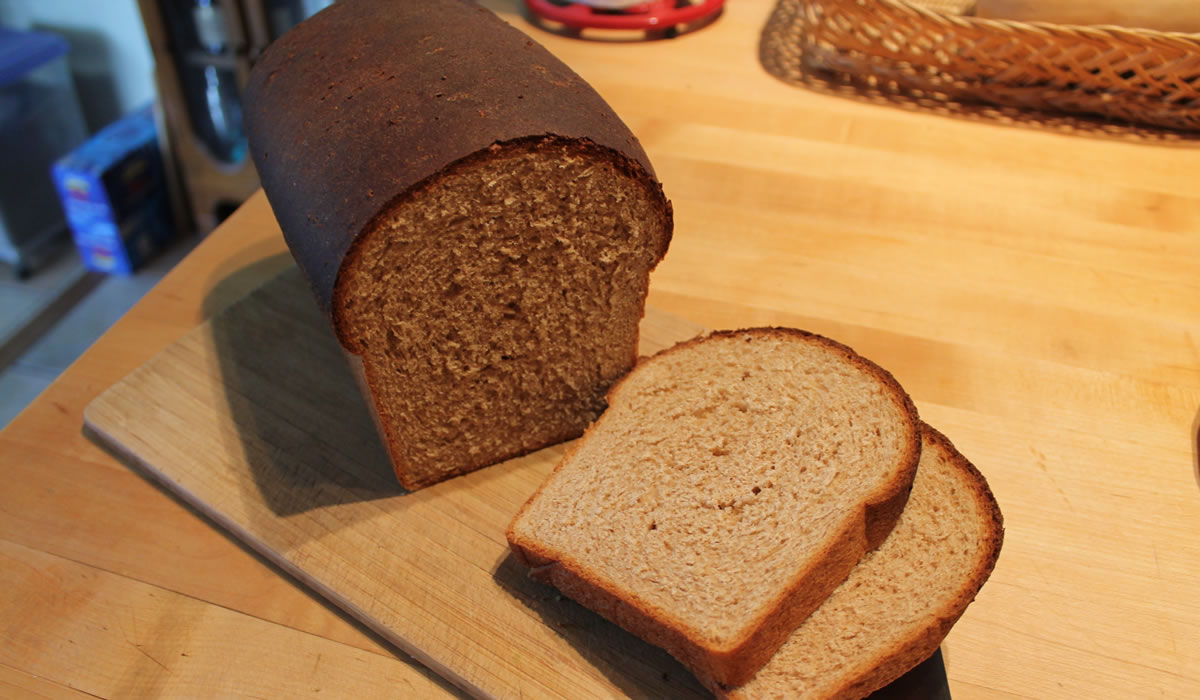
Double Wheat Whole Wheat Bread
We don't buy a lot of bread - especially in the winter. It's too easy - and too good - to just bake it. I have a few recipes that I make over-and-over, but, before I bake a new loaf, I almost always look to see what recipes I have that I haven't made in a while.
I popped over to My Mom's Cookbook site and found a recipe I haven't made in years - a whole wheat bread that is both light and substantial.
It's a rather easy recipe that even a novice baker could accomplish but it's also a hearty recipe if you want to do the entire thing by hand like I did. I have gotten a bit too comfortable with my mixer. I've been doing more breads by hand, lately - and with excellent results.
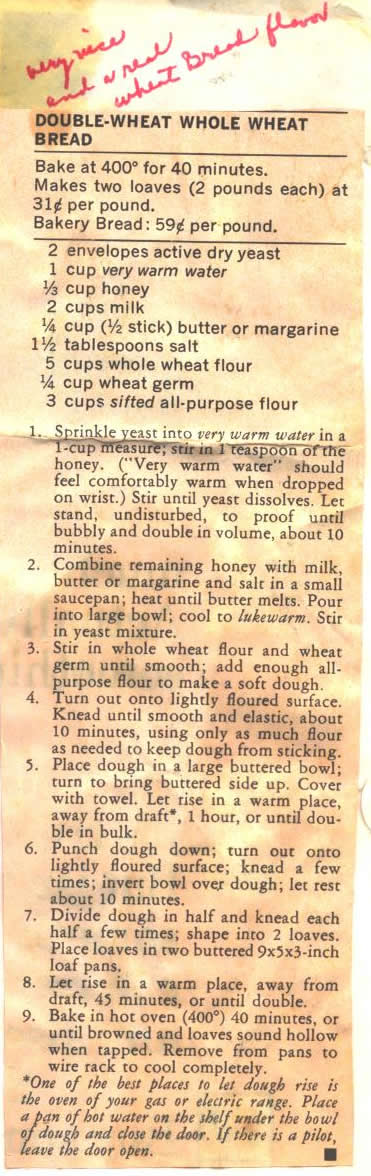
The only changes I made with the recipe was using 4 cups of whole wheat flour and a cup of sprouted whole wheat. I also used 3 cups of bread flour - not all-purpose.
It came out great. Bake some - you'll be glad you did.
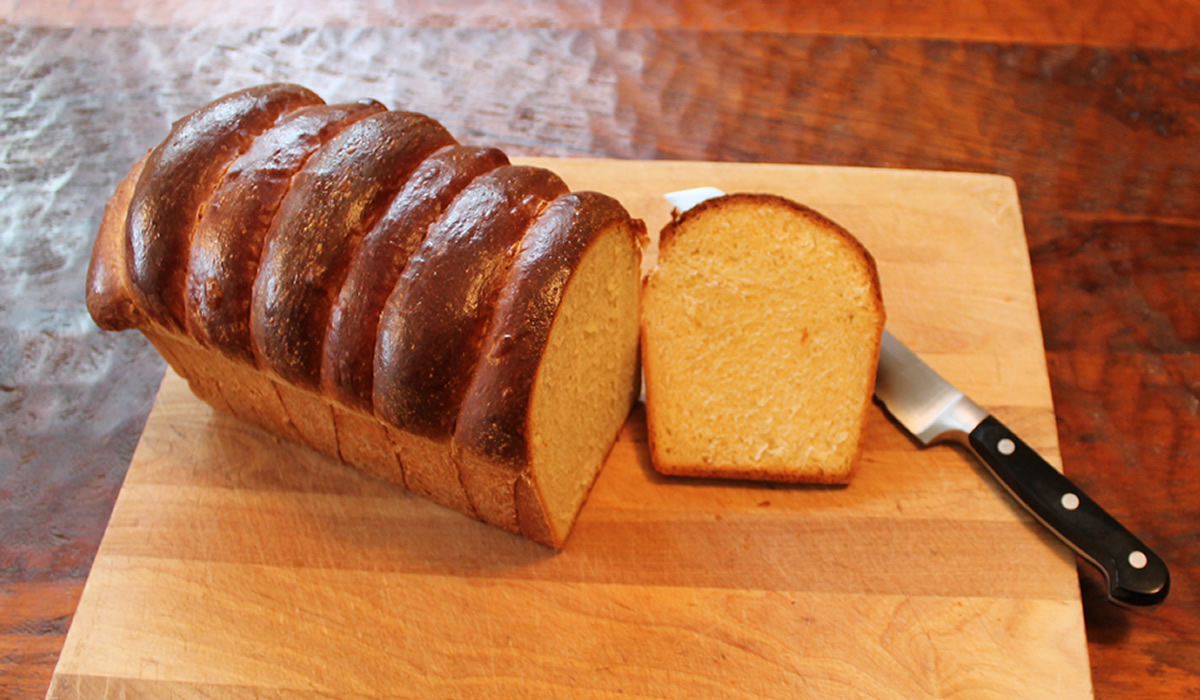
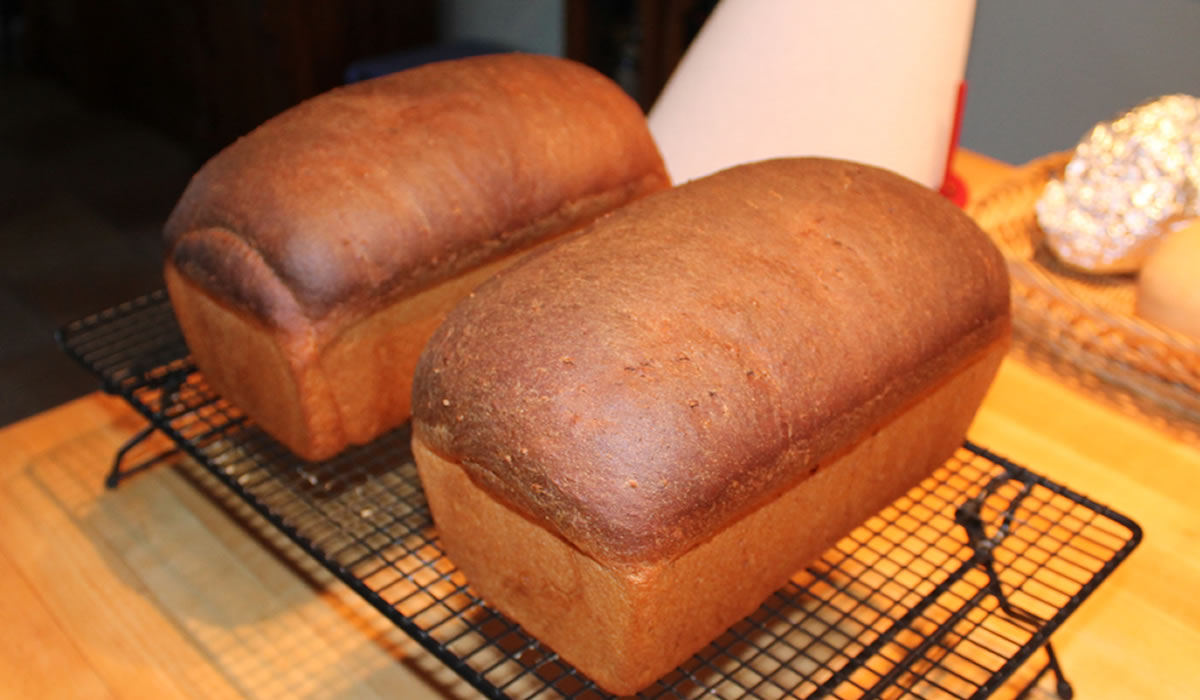
Milk Bread
With a bit of snow overnight and a light freezing rain falling since early this morning, there is just no reason to leave the house. And no reason to leave the house is the perfect reason to bake a loaf of bread.
There's just something about freshly-baking bread that can liven up an otherwise gloomy day. The smell, alone, puts one into a great mood. It's the giddy anticipation of slicing off that first piece.
I was going through bread recipes to see what I wanted to make when I came upon Milk Bread from Kindred, in North Carolina. I think I originally saw this recipe in Bon Appétit magazine several moons ago. I've made it as rolls many times - but never as a loaf.
The bread is interesting in that it starts off with a Japanese technique called the Tangzhong method. The Tangzhong method calls for cooking off a small percentage of the flour with water or milk into a roux of sorts before adding it into the dough. Cooking the flour gelatinizes it, allowing for more water absorption. That allows for more steam in the baking, making a higher rise and a lighter loaf.
Milk Bread
adapted from Kindred, North Carolina
- 5 1/3 cups bread flour, divided, plus more for surface
- 1 cup heavy cream
- 1/3 cup mild honey (such as wildflower or alfalfa)
- 3 tablespoons nonfat dry milk powder
- 2 tablespoons active dry yeast (from about 3 envelopes)
- 2 tablespoons kosher salt
- 3 large eggs
- 4 tablespoons (½ stick) unsalted butter, cut into pieces, room temperature
- Nonstick vegetable oil spray
- Flaky sea salt (optional)
Cook 1/3 cup flour and 1 cup water in a small saucepan over medium heat, whisking constantly, until a thick paste forms (almost like a roux but looser), about 5 minutes. Add cream and honey and cook, whisking to blend, until honey dissolves.
Transfer mixture to the bowl of a stand mixer fitted with a dough hook and add milk powder, yeast, kosher salt, 2 eggs, and 5 cups flour. Knead on medium speed until dough is smooth, about 5 minutes. Add butter, a piece at a time, fully incorporating into dough before adding the next piece, until dough is smooth, shiny, and elastic, about 4 minutes.
Coat a large bowl with nonstick spray and transfer dough to bowl, turning to coat. Cover with plastic wrap and let rise in a warm, draft-free place until doubled in size, about 1 hour.
If making rolls, lightly coat a 6-cup jumbo muffin pan with nonstick spray. Turn out dough onto a floured surface and divide into 6 pieces. Divide each piece into 4 smaller pieces (you should have 24 total). They don’t need to be exact; just eyeball it. Place 4 pieces of dough side-by-side in each muffin cup.
If making a loaf, lightly coat a 9x5" loaf pan with nonstick spray. Turn out dough onto a floured surface and divide into 6 pieces. Nestle pieces side-by-side to create 2 rows down length of pan.
If making split-top buns, lightly coat two 13x9" baking dishes with nonstick spray. Divide dough into 12 pieces and shape each into a 4"-long log. Place 6 logs in a row down length of each dish.
Let shaped dough rise in a warm, draft-free place until doubled in size (dough should be just puffing over top of pan), about 1 hour.
Preheat oven to 375°. Beat remaining egg with 1 tsp. water in a small bowl to blend. Brush top of dough with egg wash and sprinkle with sea salt, if desired. Bake, rotating pan halfway through, until bread is deep golden brown, starting to pull away from the sides of the pan, and is baked through, 25–35 minutes for rolls, 50–60 minutes for loaf, or 30–40 minutes for buns. If making buns, slice each bun down the middle deep enough to create a split-top. Let milk bread cool slightly in pan on a wire rack before turning out; let cool completely.
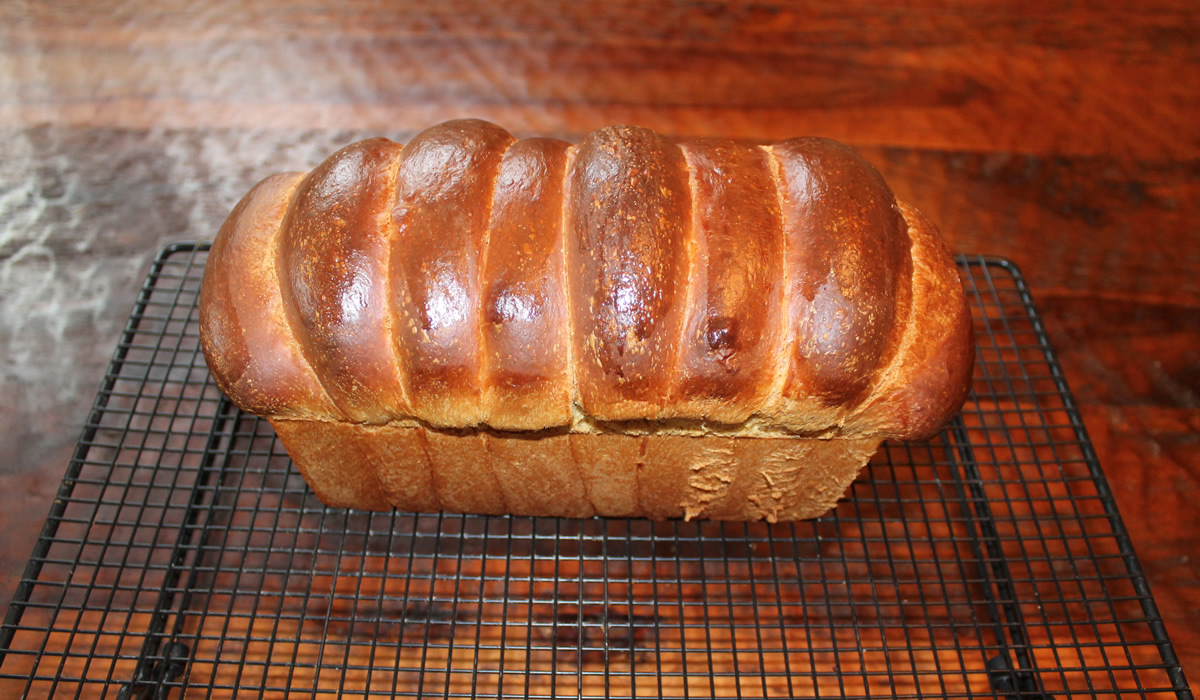
It did not disappoint! Nor did my bread pan - I've been having issues with it sticking and swore that if this loaf stuck, the pans were going into the trash. It didn't stick.
The bread is substantial but light with a really great crust. I'll bet it could be reworked into a really good sweet roll dough, too. I may have to play with it for Easter...
In the meantime, we have a great loaf of bread on a not so great day.
I'll take it.
Baking Bread
We're getting a bit of snow, so I thought a loaf or two of bread might be in order.
The call for snow around here always sends the populace into a tizzy, so I ventured out early to get the weekly shopping done - I did not want to have to deal with the last-minute panic shoppers.
We didn't need much, but I had to get a few things for Victor's mom - things that can only be found at the local Acme - pronounced AK-A-ME . They were already starting to assemble at 8:00am - so much for beating the crowds - but I was in-and-out in a reasonable amount of time for it being an Acme.
The flakes started to lightly fall as I set off to make some bread.
I'm continuing my fixation with The Great British Bake Off and found another recipe from Richard Burr of UK Season 5/US Season 1 that looked like fun.
I've baked a few loaves of bread in my time but have almost always used an industrial mixer at work or my Kitchen-aid mixer at home for the majority of the kneading, with just a bit of a hand-knead to make sure it felt right. If you bake enough bread, you learn to feel it - and know by touch if it's too dry, too wet, under-mixed, whatever. For this bread, I went all hand-kneading as the recipe stated. I do have to admit it felt good, and it does show that you really can bake bread without machinery.
Medieval Bread
adapted from Richard Burr
(makes 8 small rolls or 2 loaves)
- 650g white bread flour
- 25g rice flour
- 9g salt
- 6 g active dry yeast
- 250ml warm water
- 125ml beer - I used Old Speckled Hen
- 40g honey
Mix together the bread flour, rice flour, and salt.
Mix the water, beer, honey and yeast, stirring well.
Combine the wet and dry ingredients. When mixed, tip out onto a floured counter.
Knead by hand for about 10 minutes until you have achieved a smooth dough.
Place in a lightly oiled bowl, cover, and allow to rise for about 2 hours.
When the dough has risen, punch down and divide the dough into eight equal pieces for rolls or in half for loaves.
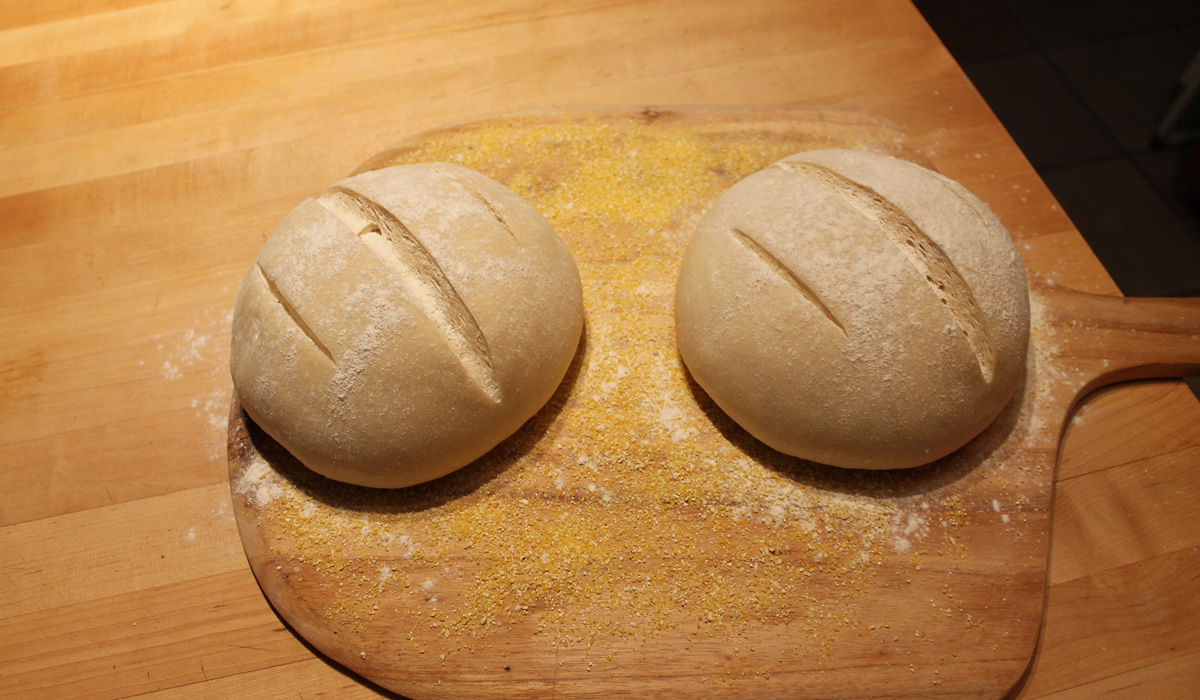
Shape each roll into a round, and leave to rise for 45 minutes on a baking tray/sheet covered in baking parchment. (I use a peel and corn meal.)
Preheat the oven to 400°F.
Dust with flour and slash with a sharp knife.
Bake rolls for 20 minutes or about 25 minutes for loaves.
Allow to cool and enjoy!

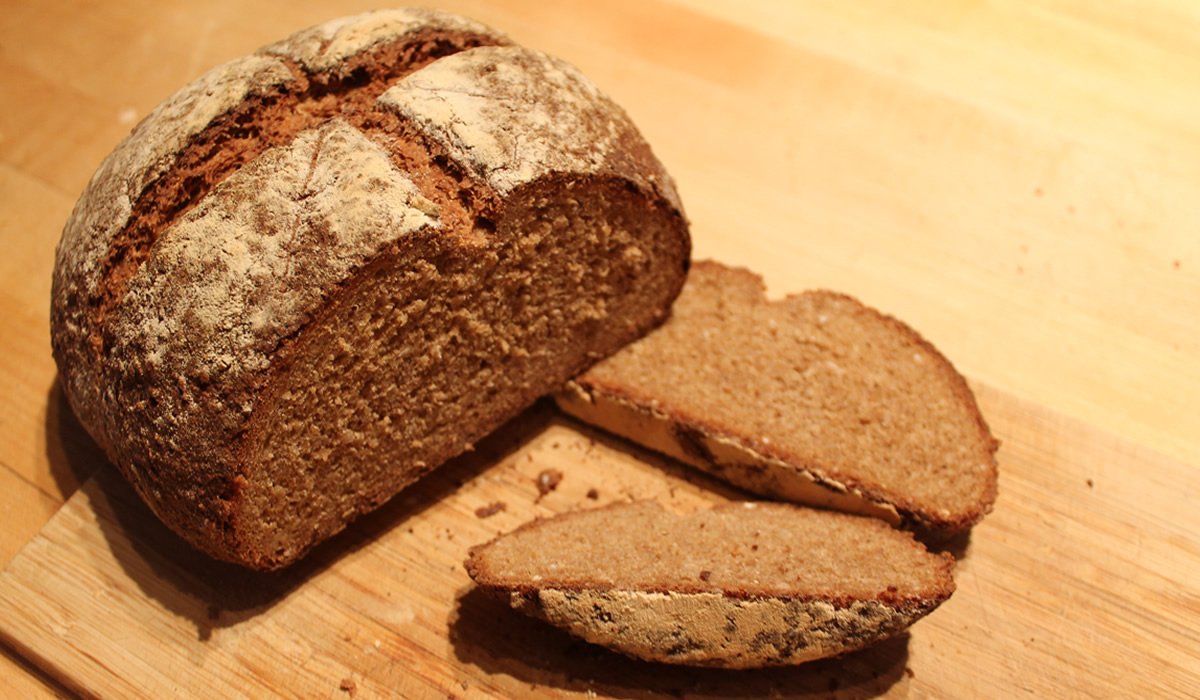
You'll note that the loaves are more elongated rather than round. It's because of the way I slashed them. By slicing them in the same direction, the bread takes the path of least resistance and pushes back along the slit. If I had made more of a cross on top - cutting equally in both directions - the dough would have remained more round.
Different cuts will give you different looks - but the bread all tastes great!
In the meantime, I may have found my new go-to loaf of bread! Everything about this bread is right - the crumb is light as a feather, the crust is properly crunchy and chewy - and the flavor is perfect!
Definitely a keeper!
A Wholesome Loaf
If you read yesterday's post, you'll note that I've started stalking following a few of the contestants from the Great British Bake Off. The show, itself, is a lot of fun to watch and the creativity of the participants is really unbelievable.
One of the things I like most about the show is the contestants are real people - they're not professional bakers. They're housewives, doctors, firemen, carpenters, teachers, and psychologists - all with a passion for baking. It's rekindled my own baking interests, although I'm passing on the gooey desserts in favor of the savories and breads, right now.
One of the tenets of the show is originality coupled with creativity. It's fun, because, unlike many professional bakers, the contestants are willing to think outside the box and play with things that by all rights shouldn't work - but every once in a while really do work well. Yeah, there are failures, but it's all part of the game.
The creativity bug hit me this morning when I decided to bake a loaf of bread. I bounced around a few of the contestant websites of the shows I've seen, and landed on the Wholesome Loaf from Nancy Birtwhistle - the winner of Episode 5 UK - and the first series we watched. I really liked Nancy on the show - a lot of spunk and great attitude.
For her bread, the first ingredient is 300g strong white bread flour. That's bread flour, here in the USofA - and 300g is roughly 2 2/3 cups. Roughly. I use a scale.
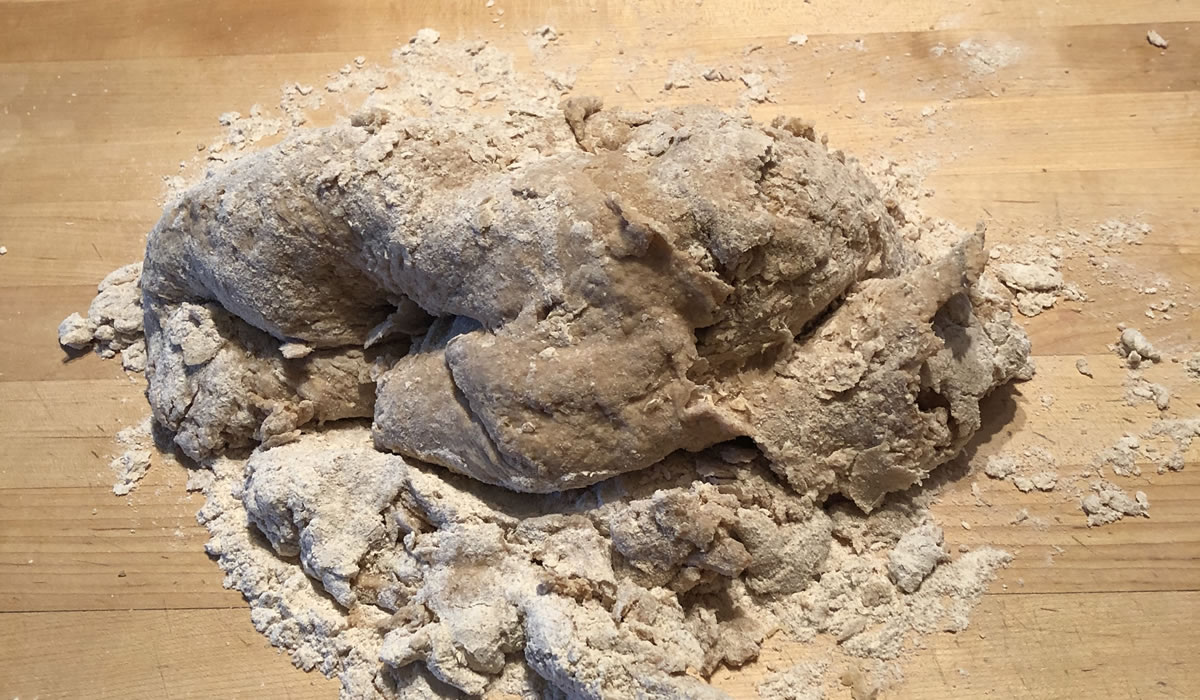
Yesterday, I received my latest shipment of goodies from Palouse Brands in Washington - including a 5 lb bag of hard red winter wheat. I normally just cook the wheat berries in soups and such, or make salads during warmer weather, but, today, I decided to try milling some to bake a loaf of bread. I don't own a flour mill - yet - so I used the food processor. It more or less worked - probably less than more - but I did end up with a usable flour after sifting a lot.

There was also a lot of kernel that didn't grind down.
I mixed the dough with about 300ml water - about 1 1/4 cups - and after 10 minutes, it really wouldn't come together in the mixer. It was hard and heavy - and wet.
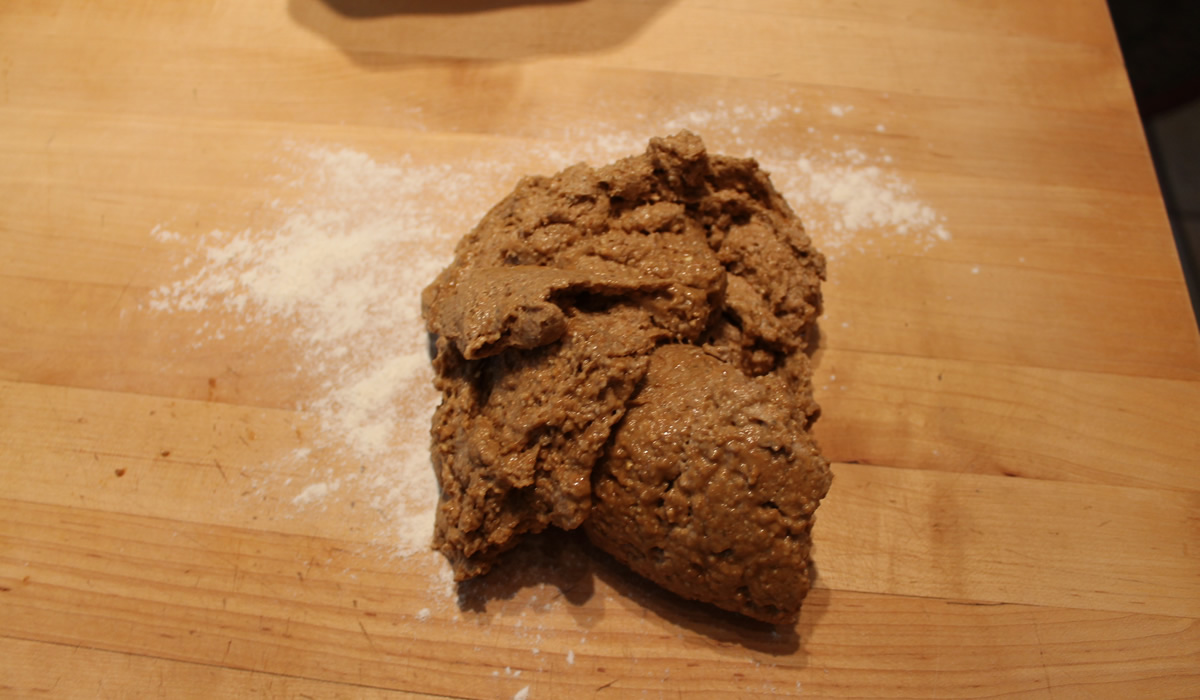
My first thought was screw it and start again, but my natural pigheadishness kicked in and I decided to start kneading by hand to see what I could do. Another good 10 minutes of working by hand - thank you gym training - and the sticky blob turned into something slightly resembling a usable bread dough.
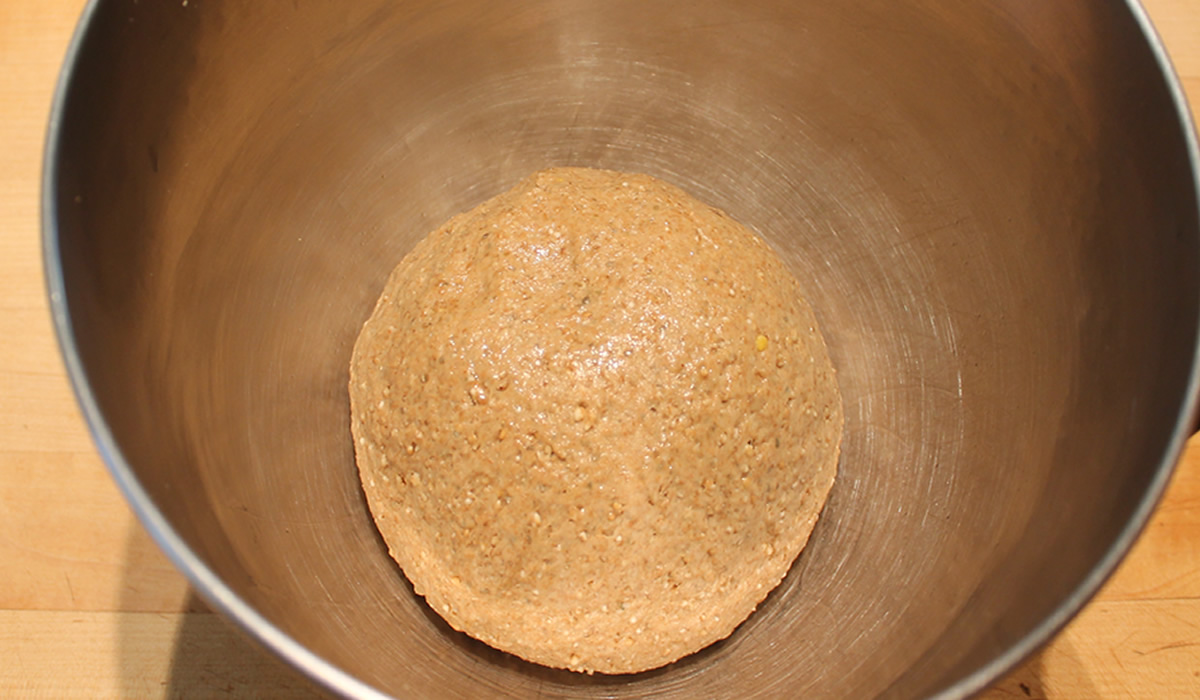
I set out to let it proof.
This is in no way Nancy's loaf of bread. It really is definitely something different than what she baked, but it was her idea that got me started. It's kinda what baking - or cooking - is all about - finding a good idea and playing with it.
It doubled nicely in size.
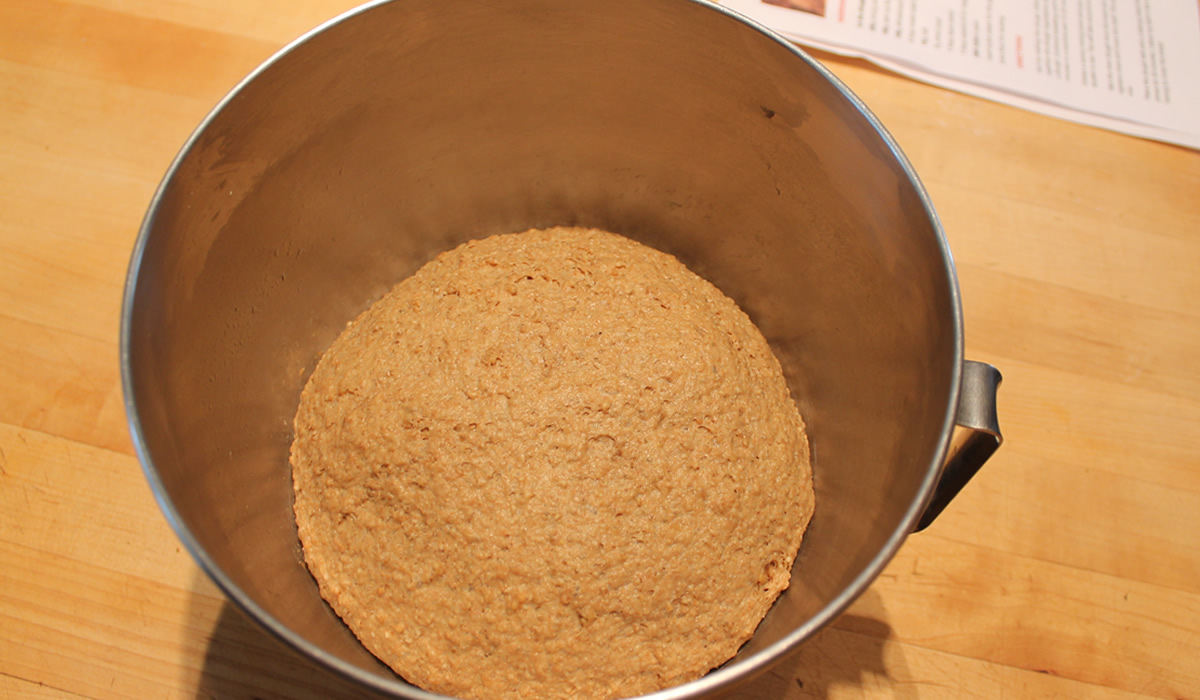
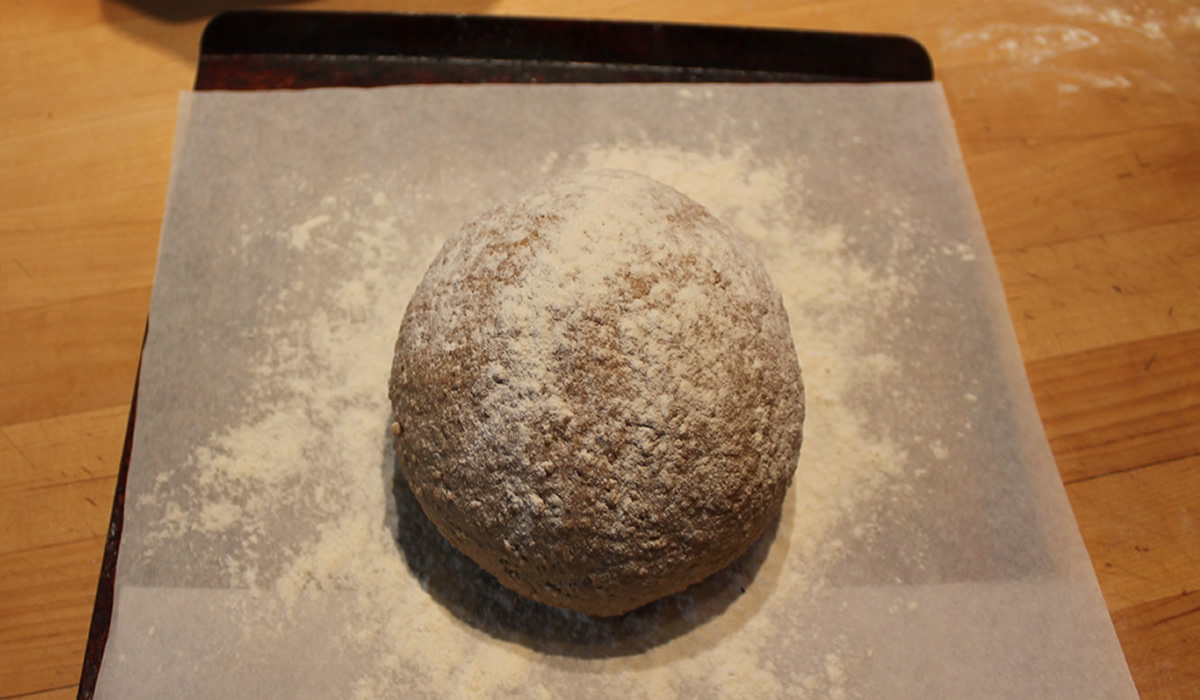
I then formed it into a loaf and set it out for its final rise.
I have a problem with picture-taking and cooking. I just start doing things and forget to pick up the camera.
But into the oven it went...
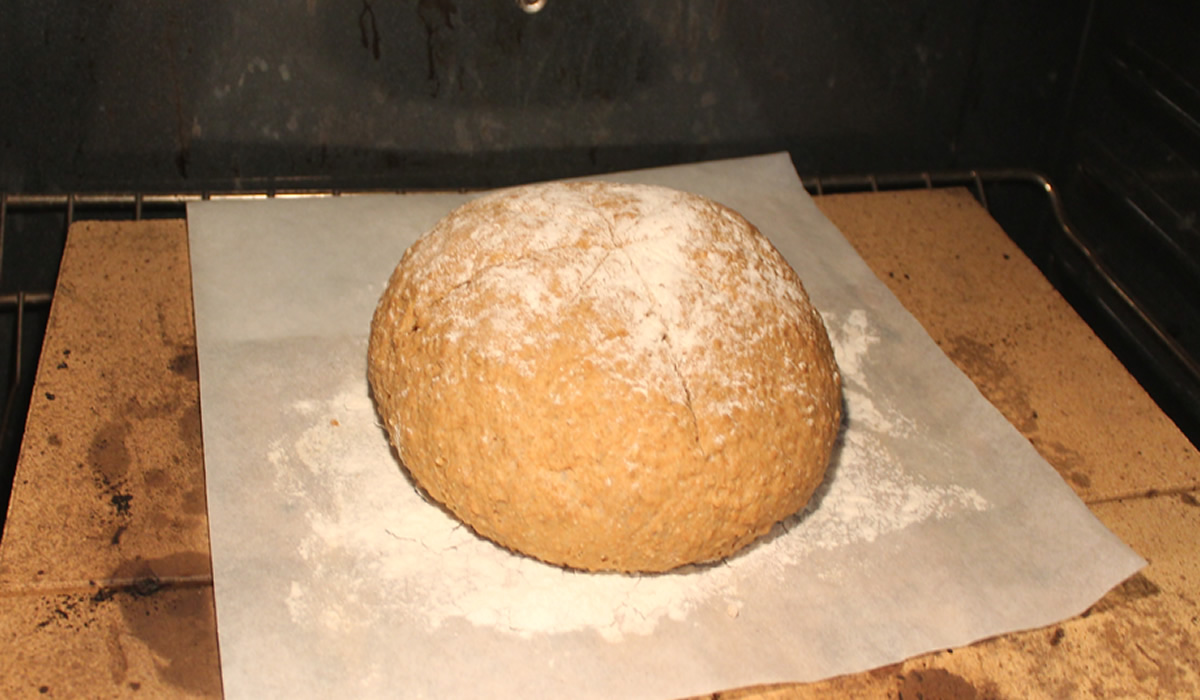
Thirty minutes later, we had achieved bread.

Flavor-wise, it is excellent. It has all the characteristics of a hearty whole wheat - and it also has that rich, unmistakable earthy flavor of rye. It is dense - but not as heavy as some I've made. And it has a great crust. Whole wheat - especially chopped the way I did it - can get pretty heavy - it sucks up moisture like there's no tomorrow, and if you overwork it - as I most likely did - the bran can cut the gluten strands, breaking down the gluten structure.
But this wasn't being judged for competition perfection. It's an excellent loaf of everyday bread.
I'm quite pleased with the outcome.
Bread and Cold
While family and friends across the USofA are getting pummeled by snow and ice, we're supposedly going to see a bit of slushy snow tonight that turns into rain on Sunday with a temperature hovering close to 50°F. On Monday, we're supposed to drop to single digits turning the roads into a surface suitable for a Shipstad and Johnson's show.
The forecasts around here change every couple of minutes, so I'm counting on anything being possible - and keeping open the idea that we could be buried under ten feet of snow, have torrential rains and floods, or sunshine and blue skies.
Anything is possible.
And, we're prepared for anything. There's plenty of food in the house and no reason to leave. We're prepared.
I think my funniest we're prepared story goes back to 2012 when I was working at Trader Joe's and a woman came in right before Hurricane Sandy was scheduled to hit land. She was panic-buying and was putting a dozen cans of tuna in her cart - along with everything else in the store - complaining that she hated tuna. I asked her why she was buying it, and she said they said I need canned tuna in my disaster kit. I tried to explain that it was just a suggestion for protein foods that didn't need refrigeration but she was adamant that she needed it - even though she hated it. I just shook my head.
It's a nice, quiet, and relaxing day around here, so I thought I'd bake my mandatory bread instead of buying it. Our friend, Susan, had just baked some gorgeous loaves from Flour Water Salt Yeast by Ken Forkish, so I thought I'd give it a try, as well. It's a very straightforward dough, but takes hours of proofing time - especially in the winter when room temperature in is the sixties. I bake a lot of bread, but have used the ol' KitchenAid mixer for most of them. I actually used my hands for this one. I guess I've been watching too much of the Great British Bake Off. Paul is pushing me back to my roots.
I found the recipe online on many different sites - so I don't feel bad about reposting, here. And I have ordered the book. You should, too. I definitely recommend using a scale, but if you don't have one, cup measurements will suffice.
I used 700 grams "00" flour, 200 grams whole wheat, and 100 grams rye. I also don't have proofing baskets so I use a colander with a floured towel for one and made a baguette with the other.
Saturday White Bread
adapted from Flour Water Salt Yeast by Ken Forkish
Ingredients
- White flour 1,000 g -- 7¾ cups
- Water 720 g, 90ºF to 95ºF (32ºC to 35ºC) -- 3 1/8 cups
- Fine sea salt 21 g -- 1 tbsp + 1 scant tsp
- Instant dried yeast 4 g -- 1 tsp
1. Autolyse
Combine the 1,000 grams of flour with the 720 grams of 90°F to 95°F (32°C to 35°C) water in a 12-quart round tub or similar container. Mix by hand just until incorporated. Cover and let rest for 20 to 30 minutes.
2. Mix
Sprinkle the 21 grams of salt and the 4 grams (1 level teaspoon) of yeast evenly over the top of the dough. Mix by hand, wet-ting your working hand before mixing so the dough doesn’t stick to you. (It’s fine to rewet your hand three or four times while you mix.) Reach underneath the dough and grab about one-quarter of it. Gently stretch this section of dough and fold it over the top to the other side of the dough. Repeat three more times with the remaining dough, until the salt and yeast are fully enclosed.Use the pincer method to fully integrate the ingredients. Make five or six pincer cuts across the entire mass of dough. Then fold the dough over itself a few times. Repeat, alternately cutting and folding until all of the ingredients are fully integrated and the dough has some tension in it. Let the dough rest for a ew minutes, then fold for another 30 seconds or until the dough tightens up. The whole process should take about 5 minutes. The target dough temperature at the end of the mix is 77°F to 78°F (25°C to 26°C). Cover the tub and let the dough rise.
3. Fold
This dough needs two folds. It’s easiest to apply the folds during the first 1½ hours after mixing the dough. Apply the first fold about 10 minutes after mixing and the second fold during the next hour (when you see the dough spread out in the tub, it’s ready for the second fold). If need be, it’s okay to fold later; just be sure to leave it alone for the last hour of rising. When the dough is triple its original volume, about 5 hours after mixing, it’s ready to be divided.
4. Divide
Moderately flour a work surface about 2 feet wide. Flour your hands and sprinkle a bit of flour around the edges of the tub. Tip the tub slightly and gently work your floured free hand beneath the dough to loosen it from the bottom of the tub. Gently ease the dough out onto the work surface without pulling or tearing it. With floured hands, pick up the dough and ease it back down onto the work surface in a somewhat even shape. Dust the area in the middle, where you’ll cut the dough, with a bit of flour. Cut the dough into 2 equal-size pieces with a dough knife or plastic dough scraper.
5. Shape
Dust 2 proofing baskets with flour. Shape each piece of dough into a medium-tight ball. Place each seam side down in its proofing basket.
6. Proof
Lightly flour the tops of the loaves. Set them side by side and cover with a kitchen towel, or place each basket in a nonperforated plastic bag. Plan on baking the loaves about 1¼ hours after they are shaped, assuming a room temperature of about 70°F (21°C). If your kitchen is warmer, they will be optimally proofed in about 1 hour. Use the finger-dent test to determine when they are perfectly proofed and ready to bake, being sure to check the loaves after 1 hour. With this bread, 15 minutes can make the difference between being perfectly proofed and collapsing a bit.
7. Preheat
At least 45 minutes prior to baking, put a rack in the middle of the oven and put 2 Dutch ovens on the rack with their lids on. Preheat the oven to 475°F (245°C). If you only have 1 Dutch oven, put the second loaf into the refrigerator about 20 minutes before baking the first loaf and bake the loaves sequentially, giving the Dutch oven a 5-minute reheat after removing the first loaf. Alternatively, you can keep the second loaf in the refrigerator overnight, in its proofing basket inside a nonperforated plastic bag, and bake it early the next morning; if you do this, put the second loaf in the refrigerator immediately after shaping.
8. Bake
For the next step, please be careful not to let your hands, fingers, or forearms touch the extremely hot Dutch oven. Invert the proofed loaf onto a lightly floured countertop, keeping in mind that the top of the loaf will be the side that was facing down while it was rising—the seam side. Use oven mitts to remove the preheated Dutch oven from the oven. Remove the lid. Carefully place the loaf in the hot Dutch oven seam side up. Use mitts to replace the lid, then put the Dutch oven in the oven. Maintain the temperature at 475°F (245°C). Bake for 30 minutes, then carefully remove the lid and bake for about 20 more minutes, until at least medium dark brown all around the loaf. Check after 15 minutes of baking uncovered in case your oven runs hot. Remove the Dutch oven and carefully tilt it to turn the loaf out. Let cool on a rack or set the loaf on its side so air can circulate around it. Let the loaf rest for at least 20 minutes before slicing.
The only caveat I have with this recipe is it takes time. The slow rise develops the flavor and texture, so don't try to rush it.
It is good. Nice crust, good crumb. It also works well just baking it in an oven on a stone - with water underneath to steam.
It's another keeper.
Loafing on Christmas Day
The benefit and the drawback of not having a lot of family around on Christmas is it's quiet. On the one hand, it's kinda nice to sit back and relax, not having to get out of comfy sweats or get into the car and deal with holiday travelers late for their next holiday gathering with step-family number three. On the other, it's not quite the same when you were raised with laughter and chaos - and you actually like the people you're not with.
This really was a relaxing day - I didn't even have to cook dinner, since we decided to go with the Cioppino, again. I had made enough for several small third world countries and an army or two, so it made sense to go for it rather than cook up another meal. And it reheated really well - even the calamari stayed tender.

I put it into a different bowl and it was just like having a totally new dinner!
But prior to reheating last night's meal, I decided to bake some bread. We had used up the last of the sandwich bread yesterday, and I always prefer a home-baked loaf to a grocery store loaf.
I made my basic multigrain loaf. It's easy and pretty much a no-fail recipe.
Multi Grain Sandwich Bread
- 2 1/2 tsp yeast
- 1/4 cup water
- 1 tsp sugar
- 2 cups whole milk - room temperature
- 1/2 stick butter - softened
- 3 cups white flour
- 1/2 cup sprouted wheat flour
- 1 cup whole wheat flour
- 1/2 cup rye flour
- 1 tbsp salt
- 2 tbsp sugar
Mix yeast with water and sugar and proof for 5 minutes.
Add milk and white flour and blend on low speed with dough hook. Slowly add very soft butter, remaining flours, sugar, and salt.
Continue mixing for about 8 minutes. Dough should completely pull away from the sides of the bowl, but won't pull away completely from bottom. Add water or flour by tablespoons, if needed.
Roll dough into a ball and place in a buttered bowl.
Cover, and allow to rise in a warm, draft-free spot until doubled. I use the microwave with a 2-cup Pyrex measuring cup filled with boiling water.
When doubled, form into two loaves, place in buttered bread pans, and allow to rise, again, until doubled.
Bake in a preheated 400°F/200°C oven for about 40 minutes, or until baked through and hollow-sounding when tapped.
Remove from pans and cool on racks completely, before slicing.
Light and delicate with a nice, crispy crust. I prefer a bit of crunch to my crust, but you can always brush on some melted butter right after it comes out of the oven to soften it a bit, if you like.
It's back to the gym tomorrow and probably another ridiculous meal on New Year's Eve - and then the holidays are over. It will be back to practicing a little restraint in the calorie department.
While we have over-eaten this past week - based upon our newer eating habits - we're still doing better than we did last year at this time.
I refuse to be a slave to a weight scale. I am going to eat and have fun - and work a bit harder if need be to balance it.
Balance. What a concept.
I wish I had figured it out 40 years ago.