
Butternut Squash Risotto

It's an Almost-Fall day. A slight chill in the air. An absolutely-perfect A perfect day to make risotto. But since it is Almost-Fall, a butternut squash risotto seemed appropriate.
I love risotto. The creamy goodness is the epitome of comfort-food. And you can literally put anything in it - from seafood to sausage, and any and every vegetable known to mankind. And they're easy to make - 20-25 minutes start to finish. Real food on the table in 20 minutes without microwaving some processed food-thing.
Perfection.
Butternut Squash. Another perfect food. Roasted, baked, boiled, mashed, cubed, sweet, savory, soup, stew... The uses are endless as are the flavors it can take.
We'll be seeing more of it this fall. For tonight's risotto rice, I used carnaroli, but arborio will work just fine...
Butternut Squash Risotto
- 1 small butternut squash, peeled and cubed
- 1 cup chopped onion
- 1 cup chopped mushrooms
- 2 cloves garlic, minced
- 1 small bell pepper, chopped
- 1 cup risotto rice (arborio, carnaroli, vialone nano)
- 1 cup shredded parmesan cheese
- 1 cup cherry tomatoes
- 6 cups hot chicken broth (or vegetable broth to make it vegetarian)
- garlic powder
- sage
- salt and pepper
Coat cubed squash with olive oils, and sprinkle with sage, garlic, and salt and pepper. Place on sheet-pan in 425° oven for about 25 minutes. Set aside.
Saute onion, mushrooms, bell pepper and garlic in 2 tbsp butter a risotto-style pan. (We use a heavy 30-year old Le Creuset braiser.) Cook until vegetables are wilted and fragrant.
Add 1 cup rice and continue sauteing until rice is slightly translucent. Add 1 cup broth and stir until most of broth is absorbed. Continue stirring and adding broth until about 3/4 has been added. Add tomatoes.
Add roasted butternut squash, mashing some with spoon as you stir.
Continue adding broth until rice is tender.
Stir in parmesan cheese and taste for seasoning, adding more salt and pepper, if necessary.
I was rich, filling, and filled the house with the scents of autumn.
Perfect for the first cool night of the season.
I'm ready.
Oh. And yes, the stove-top is dirty. It's always dirty. It's the down-side of cooking at home every night.
Oh well.
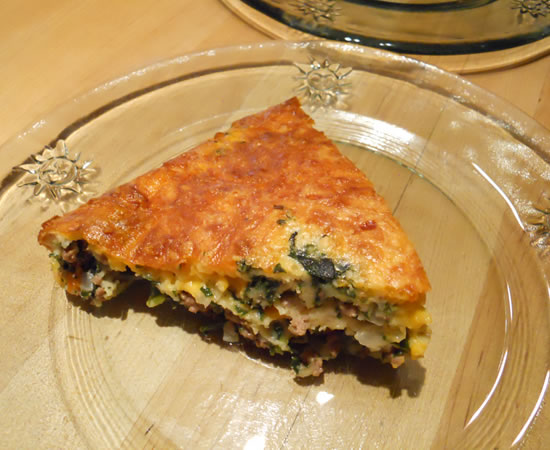
Savory Pies

Back in the '60s (I think) Bisquick came out with their "Impossible Pies." It may have been longer than that, but I remember my mom making them when we were kids. It's a pretty basic concept - a filling of sorts is put into a pie plate and a Bisquick batter is poured over it and baked. The batter forms a crust on both bottom and top - Impossible!
I haven't bought a box of Bisquick in years - but I usually have a good baking mix - without partially-hydrogenated soybean oil - on the shelf. I decided it was time to use it for something other than pancakes.
I headed over to Mom's Cook Books and found several recipes that were fun. I played around with them a bit and came up with a variation of the Cheeseburger Pie and the Vegetable Pie.
Impossible Beef and Vegetable Pie
- 1 lb ground beef
- 1 onion, chopped
- 1 cup mixed vegetables
- 1 cup frozen chopped spinach
- 1 cup shredded cheddar cheese
- 1 tsp garlic powder
- salt and pepper, to taste
- 3/4 cup baking mix
- 1 1/2 cups milk
- 3 eggs
Butter a 10" pie plate and set aside. Pre-heat oven to 400°.
Brown beef and onions. Add vegetables and heat through. Season with garlic powder, salt and pepper.
Place cooked meat and vegetables in buttered pie plate. Top with shredded cheese.
Mix baking mix with milk and eggs in a blender or mixer. Pour evenly over meat and vegetables. Place in oven and bake 30 minutes or until knife inserted in center comes out clean.
Tons of childhood memories in every bite!
That was last night.
Tonight I decided I wanted Chicken Pot Pie.
I planned on cheating and buying a crust since I have a bazillion programs to load onto the newest computer - but I forgot.
Eh... It didn't take long to make one from scratch - and it really was a good one!

Pie Crust
- 2 cups flour
- 1/3 cup pastry/cake flour
- 2 sticks butter, frozen
- pinch salt
- 1/2 cup ice water
Using a food processor, add flours and salt. Pulse to mix.
Chop up frozen butter and add. Pulse until butter is incorporated and mixture looks grainy.
Slowly add ice water and pulse until mixed.
Turn out onto counter. Press and form mixture into two disks . Wrap in plastic and refrigerate about an hour to allow the flour to properly absorb the water and to relax the gluten.
Roll out crust and place in pie plate. Crimp edges and fill.
Total simplicity. Really. I'm glad I forgot to buy the crust. This one really is superior to a store-bought.
I made the filling with chicken breasts, onions, garlic, a chopped potato, a couple of carrots and celery stalks and a cup of frozen mixed vegetables. I used salt, pepper, garlic powder, poultry seasoning and French herbs added some chicken stock and thickened it all with flour and water.
Into the crust it went, topped with another and baked at 400° for about 30 minutes.

It was just what the weatherman ordered! And really quick and simple to pull together quickly so I could do all the fun computer-related things I needed to do.
I'm looking forward to Fall.

Vanilla Pound Cake

I am just having so much fun with all of this flour! Every day is just a new reason to make or bake something.
I'm still doing my experiments and I'm still working on The Classics. I do think that a products true quality lies in how simply it can be used. And simplicity really is the key. I've heard that French restaurants will test a prospective cook by making them roast a chicken. If you can't do the basics well, you'll never be able to master the complex.
So back out came Baking With Julia. I really liked the series when it ran on PBS and the recipes are written well. Not to mention the variety of recipes - from pound cake to wedding cake - and so much more.
I followed the recipe as written except I played with the flour. It calls for 3 cups of all-purpose flour so I used 11 ounces (about 2.25 cups) of Daisy pastry flour and 5.5 ounces (1.125 cups) of Daisy bread flour. There is a bit of an adjustment for using the Daisy flour by volume. I also used Irish butter, Madagascar Bourbon Vanilla, and organic eggs. What the hell. Quality In - Quality Out.
My ratio was perfect. The cake was moist with a rich buttery-vanilla flavor. The kind of flavor that could have one sneaking into the kitchen to keep slicing off thin wedges - over-and-over. Just dense enough without being too heavy and a perfectly browned - and tender - crust.
I really could eat this one all night.
A few hints... Make sure your ingredients are all at room temperature and you sift your flour. Also, take the time the recipe calls for. Whip the butter and sugar for 5 minutes. Take a full four minutes to add the eggs. It really does make a difference. Cooking is an art and baking is a science. You really do need the proper ratio of tenderizers (sugar and butter) to proteins (flour and eggs) and you need to take the time to properly emulsify the butter, sugar, and eggs before adding the milk and flour. It really will make a huge difference.
Vanilla Pound Cake
From Baking with Julia
- 3 cups all-purpose flour
- 2 teaspoons baking powder
- ½ teaspoon salt
- 2 sticks (8 ounces) unsalted butter, at room temperature
- 2 cups sugar
- 3 large eggs, at room temperature, whisked to blend
- 1 cup milk, at room temperature
- 2 teaspoons pure vanilla extract
Position a rack in the lower third of the oven and preheat the oven to 350ºF. Butter and flour a 10-inch tube pan or other 12-cup decorative pan with a center tube.
Sift the flour, baking powder and salt together onto a sheet of waxed or parchment paper; reserve.
Put the butter into the bowl of a mixer fitted with the paddle attachment (or work with a hand-held mixer) and beat at medium speed until smooth. With the machine running, add the sugar in a steady stream. Stop the machine and scrape down the paddle and sides of the bowl with a rubber spatula. Continue to beat at medium speed until the mixture is very light and fluffy, about 4 to 5 minutes.
With the mixer still at medium speed, begin to add the eggs in small additions, about a tablespoon at a time. If the mixture becomes watery or shiny, stop adding the eggs and beat at an increased speed just until it smooths out. When the batter has come together again, decrease the speed to medium and continue adding the eggs, scraping down the paddle and sides of the bowl from time to time; it will take 3 to 4 minutes to incorporate the eggs. The mixture is properly combined when it appears white, fluffy and increased in volume.
Reduce the mixer speed to low and add the flour mixture and the milk alternating-4 additions of flour, 3 of milk-scrapping the paddle and bowl frequently and mixing until the batter is smooth after each addition. Add the vanilla and mix just to blend
Baking the cake. Spoon the batter into the prepared pan and smooth the top with a spatula. Bake for 55 to 65 minutes, or until a wooden toothpick inserted in the center of the cake comes out clean. Transfer the cake to a cooling rack and allow it to cool in the pan for 10 minutes. Invert the cake onto a rack, remove the pan, and cool to room temperature. The cake is best served in very thin slices.
Storing. The cake can be covered at room temperature for about 3 days or wrapped airtight and frozen for a month. Keep in mind that stale pound cake is excellent lightly toasted and used as the based for ice cream sundaes.
I don't think this cake will be around long enough to have to think of freezing any of it.

Beard on Bread

When the Daisy flour arrived last week I knew I was going to have some fun with it.
Baking and I go well together. I love homemade breads, pastries, cakes, cookies, pies... All that good stuff. And if you're going to take the time to do it - use quality ingredients and make the time to do it right.
Coming up with my first loaf of bread, though, presented a bit of a challenge. My first instinct was to make an artisan-type bread. Something rustic and crusty (kinda like me.) In the end, though, I thought a classic white loaf was really where I should begin - and that meant James Beard.
James Beard has been my culinary hero since day two. (Julia Child came first.) I love the introduction to his 1959 cook book - a recipe for boiling water. He taught the basics and then used them to build more complex recipes. In his 1973 Beard on Bread, he demystified bread-making for a generation that was raised on Wonder Bread.
It was to this tome I turned for my first loaf. I've made the Basic White Bread many times. It really is a quick and easy loaf and pretty foolproof. As with most of Beard's recipes, you really have to work at screwing it up.
The recipe below is verbatim from the 1973 cook book. It is long and detailed as his instructional recipes generally are. His subsequent recipes assume the reader has read and understands the basics and he does not repeat himself. The beauty of his cook books and recipes is that he actually explains why something happens and how to compensate for the variables of things such as weather and ingredients. Anyone can cook if they pay attention.
Basic White Bread
This is my idea of a good, simple loaf of bread—firm, honest in flavor, tender to the bite yet with a slight chewiness in the crust, and excellent for toast. The ingredients are just flour, water, salt, and yeast, with the addition of a little sugar. It is a recipe I use constantly, although I vary it from time to time, and I have chosen it as my first recipe here because I think it will provide any beginner with the basic techniques of breadmaking. In fact, it is one I have taught to my pupils through the years. Once you have mastered the procedures given here, you can go on to more complex recipes without difficulty.
As I have said in the introductory observations, there are many variables in breadmaking. As far as flours are concerned, for example, since I know that the hard wheat flour producing the best results in wheat breads is not always easy to come by, in this recipe we’ll use a common unbleached (or bleached) all-purpose flour. And since compressed yeast is often difficult to find and the dry variety is available everywhere, throughout this book we’ll use “active dry yeast” and refer to the measure by package, although occasionally I will suggest the alternative of compressed yeast, since many people enjoy working with it. Some breads call for milk or fruit juice; some, like this one, are made with water. The salt content of bread is adjustable too: I use a rule of thumb of 1 tablespoon for each pound (3¾ cups) of flour; you may alter this to your own taste. There are several ways to knead dough, several ways to shape it into a loaf, and it can be given one or more risings. There is also a choice of washes you can use on the loaf before it goes into the oven, and you can slash the top in different styles or leave it as it is. Even the weather has an effect on breadmaking. The degree of humidity and warmth will govern the absorption quality of the flour and the action of the yeast.
Here, in this first recipe, we’ll reduce decisions to a minimum and put all of these extra factors into footnotes. You should be able to make this loaf successfully the first time around without referring to a single one of the notes. But they will come in handy as you vary ingredients and develop your own style of baking. For instance, if you have small hands, you will probably prefer to use two hands for kneading. The approach to making every loaf of bread is essentially the same, and for that reason you should implicitly have this recipe in mind throughout the rest of the book, as I will not keep spelling out fundamental procedures, such as how to proof or how to knead.
Yield : 1 large loaf or two smaller loaves
Ingredients
- 1 package active dry yeast
- 1½ to 2 cups warm water (l00° to 115°, approximately)
- 2 teaspoons granulated sugar
- 3¾ to 4 cups all-purpose flour (approximately 1 pound)
- 1 tablespoon salt
- 1½ to 2 tablespoons softened butter for buttering bowl and pan
Directions
First, proof the yeast, which means testing it to make sure it is still active. To do this, pour the contents of the package into ½ cup of the warm water (about 100° to 115°), add the sugar, stir well, and set aside. After a few minutes the fermentation of the yeast will become apparent as the mixture swells and small bubbles appear here and there on the surface.
1. While the yeast is proofing, measure 3¾ cups unsifted flour into a 2- to 3-quart bowl with rounded sides. (Save the other ¼ cup flour for kneading, if necessary.) Add the tablespoon of salt and blend well.
2. Pour approximately ¾ cup warm waters into the flour and stir it in with a wooden spoon or with your hands. Add the yeast mixture, and continue stirring until the ingredients are thoroughly blended and tend to form a ball that breaks away from the sides of the bowl. (If the dough is very stiff, add a tiny bit more water.) Transfer the dough to a lightly floured marble slab, bread board, or counter top.
3. Now begin the kneading process, which evenly distributes the fermenting yeast cells through the dough. There are several ways to knead,4 but I prefer this one-handed method: Sprinkle the dough lightly with flour and also flour your working hand. Push the heel of your hand down into the dough and away from you. Fold the dough over, give it a quarter turn, and push again with the hand. Continue the sequence of pushing, folding, and turning until it becomes a rhythmic motion. Knead until the dough no longer feels sticky and has a smooth, satiny, elastic texture, adding more flour, if necessary; this will take anywhere from 4 to 10 minutes, depending on the character of the flour and the warmth and humidity of the room. To test whether the dough has been kneaded enough, make an indentation in it with your fingers; it should spring back. Sometimes blisters will form on the surface of the dough and break, which is another sign that the kneading is sufficient.
4. When the dough has reached the consistency described above—with experience you will know what this means by the feel of it—it is ready for the first rising. (Rising allows the fermenting yeast to produce tiny bubbles of carbon dioxide, which stretches the gluten in the flour and thus leavens the bread.) First, rest the dough on the board for several minutes. Meanwhile, wash out the mixing bowl; dry it, and rub it with 1 to l½ tablespoons of softened butter.
5. Place the ball of dough in the bowl, and roll it around so that it becomes completely coated with butter. (This will keep the surface from drying out and cracking as the dough rises.) Cover the bowl with a piece of plastic wrap or foil or with a towel and set in a warm, draft-free place. (The term “draft-free,” which you will encounter repeatedly, is used because the yeast must be pampered with constant warmth to keep it active.) Find a protected corner or shelf, or use a cool oven (it won’t hurt if the pilot light is on). Allow the dough to double in bulk, which will take about 1 to 2 hours.
It is difficult for a beginner to tell when dough has actually doubled in volume, but the increase is dramatically more than one might expect. You can get the idea best by pouring 4 cups of water into the empty bowl (before it has been greased) and then pouring in the same amount again, noting how high up the water comes. Fortunately there is another, surer test to show when the dough is properly risen. When it looks ready, simply make an indentation in it with two fingers. If the dough does not spring back, then it is ready. It will not hurt should it rise a little too much, but excessive rising will affect the flavor and texture of the finished bread. If for some reason you must prolong a rising, place the bowl of dough in the refrigerator to slow down the action of the yeast.
The dough must now undergo a second rising, which will take place in the baking pan. Thoroughly butter one or two heavily tinned loaf pans.
6. Then remove the cover from the bowl and deflate the dough by pushing down into it with your fist. Transfer it to a floured board, knead it rather well for about 3 minutes, then pat it into a smooth round or oval shape. Let it rest for 4 to 5 minutes, then form it into a loaf about 8 inches long and 3 inches wide.
7. Lift it carefully, drop it into the loaf pan, and smooth it out.Cover the loaf pan, as you did the bowl, and set it in a warm, draft-free place to double in bulk, at which point the loaf will have risen slightly above the edge of the pan. The second rising will take anywhere from 40 minutes to 1¼ hours, according to the warmth of the room and the way you have worked the dough. Don’t rush the process, and watch the dough carefully. Meanwhile, set the oven for 400°.
8. There are various ways to treat the loaf before it goes into the oven. For this recipe, merely brush the dough with cold water, which helps to give the top a textured crust.
9 Then, with a sharp knife make three diagonal slashes about ½ inch deep across the top of the loaf, both for a more professional look and to prevent cracking.
10 Place the pan near the center of the lower oven rack and set a timer for 35 minutes. Begin testing after that time, even though the total baking time may be as much as 50 minutes. To test, rap the top of the loaf with your knuckles. When done, it will sound hollow. Invert the loaf onto a towel held in one hand and test the bottom as well for that hollow sound. If it does not seem quite firm enough and needs only a little more baking, place the loaf directly on the oven rack to crisp the bottom, watching it carefully to prevent it from burning. If the test shows that the bottom is somewhat soft, slide the loaf back into the heated pan and return it to the oven to bake for 5 or 6 minutes more. Test the bottom again, and when firm enough, bake the unmolded loaf a few minutes for the final crisping. When completely baked, remove from the oven and set on a bread rack to cool.
After 2 or 3 hours the bread is good for slicing. When it is thoroughly cooled it can be stored in a plastic bag, in or out of the refrigerator, for several days. It also freezes well, and a frozen loaf, wrapped airtight, can be stored for a month. To reheat, remove from the freezer, wrap in aluminum foil, and heat in a 350° oven for about 20 to 40 minutes.
VARIATION
Whole-Wheat Bread: This same recipe can be used to make a whole-wheat loaf. Merely use 2 cups whole-wheat flour and 1¾ to 2 cups white flour. For a slightly richer loaf, add 3 to 4 tablespoons olive oil or peanut oil to the flour before adding the water, and use slightly less water to compensate for the oil.
Notes
1. If you use compressed yeast, crumble it into a measuring cup, add the sugar, and cream the two ingredients together with a spoon for a minute or two, until the mixture becomes quite soft and runny; this helps activate the yeast. Add the warm water–in this instance no warmer than 95°.
2. I feel that 1 tablespoon of salt to 1 pound of flour is the right seasoning, but some people feel it is too much. You can increase or decrease the amount according to your taste. (A sweet bread, for instance, may not take as much.)
3. Milk can be used instead of water; it makes a somewhat richer bread.
4. Here are three alternative ways to knead:
A. Push into the dough with the heel of your right hand (if you are right-handed), then fold the dough toward you, at the same time giving the mass a quarter turn with your left hand, pulling it toward you; this is one continuous circular motion. Repeat the procedure, increasing your speed. It sounds complicated but is in fact quite simple and fast; and it gives a better fold.
B. Many people prefer to knead with both hands. In this procedure you push into the dough with the heels of the hands, fold the dough over, and give it a quarter turn before pushing again.
C. You can use the dough hook in the electric mixer; see description on page 10.
5. You can also use vegetable oil.
6. You can also use aluminum, aluminum foil, stainless steel, or glass.
7. Here are two alternative ways to shape a loaf:
A. Pat or roll the dough into a strip about as wide as the bottom of the loaf pan and approximately three times the length of the pan. Lightly mark the dough into thirds or just visualize the divisions. Fold the first third over the middle third, and pinch the edges together very well. Fold the final third over the other two thirds, again pinching the edges together. Then with both hands plump the loaf and fit it into the buttered pan.
B. Roll out the dough, and then roll it up into a sausage shape. Tuck the ends under and fit it, seam side down, in the buttered pan.
8. When using glass for baking, always set the temperature 25 degrees lower than is specified, since glass heats faster than metal and holds the heat longer.
9. The dough can also be brushed with a mixture of lightly beaten egg whites and water, which colors the crust and makes it very crisp, or it can be brushed with a mixture of beaten egg yolk and milk, cream, or water, which gives the crust a rich brown color.
10. The loaf can also be slashed lengthwise down the center.
REMEDIES FOR THE NOT-QUITE-PERFECT SLICE
- If your slice sags more than the one on the next page and is soggy to the bite, the dough was not aerated enough. It probably had too much liquid and did not get enough kneading. Next time work in a bit more flour as you knead and keep at it longer.
- If your dough seems to have a pretty good crumb but tastes damp, it means that it did not bake long enough. Try putting it in the oven at a slightly lower temperature at the start and let it cook longer.
- If your loaf has really fallen flat and doughy, gooey streaks appear in the slices, the chances are that the second rising was too long and the bread collapsed on contact with the heat. Be careful not to let the loaves rise too much in the pans.
- If your bread has risen more on one side than on the other, you probably had it in the wrong position in the oven. And if the slice has an uneven crumb, this is certainly true. Next time be sure to place a single loaf in the center of the oven so that uneven distribution of heat won’t upset the form and shape of the loaf while it is baking. Usually, if you have several loaves in the oven, evenly spaced, this problem will not occur, since the flow of air around the pans will be regular.
- If your loaf has cracked on one side during the baking, don’t worry. It is likely to be a perfectly good loaf–in fact, it may be utterly delicious–even if it doesn’t look beautiful. This is something that at times even the best bakers can’t prevent.
- If the bottom and side crusts are pale and soft and the bread is difficult to slice without having to saw with a very sharp knife, next time remove the bread from the pan and place it on the rack or on tiles in the warm oven to brown and crisp the bottom and sides, turning the loaves once, before cooling. (Also, do not ever wrap loaves in plastic before they are thoroughly cooled.)
- If your bread has really mushroomed and there is a rather deep indentation around the bottom, it means that the entire loaf has broken away from the bottom crust, probably because you tried to pack too much dough into too small a pan, or, if you were making a free-form loaf, your oven was undoubtedly too hot at first so that the bottom cooked too quickly and as the loaf rose it broke away and mushroomed. In either case you’ll have an uneven slice, denser at the bottom than at the top, but this is no great tragedy.
- If your free-form loaf spread too much as it was rising, your dough was too soft. Free-form loaves must be quite firm when shaped. Next time remember to add extra flour as you are kneading and if you are still uncertain put the dough in a ring to contain it.
- If, when slicing your bread, you find that the top crust separates from the rest, it means your loaf was not properly formed and the heat caused instant aeration when it was put in the oven. This is not a serious matter and sometimes happens even with commercial breads. To remedy, try one of the alternate methods of forming to get a tighter loaf.
- Large holes in your bread indicate that you may have overkneaded or that the dough rose too long. This is an advantage with certain freeform loaves, particularly French, but with other breads an even crumb is one of the attributes of good baking. All this is really a matter of taste, however, and if you really like a strong bread with big holes and a chewy texture, given the dough lots of kneading and a long, slow rise–even two risings.
- If there are circular streaks in your slice, don’t worry. They are usually caused by the rolling and pinching of the dough when you formed your loaf, and you probably pinched too vigorously.
- If your slice has doughy or small, hard lumps, it is certain that the original dough was not mixed sufficiently, possibly because it got too stiff to handle. Next time hold back on the flour so that the dough gets thoroughly mixed, then work in additional flour as you knead.

The recipe calls for 3 3/4 to 4 cups of flour - or 1 pound. Weights are more accurate than cups, so if you have a scale, use it!

I use a KitchenAid mixer to make the dough but always finish it off by hand. All of the precise measurements in the world cannot compete with your hands for knowing exactly when the dough is ready.

Place in a well-buttered bowl and roll the dough around to cover it completely with a butter film. This keeps the dough from drying out and forming a tough skin.

Let the dough rise until it is double in bulk and when your fingers pressed into the dough leave an impression.

Pat the dough out to the size of your pan. Starting at the top, roll it towards you with the heels of your hands, pinching and sealing it as you go.

Place formed loaf into buttered pan and cover for second rise.

After second rise.

Brush loaf with water and slit top. Three width-wise cuts or one lengthwise cut will work. Bake..

Let cool and then enjoy...
And enjoy, we did!
Hands-down one of the best loaves of plain ol' sandwich bread I've ever made! A perfect crust and a perfect crumb. Soft, but with substance. Out-of-this-world-goodness!
So, you ask... is it the flour or is it the recipe?
And the answer is both, of course. A perfect flour with a mediocre recipe will result in a mediocre product. The same holds true with the flour - mediocre flour will produce a mediocre product no matter how fantastic the recipe.
So thank you, James Beard, and thank you, Daisy Flour.
I have a feeling I'm going to be making a lot of this.
It's perfect.
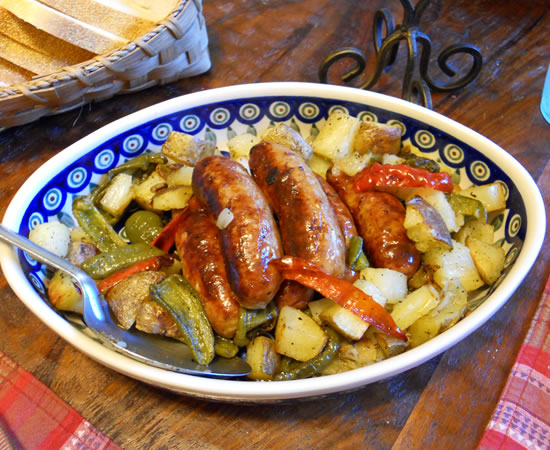
Sausage and Peppers
Sometimes the simplest foods are the best.
Case in point is sausage and peppers. You can't get more versatile. Roasted, grilled, baked, or fried - they're perfect. Add peppers and onions, roast with potatoes, scramble eggs into the finished product... A simple, easy, and tasty meal.
Tonight the original plan was to grill the sausages. Victor took over kitchen duty. Alas, he fired up the grill and it went Pffft. Out of gas. Into the oven they went with the potatoes, onions, and peppers. 20 minutes later, dinner was on the table.
We also had some Italian bread, so slices of bread became sausage sandwiches. Messy, but oh, so good!
Speaking of bread... I'm going to bake some tomorrow but I am slightly torn between a classic white sandwich loaf and a more rustic, artisan-type loaf.
Time to break out the bread books...

Cybil's Birthday and Tuscan Chicken

Today is Cybil's 9th Birthday!
Well... Actually, it's her Adoption Day. (Shhh! Don't tell her - she doesn't know she was adopted!) 8 years ago we found her at the Chester County SPCA. We didn't even notice her the first time we walked through - she was curled up in a ball in the back corner of the cage shivering. The most pathetic thing I have ever seen.
The aid put a leash on her and brought us outside to a small area where dog and person can get to know one another. Victor sat on the bench and I sat down on the curb. She walked over to me, laid down and put her head in my lap.
That was all she wrote.
We filled out the paperwork, paid the fee, and she jumped in the back of the car - somehow knowing she had scored big-time.
Driving home, we started thinking of names. She had been picked up as a stray on the streets and they had named her "Sparkle." We were not going to make her go through life with a name like that. She needed something that suited her regalness. Since she is part German Shepherd and part Border Collie, we decided "Cybil Shepherd Dineen Martorano" was a perfectly-fitting name. And she definitely approved.
This is our little girl the first day we had her at home. A skinny little runt about a year old - maybe. It's hard to remember her being so little.
Fast-forward 8 years and she has us wrapped around her little paws. It's not a bad thing.
For her birthday dinner, I grilled her a steak. She usually gets a bit of our dinner after we eat but once a year she gets her own. No leftovers on Birth(Adoption)Days!
While her steak was cooling, we ate our dinner. It was a concept from the October 2010 edition of Cooking Light Magazine.

I played with it a bit. I used boneless, skinless breasts for the whole chicken, 4 oz of diced speck (a type of prosciutto) for the bacon, arugula for the spinach, and cherry tomatoes from the yard for the canned diced tomatoes. I also used pinto beans because (horrors!!) I didn't have any cannellini beans in the cabinet. And I served it over polenta. Otherwise, it's just like the recipe!
Tuscan Baked Chicken and Beans
Ingredients
- 1 (3 1/2-pound) roasting chicken
- 1/4 teaspoon kosher salt
- 1/4 teaspoon freshly ground black pepper
- 3 slices center-cut bacon
- 1 cup chopped onion
- 1/8 teaspoon kosher salt
- 2 cups packed torn spinach
- 1/2 teaspoon chopped fresh rosemary
- 2 (16-ounce) cans cannellini or other white beans, rinsed and drained
- 1 (14.5-ounce) can diced tomatoes, undrained
Preparation
- Preheat oven to 350°.
- Remove and discard giblets and neck from chicken. Trim excess fat. Cut chicken into 2 breast halves, 2 drumsticks, and 2 thighs. Season with 1/4 teaspoon salt and pepper. Cook bacon in a 12-inch ovenproof skillet over medium-high heat until crisp. Remove bacon from pan; chop and set aside, reserving drippings in pan. Add chicken pieces to reserved drippings in pan; cook for 2 minutes on each side or until browned. Remove chicken from pan; set aside.
- Add onion and 1/8 teaspoon salt to pan; reduce heat to medium, and cook 5 minutes or until onion begins to brown. Stir in bacon, spinach, rosemary, beans, and tomatoes; remove from heat. Arrange chicken pieces on top; bake, uncovered, at 350° for 40 minutes. Discard skin before serving.
Peg Palmasano, St. Michaels, Maryland, Cooking Light October 2010
We both ate about a third of our chicken breasts and scarfed up everything else! The meal would have been perfect without the chicken! But that's okay. Victor and Cybil have lunch tomorrow while I'm at work.
I thought about a birthday cake for Cybil and decided some special dog-friendly treats would be more appropriate.
We'll have brownies, later...
Veal Chops and Yet Another Computer
Third time's the charm!
So... what are the odds of getting two computers within 4 days that had identical problems? While I have no idea what the actual odds might be, the folks at MicroCenter came through with flying colors. "We will make this work for you." is what they told me - and they did. It's nice to see that sort of customer service - it's been a while since I've experienced quite that level.
I now have to install all of those programs for the third time in a week. The little robot at Microsoft is really tired of me calling, I'm sure. I know I'm tired of calling it.
But it matters not, really. The computer is running, I can get back to playing Scrabble, and taking pictures of dinner.
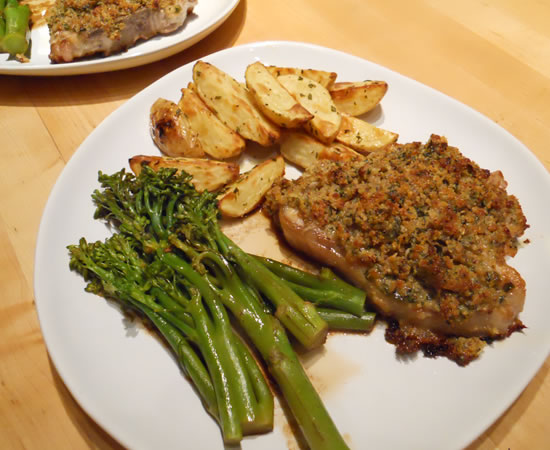
I had a couple of veal chops - veal porterhouse, actually - and wanted to do something other than grill them. I started leafing through some old Bon Appetit magazines that are still around cluttering up the house and found a recipe for Basil-Crusted Veal Chops. We just happen to have lots of fresh basil so I gave it a whirl.
It was g-o-o-d! One of the most simple recipes imaginable - but loaded with flavor! The basil-crust would be perfect on any number of things - from chicken to fish. The one ingredient that took it from ordinary to extraordinary was just a bit of seeded Dijon mustard. I'm definitely going to keep it around.
Basil-Crusted Veal Chops
- 1/4 cup minced fresh basil
- 1/4 cup plus 2 tablespoons fresh breadcrumbs made from crustless French bread
- 1/4 cup (packed) freshly grated Parmesan cheese
- 2 tablespoons (1/4 stick) butter, room temperature
- 2 teaspoons coarse-grained mustard
- 2 8-ounce veal loin chops (each about 1 1/2 inches thick)
- 1 tablespoon olive oil
Preheat oven to 450°F. Mix basil, 1/4 cup breadcrumbs, Parmesan, butter and mustard in small bowl. Season with salt and pepper.
Pat veal chops dry with paper towels. Sprinkle with salt and pepper. Heat oil in heavy large ovenproof skillet over high heat. Add veal. Cook until brown, about 1 minute per side. Remove from heat. Press basil mixture onto top of veal chops. Sprinkle 1 tablespoon remaining breadcrumbs over each. Roast in oven until cooked to desired doneness, about 15 minutes for medium-rare.
My chops were much thinner (maybe 3/4") so I cooked them at 425° for about 10 minutes. They came out medium rare and juicy.
The potatoes were baked with fresh rosemary, garlic, and olive oil. The baby broccoli was steamed and then drizzled with melted butter mixed with balsamic vinegar.
Simple but effective.
The veal chops really did come out good. The crumb top really has a lot of flavor.
So... time to start installing more programs. Hopefully, this will be it for a loooooong time!

Perfect Genoise

A couple of days ago I talked about ordering Daisy Flour.
It arrived! And the timing could not have been more perfect; I was charged with bringing a dessert to The In-Law's for the Labor Day Dinner.
I immediately pulled out Baking with Julia. It's definitely one of my more-favorite cook books and has lots and lots of really excellent recipes - some complex and others not-so. I vacillated between several, but finally decided on a variation of the French Strawberry Cake. I had raspberries. I decided to use the "Perfect Genoise" and make a raspberry cream. And maybe a little chocolate.
A genoise can be intimidating, at first, but this particular recipe really takes a lot of the angst out of it. A true genoise is an Italian sponge cake named after Genoa. It is also the foundation of many French cakes and desserts. It uses whole eggs - perfectly whipped - as leavening. No baking powder, baking, soda, or other leavening agents.
I thought it perfect for using the Daisy Pastry Flour. And, of course, it was!
The basic for a genoise is whipping whole eggs until they're tripled in volume, gently folding in flour, and then gently adding melted butter. It's not difficult - if you pay attention.
Perfect Genoise
Baking With Julia
makes enough batter for one 8-inch round cake
Ingredients
- 2 tbsp unsalted butter, melted
- 1 cup sifted cake flour
- 1/2 cup sugar
- 1/8 tsp salt
- 4 large eggs, at room temperature
- 1 tsp pure vanilla extract
Directions
Pour the melted butter into a 1-quart bowl; reserve. Return the sifted flour to the sifter or sieve and add 1 tbsp of the sugar and the salt; sift onto a piece of waxed paper and set aside.
Put the eggs and the remaining sugar into the bowl of a heavy-duty mixer (or work with a hand-held mixer). Holding the whisk attachment from the mixer in your hand, beat the mixture to blend the ingredients. With the bowl and whisk attachment in place, whip the mixture on medium speed until it is airy, pale, and tripled in volume, like softly whipped cream, 4 to 5 minutes. You'll know that the eggs are properly whipped when you lift the whisk and the mixture falls back into the bowl in a ribbon that rests on the surface for about 10 seconds. If the ribbon immediately sinks into the mixture, continue whipping for a few more minutes. Pour in the vanilla extract during the last moments of whipping.
Detach the bowl from the mixer. Sprinkle about one third of the sifted flour mixture over the batter. Fold in the flour with a rubber spatula, stopping as soon as the flour is incorporated. Fold in the rest of the flour in 2 more additions.
Gently spoon about 1 cup of the batter into the bowl with the melted butter and fold the butter in with the rubber spatula. Fold this mixture into the batter in the mixer bowl. (This is the point at which the batter is at its most fragile, so fold gingerly.) The batter should be poured into a prepared pan and baked immediately.
Bake at 350° about 25-27 minutes or until cake springs back when lightly touched and just begins to pull away from the sides of the pan.
Cool in pan about 10 minutes then remove, cooling right-side up on cooling rack.
May be prepared 24 hours in advance. leave on rack, uncovered, at room temperature.

Whip eggs until they're triple in volume and 'ribbon' back into the bowl when the beaters are lifted

Mix a cup of batter into the melted butter to lighten it - and then fold it into the main bowl.

Baked for 27 minutes and cooled overnight. The cake came out perfect. It sliced perfectly. It just could not have been better.
I made a whipped raspberry cream by adding thawed, frozen raspberries to 2 cups of heavy cream along with a teaspoon of vanilla. I did not add any sugar.
I split the cake into three layers and dusted the bottom layer with unsweetened cocoa.

I could have used more, but I wasn't sure how it would come out. I actually thought of making a cocoa simple syrup but decided this would work.

I spread the layer with the raspberry cream and then added more thawed raspberries.

I then repeated wuith the next layer.
I topped the third layer with more raspberry cream and then piped rosettes along the outside edge. I added chocolate curls by using a potato peeler on a chocolate bar and added fresh raspberries for the final garnish.
Neither Daisy nor Julia disappointed! This cake came out great! It was light and airy without having an 'eggy' flavor that some sponge cakes can have. A genoise is a slightly dry cake by nature and the cream offset that dryness perfectly.
So... my first dessert with the Daisy Flour was a resounding success. There's a recipe in the book for a white bread that I haven't made in a few years. I think that may be my next project!
This is going to be a fun Fall and Winter!
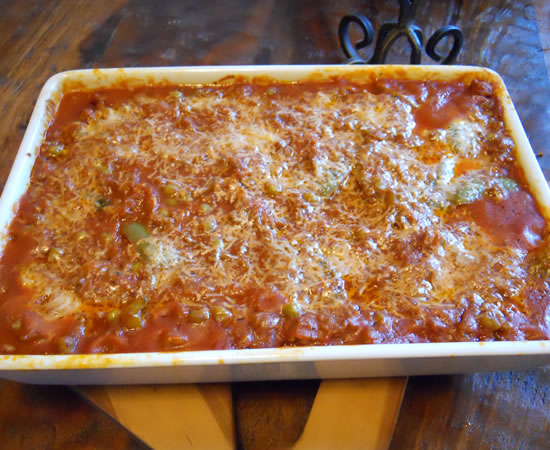
New Computers and Baked Ravioli
Hiding under that sauce and cheese are ravioli - cheese and spinach ravioli. Big cheese and spinach ravioli. In a sauce of tomatoes, fresh green peppers, peas, garlic, and ground beef. An out-of-this-world sauce of tomatoes, fresh green peppers, peas, garlic, and ground beef.
Ya know that brand-new computer I got on Thursday? On Friday it wasn't working very well. On Saturday it was worse. Today it went back and in less than 3 minutes - no hassle, no fuss, no raising my voice - I had a brand-new one - again. Thank you, MicroCenter!
So... I spent the day installing updates, programs, and peripherals on my new machine. It's a bit of a speed-demon. I think I'm going to enjoy it.
Victor, taking pity on me (and knowing if he wanted to eat he was going to have to cook because I was up-to-my-ears in computer-related tunnel-vision) made one of the most perfect meals imaginable. There is just something so comforting about baked pasta and baked ravioli takes it up to another level. It's tender and cheesy and warm and filling all at once. And with chunks of ground beef, strips of bell pepper, and just the right amount of green peas, I went for it. A bit too much. I have to admit that not only did I go back for seconds after taking a hefty helping to begin with, I sopped every last bit of sauce off my plate with a piece of garlic toast. I hurt myself - and I loved every calorie of it!
So while I was waiting for the store to open this morning, I made a génoise cake from Baking with Julia. My Organic Daisy Flour arrived and since we're bringing dessert tomorrow to Victor's brother's house, I thought a split-three-layer génoise filled with raspberry cream would make a nice afternoon dessert. The nice thing about a génoise is that they can be baked ahead and just left out over-night.
Pictures and recipe tomorrow.
Now...
Back to installing programs...
Power Failures, Computer Failures, and Back Again
Back in January I bought a new computer. My old one had outlived its extended warranty and was crashing quickly.
I admit to being a bit of a computer geek. Newer, faster, bigger, better is always fine with me.
It was a nice upgrade from the old one. I was pleased.
So... mid-August and my new computer dies. I was not pleased.
I faithfully back up everything so I wasn't panicked. The biggest hassle was I couldn't de-authorize a lot of programs. It's a pain having to call everyone up and get new install codes. But... I brought it back to MicroCenter for repair, hoping for the best.
August 19th I got it back. A new hard-drive. Goodbye programs. I spent the weekend reinstalling programs, making those pesky phone calls... Hurricane outside but all was dry inside. We had weathered the hurricane with no major problems. A bit of water in the basement and lots of limbs and leaves - but we never lost power. We were feeling extremely lucky.
And then Sunday night the computer dies, again! Deader than a doornail. Without the ability to de-authorize the programs I had just spent hours re-authorizing.
Oh well...
Back to the shop on Monday and back to using the laptop.
And then on Wednesday - in beautiful weather - sunshine and blue skies - the power goes out. Phone call to PECO and the recorded message states the power will be back on September 2, 2011 at 2:40pm.
2:40pm. I love how precise they can be.
In the meantime, we have the iPad and the phones. We're not without outside communication.
The power went off just after 5pm when I was starting dinner. It was going to be a Frozen Chinese Night. Pot stickers, shu mai, Thai egg rolls, fried rice... We have the propane cooktop so we could cook - but the egg rolls needed an oven. The gas grill worked just fine and we had a lovely candle-lit dinner.
PECO surprised us and the electricity came on a bit after noon, yesterday - 26 hours earlier than expected. We were pleased.
And while we were busy being pleased, the phone rang - MicroCenter was calling me to tell me my new computer was dead. Because it was less than a year old, they bought it back from me at full purchase price and I was off to get another. Oh boy. More programs to install and more phone calls to make. "Hi. Yes, I know this is the third time in a week I've installed the program. The other two installations were on a dead computer. Really. Don't you just hate those weeks where you keep getting your computer back and it keeps dying right after you spent all that time reinstalling programs?!? Hopefully I won't have to call you again any time soon."
Ya do what ya hafta do...
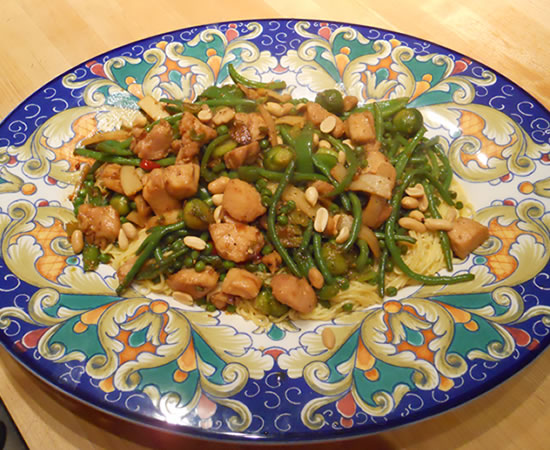
So... with about half of the programs back on and email configured, Victor took pity and cooked dinner tonight - a chicken stir-fry with corn noodles.
He marinated the chicken breast in Soy Vey Veri Teriyaki Sauce and then cooked it up with green peppers, green beans, brussels sprouts, peas, bamboo shoots, and a couple of chile peppers.
It was soooooo good! I really like the corn spaghetti noodles. They are just different enough to be fun. And perfect for you wheat-allergy and/or gluten-free-types.
I'm about a third of the way through the re-installation process. Hopefully by Monday.....