
I am one happy baker today! Really happy!
The springerle cookies came out fantastic! Better than fantastic! They’re really, really good!
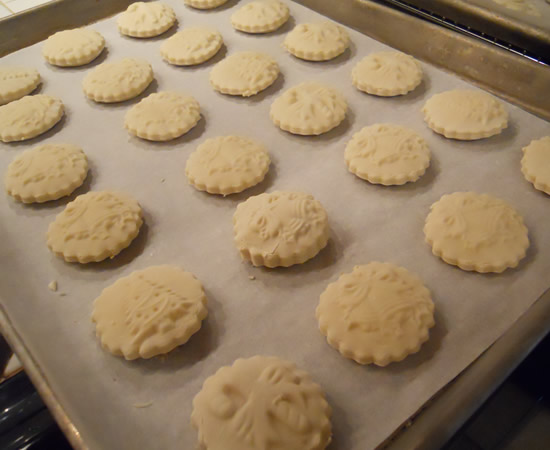
For those not in the know (and that would have been me until a few weeks ago) a springerle cookie is a German cookie that is stamped with a design and then allowed to dry overnight. This sets the design so it doesn’t “melt” during baking. They’re baked at a low temperature until the bottom is barely browned. The cookie itself stays pretty white. They are also leavened with bakers ammonia – a leavening agent that only reacts with heat – not liquid.
I had never heard of them until our friend Luigi said she was making them. I’ve made her Oma’s stollen for the past few years and love it.
They take a bit of time, but really not a lot of effort. The dough is velvety-smooth and easy to work.

Even a novice baker could make an acceptable cookie with this. The trick – and it’s one I am learning – is the pressing and cutting. These cookies came out okay, but I can see where a couple of really good springerele molds would really make a lot of difference.

They really are works of art and while anything will taste good, the artistry is in the pressing and cutting. I shall enjoy practicing!

I did not have a wood-carved traditional springerle mold. I had three ceramic molds that did the trick this year, but I’m going to get a few real ones for next Christmas now that I know how wonderful the cookies are!

I made two shapes with the molds – round where I used a cookie cutter around the imprint and square where I just cut the dough sheet into blocks after pressing.
Both worked well, and while probably not exactly traditional, it does show that just about anyone cold make them at home without having to buy a lot of special equipment.
Luigi doesn’t have her Oma’s original recipe, but she said the recipe at House on the Hill was pretty close to what she used to make. And they have a ton of springerele molds of every shape, size, and design. Check them out!
This is Nini’s Perfection Springerle Cookie Recipe from House on the Hill:
Nini’s Perfection Springerle Cookie Recipe
These whisked-egg holiday cookies date back to at least the 1600′s and are made in Bavaria, Switzerland and the Alsace area of France. For eating quality, ease and quality of prints this recipe is just perfection!
What you’ll need:
- 1/2 teaspoon baker’s ammonia (Hartshorn) or baking powder
- 2 tablespoons milk
- 6 large eggs, room temperature
- 6 cups powdered sugar (1 – 1 1/2 #)
- 1/2 cup unsalted butter, softened but not melted
- 1/2 teaspoon salt
- 1/2 teaspoon of anise (if substituting fruit flavored oils, use 3 teaspoons)
- 2 lb. box sifted cake flour (Swansdown or Softasilk)
- grated rind of orange or lemon – optional (enhances flavor of the traditional anise or the citrus flavors)
- more flour as needed
Dissolve hartshorn in milk and set aside. Beat eggs till thick and lemon-colored (10-20 minutes). Slowly beat in the powdered sugar, then the softened butter.
Add the hartshorn and milk, salt, preferred flavoring, and grated rind of lemon or orange, if desired. Gradually beat in as much flour as you can with the mixer, then stir in the remainder of the 2 lbs. of flour to make stiff dough. Turn onto floured surface and knead in enough flour to make a good print without sticking.
Follow general directions for imprinting and drying cookies.Printing Cookies
Method #1 – For most cookies…
Dough will be rolled approximately 1/4″ to 3/8″ thick, like pie crust (deeper molds need thicker dough). Brush confectioner’s sugar or flour on the mold image, then imprint with your press (mold), cut out shape with knife or pastry wheel, dry and bake. Remember to “press and cut, press and cut” so that adjacent images are not distorted.Method #2 – For very deep or large cookies…
Roll out dough to desired thickness and, using a dry, clean pastry brush, apply flour or sugar and cut a piece of dough the approximate size needed for the mold. Press dough into the mold with fingers, working from center outward. You may lightly roll the back side of the cookie to smooth before turning out of the mold. Trim, dry and bake. To check your print, use light from the side – daylight or light from a floor lamp – so the shadows let you see if your prints are good.Drying
Most printed cookies are dried 2-24 hours before baking (depending on your schedule, humidity, etc.) Drying preserves the image during baking.
Baking
Bake on greased or baker’s parchment-lined cookie sheets at 255° to 325° till barely golden on the bottom, 10-15 minutes or more, depending on size of cookie.
Store in airtight containers or in zipper bags in the freezer. They keep for months, and improve with age. Yield 3 to 12 dozen.
The the drying and baking instructions are extremely vague. In one respect they have to be, because there are so many different sizes and shapes of molds and cookies. That didn’t help this first-time springerle baker, however.
I preheated the oven to 255° and baked the smaller round cookies for about 22 minutes. I baked the larger squares almost 30 minutes.
As with any baking, a bit of close watching definitely doesn’t hurt. Just keep a close eye and pull them when they’re “barely golden on the bottom” and you’ll have a perfect cookie!
I definitely want to thank the folks at House on the Hill for sharing their recipe! I can see myself making these for many years to come!
Tim, any other flavor possible besides anise. Not a fan of licorice. Thanks they look great!
You can use anything you like = plain vanilla would work! And they are DE-LISH!